Унаследуйтесь от этого базового класса, чтобы создать собственный инспектор или редактор для своего объекта.
using UnityEngine;
using System.Collections;

// This is not an editor script.
public class MyPlayer : MonoBehaviour
{
    public int armor = 75;
    public int damage = 25;
    public GameObject gun;

    void Update()
    {
        // Update logic here...
    }
}
Например, используйте пользовательский редактор для изменения внешнего вида скрипта в Inspector.
Вы можете прикрепить Редактор к пользовательскому компоненту, используя CustomEditor атрибут.
Существует несколько способов разработки пользовательских редакторов. Если вы хотите, чтобы редактор поддерживал многообъектное редактирование, вы можете использовать CanEditMultipleObjects атрибут. Вместо того, чтобы изменять переменные скрипта напрямую, выгодно использовать SerializedObject и SerializedProperty
система может редактировать их, поскольку это автоматически обрабатывает многообъектное редактирование, отмену и переопределение Префаб. Если этот подход используется, пользователь может выбрать несколько ассетов в окне иерархии и изменить значения для всех из них одновременно.
Собственный интерфейс можно построить средствами UIElements или IMGUI. Чтобы создать пользовательский инспектор на UIElements, необходимо переопределить Editor.CreateInspectorGUI по вопросу Editor класс. Чтобы создать пользовательский инспектор на IMGUI, необходимо переопределить Editor.OnInspectorGUI по вопросу Editor класс. Если вы используете UIElements и у вас есть Editor.CreateInspectorGUI перезаписывается, любая существующая реализация IMGUI, использующая Editor.OnInspectorGUI на одном и том же редакторе будет игнорироваться.
Вот пример настраиваемого инспектора:
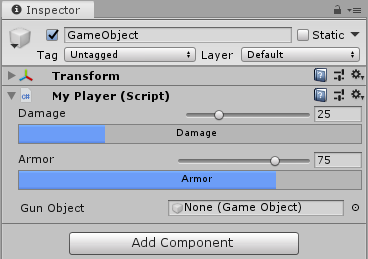
Настраиваемый редактор в Inspector.
using UnityEditor;
using UnityEditor.UIElements;
using UnityEngine;
using UnityEngine.UIElements;
[CustomEditor(typeof(MyPlayer))]
public class MyPlayerEditor : Editor
{
    const string resourceFilename = "custom-editor-uie";
    public override VisualElement CreateInspectorGUI()
    {
        VisualElement customInspector = new VisualElement();
        var visualTree = Resources.Load(resourceFilename) as VisualTreeAsset;
        visualTree.CloneTree(customInspector);
        customInspector.styleSheets.Add(Resources.Load($"{resourceFilename}-style") as StyleSheet);
        return customInspector;
    }
}
В следующем примере макет пользовательского Inspector определяется в UXML. Определение загружается как ресурс, а метод VisualTreeAsset.CloneTree помещает иерархию в VisualElement как в объект-контейнер.
InspectorWindow создаёт экземпляр InspectorElement, содержащий пользовательский Inspector. Объект InspectorElement вызывает Bind для пользовательского Inspector, привязывая его к объекту MyPlayer.
<UXML xmlns="UnityEngine.UIElements" xmlns:e="UnityEditor.UIElements">
    <VisualElement class="player-property">
        <VisualElement class="slider-row">
            <Label class="player-property-label" text="Damage"/>
            <VisualElement class="input-container">
                <SliderInt class="player-slider" name="damage-slider" high-value="100" direction="Horizontal" binding-path="damage"/>
                <e:IntegerField class="player-int-field" binding-path="damage"/>
            </VisualElement>
        </VisualElement>
        <e:ProgressBar class="player-property-progress-bar" name="damage-progress" binding-path="damage" title="Damage"/>
    </VisualElement>

    <VisualElement class="player-property">
        <VisualElement class="slider-row">
            <Label class="player-property-label" text="Armor"/>
            <VisualElement class="input-container">
                <SliderInt class="player-slider" name="armor-slider" high-value="100" direction="Horizontal" binding-path="armor"/>
                <e:IntegerField class="player-int-field" binding-path="armor"/>
            </VisualElement>
        </VisualElement>
        <e:ProgressBar class="player-property-progress-bar" name="armor-progress" binding-path="armor" title="Armor"/>
    </VisualElement>

    <e:PropertyField class="gun-field" binding-path="gun" label="Gun Object"/>
</UXML>
UIElements автоматически обновляет UI при изменении данных и наоборот. Чтобы связать данные и автоматически обновить данные и UI, установите значения для атрибутов "binding-path".
Стиль инспектора выполняется в uss.
.slider-row {
    flex-direction: row;
    justify-content: space-between;
    margin-top: 4px;
}
.input-container {
    flex-direction: row;
    flex-grow: .6;
    margin-right: 4px;
}
.player-property {
    margin-bottom: 4px;
}
.player-property-label {
    flex:1;
    margin-left: 16;
}
.player-slider {
    flex:3;
    margin-right: 4px;
}
.player-property-progress-bar {
    margin-left: 16px;
    margin-right: 4px;
}
.player-int-field {
    min-width: 48px;
}
.gun-field {
    justify-content: space-between;
    margin-left: 16px;
    margin-right: 4px;
    margin-top: 6px;
    flex-grow: .6;
}
Вот пример настраиваемого инспектора, использующего IMGUI и многократный выбор:
using UnityEditor;
using UnityEngine;
using System.Collections;

// Custom Editor using SerializedProperties.
// Automatic handling of multi-object editing, undo, and Prefab overrides.
[CustomEditor(typeof(MyPlayer))]
[CanEditMultipleObjects]
public class MyPlayerEditor : Editor
{
    SerializedProperty damageProp;
    SerializedProperty armorProp;
    SerializedProperty gunProp;

    void OnEnable()
    {
        // Setup the SerializedProperties.
        damageProp = serializedObject.FindProperty ("damage");
        armorProp = serializedObject.FindProperty ("armor");
        gunProp = serializedObject.FindProperty ("gun");
    }

    public override void OnInspectorGUI()
    {
        // Update the serializedProperty - always do this in the beginning of OnInspectorGUI.
        serializedObject.Update ();

        // Show the custom GUI controls.
        EditorGUILayout.IntSlider (damageProp, 0, 100, new GUIContent ("Damage"));

        // Only show the damage progress bar if all the objects have the same damage value:
        if (!damageProp.hasMultipleDifferentValues)
            ProgressBar (damageProp.intValue / 100.0f, "Damage");

        EditorGUILayout.IntSlider (armorProp, 0, 100, new GUIContent ("Armor"));

        // Only show the armor progress bar if all the objects have the same armor value:
        if (!armorProp.hasMultipleDifferentValues)
            ProgressBar (armorProp.intValue / 100.0f, "Armor");

        EditorGUILayout.PropertyField (gunProp, new GUIContent ("Gun Object"));

        // Apply changes to the serializedProperty - always do this in the end of OnInspectorGUI.
        serializedObject.ApplyModifiedProperties ();
    }

    // Custom GUILayout progress bar.
    void ProgressBar (float value, string label)
    {
        // Get a rect for the progress bar using the same margins as a textfield:
        Rect rect = GUILayoutUtility.GetRect (18, 18, "TextField");
        EditorGUI.ProgressBar (rect, value, label);
        EditorGUILayout.Space ();
    }
}
Если автоматическая обработка многообъектного редактирования, отмены и переопределения Префаб не требуется, переменные скрипта могут быть изменены непосредственно редактором без использования системы SerializedObject и SerializedProperty, как в примере IMGUI ниже.
using UnityEditor;
using UnityEngine;
using System.Collections;

// Example script with properties.
public class MyPlayerAlternative : MonoBehaviour
{
    public int damage;
    public int armor;
    public GameObject gun;

    // ...other code...
}

// Custom Editor the "old" way by modifying the script variables directly.
// No handling of multi-object editing, undo, and Prefab overrides!
[CustomEditor (typeof(MyPlayerAlternative))]
public class MyPlayerEditorAlternative : Editor
{

    public override void OnInspectorGUI()
    {
        MyPlayerAlternative mp = (MyPlayerAlternative)target;

        mp.damage = EditorGUILayout.IntSlider ("Damage", mp.damage, 0, 100);
        ProgressBar (mp.damage / 100.0f, "Damage");

        mp.armor = EditorGUILayout.IntSlider ("Armor", mp.armor, 0, 100);
        ProgressBar (mp.armor / 100.0f, "Armor");

        bool allowSceneObjects = !EditorUtility.IsPersistent (target);
        mp.gun = (GameObject)EditorGUILayout.ObjectField ("Gun Object", mp.gun, typeof(GameObject), allowSceneObjects);
    }

    // Custom GUILayout progress bar.
    void ProgressBar (float value, string label)
    {
        // Get a rect for the progress bar using the same margins as a textfield:
        Rect rect = GUILayoutUtility.GetRect (18, 18, "TextField");
        EditorGUI.ProgressBar (rect, value, label);
        EditorGUILayout.Space ();
    }
}