Создание списка перетаскивания и дерева представлений между окнами
Версия: 2023.2+
Перетаскивание является общей особенностью дизайна UI. Вы можете использовать UI Toolkit для создания перетаскиваемого UI в окне пользовательского редактора или в приложении, созданном Unity. В этом примере показано, как создать перетаскиваемый UI с ListView и TreeView в окне пользовательского редактора.
Примерный обзор
В примере создается разделенное окно, которое включает в себя лобби и две команды в окне пользовательского редактора. Лобби создается с помощью ListView. Для демонстрационных целей одна команда создается с помощью MultiColumnListView, а другая команда создается с помощью TreeView. В примере используется переключатель для включения и отключения перетаскивания. После включения вы можете перетаскивать игроков, чтобы изменить их порядок, и перетаскивать их из списка лобби в списки команд, как показано ниже:
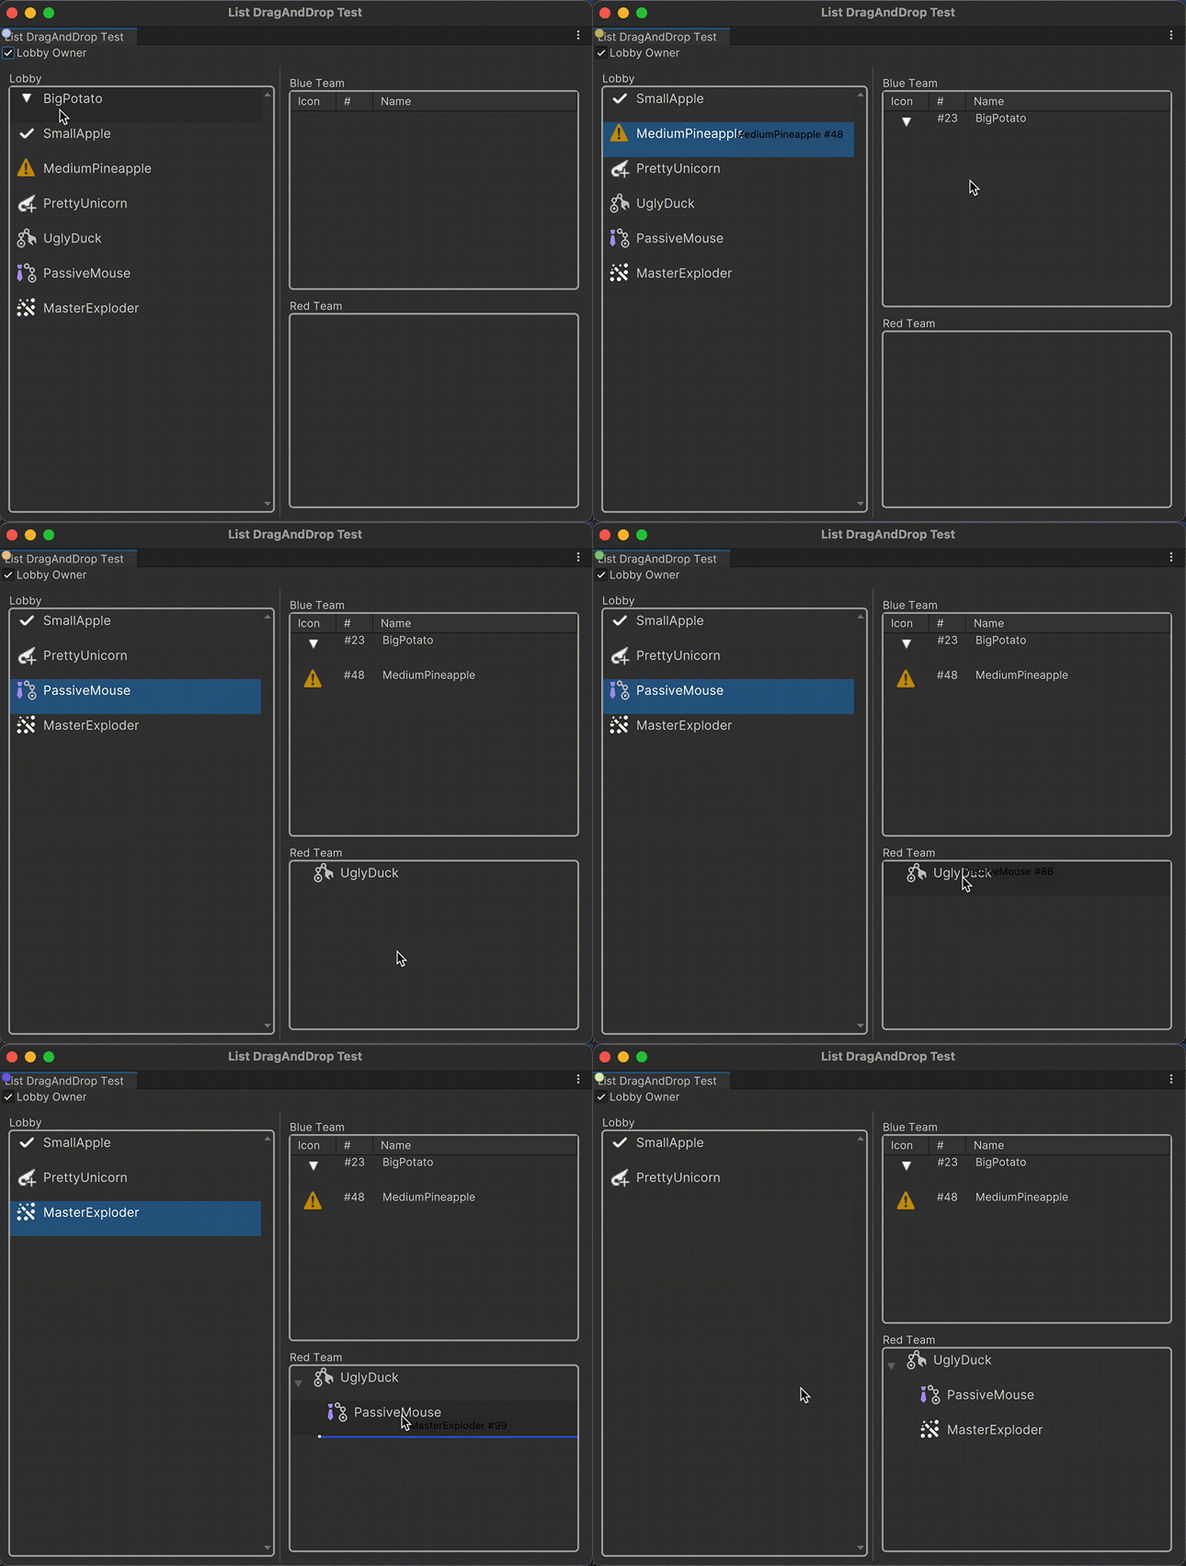
Вы можете найти завершенные файлы, созданные этим примером, в хранилище GitHub.
Предварительные условия
Это руководство предназначено для разработчиков, знакомых со скриптами Unity Editor, UI Toolkit и C#. Перед началом работы ознакомьтесь со следующим:
Создание данных игрока
Для начала создайте ассет для управления списком игроков в лобби. Создайте скрипт, описывающий структуру PlayerData с данными игрока. В структуре три поля: строка name, целое число number и объект Texture2D icon. Пометьте поля атрибутом [SerializeField] атрибут, так что их значения могут быть сериализированы и хранятся в UnityСоздать ресурс базы данных коллекции для управления данными игрока для перетаскивания и сбрасывания UI. Ассет базы данных о коллекции содержит серийный список PlayerData объектов, которые вы можете установить в Unity Editor.
Создайте проект в Unity с любым шаблоном.
В папке Ассеты окна Project создайте папку
Scriptsдля хранения файлов скриптов.В папке Скрипты создайте папку
Data.-
В папке Данные создайте скрипт C# с именем
PlayerData.csсо следующим содержанием:using System; using UnityEngine; namespace CollectionTests { // Make the struct serializable, so its values can be stored in Unity's data format [Serializable] public struct PlayerData { // Declare private fields for the player's name, number, and icon, with the SerializeField attribute [SerializeField] string name; [SerializeField] int number; [SerializeField] Texture2D icon; // Calculate a unique identifier for the player based on their name and number public int id => name.GetHashCode() + 27 * number; // Define read-only properties for accessing the private fields public string Name => name; public int Number => number; public Texture2D Icon => icon; // Override the ToString() method to return a formatted string representation of the player data public override string ToString() { return $"{Name} #{Number.ToString()}"; } } } -
В папке Данные создайте скрипт C# с именем
CollectionDatabase.csсо следующим содержанием:using System.Collections.Generic; using UnityEngine; namespace CollectionTests { // Create a CollectionDatabase object that you can create as an asset via the Asset menu. [CreateAssetMenu] public class CollectionDatabase : ScriptableObject { // Declare a private list of PlayerData that can set in the Unity Editor. [SerializeField] List<PlayerData> m_InitialLobbyList; public IEnumerable<PlayerData> initialLobbyList => m_InitialLobbyList; } } В папке Ассеты создайте папку
Resources.Щелкните правой кнопкой мыши Ресурсы папку и выберите Создать > База данных коллекций. Это создает новый ассет базы данных коллекций.
В окне Inspector базы данных коллекций добавьте несколько игроков в список лобби. Вы можете добавить столько игроков, сколько хотите.
Создание пользовательских элементов управления для отображения данных
Создайте настраиваемые элементы управления с именами PlayerDataElement и PlayerItemView для отображения данных проигрывателя. Управляющий элемент PlayerItemView связывается с объектом PlayerData в качестве контекста данных.
В папке Скрипты создайте папку
UI.-
В папке UI создайте скрипт C# с именем
PlayerDataElement.csсо следующим содержанием:using System; using UnityEngine.UIElements; namespace CollectionTests { [UxmlElement] public partial class PlayerDataElement : VisualElement { public PlayerData data { get; private set; } public int id { get; set; } public virtual void Bind(PlayerData player) { data = player; } public virtual void Reset() { data = default; id = -1; } } } -
В папке UI создайте скрипт C# с именем
PlayerItemView.csсо следующим содержанием:using System; using UnityEngine.UIElements; namespace CollectionTests { [UxmlElement] public partial class PlayerItemView : PlayerDataElement { VisualElement m_Icon; Label m_Name; // Bind the player data to the UI. public override void Bind(PlayerData player) { base.Bind(player); m_Icon ??= this.Q("Icon"); m_Name ??= this.Q<Label>(); m_Icon.style.backgroundImage = player.Icon; m_Name.text = player.Name; } } }
Определить макет и стиль UI
Создайте файл USS для определения стиля UI. Создайте два Документа UXML для определения макета UI для представления элементов плеера и главного представления. В главном представлении, чтобы разрешить перестановку элементов списка путем перетаскивания, установите атрибут reorderable на true для ListView, MultiColumnListView и TreeView.
В папке Ассеты создайте папку
UIдля хранения файлов UXML и USS.-
В папке UI создайте файл USS с именем
main.ussсо следующим содержимым:.team-list { border-color: rgb(164, 164, 164); border-width: 2px; border-top-left-radius: 5px; border-bottom-left-radius: 5px; border-top-right-radius: 5px; border-bottom-right-radius: 5px; flex-grow: 1; } .section-container { padding: 5px; flex-grow: 1; background-color: rgba(0, 0, 0, 0); } .unity-list-view__empty-label { display: none; } #Container { flex-direction: row; align-items: center; padding-left: 6px; } #Icon { width: 24px; height: 24px; } #PlayerName { flex-grow: 1; -unity-text-align: middle-left; font-size: 14px; padding-left: 6px; } .split-window{ min-width: 250px; } .main-view{ flex-grow: 1; background-color: rgba(0, 0, 0, 0); flex-direction: column; } -
В папке UI создайте файл UXML с именем
PlayerItemView.uxmlсо следующим содержимым:<ui:UXML xmlns:ui="UnityEngine.UIElements" xmlns:uie="UnityEditor.UIElements" editor-extension-mode="False"> <Style src="main.uss" /> <CollectionTests.PlayerItemView name="container"> <ui:VisualElement name="Icon" /> <ui:Label name="PlayerName"/> </CollectionTests.PlayerItemView> </ui:UXML> -
В папке UI создайте файл UXML с именем
ListDragAndDropTestWindow.uxmlсо следующим содержимым:<ui:UXML xmlns:ui="UnityEngine.UIElements" xmlns:uie="UnityEditor.UIElements" xsi="http://www.w3.org/2001/XMLSchema-instance" engine="UnityEngine.UIElements" editor="UnityEditor.UIElements" noNamespaceSchemaLocation="../../../UIElementsSchema/UIElements.xsd" editor-extension-mode="False"> <Style src="main.uss" /> <ui:VisualElement class="main-view"> <ui:Toggle name="Toggle-LobbyOwner" text="Lobby Owner" /> <ui:VisualElement class="section-container" > <ui:TwoPaneSplitView fixed-pane-initial-dimension="300"> <ui:VisualElement class="split-window" > <ui:VisualElement name="LobbyContainer" class="section-container" > <ui:Label tabindex="-1" text="Lobby" display-tooltip-when-elided="true" name="Name-Lobby" /> <ui:ListView name="ListView-Lobby" reorderable="true" selection-type="Multiple" class="team-list" /> </ui:VisualElement> </ui:VisualElement> <ui:VisualElement class="split-window" > <ui:VisualElement name="TeamContainer" class="section-container" > <ui:VisualElement name="BlueTeam" class="section-container" > <ui:Label tabindex="-1" text="Blue Team" display-tooltip-when-elided="true" name="Name-BlueTeam" /> <ui:MultiColumnListView name="ListView-BlueTeam" reorderable="true" selection-type="Multiple" class="team-list" > <ui:Columns> <ui:Column name="icon" title="Icon" width="50" resizable="false" /> <ui:Column name="number" title="#" width="40" resizable="false" /> <ui:Column name="name" stretchable="true" title="Name" /> </ui:Columns> </ui:MultiColumnListView> </ui:VisualElement> <ui:VisualElement name="RedTeam" class="section-container" > <ui:Label tabindex="-1" text="Red Team" display-tooltip-when-elided="true" name="Name-RedTeam" /> <ui:TreeView name="TreeView-RedTeam" reorderable="true" selection-type="Multiple" class="team-list" /> </ui:VisualElement> </ui:VisualElement> </ui:VisualElement> </ui:TwoPaneSplitView> </ui:VisualElement> </ui:VisualElement> </ui:UXML>
Реализация операций перетаскивания
Создайте скрипт для настройки лобби и списков команд и связайте их с данными игроков, которые вы создали ранее. Скрипт также реализует операции перетаскивания между лобби и списками команд.
В папке Скрипты создайте папку
Controllers.-
В папке Контролеры создайте скрипт C# с именем
LobbyController.csсо следующим содержанием:using System; using System.Collections.Generic; using UnityEngine; using UnityEngine.UIElements; namespace CollectionTests { public class LobbyController { const string k_DraggedItemsKey = "DraggedIndices"; const string k_SourceKey = "SourceCollection"; ListView m_LobbyListView; MultiColumnListView m_BlueTeamListView; TreeView m_RedTeamTreeView; Toggle m_IsOwnerToggle; List<PlayerData> m_LobbyItemsSource; List<PlayerData> m_BlueTeamItemsSource = new(); List<TreeViewItemData<PlayerData>> m_RedTeamItemsSource = new(); public LobbyController(VisualElement rootVisualElement, VisualTreeAsset playerItemAsset, CollectionDatabase collectionDatabase) { // Grab references m_IsOwnerToggle = rootVisualElement.Q<Toggle>("Toggle-LobbyOwner"); m_LobbyListView = rootVisualElement.Q<ListView>("ListView-Lobby"); m_BlueTeamListView = rootVisualElement.Q<MultiColumnListView>("ListView-BlueTeam"); m_RedTeamTreeView = rootVisualElement.Q<TreeView>("TreeView-RedTeam"); m_LobbyItemsSource = new List<PlayerData>(); foreach (var item in collectionDatabase.initialLobbyList) { m_LobbyItemsSource.Add(item); } m_LobbyListView.makeItem = MakeItem; m_LobbyListView.bindItem = (e, i) => BindItem(e, i, m_LobbyItemsSource[i]); m_LobbyListView.destroyItem = DestroyItem; m_LobbyListView.fixedItemHeight = 38; m_LobbyListView.itemsSource = m_LobbyItemsSource; m_LobbyListView.canStartDrag += OnCanStartDrag; m_LobbyListView.setupDragAndDrop += args => OnSetupDragAndDrop(args, m_LobbyListView); m_LobbyListView.dragAndDropUpdate += args => OnDragAndDropUpdate(args, m_LobbyListView, true); m_LobbyListView.handleDrop += args => OnHandleDrop(args, m_LobbyListView, true); var scrollView = m_LobbyListView.Q<ScrollView>(); scrollView.touchScrollBehavior = ScrollView.TouchScrollBehavior.Elastic; scrollView.verticalScrollerVisibility = ScrollerVisibility.AlwaysVisible; m_BlueTeamListView.columns["icon"].makeCell = () => new PlayerDataElement { style = { width = 24, height = 24, alignSelf = Align.Center } }; m_BlueTeamListView.columns["icon"].bindCell = (element, i) => { BindItem(element, i, m_BlueTeamItemsSource[i]); element.style.backgroundImage = m_BlueTeamItemsSource[i].Icon; }; m_BlueTeamListView.columns["number"].makeCell = () => new Label { style = { alignSelf = Align.Center } }; m_BlueTeamListView.columns["number"].bindCell = (element, i) => ((Label)element).text = $"#{m_BlueTeamItemsSource[i].Number}"; m_BlueTeamListView.columns["name"].makeCell = () => new Label { style = { paddingLeft = 10 } }; m_BlueTeamListView.columns["name"].bindCell = (element, i) => ((Label)element).text = m_BlueTeamItemsSource[i].Name; m_BlueTeamListView.fixedItemHeight = 38; m_BlueTeamListView.reorderable = false; m_BlueTeamListView.itemsSource = m_BlueTeamItemsSource; m_BlueTeamListView.canStartDrag += OnCanStartDrag; m_BlueTeamListView.setupDragAndDrop += args => OnSetupDragAndDrop(args, m_BlueTeamListView); m_BlueTeamListView.dragAndDropUpdate += args => OnDragAndDropUpdate(args, m_BlueTeamListView); m_BlueTeamListView.handleDrop += args => OnHandleDrop(args, m_BlueTeamListView); m_RedTeamTreeView.makeItem = MakeItem; m_RedTeamTreeView.bindItem = (e, i) => BindItem(e, m_RedTeamTreeView.GetIdForIndex(i), (PlayerData)m_RedTeamTreeView.viewController.GetItemForIndex(i)); m_RedTeamTreeView.destroyItem = DestroyItem; m_RedTeamTreeView.fixedItemHeight = 38; m_RedTeamTreeView.SetRootItems(m_RedTeamItemsSource); m_RedTeamTreeView.canStartDrag += OnCanStartDrag; m_RedTeamTreeView.setupDragAndDrop += args => OnSetupDragAndDrop(args, m_RedTeamTreeView); m_RedTeamTreeView.dragAndDropUpdate += args => OnDragAndDropUpdate(args, m_RedTeamTreeView); m_RedTeamTreeView.handleDrop += args => OnHandleDrop(args, m_RedTeamTreeView); VisualElement MakeItem() { return playerItemAsset.Instantiate(); } static void BindItem(VisualElement element, int index, PlayerData data) { var playerView = element.Q<PlayerDataElement>(); playerView.Bind(data); playerView.id = index; } static void DestroyItem(VisualElement element) { var playerView = element.Q<PlayerDataElement>(); playerView.Reset(); } bool OnCanStartDrag(CanStartDragArgs _) => m_IsOwnerToggle.value; StartDragArgs OnSetupDragAndDrop(SetupDragAndDropArgs args, BaseVerticalCollectionView source) { var playerView = args.draggedElement.Q<PlayerDataElement>(); if (playerView == null) return args.startDragArgs; var startDragArgs = new StartDragArgs(args.startDragArgs.title, DragVisualMode.Move); startDragArgs.SetGenericData(k_SourceKey, source); var hasSelection = false; foreach (var id in args.selectedIds) { hasSelection = true; break; } startDragArgs.SetGenericData(k_DraggedItemsKey, hasSelection ? args.selectedIds : new List<int> { playerView.id }); return startDragArgs; } DragVisualMode OnDragAndDropUpdate(HandleDragAndDropArgs args, BaseVerticalCollectionView destination, bool isLobby = false) { var source = args.dragAndDropData.GetGenericData(k_SourceKey); if (source == destination) return DragVisualMode.None; return !isLobby && destination.itemsSource.Count >= 3 ? DragVisualMode.Rejected : DragVisualMode.Move; } DragVisualMode OnHandleDrop(HandleDragAndDropArgs args, BaseVerticalCollectionView destination, bool isLobby = false) { if (args.dragAndDropData.entityIds != null) { var objectsToString = string.Empty; foreach (var id in args.dragAndDropData.entityIds) { var obj = UnityEditor.EditorUtility.InstanceIDToObject(id); var name = obj ? obj.name : ""; objectsToString += $"{name}, "; } if (!string.IsNullOrEmpty(objectsToString)) { Debug.Log($"That was {objectsToString}"); return DragVisualMode.Move; } } if (args.dragAndDropData.GetGenericData(k_DraggedItemsKey) is not List<int> draggedIds) throw new ArgumentNullException($"Indices are null."); if (args.dragAndDropData.GetGenericData(k_SourceKey) is not BaseVerticalCollectionView source) throw new ArgumentNullException($"Source is null."); // Let default reordering happen. if (source == destination) return DragVisualMode.None; // Be coherent with the dragAndDropUpdate condition. if (!isLobby && destination.itemsSource.Count >= 3) return DragVisualMode.Rejected; var treeViewSource = source as BaseTreeView; // ******************************************************** // Add items first, from item indices in the source. // ******************************************************** // Gather ids from dragged indices var ids = new List<int>(); foreach (var id in draggedIds) { ids.Add(id); } // Special TreeView case, we need to gather children or selected indices. if (treeViewSource != null) { GatherChildrenIds(ids, treeViewSource); } if (destination is BaseTreeView treeView) { foreach (var id in ids) { var data = (PlayerData)source.viewController.GetItemForId(id); treeView.AddItem(new TreeViewItemData<PlayerData>(data.id, data), args.parentId, args.childIndex, false); } treeView.viewController.RebuildTree(); } else if (destination.viewController is BaseListViewController destinationListViewController) { for (var i = ids.Count - 1; i >= 0; i--) { var id = ids[i]; var data = (PlayerData)source.viewController.GetItemForId(id); destinationListViewController.itemsSource.Insert(args.insertAtIndex, data); } } else { throw new ArgumentException("Unhandled destination."); } // Then remove from the source. if (source is BaseTreeView sourceTreeView) { foreach (var id in draggedIds) { var data = (PlayerData)source.viewController.GetItemForId(id); sourceTreeView.viewController.TryRemoveItem(data.id, false); } sourceTreeView.viewController.RebuildTree(); sourceTreeView.RefreshItems(); } else if (source.viewController is BaseListViewController sourceListViewController) { sourceListViewController.RemoveItems(draggedIds); } else { throw new ArgumentException("Unhandled source."); } foreach (var id in ids) { var index = destination.viewController.GetIndexForId(id); destination.AddToSelection(index); } source.ClearSelection(); destination.RefreshItems(); LogTeamSizes(); return DragVisualMode.Move; } } void LogTeamSizes() { Debug.Log($"Blue: {m_BlueTeamListView.itemsSource.Count} / 3\tRed: {m_RedTeamTreeView.viewController.GetItemsCount()} / 3"); } static void GatherChildrenIds(List<int> ids, BaseTreeView treeView) { for (var i = 0; i < ids.Count; i++) { var id = ids[i]; var childrenIds = treeView.viewController.GetChildrenIds(id); foreach (var childId in childrenIds) { ids.Insert(i + 1, childId); i++; } } } } }
Создание настраиваемого окна редактора
Создать пользовательское окно редактора для отображения перетаскивания UI.
В папке Ассеты создайте папку
Editor.-
В течение Редактор папка, создать C# скрипт назван
ListDragAndDropTestWindow.csсо следующим содержанием:using System; using UnityEditor; using UnityEngine; using UnityEngine.UIElements; namespace CollectionTests { public class ListDragAndDropTestWindow : EditorWindow { [MenuItem("Collection Tests/List DragAndDrop Window")] public static void ShowExample() { var wnd = GetWindow<ListDragAndDropTestWindow>(); wnd.titleContent = new GUIContent("List DragAndDrop Test"); } public void CreateGUI() { // Each editor window contains a root VisualElement object var root = rootVisualElement; // Import UXML var visualTreeAsset = EditorGUIUtility.Load("Assets/create-drag-and-drop-list-treeview/UI/ListDragAndDropTestWindow.uxml") as VisualTreeAsset; visualTreeAsset.CloneTree(root); // Load the PlayerItemView.uxml file var playerItemAsset = EditorGUIUtility.Load("Assets/create-drag-and-drop-list-treeview/UI/PlayerItemView.uxml") as VisualTreeAsset; //Load the CollectionDatabase from the Resources folder var collectionDatabase = Resources.Load<CollectionDatabase>("CollectionDatabaseAsset"); // Create the LobbyController var lobbyController = new LobbyController(root, playerItemAsset, collectionDatabase); } } }
Проверьте UI
Для тестирования измените порядок игроков в списке Лобби и переместите игроков из списка Лобби в списки команд, когда установлен флажок Владелец Лобби. Вы также можете изменить иерархию игроков в списке команды Красный. На основе условий, установленных в скрипте LobbyController.cs, вы можете добавить максимум трех игроков в каждую команду.
- В главном меню выберите Collection Tests > List DragAndDrop Window.
- В окне List DragAndDrop Test установите флажок Lobby Owner.
- Перетащите игроков из списка в лобби, чтобы изменить их порядок.
- Перетащите игроков из списка в лобби в списки команд.
- Перетащите игроков в списке команды красных, чтобы изменить их иерархию.