Создать перетаскивание UI для перетаскивания между окнами редактора
Версия: 2021.3+
Этот пример показывает, как использовать события перетаскивания UI Toolkit вместе с UnityEditor.DragAndDrop класс, чтобы включить перетаскивание элементов интерфейса между окнами.
Примерный обзор
В примере созданы два окна редактора. Вы можете перетащить ресурс из окна Project в окна редактора. Вы также можете перетащить один и тот же ресурс из одного окна в другое.
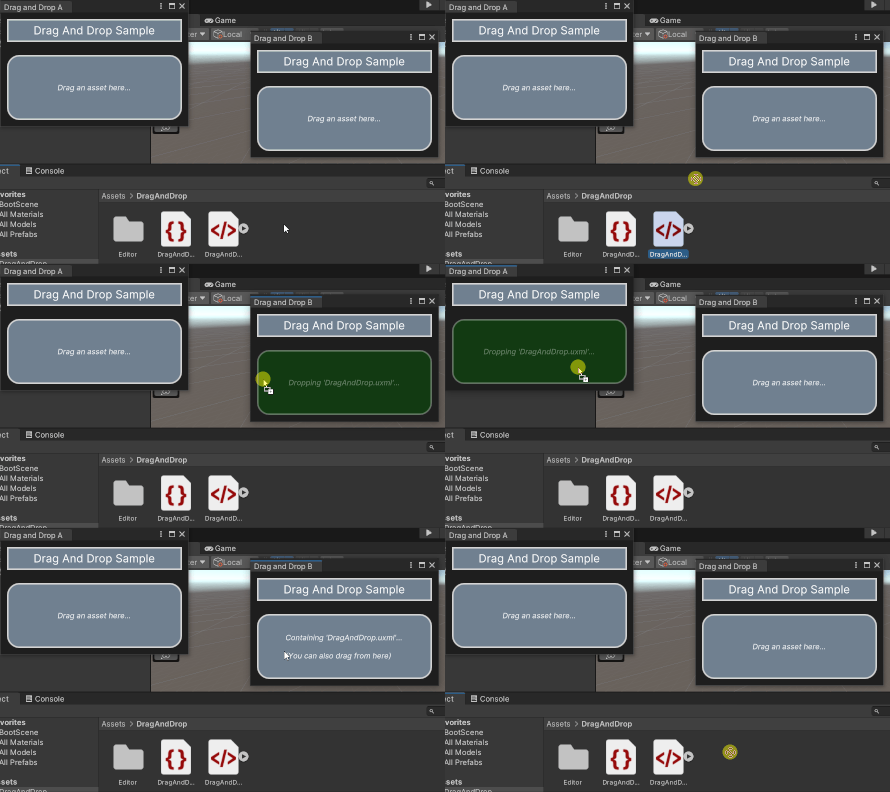
Вы можете найти завершенные файлы, созданные в этом примере, в хранилище GitHub
Предварительные условия
Это руководство предназначено для разработчиков, знакомых со скриптами Unity Editor, UI Toolkit и C#. Перед началом работы ознакомьтесь со следующим:
Определение содержимого окон редактора
Определите содержимое каждого окна редактора в файле UXML с встроенными визуальными элементами. Каждое окно редактора включает фон, заголовок, зону перемещения и текст. Стиль визуальных элементов в файле USS.
Создайте проект Unity с любым шаблоном.
Создайте папку с именем
drag-and-drop-across-windowдля хранения всех файлов.-
Создайте документ UI с именем
DragAndDrop.uxmlсо следующим содержанием:<ui:UXML xmlns:ui="UnityEngine.UIElements" xmlns:uie="UnityEditor.UIElements" xsi="http://www.w3.org/2001/XMLSchema-instance" engine="UnityEngine.UIElements" editor="UnityEditor.UIElements" noNamespaceSchemaLocation="../../UIElementsSchema/UIElements.xsd" editor-extension-mode="False"> <ui:VisualElement class="background"> <ui:VisualElement class="header"> <ui:Label text="Drag And Drop Sample" display-tooltip-when-elided="true" class="header__label" /> </ui:VisualElement> <ui:VisualElement class="drop-area"> <ui:Label text="Drag an asset here..." display-tooltip-when-elided="true" class="drop-area__label" /> </ui:VisualElement> </ui:VisualElement> </ui:UXML> -
Создайте таблицу стилей под названием
DragAndDrop.ussсо следующим содержанием:.background { flex-grow: 1; background-color: rgba(30, 30, 30, 255); } .header { align-items: center; margin-left: 10px; margin-right: 10px; margin-top: 10px; margin-bottom: 10px; padding-left: 5px; padding-right: 5px; padding-top: 5px; padding-bottom: 5px; background-color: rgba(112, 128, 144, 255); border-left-color: rgba(211, 211, 211, 255); border-right-color: rgba(211, 211, 211, 255); border-top-color: rgba(211, 211, 211, 255); border-bottom-color: rgba(211, 211, 211, 255); border-left-width: 2px; border-right-width: 2px; border-top-width: 2px; border-bottom-width: 2px; } .header__label { font-size: 18px; color: rgba(255, 255, 255, 255); } .drop-area { flex-grow: 1; align-items: center; justify-content: center; margin-left: 10px; margin-right: 10px; margin-top: 10px; margin-bottom: 10px; padding-left: 5px; padding-right: 5px; padding-top: 5px; padding-bottom: 5px; background-color: rgba(112, 128, 144, 255); border-left-color: rgba(211, 211, 211, 255); border-right-color: rgba(211, 211, 211, 255); border-top-color: rgba(211, 211, 211, 255); border-bottom-color: rgba(211, 211, 211, 255); border-left-width: 2px; border-right-width: 2px; border-top-width: 2px; border-bottom-width: 2px; border-top-left-radius: 20px; border-bottom-left-radius: 20px; border-top-right-radius: 20px; border-bottom-right-radius: 20px; } .drop-area--dropping { opacity: 0.4; background-color: rgba(0, 100, 0, 255); } .drop-area__label { -unity-font-style: italic; color: rgba(255, 255, 255, 255); } Дважды щелкните
DragAndDrop.uxml, чтобы открыть его в UI Builder.Добавить
DragAndDrop.ussв качестве существующего USS.
Создание манипулятора для хранения обратных вызовов событий
A манипулятор является объектом, который регистрирует и отменяет регистрацию обратных вызовов событий, связанных с вводом. Создать пользовательский манипулятор в C# скрипт для регистрации событий указателя и перетаскивания для окна Редактора.
В папке
drag-and-drop-across-windowсоздайте папкуEditor.-
В папке
Editorсоздайте файл C# с именемDragAndDropManipulator.csсо следующим содержимым:using UnityEngine; using UnityEditor; using UnityEngine.UIElements; namespace Samples.Editor.General { // The DragAndDropManipulator class is a private class within DragAndDropWindow. public partial class DragAndDropWindow { // DragAndDropManipulator is a manipulator that stores pointer-related callbacks, so it inherits from // PointerManipulator. class DragAndDropManipulator : PointerManipulator { // The Label in the window that shows the stored asset, if any. Label dropLabel; // The stored asset object, if any. Object droppedObject = null; // The path of the stored asset, or the empty string if there isn't one. string assetPath = string.Empty; public DragAndDropManipulator(VisualElement root) { // The target of the manipulator, the object to which to register all callbacks, is the drop area. target = root.Q<VisualElement>(className: "drop-area"); dropLabel = root.Q<Label>(className: "drop-area__label"); } protected override void RegisterCallbacksOnTarget() { // Register a callback when the user presses the pointer down. target.RegisterCallback<PointerDownEvent>(OnPointerDown); // Register callbacks for various stages in the drag process. target.RegisterCallback<DragEnterEvent>(OnDragEnter); target.RegisterCallback<DragLeaveEvent>(OnDragLeave); target.RegisterCallback<DragUpdatedEvent>(OnDragUpdate); target.RegisterCallback<DragPerformEvent>(OnDragPerform); } protected override void UnregisterCallbacksFromTarget() { // Unregister all callbacks that you registered in RegisterCallbacksOnTarget(). target.UnregisterCallback<PointerDownEvent>(OnPointerDown); target.UnregisterCallback<DragEnterEvent>(OnDragEnter); target.UnregisterCallback<DragLeaveEvent>(OnDragLeave); target.UnregisterCallback<DragUpdatedEvent>(OnDragUpdate); target.UnregisterCallback<DragPerformEvent>(OnDragPerform); } // This method runs when a user presses a pointer down on the drop area. void OnPointerDown(PointerDownEvent _) { // Only do something if the window currently has a reference to an asset object. if (droppedObject != null) { // Clear existing data in DragAndDrop class. DragAndDrop.PrepareStartDrag(); // Store reference to object and path to object in DragAndDrop static fields. DragAndDrop.objectReferences = new[] { droppedObject }; if (assetPath != string.Empty) { DragAndDrop.paths = new[] { assetPath }; } else { DragAndDrop.paths = new string[] { }; } // Start a drag. DragAndDrop.StartDrag(string.Empty); } } // This method runs if a user brings the pointer over the target while a drag is in progress. void OnDragEnter(DragEnterEvent _) { // Get the name of the object the user is dragging. var draggedName = string.Empty; if (DragAndDrop.paths.Length > 0) { assetPath = DragAndDrop.paths[0]; var splitPath = assetPath.Split('/'); draggedName = splitPath[splitPath.Length - 1]; } else if (DragAndDrop.objectReferences.Length > 0) { draggedName = DragAndDrop.objectReferences[0].name; } // Change the appearance of the drop area if the user drags something over the drop area and holds it // there. dropLabel.text = $"Dropping '{draggedName}'..."; target.AddToClassList("drop-area--dropping"); } // This method runs if a user makes the pointer leave the bounds of the target while a drag is in progress. void OnDragLeave(DragLeaveEvent _) { assetPath = string.Empty; droppedObject = null; dropLabel.text = "Drag an asset here..."; target.RemoveFromClassList("drop-area--dropping"); } // This method runs every frame while a drag is in progress. void OnDragUpdate(DragUpdatedEvent _) { DragAndDrop.visualMode = DragAndDropVisualMode.Generic; } // This method runs when a user drops a dragged object onto the target. void OnDragPerform(DragPerformEvent _) { // Set droppedObject and draggedName fields to refer to dragged object. droppedObject = DragAndDrop.objectReferences[0]; string draggedName; if (assetPath != string.Empty) { var splitPath = assetPath.Split('/'); draggedName = splitPath[splitPath.Length - 1]; } else { draggedName = droppedObject.name; } // Visually update target to indicate that it now stores an asset. dropLabel.text = $"Containing '{draggedName}'...\n\n" + $"(You can also drag from here)"; target.RemoveFromClassList("drop-area--dropping"); } } } }
Создание окон редактора и экземпляр манипулятора
Создайте два пользовательских окна Редактора в скрипте C# и создайте экземпляр манипулятора для каждого окна Редактора.
-
Создайте файл C# с именем
DragAndDropWindow.csсо следующим содержимым:using UnityEditor; using UnityEngine; using UnityEngine.UIElements; namespace Samples.Editor.General { public partial class DragAndDropWindow : EditorWindow { // This is the visual tree that contains the UI structure of the window. [SerializeField] VisualTreeAsset uxmlAsset; // This manipulator contains all of the event logic for this window. DragAndDropManipulator manipulator; // This is the minimum size of both windows. readonly static Vector2 windowMinSize = new(300, 180); // These are the starting positions of the windows. readonly static Vector2 windowAPosition = new(50, 50); readonly static Vector2 windowBPosition = new(450, 100); // These are the titles of the windows. const string windowATitle = "Drag and Drop A"; const string windowBTitle = "Drag and Drop B"; // This method opens two DragAndDropWindows when a user selects the specified menu item. [MenuItem("Window/UI Toolkit/Drag And Drop (Editor)")] public static void OpenDragAndDropWindows() { // Create the windows. var windowA = CreateInstance<DragAndDropWindow>(); var windowB = CreateInstance<DragAndDropWindow>(); // Define the attributes of the windows and display them. windowA.minSize = windowMinSize; windowB.minSize = windowMinSize; windowA.Show(); windowB.Show(); windowA.titleContent = new(windowATitle); windowB.titleContent = new(windowBTitle); windowA.position = new(windowAPosition, windowMinSize); windowB.position = new(windowBPosition, windowMinSize); } void OnEnable() { if (uxmlAsset != null) { uxmlAsset.CloneTree(rootVisualElement); } // Instantiate manipulator. manipulator = new(rootVisualElement); } void OnDisable() { // The RemoveManipulator() method calls the Manipulator's UnregisterCallbacksFromTarget() method. manipulator.target.RemoveManipulator(manipulator); } } } В окне Project выберите
DragAndDropWindow.csи перетащитеDragAndDrop.uxmlв Uxml Asset в Inspector.В меню выберите Окно > UI Toolkit > Перетаскивание (Редактор). Открываются два окна перетаскивания. Вы можете перетаскивать ассет из окна Project окна в области перемещения в этих окнах. Вы также можете перетаскивать один и тот же ассет из одного окна в другое.