Используйте Mesh API для создания радиального индикатора прогресса
Версия: 2023.2+
В этом примере показано, как использовать Mesh API для рисования визуального контента на визуальный элемент.
Примечание: Сетка API является инструментом для продвинутых пользователей. В версии 2022.1 и позже, если вы хотите только генерировать простую геометрию, используйте Вектор API Для получения дополнительной информации см. Используйте вектор API для создания радиального индикатора прогресса.
Примерный обзор
В этом примере создается пользовательский контроллер, отображающий прогресс, в качестве альтернативы строке загрузки. Индикатор прогресса отображает значение прогресса в частично заполненном кольце вокруг метки, отображающей процент. Он поддерживает значение от 0 до 100, которое определяет, насколько кольцо заполнено.
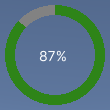
Вы можете найти завершенные файлы, созданные этим примером, в хранилище GitHub.
Предварительные условия
Это руководство предназначено для разработчиков, знакомых со скриптами Unity Editor, UI Toolkit и C#. Перед началом работы ознакомьтесь со следующим:
Создание радиального индикатора прогресса и его пользовательской сетки
Создайте скрипт C# для определения RadialProgress класс и сделайте элемент управления доступным в UXML и UI Builder.
- Создайте проект Unity с любым шаблоном.
- Создайте папку
radial-progressдля хранения ваших файлов. - В папке
radial-progressсоздайте скрипт C# с именемRadialProgress.csсо следующим содержанием:
using Unity.Collections;
using UnityEngine;
using UnityEngine.UIElements;

namespace MyUILibrary
{
    /// <summary>
    /// An element that displays progress inside a partially filled circle
    /// </summary>
    [UxmlElement]
    public partial class RadialProgress : VisualElement
    {
        // These are USS class names for the control overall and the label.
        public static readonly string ussClassName = "radial-progress";
        public static readonly string ussLabelClassName = "radial-progress__label";

        // These objects allow C# code to access custom USS properties.
        static CustomStyleProperty<Color> s_TrackColor = new CustomStyleProperty<Color>("--track-color");
        static CustomStyleProperty<Color> s_ProgressColor = new CustomStyleProperty<Color>("--progress-color");

        // These are the meshes this control uses.
        EllipseMesh m_TrackMesh;
        EllipseMesh m_ProgressMesh;

        // This is the label that displays the percentage.
        Label m_Label;

        // This is the number of outer vertices to generate the circle.
        const int k_NumSteps = 200;

        // This is the number that the Label displays as a percentage.
        float m_Progress;

        /// <summary>
        /// A value between 0 and 100
        /// </summary>
        [UxmlAttribute]
        public float progress
        {
            // The progress property is exposed in C#.
            get => m_Progress;
            set
            {
                // Whenever the progress property changes, MarkDirtyRepaint() is named. This causes a call to the
                // generateVisualContents callback.
                m_Progress = value;
                m_Label.text = Mathf.Clamp(Mathf.Round(value), 0, 100) + "%";
                MarkDirtyRepaint();
            }
        }

        // This default constructor is RadialProgress's only constructor.
        public RadialProgress()
        {
            // Create a Label, add a USS class name, and add it to this visual tree.
            m_Label = new Label();
            m_Label.AddToClassList(ussLabelClassName);
            Add(m_Label);

            // Create meshes for the track and the progress.
            m_ProgressMesh = new EllipseMesh(k_NumSteps);
            m_TrackMesh = new EllipseMesh(k_NumSteps);

            // Add the USS class name for the overall control.
            AddToClassList(ussClassName);

            // Register a callback after custom style resolution.
            RegisterCallback<CustomStyleResolvedEvent>(evt => CustomStylesResolved(evt));

            // Register a callback to generate the visual content of the control.
            generateVisualContent += context => GenerateVisualContent(context);

            progress = 0.0f;
        }

        static void CustomStylesResolved(CustomStyleResolvedEvent evt)
        {
            RadialProgress element = (RadialProgress)evt.currentTarget;
            element.UpdateCustomStyles();
        }

        // After the custom colors are resolved, this method uses them to color the meshes and (if necessary) repaint
        // the control.
        void UpdateCustomStyles()
        {
            if (customStyle.TryGetValue(s_ProgressColor, out var progressColor))
            {
                m_ProgressMesh.color = progressColor;
            }

            if (customStyle.TryGetValue(s_TrackColor, out var trackColor))
            {
                m_TrackMesh.color = trackColor;
            }

            if (m_ProgressMesh.isDirty || m_TrackMesh.isDirty)
                MarkDirtyRepaint();
        }

        // The GenerateVisualContent() callback method calls DrawMeshes().
        static void GenerateVisualContent(MeshGenerationContext context)
        {
            RadialProgress element = (RadialProgress)context.visualElement;
            element.DrawMeshes(context);
        }

        // DrawMeshes() uses the EllipseMesh utility class to generate an array of vertices and indices, for both the
        // "track" ring (in grey) and the progress ring (in green). It then passes the geometry to the MeshWriteData
        // object, as returned by the MeshGenerationContext.Allocate() method. For the "progress", only a slice of
        // the index arrays is used to progressively reveal parts of the mesh.
        void DrawMeshes(MeshGenerationContext context)
        {
            float halfWidth = contentRect.width * 0.5f;
            float halfHeight = contentRect.height * 0.5f;

            if (halfWidth < 2.0f || halfHeight < 2.0f)
                return;

            m_ProgressMesh.width = halfWidth;
            m_ProgressMesh.height = halfHeight;
            m_ProgressMesh.borderSize = 10;
            m_ProgressMesh.UpdateMesh();

            m_TrackMesh.width = halfWidth;
            m_TrackMesh.height = halfHeight;
            m_TrackMesh.borderSize = 10;
            m_TrackMesh.UpdateMesh();

            // Draw track mesh first
            var trackMeshWriteData = context.Allocate(m_TrackMesh.vertices.Length, m_TrackMesh.indices.Length);
            trackMeshWriteData.SetAllVertices(m_TrackMesh.vertices);
            trackMeshWriteData.SetAllIndices(m_TrackMesh.indices);

            // Keep progress between 0 and 100
            float clampedProgress = Mathf.Clamp(m_Progress, 0.0f, 100.0f);

            // Determine how many triangle are used to depending on progress, to achieve a partially filled circle
            int sliceSize = Mathf.FloorToInt((k_NumSteps * clampedProgress) / 100.0f);

            if (sliceSize == 0)
                return;

            // Every step is 6 indices in the corresponding array
            sliceSize *= 6;

            var progressMeshWriteData = context.Allocate(m_ProgressMesh.vertices.Length, sliceSize);
            progressMeshWriteData.SetAllVertices(m_ProgressMesh.vertices);

            var tempIndicesArray = new NativeArray<ushort>(m_ProgressMesh.indices, Allocator.Temp);
            progressMeshWriteData.SetAllIndices(tempIndicesArray.Slice(0, sliceSize));
            tempIndicesArray.Dispose();
        }

    }
}
Создание пользовательской сетки
Создайте скрипт C# с именем EllipseMesh.cs со следующим содержанием:
using UnityEngine;
using UnityEngine.UIElements;

namespace MyUILibrary
{
    public class EllipseMesh
    {
        int m_NumSteps;
        float m_Width;
        float m_Height;
        Color m_Color;
        float m_BorderSize;
        bool m_IsDirty;
        public Vertex[] vertices { get; private set; }
        public ushort[] indices { get; private set; }

        public EllipseMesh(int numSteps)
        {
            m_NumSteps = numSteps;
            m_IsDirty = true;
        }

        public void UpdateMesh()
        {
            if (!m_IsDirty)
                return;

            int numVertices = numSteps * 2;
            int numIndices = numVertices * 6;

            if (vertices == null || vertices.Length != numVertices)
                vertices = new Vertex[numVertices];

            if (indices == null || indices.Length != numIndices)
                indices = new ushort[numIndices];

            float stepSize = 360.0f / (float)numSteps;
            float angle = -180.0f;

            for (int i = 0; i < numSteps; ++i)
            {
                angle -= stepSize;
                float radians = Mathf.Deg2Rad * angle;

                float outerX = Mathf.Sin(radians) * width;
                float outerY = Mathf.Cos(radians) * height;
                Vertex outerVertex = new Vertex();
                outerVertex.position = new Vector3(width + outerX, height + outerY, Vertex.nearZ);
                outerVertex.tint = color;
                vertices[i * 2] = outerVertex;

                float innerX = Mathf.Sin(radians) * (width - borderSize);
                float innerY = Mathf.Cos(radians) * (height - borderSize);
                Vertex innerVertex = new Vertex();
                innerVertex.position = new Vector3(width + innerX, height + innerY, Vertex.nearZ);
                innerVertex.tint = color;
                vertices[i * 2 + 1] = innerVertex;

                indices[i * 6] = (ushort)((i == 0) ? vertices.Length - 2 : (i - 1) * 2); // previous outer vertex
                indices[i * 6 + 1] = (ushort)(i * 2); // current outer vertex
                indices[i * 6 + 2] = (ushort)(i * 2 + 1); // current inner vertex

                indices[i * 6 + 3] = (ushort)((i == 0) ? vertices.Length - 2 : (i - 1) * 2); // previous outer vertex
                indices[i * 6 + 4] = (ushort)(i * 2 + 1); // current inner vertex
                indices[i * 6 + 5] = (ushort)((i == 0) ? vertices.Length - 1 : (i - 1) * 2 + 1); // previous inner vertex
            }

            m_IsDirty = false;
        }

        public bool isDirty => m_IsDirty;

        void CompareAndWrite(ref float field, float newValue)
        {
            if (Mathf.Abs(field - newValue) > float.Epsilon)
            {
                m_IsDirty = true;
                field = newValue;
            }
        }

        public int numSteps
        {
            get => m_NumSteps;
            set
            {
                m_IsDirty = value != m_NumSteps;
                m_NumSteps = value;
            }
        }

        public float width
        {
            get => m_Width;
            set => CompareAndWrite(ref m_Width, value);
        }

        public float height
        {
            get => m_Height;
            set => CompareAndWrite(ref m_Height, value);
        }

        public Color color
        {
            get => m_Color;
            set
            {
                m_IsDirty = value != m_Color;
                m_Color = value;
            }
        }

        public float borderSize
        {
            get => m_BorderSize;
            set => CompareAndWrite(ref m_BorderSize, value);
        }

    }
}
Стиль настраиваемого контроля
Создайте файл USS с именем RadialProgress.uss со следующим содержимым:
.radial-progress {
        min-width: 26px;
        min-height: 20px;
        --track-color: rgb(130, 130, 130);
        --progress-color: rgb(46, 132, 24);
        --percentage-color: white;
        margin-left: 5px;
        margin-right: 5px;
        margin-top: 5px;
        margin-bottom: 5px;
        flex-direction: row;
        justify-content: center;
        width: 100px;
        height: 100px;
    }

    .radial-progress__label {
        -unity-text-align: middle-left;
        color: var(--percentage-color);
    }
Используйте пользовательский элемент управления в UI Документ и тест
Используйте UI Builder для добавления элемента управления и применения таблицы стилей USS. Проверьте элемент управления с различными значениями Progress.
- Создать UI Документ с именем
RadialProgressExample.uxml. - Дважды щелкните
RadialProgressExample.uxml, чтобы открыть его в UI Builder. - В окне Библиотека выберите Project > Пользовательские элементы управления > UxmlSerializedData > MyUILibrary.
- Перетащите RadialProgress в окно Hierarchy.
- В разделе StyleSheets UI Builder добавить
RadialProgress.ussв качестве существующего USS.. - В окне Hierarchy выберите RadialProgress.
- В окне Inspector введите
radial-progressв поле Имя. - В окне Inspector введите различные значения в поле Прогресс. Процент в окне Видовой проем изменяется, и зеленое кольцо прогресса изменяет размер.
Создание логики для обновления прогресса с динамическими значениями
Создайте скрипт C# MonoBehaviour для обновления свойства Progress управления динамическими значениями для демонстрационных целей. В папке radial-progress создайте скрипт C# MonoBehaviour с именем RadialProgressComponent.cs со следующим содержанием:
using MyUILibrary;
using UnityEngine;
using UnityEngine.UIElements;

[RequireComponent(typeof(UIDocument))]
public class RadialProgressComponent : MonoBehaviour
{
    RadialProgress m_RadialProgress;

    void OnEnable()
    {
        var root = GetComponent<UIDocument>().rootVisualElement;

        m_RadialProgress = new RadialProgress() {
            style = {
                position = Position.Absolute,
                left = 20, top = 20, width = 200, height = 200
            }
        };

        root.Add(m_RadialProgress);
    }

    void Update()
    {
        m_RadialProgress.progress = ((Mathf.Sin(Time.time) + 1.0f) / 2.0f) * 60.0f + 10.0f;
    }
}
Проверка индикатора прогресса во время выполнения
- В Unity выберите GameObject > UI Toolkit > UI Документ.
- Выберите UIDocument в окне Hierarchy.
- Добавить RadialProgressComponent.cs в качестве компонента UIDocument GameObject.
- Введите режим воспроизведения. Индикатор прогресса появляется в сцене, и кольцо прогресса и значение изменяются динамически.