Создать перетаскивание UI внутри окна пользовательского редактора
Версия: 2021.3+
Перетаскивание является общей особенностью дизайна UI. Вы можете использовать UI Toolkit для создания перетаскивания UI внутри окна пользовательского редактора или внутри приложения, созданного Unity. В этом примере показано, как создать перетаскивание UI внутри окна пользовательского редактора.
Примерный обзор
Пример добавляет несколько слотов и один объект в окно пользовательского редактора. Вы можете перетащить объект в любой слот, как показано ниже:
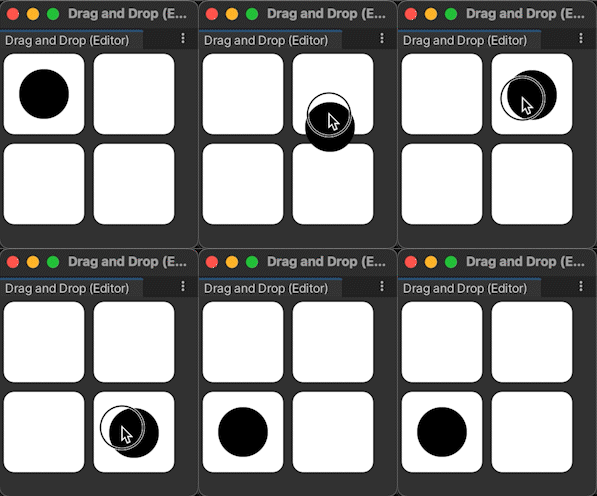
Вы можете найти завершенные файлы, созданные этим примером, в хранилище GitHub.
Предварительные условия
Это руководство предназначено для разработчиков, знакомых со скриптами Unity Editor, UI Toolkit и C#. Перед началом работы ознакомьтесь со следующим:
Создание настраиваемого окна редактора
Чтобы начать, создайте окно редактора по умолчанию из меню. Измените имя меню и название окна на Drag And Dropи удалите код для стандартных меток, чтобы сделать UI более удобным для пользователя.
Создайте проект в Unity с любым шаблоном.
Щелкните правой кнопкой мыши в папке
Assetsи выберите Создать > UI Toolkit > Окно редактора.В UI Toolkit Создатель окна редактора, вставить
DragAndDropWindow.Нажмите Confirm. Это автоматически создаст три файла:
DragAndDropWindow.cs,DragAndDropWindow.uxmlиDragAndDropWindow.uss.-
Заменить содержание
DragAndDropWindow.csследующим текстом:using UnityEditor; using UnityEngine; using UnityEngine.UIElements; using UnityEditor.UIElements; public class DragAndDropWindow : EditorWindow { [MenuItem("Window/UI Toolkit/Drag And Drop")] public static void ShowExample() { DragAndDropWindow wnd = GetWindow<DragAndDropWindow>(); wnd.titleContent = new GUIContent("Drag And Drop"); } public void CreateGUI() { // Each editor window contains a root VisualElement object VisualElement root = rootVisualElement; // Import UXML var visualTree = AssetDatabase.LoadAssetAtPath<VisualTreeAsset>("Assets/Editor/DragAndDropWindow.uxml"); VisualElement labelFromUXML = visualTree.Instantiate(); root.Add(labelFromUXML); // A stylesheet can be added to a VisualElement. // The style will be applied to the VisualElement and all of its children. var styleSheet = AssetDatabase.LoadAssetAtPath<StyleSheet>("Assets/Editor/DragAndDropWindow.uss"); } }
Создание слотов и объектов
Затем добавьте UI элементы управления в ваше пользовательское окно:
- Одна из них называется
slotsс двумя детьми, именуемымиslot_row1иslot_row2. Каждая строка должна иметь двух детей, именуемыхslot1иslot2. - Один из них называется
objectна том же уровне, что иslots.objectдолжен следовать послеslotsв Hierarchy.
Стиль управления UI следующим образом:
- Для
slot1иslot2стилизуйте их как квадраты 80px X 80px с белым фоном и округленными углами. Выравнивайте слоты как два ряда с двумя слотами в каждом ряду. - Для
objectстилизуйте его как круглое пятно размером 50px X 50px с черным цветом фона.
Тип: Чтобы сделать ваш проект более забавным, вы можете использовать фоновое изображение для объекта. Вы можете найти изображение (Pouch.png) в GitHub хранилище.
-
Заменить содержание
DragAndDropWindow.uxmlследующим текстом:<ui:UXML xmlns:ui="UnityEngine.UIElements" xmlns:uie="UnityEditor.UIElements" xsi="http://www.w3.org/2001/XMLSchema-instance" engine="UnityEngine.UIElements" editor="UnityEditor.UIElements" noNamespaceSchemaLocation="../../../UIElementsSchema/UIElements.xsd" editor-extension-mode="False"> <Style src="DragAndDropWindow.uss" /> <ui:VisualElement name="slots"> <ui:VisualElement name="slot_row1" class="slot_row"> <ui:VisualElement name="slot1" class="slot" /> <ui:VisualElement name="slot2" class="slot" /> </ui:VisualElement> <ui:VisualElement name="slot_row2" class="slot_row"> <ui:VisualElement name="slot1" class="slot" /> <ui:VisualElement name="slot2" class="slot" /> </ui:VisualElement> </ui:VisualElement> <ui:VisualElement name="object" class="object" /> </ui:UXML> -
Заменить содержание
DragAndDropWindow.ussследующим текстом:.slot { width: 80px; height: 80px; margin: 5px; background-color: rgb(255, 255, 255); border-top-radius: 10px; border-top-left-radius: 10px; border-bottom-left-radius: 10px; border-top-right-radius: 10px; border-bottom-right-radius: 10px; } .slot_row { flex-direction: row; } .object { width: 50px; height: 50px; position: absolute; left: 20px; top: 20px; border-radius: 30px; background-color: rgb(0, 0, 0); }
Определение логики перетаскивания
Чтобы определить поведение перетаскивания, расширите PointerManipulator класс и опишите логику. Напишите конструктор, чтобы задать target Напишем четыре метода, которые будут действовать как обратные вызова для данного метода, и укажем, какие из них PointerDownEvents, PointerMoveEvents, PointerUpEvents, и PointerCaptureOutEvents. Осуществление RegisterCallbacksOnTarget() и UnregisterCallbacksOnTarget() для регистрации и отмены регистрации этих четырех обратных вызовов target.
В папке
Editorсоздайте еще один файл C# с именемDragAndDropManipulator.cs.-
Заменить содержание
DragAndDropManipulator.csследующим текстом:using System.Collections; using System.Collections.Generic; using UnityEngine; using UnityEngine.UIElements; public class DragAndDropManipulator : PointerManipulator { // Write a constructor to set target and store a reference to the // root of the visual tree. public DragAndDropManipulator(VisualElement target) { this.target = target; root = target.parent; } protected override void RegisterCallbacksOnTarget() { // Register the four callbacks on target. target.RegisterCallback<PointerDownEvent>(PointerDownHandler); target.RegisterCallback<PointerMoveEvent>(PointerMoveHandler); target.RegisterCallback<PointerUpEvent>(PointerUpHandler); target.RegisterCallback<PointerCaptureOutEvent>(PointerCaptureOutHandler); } protected override void UnregisterCallbacksFromTarget() { // Un-register the four callbacks from target. target.UnregisterCallback<PointerDownEvent>(PointerDownHandler); target.UnregisterCallback<PointerMoveEvent>(PointerMoveHandler); target.UnregisterCallback<PointerUpEvent>(PointerUpHandler); target.UnregisterCallback<PointerCaptureOutEvent>(PointerCaptureOutHandler); } private Vector2 targetStartPosition { get; set; } private Vector3 pointerStartPosition { get; set; } private bool enabled { get; set; } private VisualElement root { get; } // This method stores the starting position of target and the pointer, // makes target capture the pointer, and denotes that a drag is now in progress. private void PointerDownHandler(PointerDownEvent evt) { targetStartPosition = target.transform.position; pointerStartPosition = evt.position; target.CapturePointer(evt.pointerId); enabled = true; } // This method checks whether a drag is in progress and whether target has captured the pointer. // If both are true, calculates a new position for target within the bounds of the window. private void PointerMoveHandler(PointerMoveEvent evt) { if (enabled && target.HasPointerCapture(evt.pointerId)) { Vector3 pointerDelta = evt.position - pointerStartPosition; target.transform.position = new Vector2( Mathf.Clamp(targetStartPosition.x + pointerDelta.x, 0, target.panel.visualTree.worldBound.width), Mathf.Clamp(targetStartPosition.y + pointerDelta.y, 0, target.panel.visualTree.worldBound.height)); } } // This method checks whether a drag is in progress and whether target has captured the pointer. // If both are true, makes target release the pointer. private void PointerUpHandler(PointerUpEvent evt) { if (enabled && target.HasPointerCapture(evt.pointerId)) { target.ReleasePointer(evt.pointerId); } } // This method checks whether a drag is in progress. If true, queries the root // of the visual tree to find all slots, decides which slot is the closest one // that overlaps target, and sets the position of target so that it rests on top // of that slot. Sets the position of target back to its original position // if there is no overlapping slot. private void PointerCaptureOutHandler(PointerCaptureOutEvent evt) { if (enabled) { VisualElement slotsContainer = root.Q<VisualElement>("slots"); UQueryBuilder<VisualElement> allSlots = slotsContainer.Query<VisualElement>(className: "slot"); UQueryBuilder<VisualElement> overlappingSlots = allSlots.Where(OverlapsTarget); VisualElement closestOverlappingSlot = FindClosestSlot(overlappingSlots); Vector3 closestPos = Vector3.zero; if (closestOverlappingSlot != null) { closestPos = RootSpaceOfSlot(closestOverlappingSlot); closestPos = new Vector2(closestPos.x - 5, closestPos.y - 5); } target.transform.position = closestOverlappingSlot != null ? closestPos : targetStartPosition; enabled = false; } } private bool OverlapsTarget(VisualElement slot) { return target.worldBound.Overlaps(slot.worldBound); } private VisualElement FindClosestSlot(UQueryBuilder<VisualElement> slots) { List<VisualElement> slotsList = slots.ToList(); float bestDistanceSq = float.MaxValue; VisualElement closest = null; foreach (VisualElement slot in slotsList) { Vector3 displacement = RootSpaceOfSlot(slot) - target.transform.position; float distanceSq = displacement.sqrMagnitude; if (distanceSq < bestDistanceSq) { bestDistanceSq = distanceSq; closest = slot; } } return closest; } private Vector3 RootSpaceOfSlot(VisualElement slot) { Vector2 slotWorldSpace = slot.parent.LocalToWorld(slot.layout.position); return root.WorldToLocal(slotWorldSpace); } }
Создание экземпляра поведения перетаскивания
Чтобы разрешить перетаскивание в настраиваемом окне, создайте его экземпляр при открытии окна.
-
В
DragAndDropWindow.cs, добавить следующий текст:CreateGUI()метод для инстанционированияDragAndDropManipulatorclass:DragAndDropManipulator manipulator = new(rootVisualElement.Q<VisualElement>("object")); В меню выберите Окно > UI Toolkit > Перетаскивание. В открывшемся окне пользовательского редактора вы можете перетащить объект в любое место.