Организация проекта
Project organization As your project grows, you will need to maintain a level of organization so that it can scale with your team and application requirements. These general tips will help you to establish your basic project and scene structure. The Project view The Project window displays all of the files related to your project. This is the content directory where you will find assets and other project files in your application. Unity stores the source files directly in the project, alongside individual .meta files. Meta files contain engine- and Editor-specific data for the associated asset. Unity also imports each asset into an optimized format which the engine uses at runtime. These processed assets appear in the Library folder, which serves as a cache and does not need to be added to source control. The project window has a few UI features to assist with navigation: —
Right-click to reveal the context menu for frequently used commands (creating/importing assets, revealing full path on disk, etc.).
Use the Search field to locate assets as your project grows in size. If you’re looking for a particular type of asset, filter by type using the t: syntax (e.g., t:Material will filter for all material assets in the project). This can help you to navigate large projects.
Drag a frequently used folder into the Favorites field at the top of the interface. You can also save a search to the Favorites with the Save Search button.
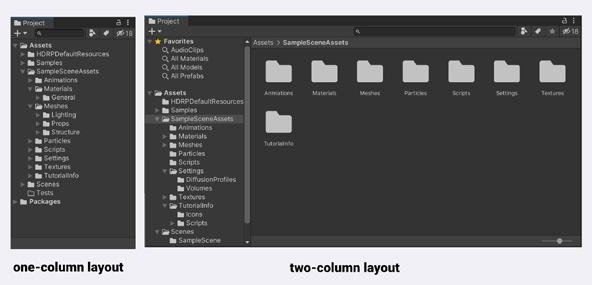
You can also change the layout of the window itself. Select the More Items ( ) menu in the top right of the window, and choose from either One Column Layout or Two Column Layout. The two-column layout has an extra pane with a visual preview of each file.
One-column vs two-column layout
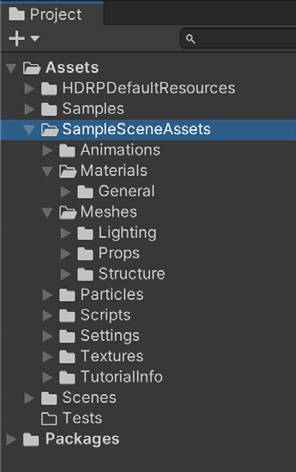
Inside of the Project window is the Assets folder. This contains the assets used to build your game. If you’ve started your project with a template, you should see subfolders that represent several common assets. While most of these are userdefined, Unity does reserve a few folder names for specific purposes. Make sure you are aware of this list of Special folder names. The following are some common subdirectories that you might use to organize your project, although these vary by team and project according to preferences. Above all, stay consistent – create a style guide and follow it.
Animations
This folder contains animated motion clips and their controller files, as well as Timeline assets for in-game cinematics or rigging information for procedural animation.
Audio
Sound assets include audio clips as well as the mixers used for blending effects and music.
Editor
This folder contains scripted tools made for use with the Unity Editor but not appearing in a target build.
Fonts
The fonts used in the game.
Gizmos
Having a Gizmo icon can help visualize a GameObject in the Scene or Game view, especially if it does not have a mesh. Store the image files for these icons in the Gizmos folder.
Materials
These assets describe surface shading properties.
Meshes
Store models created in an external DCC application here.
Particles
Manage particle simulations in Unity, created either with the ParticleSystem or Visual Effect Graph.
Prefabs
These are reusable GameObjects with prebuilt components. Add them to a scene to build your levels and gameplay.
Scripts
All user-developed code for gameplay appears here.
Scenes
Unity stores small, functional portions of your project in scene assets. They often correspond to game levels or part of a level.
Settings
Assets store render pipeline settings for both HDRP and URP.
Shaders
These programs run on the GPU as part of the graphics pipeline.
Textures
Image files can consist of texture files for materials and surfacing, UI overlay elements for user interface, and lightmaps to store lighting information.
ThirdParty
If you have assets from an external source like the Asset Store, keep them separated from the rest of your project here. This makes updating your third-party assets and scripts easier. Third-party assets may have a set structure that cannot be altered.
The Sample Scene with the HDRP template includes several asset folders.
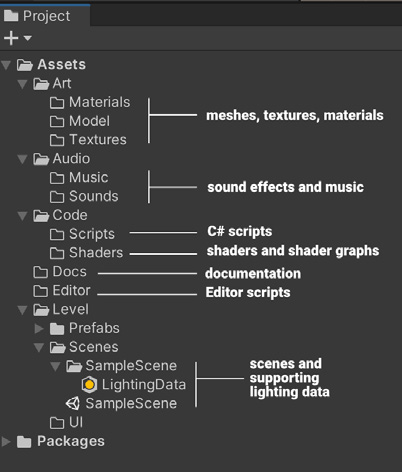
The Supported Asset Types manual page describes the most common assets in more detail. You can use the Template or Learn projects as an example of how to organize your folders effectively. While you’re not limited to these folder names, this list should give you a good starting point that you can expand upon as your project scales up. You are of course free to adapt the folder structure to your specific project’s needs and team preferences, as in the image below.
Organize folders for your project needs, but stay consistent once you decide on a structure.
Folder structure and naming While there’s no single way to organize your project, we recommend that you follow these best practices in general: —
Document your naming conventions and folder structure. A style guide and/or project template makes your files easier to find and organize.
Whatever naming convention you choose, make sure you remain consistent. Don’t deviate from your chosen style guide or template. If you do need to amend your naming rules, parse and rename your affected assets all at once with a script.
Don’t use spaces in file and folder names. Unity’s command line tools have issues with path names that have spaces.
Separate your testing or sandbox areas. Create a separate folder for non-production scenes and experimentation. Subfolders with usernames can divide your work area by team member.
Avoid extra folders at the root level. In general, store your content files within the Assets folder. Don’t create additional folders at the project’s root level unless absolutely necessary.
Scenes Scenes are where you work with content in Unity. They contain the objects of your game and can be used to create a main menu, individual levels, and anything else. In each unique scene, you will place the environments, obstacles, and decorations that roughly translate into one level of your game. This enables you to design and build your application piece by piece, keeping it modular. The scene files themselves are assets that are stored on disk. If you use Force Text Mode for Asset Serialization, they appear as text files; otherwise, they default to binaries. Scenes often represent a level of your game or a portion of a level. While demos and simple games might occupy just a single scene, most commercial games might use one scene per level, each with its own environments, characters, UI, etc.
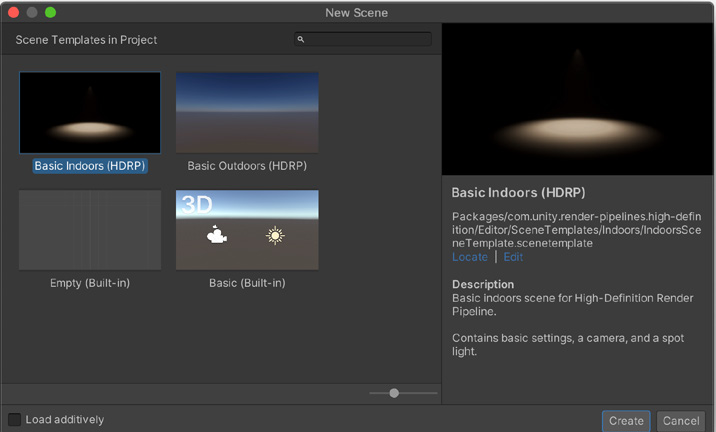
You can create any number of scenes in a project, but be aware that how you structure your scenes can have a significant performance impact. For more info on scene organization and performance, check out our mobile performance optimization guide. You’ll need to create, create, load, and save scenes to represent different portions of your game and flesh out your application. A typical “scene flow” involves triggering the loading of another scene with an event. For example, you may have a menu scene that loads up a main gameplay scene when the user clicks the interface. Note that you can load scenes one at a time, or separate elements and load the scenes additively. When creating a new scene, Unity allows you to select from a set of Scene Templates. For example, the HDRP 3D Sample Scene comes with several templates. You can define your own scene templates to streamline your workflow and start everyone on your team with the same assets and configuration.
Scene templates in HDRP
Unity provides a SceneManagement API for loading or managing scenes from scripts. See this Learn tutorial on scene flow for more information.
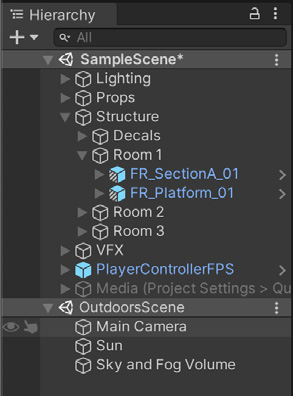
The Hierarchy window The Hierarchy window displays every GameObject in the currently loaded scene’s assets. These include your models, Cameras, and Prefabs. Simply drag a GameObject to change its parenting. Adding or removing objects in the Scene view also adds or removes them from the Hierarchy window (and vice versa). The Hierarchy window can show more than one loaded scene at runtime, with each scene containing its own GameObjects.
The Sample Scene with the HDRP template includes several asset folders.
General tips for scenes and hierarchies —
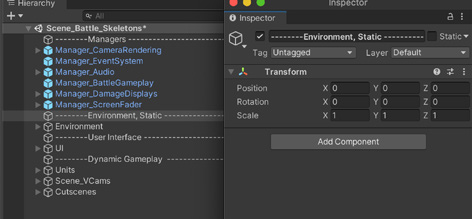
Use named, empty GameObjects as spacers. Carefully organize your scenes to make it easy to
at (0,0,0). This simplifies code and reduces issues converting between local and world space. —
to put objects on the floor. Treat the world as a 2D
find objects. Keep these to a minimum, as every
space along the xz-plane for game logic, AI, and
GameObject matters. Balance your organizational needs with performance. Avoid unnecessary parenting for organization (see Use proper
Put your world floor at y = 0. This makes it easier
physics. —
Separate dynamic and static objects. If you generate moving objects at runtime, consider
parenting below).
keeping them organized under an empty placeholder object. Likewise, store non-moving level geometry in a different part of the hierarchy. This can help you apply the appropriate lighting techniques to your geometry (e.g., lightmapping versus probe lighting). —
Use proper parenting. Group related objects by function. Use common sense when creating
Caption: Empty game objects serve as spacers.
hierarchies (e.g., parent the tires so that they are children of the car body). Avoid unnecessary
Put maintenance Prefabs and empty
parenting when possible, as a flatter hierarchy
GameObjects at world origin. If a transform is not
is more performant. Follow these guidelines for
specifically used to position an object, it should be
scene hierarchies.
Naming standards While there is no definitive naming standard for GameObjects, consider the following standards and practices for your project. Standard
Example
Use descriptive names. Don’t abbreviate. Use names that you will remember several months from now. Consider whether another person will understand your notation, and choose names that you can pronounce and remember. Be aware that abbreviations can create confusion.
largeButton, LargeButton, or leftButton
Use Camel case/Pascal case. Avoid spaces in your object names. Camel case or Pascal case improve readability (and typing accuracy, according to this study).
OutOfMemoryException, dateTimeFormat,
NOT: lButton
NOT: Outofmemoryexception, datetimeformat
Use underscores (or hyphens) sparingly. Avoid underscores and hyphens in general. However, they can be useful in certain circumstances. Prefixing a name with an underscore puts it alphabetically first. You can also use underscores to denote variants of a specific object.
Active states: EnterButton_Active, EnterButton_Inactive maps: Foliage_Diffuse, Foliage_ Normalmap Level of detail: Building_LOD1, Building_LOD0
Use number suffixes to denote a sequence. Don’t suffix with a number if it’s not part of a list.
For a path, name the nodes:
Follow the design document naming.
If your design document names locations like HighSpellTower or RedDragonLair, use those exact spellings.
Node0, Node1, Node2, etc.
As with all naming standards, decide on what works for your team and apply it consistently.