Программирование
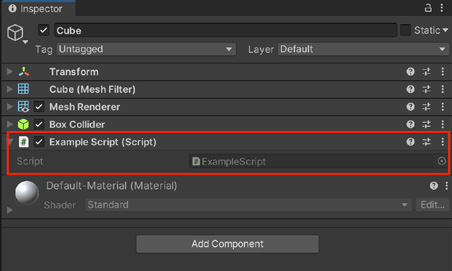
Programming In Unity, you can use code to customize and control just about any part of your game, create visual tools for your team, and even change the way Unity itself works. Unity uses C#, a modern object-oriented language adopted widely in software industries. Custom components and MonoBehaviours Every type of GameObject comes with a set of default components. For example, an empty GameObject starts with the Transform component. But you can extend this default collection with custom components that can tie your own game logic directly to objects your team uses in game scenes. You can even empower your designers to tweak values and behavior through values in your components. To do this, create scripts, then add those scripts as components to GameObjects. Each script derives from the built-in class called MonoBehaviour. Think of the MonoBehaviour class as a kind of blueprint for creating a new component type. Each time you attach a script component to a GameObject, the blueprint defines a new instance of that particular component. Scripts are created directly within Unity. If you use the Assets menu (or rightclick) > Create > C# Script, this generates a new C# script on disk. Name the filename to match your desired class name. Drag this onto an object in the hierarchy, and the inspector shows the ExampleScript appears as a component.
A new C# script
Note: If you change the name of the class inside the file but not the filename, it can cause the script to not function properly when attached as a custom component. Unity will automatically set up a class named ExampleScript that inherits from MonoBehaviour.
Unity’s current script template starts the class with two functions, Start and Update.
using System.Collections;
using System.Collections.Generic;
using UnityEngine;
public class ExampleScript : MonoBehaviour {
    // Start is called before the first frame update

    void Start() { }
    // Update is called once per frame

    void Update() { }
}
Unity calls the Start function before gameplay begins and before it calls the Update function for the first time. Thus, the Start function is an ideal place to set up variables, read preferences, and make connections with other GameObjects. The Update function handles code that runs every frame. For example, this might include movement, triggering actions, and responding to user input. Update and Start are only two of MonoBehaviour’s event functions. These built-in methods run on a set order of execution. Overriding MonoBehaviour’s event functions is how you will construct gameplay and build the main game loop. To familiarize yourself with the basics of coding in Unity, check out our documentation here.
Initializing objects Experienced programmers may be surprised that initializing an object is not done using a constructor. The Editor handles object construction, which does not take place at the start of gameplay. Attempting to define a constructor for a script component will interfere with the normal operation of Unity and can cause problems.
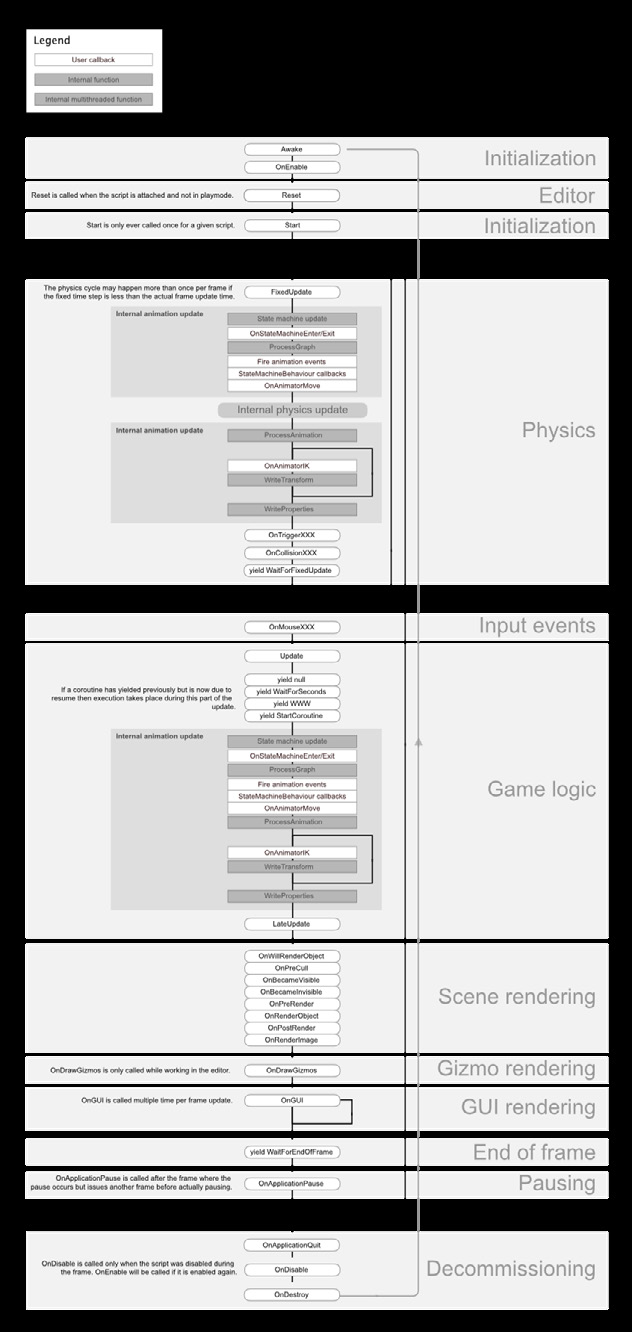
MonoBehaviour lifecycle and structure Game engines rely on an endless loop responsible for processing user input, updating game state, and rendering to the screen. In Unity, this PlayerLoop is a low-level class at the heart of the game engine. It controls a number of subsystems that handle initialization and per-frame updates. To interface with the PlayerLoop, your scripts derive from the MonoBehaviour base class, and learning how this operates is key to creating gameplay. This flowchart shows MonoBehaviour’s event functions and how they execute over a script’s lifetime. Here are some essential parts of the game loop when working with MonoBehaviours:
First scene load
Editor
Before the first frame update
In between frames
Update order
Animation update loop
Rendering
Coroutines
When the object is destroyed
When quitting
Experienced users can even build their own PlayerLoop and PlayerLoopSystems. However, we recommend that you begin by familiarizing yourself with the Monobehaviour class and the most common classes below.
MonoBehaviour lifecycle
More scripting tips Unity’s scripting backend is based on the .NET Framework. Take advantage of these C# features when scripting for Unity development: —
Namespaces: Classes in Unity must have unique names. When several programmers check their work into the same project, common names like “Controller” can create conflicts. Use namespaces to avoid this, and organize your data types. Apply the using directive to shorten the namespace prefix if desired. For example, you could create a namespace for the Player as well as for an Enemy. Then Player.Controller and Enemy.Controller could safely live in the same project. See the Namespaces manual page for more information.
Coroutines: Sometimes you may want to trigger an action and have it take place over multiple frames. For example, imagine moving an object from A to B over a duration or slowly fading its color. Normally a function runs to completion and returns on the same frame, making it more difficult to perform logic over a timeframe. A coroutine has the ability to pause execution and return control to Unity, then continue where it left off on the following frame. You can use coroutines to apply game logic for a specified time. For example, pausing execution for a set time is often done via coroutine. You can even use coroutines to wait for other coroutines or combine it with a while loop to wait for a condition. Coroutines can behave like MonoBehaviour’s Update event functions but with the added benefit of controlling the update interval. Refer to the Coroutine manual page for more information.
Attributes: These are markers that can be placed above a class, property, or function to indicate special behaviour. For example, you can turn a numeric field into a slider in the Inspector using the Range attribute or add a floating Tooltip over a field in the Inspector. C# contains attribute names within square brackets. You can find a complete list of Attributes in the Scripting API.
Common classes Once you start scripting in Unity, you should review some of the most important built-in classes. While this list is not exhaustive, it should help you start exploring Unity. See the Scripting API for a complete list of classes for more information.
Class
Description
GameObject
Represents the type of objects which can exist in a scene
MonoBehaviour
The base class from which every Unity script derives
Object
The base class for all objects that Unity can reference in the Editor
Transform
Provides you with a variety of ways to work with a GameObject’s position, rotation, and scale via script, as well as its hierarchical relationship to parent and child GameObjects
Vectors
Classes for expressing and manipulating 2D, 3D, and 4D points, lines, and directions
Quaternion
A class which represents an absolute or relative rotation, and provides methods for creating and manipulating them
ScriptableObject
A data container that you can use to save large amounts of data
Time
This class allows you to measure and control time, and manage the frame rate of your project
Mathf
A collection of common math utilities, including trigonometric, logarithmic, and other functions
Random
Provides you with easy ways of generating various commonly required types of random values
Debug
Allows you to visualize information in the Editor that may help you understand or investigate what is going on in your project while it is running
Gizmos and Handles
Allows you to draw lines and shapes in the Scene view and Game view, as well as interactive handles and controls
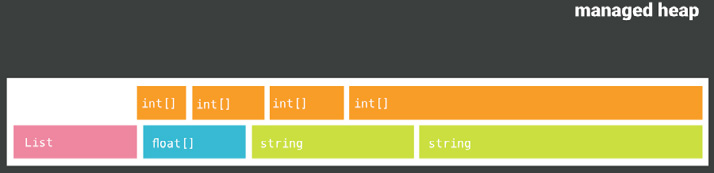
Memory management Unity supports C#, an industry-standard language with some similarities to Java or C++. C# is a “managed language.” It automatically handles memory management for you: allocating and deallocating memory, covering memory leaks, and so on. In some languages like C++, the programmer is responsible for allocating and releasing these blocks of heap memory with the appropriate function calls. By contrast, automatic memory management in C# requires less coding effort than explicit allocation/release, while greatly reducing the potential for memory leakage (where memory is allocated but never subsequently released). Value versus reference types When you call a function, Unity reserves an area of memory for it and copies the values of the function’s parameters as well. Value types, like integers, floats, and booleans, only occupy a few bytes. Unity stores value types directly and copies them during parameter passing. Other data types (like objects, strings, and arrays) are reference types. They occupy more space and would be inefficient to copy on a regular basis. Instead, Unity stores their data in heap memory and accesses them via pointers. Thus, if you only need a struct (value type), using that can be more efficient than if you use a class (reference type) to hold the same data. Although you won’t need to allocate and release memory explicitly, you will need to understand managed heap memory and how it affects the performance of your game application. Garbage collection Blocks of heap memory are “live” if they are still in use and have active references.
The Managed Memory Allocator automatically allocates heap memory.
As your game runs, references to a block of memory may disappear (GameObjects get destroyed, variables get reassigned, etc.). Once all references to a memory block are gone, the Managed Memory Allocator can safely reuse the memory. Periodically, the allocator searches the empty spaces between live blocks of memory. Locating and freeing up unused memory is known as garbage collection, or GC for short. When the game application requests new blocks of memory, the allocator draws from these unused blocks.
Garbage collection frees up unused memory but pauses execution of your script code.
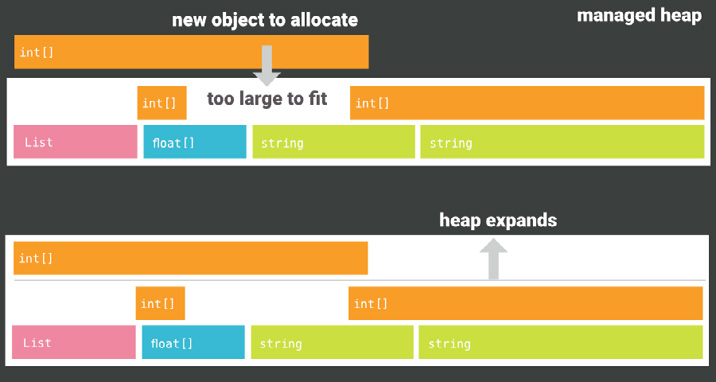
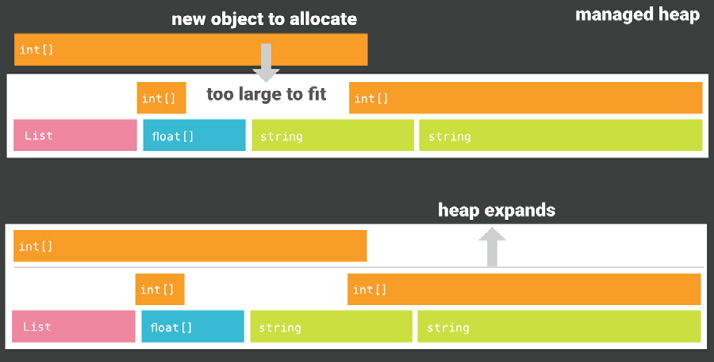
Unity implements the Boehm–Demers–Weiser garbage collector. During garbage collection, Unity stops running your program code, and it only resumes normal execution when the garbage collector finishes. This interruption can cause delays in the execution of your application, which depend on how much memory the garbage collector needs to process and the game’s target platform. These can vary, anywhere from less than one millisecond to hundreds of milliseconds. For real-time applications like games, this can become quite a big issue. Interruptions from garbage collection, called GC spikes, can cause game play to stutter. Even though garbage collection is invisible for the most part, the collection process actually requires significant CPU time behind the scenes. Also, be aware that the Boehm GC algorithm is non-compacting. It does not move existing objects in memory to close the gaps between objects, which can lead to memory fragmentation. If you try to allocate a new object that does not fit within the existing gaps, the allocator may need to expand the size of the heap to accommodate it. Heap expansion can impact performance.
Be aware that the heap can expand.
In Unity, you need to avoid triggering the garbage collector more often than necessary. Otherwise, your application could freeze or stutter at runtime. Check out this blog post for optimization tips and tricks that can help reduce the impact of garbage collection. Unity also offers an optional Incremental Garbage Collector that splits GC over multiple frames. This feature is currently Experimental and detailed in this blog post. See Understanding Automatic Memory Management and Understanding the managed heap in the Unity documentation for more information about memory management and garbage collection. You can also read the Memory Management in Unity guide from the Learn site. Multithreading: C# Job System and Burst compiler Modern CPUs have multiple cores, but your application needs multithreaded code to take advantage of them. Unity’s Job System allows you to split large tasks into smaller chunks that run in parallel on those extra CPU cores. This can significantly improve performance. Often in multithreaded programming, one CPU thread of execution, the main thread, creates other threads to handle tasks. These additional worker threads then synchronize with the main thread once their work completes.
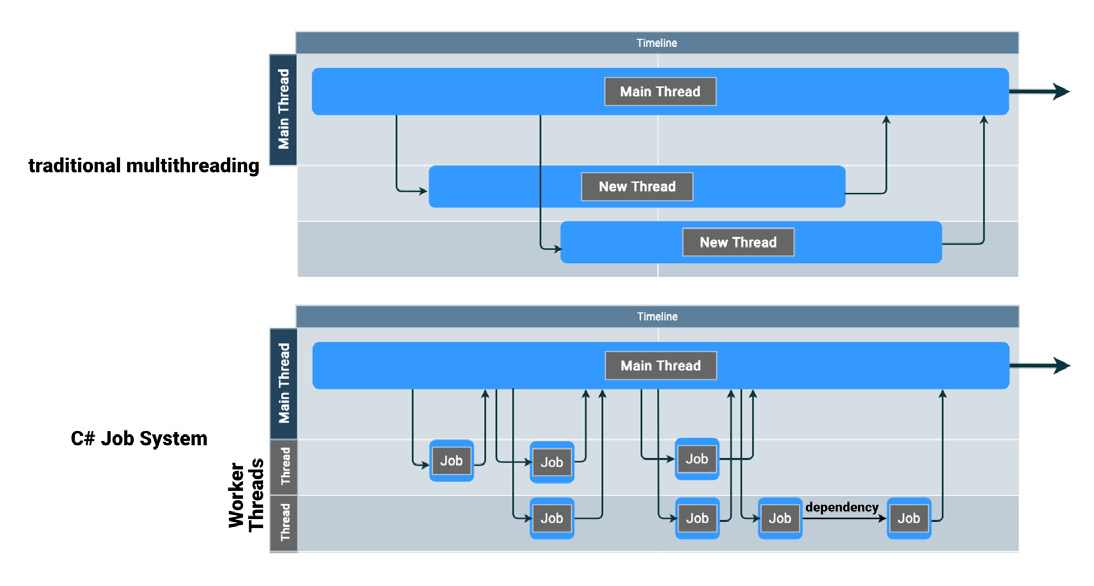
In traditional multithreaded programming, threads are created and destroyed. In the C# Job System, small jobs run on a pool of threads.
If you have a few tasks that run for a long time, this approach to multithreading works well. However, it’s less efficient for a game application, which typically must process many short tasks at 30–60 frames per second. Thus, Unity uses a slightly different approach to multithreading called the C# Job System. Rather than generate many threads with a short lifetime, it breaks your work into smaller units called jobs. These jobs go into a queue, which schedules them to run on a shared pool of worker threads. JobHandles help you create dependencies, ensuring the jobs run in the correct order. In order for a safety system to prevent race conditions, jobs work on a copy of the data. Then, Native Containers send the results back to the main thread. Complementing the Job System is the Burst compiler. Burst translates IL/.NET bytecode into optimized native code using LLVM. To access it, simply add the Burst package from the Package Manager. Burst allows Unity developers to continue using a subset of C# for convenience while improving on performance. Scripting backends in Unity Unity has two scripting backends: Mono and IL2CPP (Intermediate Language To C++). Each uses a different compilation technique: —
Mono uses just-in-time (JIT) compilation and compiles code on demand at runtime.
IL2CPP uses ahead-of-time (AOT) compilation and compiles your entire application before it is run.
IL2CPP is a Unity-developed scripting backend which you can use as an alternative to Mono when building projects for some platforms. It can improve performance and reduce build sizes, but this often comes with slower build time. When you choose to build a project using IL2CPP, Unity converts IL code from scripts and assemblies into C++ code, before creating a native binary file (.exe, apk, .xap, for example) for your chosen platform. Note that IL2CPP is the only scripting backend available when building for iOS and WebGL. For more information about using IL2CPP, refer to the The Unity IL2CPP blog series and the Building a project using IL2CPP page. Editor scripting You may want to tailor your development environment to the specific needs of your team and project to work more efficiently.
If you require a specialized workflow, you can extend the Editor with your own custom inspectors and windows. These can behave just like the Inspector, Scene, or other built-in windows. You can also define how properties appear with custom Property Drawers.
A custom Editor window
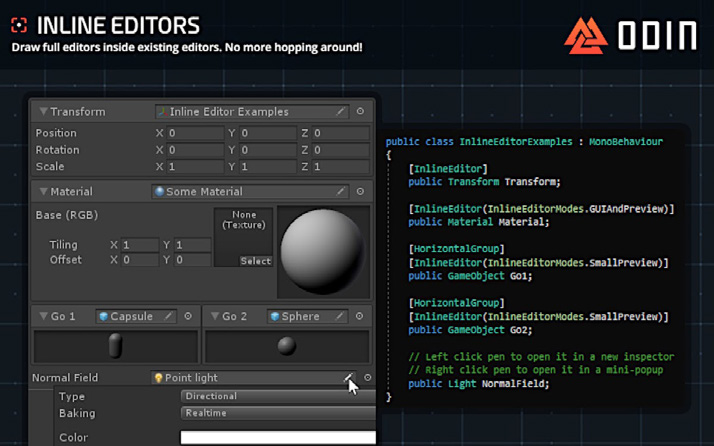
Odin Inspector and Serializer You can reduce the time you spend in the EditorWindow API using Odin Inspector and Serializer, a third-party Unity Verified Solutions Partner tool that you can purchase on the Unity Asset Store. Odin provides over 100 buildingblock attributes that let you create custom editors without manually writing and maintaining custom GUI code. To create a custom editor window with Odin, simply inherit from the OdinEditor Window class, and populate your fields, properties, and methods with attributes. These are just a few of the processes you can define with Odin:
Customize layouts with group attributes such as TabGroup and ToggleGroup
Serialize fields like dictionaries that are normally unavailable with the native Unity Inspector
Easily create buttons in the Inspector window by adding button attributes to your methods
Modify static members for testing and debugging; for example, invoke a static method with any arguments directly from the Inspector
Create custom editors for the Inspector window using attributes
Write snippets of C# code with attribute expressions directly inside the attributes to reduce boilerplate
Validate user input with attributes such as Required, ValidateInput, ChildGameObjectsOnly
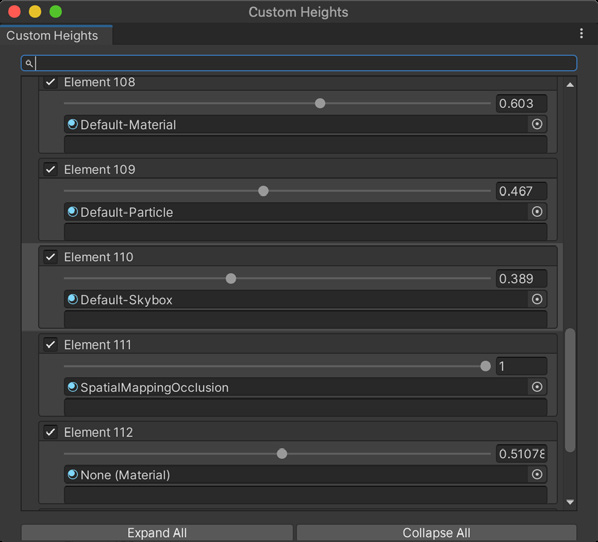
For example, you can generate an Inspector that looks like this, using a script:
Example created in Odin Inspector
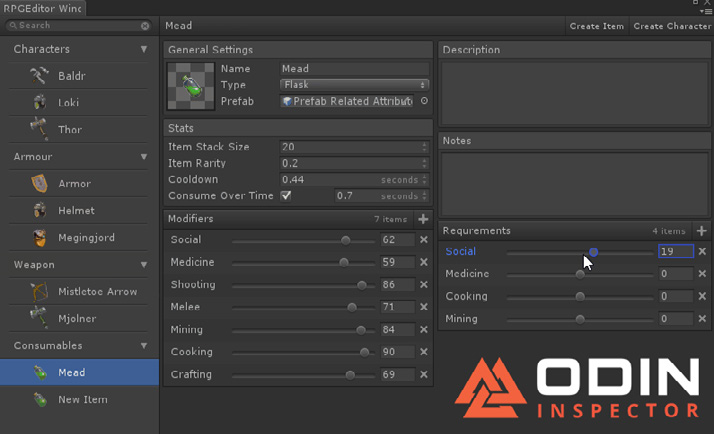
Here is an example of an editor window that was made using Odin:
RPG editor window created in Odin
The Odin Inspector is available in both Personal and Enterprise editions from the Unity Asset Store.
Integrated development environment (IDE) support Unity supports several IDEs so that you can work in your preferred development environment. Visual Studio is installed by default with Unity on Windows and macOS. Select your script editor in Preferences (Unity > Preferences > External Tools > External Script Editor). Unity supports the following IDEs out of the box: —
Visual Studio is the default IDE for Unity on Windows and macOS. On Windows, Unity also includes Visual Studio 2019 Community. On macOS, Unity includes Visual Studio for Mac.
Visual Studio Code (Windows, macOS, Linux) is a free, lightweight, and customizable open source code editor known for speed and customizability. For information on using VS Code with Unity, see Unity Development with VS Code.
JetBrains Rider (Windows, macOS, Linux) is built on top of ReSharper and includes most of its features. For more information, see the JetBrains documentation on Rider for Unity.
If your text editor of choice is not one of the above with built-in support, you may need to customize your text editor for Unity development. For example, many community members have created packages (plug-ins, extensions, and add-ons) to use Sublime Text with Unity. Script templates As you start creating your custom components, you may find that you make the same changes every time you create a new C# script. For example, you might want to delete the Update event function automatically or add a default namespace. Save yourself a few keystrokes and set up the script template so it fits the task at hand. Unity uses templates stored in the ScriptTemplates resources: —
Windows: C:\Program Files\Unity\Editor\Data\Resources\ScriptTemplates
Mac: /Applications/Hub/Editor/[version]/Unity/Unity.app/Contents/Resources/ ScriptTemplates
Open and edit these template files as needed, then relaunch the Unity Editor to apply your changes. Be sure to back up both your original template files and the modified ones.