Организация проекта
Организация проекта По мере роста проекта необходимо поддерживать такой уровень организации, который позволит масштабировать его с учётом размера команды и требований приложения. Эти общие рекомендации помогут заложить базовую структуру проекта и сцен. Окно Project В окне Project отображаются все файлы, связанные с проектом. Это каталог содержимого, где находятся ресурсы и другие файлы приложения. Unity хранит исходные файлы непосредственно в проекте вместе с отдельными файлами .meta. В файлах .meta содержатся связанные с ресурсом данные, необходимые движку и Unity Editor. Unity также импортирует каждый ресурс в оптимизированный формат, который движок использует во время выполнения. Обработанные ресурсы помещаются в папку Library: она служит кэшем, и добавлять её в систему контроля версий не нужно. В окне Project есть несколько элементов интерфейса, упрощающих навигацию: - Щёлкните правой кнопкой мыши, чтобы открыть контекстное меню часто используемых команд: создания и импорта ресурсов, показа полного пути на диске и других.
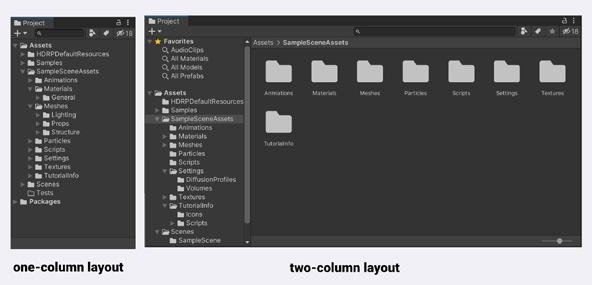
- По мере роста проекта используйте поле Search для поиска ресурсов. Чтобы найти ресурсы определённого типа, примените фильтр с синтаксисом t:. Например, t:Material покажет все ресурсы материалов в проекте. Это упрощает навигацию по крупным проектам. - Перетащите часто используемую папку в область Favorites в верхней части интерфейса. Результат поиска также можно сохранить в Favorites с помощью кнопки Save Search. - Можно изменить и компоновку самого окна. Откройте меню More Items в правом верхнем углу и выберите One Column Layout или Two Column Layout. В двухколоночном режиме есть
дополнительная панель с визуальным предпросмотром каждого файла.
Одноколоночный и двухколоночный режимы
В окне Project находится папка Assets. Она содержит ресурсы, используемые при сборке игры. Если проект создан из шаблона, внутри должны быть подпапки для нескольких распространённых типов ресурсов. Большинство этих папок определяет пользователь, однако Unity резервирует некоторые имена для специальных целей. Обязательно ознакомьтесь со списком специальных имён папок. Ниже перечислены распространённые подпапки для организации проекта. Конкретный набор зависит от предпочтений команды и особенностей проекта. Главное - будьте последовательны: составьте руководство по стилю и придерживайтесь его.
Анимация
В этой папке хранятся клипы анимации и файлы их контроллеров, а также ресурсы Timeline для внутриигровых кинематографических сцен и данные рига для процедурной анимации.
Аудио
К звуковым ресурсам относятся аудиоклипы и микшеры, используемые для сведения эффектов и музыки.
Editor
Здесь находятся скриптовые инструменты для Unity Editor, которые не включаются в целевую сборку.
Шрифты
Шрифты, используемые в игре.
Gizmos
Значок Gizmo помогает увидеть GameObject в окне Scene или Game, особенно если у него нет меша. Файлы изображений для таких значков храните в папке Gizmos.
Материалы
Эти ресурсы описывают свойства затенения поверхности.
Меши
Здесь хранятся модели, созданные во внешнем приложении для создания цифрового контента (DCC).
Частицы
Управляйте в Unity симуляциями частиц, созданными с помощью Particle System или Visual Effect Graph.
Prefab
Многократно используемые GameObject с заранее настроенными компонентами. Добавляйте их на сцену, чтобы собирать уровни и элементы игрового процесса.
Скрипты
Здесь находится весь написанный пользователями код игрового процесса.
Сцены
Unity хранит небольшие функциональные части проекта в ресурсах сцен. Обычно они соответствуют игровому уровню или его части.
Настройки
Здесь хранятся параметры конвейеров рендеринга HDRP и URP.
Шейдеры
Эти программы выполняются на GPU как часть графического конвейера.
Текстуры
Файлы изображений могут содержать текстуры материалов и поверхностей, элементы интерфейса и карты освещения со сведениями об освещении.
ThirdParty
Ресурсы из внешних источников, например Asset Store, храните отдельно. Так сторонние ресурсы и скрипты проще обновлять. Их фиксированную структуру иногда нельзя изменять.
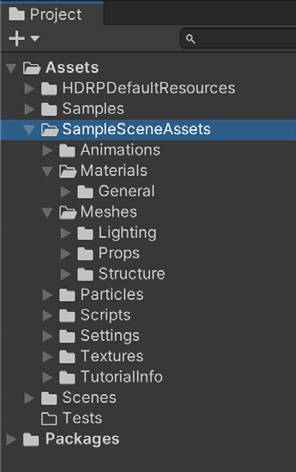
Пример сцены из шаблона HDRP содержит несколько папок ресурсов.
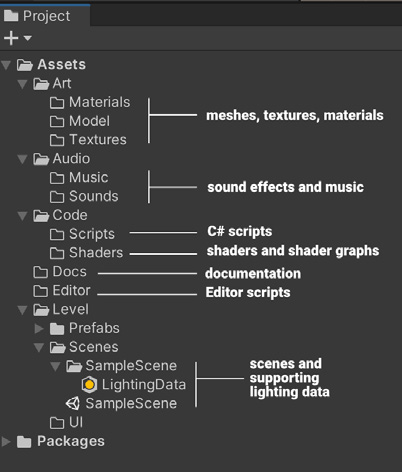
На странице руководства «Поддерживаемые типы ресурсов» распространённые ресурсы описаны подробнее. В качестве примера эффективной организации папок можно использовать проекты Template или Learn. Вы не обязаны ограничиваться перечисленными именами папок, но этот список станет хорошей отправной точкой, которую можно расширять по мере роста проекта. Разумеется, структуру папок можно адаптировать к потребностям конкретного проекта и предпочтениям команды, как показано на рисунке ниже.
Организуйте папки в соответствии с потребностями проекта, но, выбрав структуру, придерживайтесь её.
Структура папок и именование Единственного правильного способа организовать проект нет, однако мы рекомендуем придерживаться следующих общих правил: - Документируйте соглашения об именовании и структуру папок.
Руководство по стилю и/или шаблон проекта упрощают поиск и организацию файлов. - Какое бы соглашение об именовании вы ни выбрали, обязательно соблюдайте
его последовательно. Не отступайте от выбранного руководства по стилю или шаблона. Если правила именования всё же нужно изменить, обработайте и переименуйте все затронутые ресурсы одновременно с помощью скрипта. - Не используйте пробелы в именах файлов и папок. Инструменты командной строки Unity
могут некорректно работать с путями, содержащими пробелы.
- Отделяйте области тестирования и экспериментов. Создайте отдельную папку
для сцен, не предназначенных для выпуска, и экспериментов. Подпапки с именами пользователей помогут разделить рабочую область между участниками команды. - Не создавайте лишних папок в корне. Обычно храните материалы
в папке Assets. Не создавайте дополнительные папки в корне проекта без крайней необходимости.
Сцены В Unity вы работаете с содержимым в сценах. Они содержат объекты игры и могут представлять главное меню, отдельные уровни и многое другое. В каждой сцене размещаются окружение, препятствия и декорации, обычно соответствующие одному уровню игры. Так приложение можно проектировать и собирать по частям, сохраняя модульность.
Файлы сцен сами являются ресурсами и хранятся на диске. Если для Asset Serialization выбран режим Force Text, они представлены текстовыми файлами; в противном случае по умолчанию используется двоичный формат. Сцена часто представляет уровень игры или его часть. Демонстрационные и простые игры могут состоять всего из одной сцены, но в большинстве коммерческих игр для каждого уровня используется отдельная сцена со своим окружением, персонажами, пользовательским интерфейсом и другими элементами.
В проекте можно создать любое количество сцен, однако их структура способна существенно повлиять на производительность. Подробнее об организации сцен и производительности рассказывается в нашем руководстве по оптимизации производительности на мобильных устройствах. Чтобы представить разные части игры и наполнить приложение содержимым, потребуется создавать, загружать и сохранять сцены. Типичный «поток сцен» предполагает загрузку другой сцены по событию. Например, после щелчка по элементу интерфейса сцена меню может загрузить основную игровую сцену. Сцены можно загружать по одной либо разделить элементы между ними и использовать аддитивную загрузку.
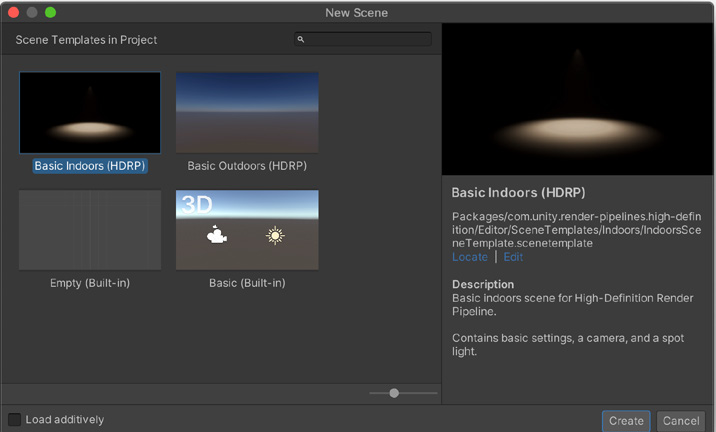
При создании новой сцены Unity позволяет выбрать один из шаблонов сцен. Например, HDRP 3D Sample Scene поставляется с несколькими шаблонами. Можно определить собственные шаблоны сцен, чтобы ускорить работу и предоставить всем участникам команды одинаковый исходный набор ресурсов и настроек.
Шаблоны сцен в HDRP
Unity предоставляет SceneManagement API для загрузки сцен и управления ими из скриптов. Подробнее о потоке сцен рассказывается в этом руководстве Learn.
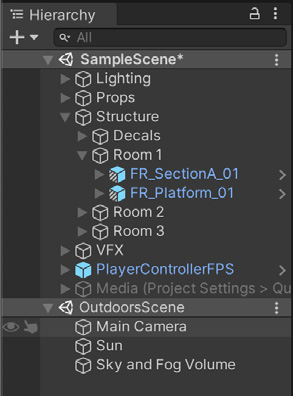
Окно Hierarchy Окно Hierarchy отображает все GameObject в загруженной сцене. Среди них могут быть модели, камеры и экземпляры Prefab. Чтобы изменить родительско-дочерние связи GameObject, просто перетащите его. При добавлении или удалении объектов в окне Scene они также добавляются в Hierarchy или удаляются из него, и наоборот. Во время выполнения Hierarchy может показывать несколько загруженных сцен, каждая со своими GameObject.
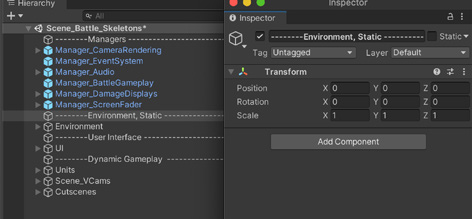
Общие рекомендации по сценам и иерархиям - Используйте именованные пустые GameObject как разделители. Тщательно организуйте сцены, чтобы объекты было легко находить. Не создавайте лишние GameObject: каждый из них влияет на производительность. Соотносите удобство структуры с затратами и не усложняйте иерархию без необходимости.
Пример сцены из шаблона HDRP содержит несколько папок ресурсов.
- Располагайте поверхность мира на уровне y = 0. Тогда объекты проще ставить на землю. Для игровой логики, ИИ и физики рассматривайте мир как двумерное пространство в плоскости XZ.
- Разделяйте динамические и статические объекты. Объекты, создаваемые во время выполнения, удобно хранить под пустым контейнером. Неподвижную геометрию уровня разместите в другой части иерархии: так проще применять разные методы освещения, например lightmap и Light Probe.
- Правильно задавайте родительско-дочерние связи. Группируйте объекты по назначению и руководствуйтесь здравым смыслом: например, колёса должны быть дочерними объектами кузова автомобиля. Избегайте лишней вложенности - более плоская иерархия обычно производительнее. Пустые GameObject служат разделителями иерархии.
- Размещайте служебные Prefab и пустые GameObject в начале мировых координат. Если Transform не задаёт позицию объекта, оставляйте его в точке (0, 0, 0): это упрощает код и преобразования между локальными и мировыми координатами.
Стандарты именования Хотя единого стандарта именования GameObject не существует, примите во внимание следующие правила и рекомендации для своего проекта. Правило
Пример
Используйте понятные имена без сокращений. Выбирайте варианты, которые легко произнести, запомнить и понять другому участнику команды.
largeButton, LargeButton или leftButton
Используйте camelCase или PascalCase. Не ставьте пробелы в именах объектов: это повышает читаемость и точность набора.
OutOfMemoryException, dateTimeFormat
Не злоупотребляйте подчёркиваниями и дефисами. Они полезны для вариантов и состояний; начальное подчёркивание ставит имя первым по алфавиту.
Активные состояния: EnterButton_Active EnterButton_Inactive
Не: lButton
Не: Outofmemoryexception, datetimeformat
Карты: Foliage_Diffuse Foliage_Normalmap Уровни детализации: Building_LOD1 Building_LOD0
Числовые суффиксы используйте только для элементов последовательности.
Для пути: Node0, Node1, Node2 и т. д.
Следуйте правилам именования из дизайн-документа.
HighSpellTower RedDragonLair
Как и любые правила именования, выберите подходящий для вашей команды вариант и применяйте его последовательно.
Project organization As your project grows, you will need to maintain a level of organization so that it can scale with your team and application requirements. These general tips will help you to establish your basic project and scene structure. The Project view The Project window displays all of the files related to your project. This is the content directory where you will find assets and other project files in your application. Unity stores the source files directly in the project, alongside individual .meta files. Meta files contain engine- and Editor-specific data for the associated asset. Unity also imports each asset into an optimized format which the engine uses at runtime. These processed assets appear in the Library folder, which serves as a cache and does not need to be added to source control. The project window has a few UI features to assist with navigation: —
Right-click to reveal the context menu for frequently used commands (creating/importing assets, revealing full path on disk, etc.).
Use the Search field to locate assets as your project grows in size. If you’re looking for a particular type of asset, filter by type using the t: syntax (e.g., t:Material will filter for all material assets in the project). This can help you to navigate large projects.
Drag a frequently used folder into the Favorites field at the top of the interface. You can also save a search to the Favorites with the Save Search button.
You can also change the layout of the window itself. Select the More Items ( ) menu in the top right of the window, and choose from either One Column Layout or Two Column Layout. The two-column layout has an extra pane with a visual preview of each file.
One-column vs two-column layout
Inside of the Project window is the Assets folder. This contains the assets used to build your game. If you’ve started your project with a template, you should see subfolders that represent several common assets. While most of these are userdefined, Unity does reserve a few folder names for specific purposes. Make sure you are aware of this list of Special folder names. The following are some common subdirectories that you might use to organize your project, although these vary by team and project according to preferences. Above all, stay consistent – create a style guide and follow it.
Animations
This folder contains animated motion clips and their controller files, as well as Timeline assets for in-game cinematics or rigging information for procedural animation.
Audio
Sound assets include audio clips as well as the mixers used for blending effects and music.
Editor
This folder contains scripted tools made for use with the Unity Editor but not appearing in a target build.
Fonts
The fonts used in the game.
Gizmos
Having a Gizmo icon can help visualize a GameObject in the Scene or Game view, especially if it does not have a mesh. Store the image files for these icons in the Gizmos folder.
Materials
These assets describe surface shading properties.
Meshes
Store models created in an external DCC application here.
Particles
Manage particle simulations in Unity, created either with the ParticleSystem or Visual Effect Graph.
Prefabs
These are reusable GameObjects with prebuilt components. Add them to a scene to build your levels and gameplay.
Scripts
All user-developed code for gameplay appears here.
Scenes
Unity stores small, functional portions of your project in scene assets. They often correspond to game levels or part of a level.
Settings
Assets store render pipeline settings for both HDRP and URP.
Shaders
These programs run on the GPU as part of the graphics pipeline.
Textures
Image files can consist of texture files for materials and surfacing, UI overlay elements for user interface, and lightmaps to store lighting information.
ThirdParty
If you have assets from an external source like the Asset Store, keep them separated from the rest of your project here. This makes updating your third-party assets and scripts easier. Third-party assets may have a set structure that cannot be altered.
The Sample Scene with the HDRP template includes several asset folders.
The Supported Asset Types manual page describes the most common assets in more detail. You can use the Template or Learn projects as an example of how to organize your folders effectively. While you’re not limited to these folder names, this list should give you a good starting point that you can expand upon as your project scales up. You are of course free to adapt the folder structure to your specific project’s needs and team preferences, as in the image below.
Organize folders for your project needs, but stay consistent once you decide on a structure.
Folder structure and naming While there’s no single way to organize your project, we recommend that you follow these best practices in general: —
Document your naming conventions and folder structure. A style guide and/or project template makes your files easier to find and organize.
Whatever naming convention you choose, make sure you remain consistent. Don’t deviate from your chosen style guide or template. If you do need to amend your naming rules, parse and rename your affected assets all at once with a script.
Don’t use spaces in file and folder names. Unity’s command line tools have issues with path names that have spaces.
Separate your testing or sandbox areas. Create a separate folder for non-production scenes and experimentation. Subfolders with usernames can divide your work area by team member.
Avoid extra folders at the root level. In general, store your content files within the Assets folder. Don’t create additional folders at the project’s root level unless absolutely necessary.
Scenes Scenes are where you work with content in Unity. They contain the objects of your game and can be used to create a main menu, individual levels, and anything else. In each unique scene, you will place the environments, obstacles, and decorations that roughly translate into one level of your game. This enables you to design and build your application piece by piece, keeping it modular. The scene files themselves are assets that are stored on disk. If you use Force Text Mode for Asset Serialization, they appear as text files; otherwise, they default to binaries. Scenes often represent a level of your game or a portion of a level. While demos and simple games might occupy just a single scene, most commercial games might use one scene per level, each with its own environments, characters, UI, etc.
You can create any number of scenes in a project, but be aware that how you structure your scenes can have a significant performance impact. For more info on scene organization and performance, check out our mobile performance optimization guide. You’ll need to create, create, load, and save scenes to represent different portions of your game and flesh out your application. A typical “scene flow” involves triggering the loading of another scene with an event. For example, you may have a menu scene that loads up a main gameplay scene when the user clicks the interface. Note that you can load scenes one at a time, or separate elements and load the scenes additively. When creating a new scene, Unity allows you to select from a set of Scene Templates. For example, the HDRP 3D Sample Scene comes with several templates. You can define your own scene templates to streamline your workflow and start everyone on your team with the same assets and configuration.
Scene templates in HDRP
Unity provides a SceneManagement API for loading or managing scenes from scripts. See this Learn tutorial on scene flow for more information.
The Hierarchy window The Hierarchy window displays every GameObject in the currently loaded scene’s assets. These include your models, Cameras, and Prefabs. Simply drag a GameObject to change its parenting. Adding or removing objects in the Scene view also adds or removes them from the Hierarchy window (and vice versa). The Hierarchy window can show more than one loaded scene at runtime, with each scene containing its own GameObjects.
The Sample Scene with the HDRP template includes several asset folders.
General tips for scenes and hierarchies —
Use named, empty GameObjects as spacers. Carefully organize your scenes to make it easy to
at (0,0,0). This simplifies code and reduces issues converting between local and world space. —
to put objects on the floor. Treat the world as a 2D
find objects. Keep these to a minimum, as every
space along the xz-plane for game logic, AI, and
GameObject matters. Balance your organizational needs with performance. Avoid unnecessary parenting for organization (see Use proper
Put your world floor at y = 0. This makes it easier
physics. —
Separate dynamic and static objects. If you generate moving objects at runtime, consider
parenting below).
keeping them organized under an empty placeholder object. Likewise, store non-moving level geometry in a different part of the hierarchy. This can help you apply the appropriate lighting techniques to your geometry (e.g., lightmapping versus probe lighting). —
Use proper parenting. Group related objects by function. Use common sense when creating
Caption: Empty game objects serve as spacers.
hierarchies (e.g., parent the tires so that they are children of the car body). Avoid unnecessary
Put maintenance Prefabs and empty
parenting when possible, as a flatter hierarchy
GameObjects at world origin. If a transform is not
is more performant. Follow these guidelines for
specifically used to position an object, it should be
scene hierarchies.
Naming standards While there is no definitive naming standard for GameObjects, consider the following standards and practices for your project. Standard
Example
Use descriptive names. Don’t abbreviate. Use names that you will remember several months from now. Consider whether another person will understand your notation, and choose names that you can pronounce and remember. Be aware that abbreviations can create confusion.
largeButton, LargeButton, or leftButton
Use Camel case/Pascal case. Avoid spaces in your object names. Camel case or Pascal case improve readability (and typing accuracy, according to this study).
OutOfMemoryException, dateTimeFormat,
NOT: lButton
NOT: Outofmemoryexception, datetimeformat
Use underscores (or hyphens) sparingly. Avoid underscores and hyphens in general. However, they can be useful in certain circumstances. Prefixing a name with an underscore puts it alphabetically first. You can also use underscores to denote variants of a specific object.
Active states: EnterButton_Active, EnterButton_Inactive maps: Foliage_Diffuse, Foliage_ Normalmap Level of detail: Building_LOD1, Building_LOD0
Use number suffixes to denote a sequence. Don’t suffix with a number if it’s not part of a list.
For a path, name the nodes:
Follow the design document naming.
If your design document names locations like HighSpellTower or RedDragonLair, use those exact spellings.
Node0, Node1, Node2, etc.
As with all naming standards, decide on what works for your team and apply it consistently.