Интерфейс Unity Editor
Интерфейс Unity Editor Unity предлагает гибкий модульный пользовательский интерфейс. Если вы раньше не работали с Unity Editor, начните с этого краткого обзора основных окон.
Основные окна Unity Editor
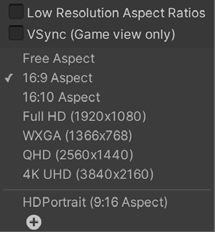
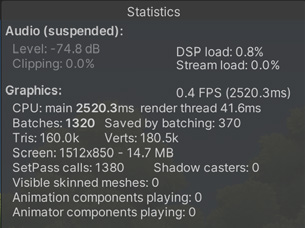
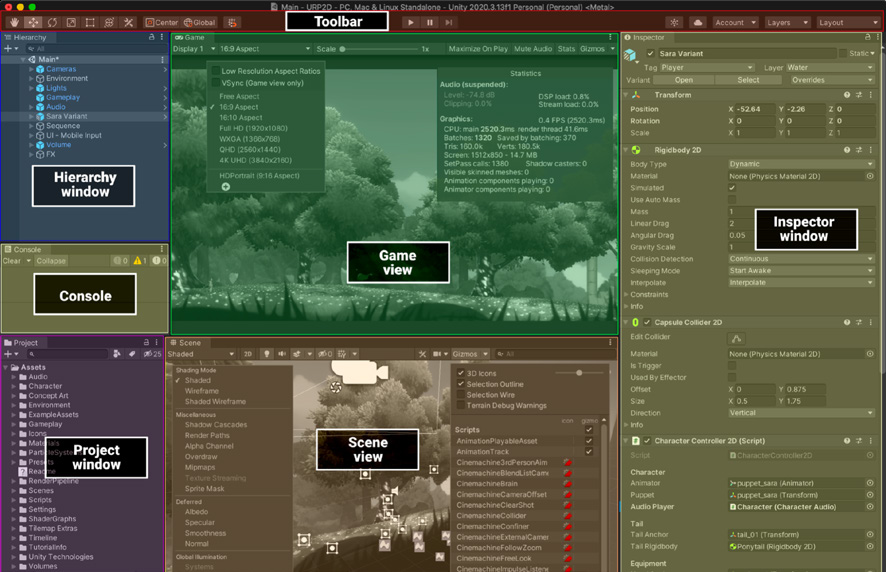
Основные окна Окно Game: здесь можно предварительно увидеть изображение с основной камеры игры и оценить, как игрок будет взаимодействовать с игрой. В правом верхнем углу находится окно Rendering Statistics со статистикой графики и звука, которая помогает оптимизировать приложение. Элемент Aspect Ratio в левом верхнем углу позволяет проверить несколько разрешений экрана или задать собственное целевое разрешение.
Статистика рендеринга
Aspect Ratio (соотноше ние сторон)
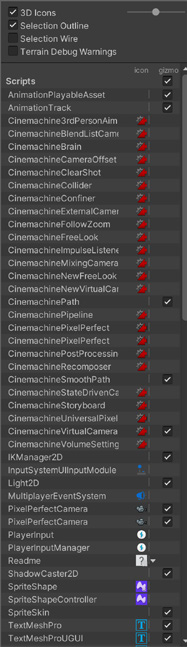
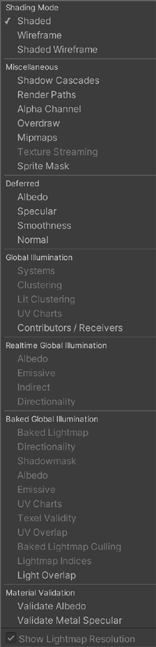
Окно Scene: здесь показаны объекты, составляющие каждую сцену. Именно в этом окне Unity Editor вы в основном будете размещать модели, источники света, физические тела и другие элементы. На панели управления можно изменить Draw Mode, что полезно для поиска неполадок и быстрой диагностики. Меню Gizmos управляет значками и накладной графикой отдельных GameObject.
Меню Draw Mode и Gizmos
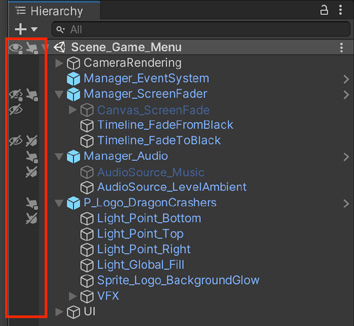
Окно Hierarchy: здесь показаны объекты активной сцены и родительско-дочерние связи между ними. Hierarchy предоставляет удобные средства переопределения видимости объектов и возможности выбирать их в окне Scene. Эти настройки интерфейса не влияют на окно Game. Они упрощают навигацию по сложным сценам с большим количеством GameObject.
Переопределение видимости и возможности выбора объектов в окне Scene
Окно Inspector: здесь отображаются свойства и настройки выбранных объектов, а также доступны широкие возможности настройки. Можно открыть отдельное окно Inspector для конкретного GameObject, ресурса или компонента, чтобы упростить сравнение игровых переменных и объектов сцены. Inspector позволяет изменять эти свойства во время выполнения, не обращаясь каждый раз к коду, благодаря чему тестирование становится интерактивнее, а работа идёт быстрее.
Окно Project: Unity хранит все ресурсы, из которых создаётся игра (Prefab, текстуры, модели, анимации и скрипты), в виде файлов на диске. Окно Project предоставляет удобный доступ к этим файлам. Его можно представить как каталог или библиотеку содержимого, где находятся игровые ресурсы. Для поиска конкретных ресурсов или их типов используйте строку Search. Панель инструментов: она расположена в верхней части Unity Editor и закреплена в строке заголовка окна приложения. Кнопки панели управляют режимом Play и позволяют проверить работу публикуемого приложения. Инструмент Hand перемещает область просмотра сцены, а Move, Rotate, Scale, Rect Transform и Transform служат для изменения GameObject. Окно Console: используется для отладки и отображает ошибки, предупреждения и другие сообщения, создаваемые Unity (см. класс Debug). Всё, что Unity или ваш код выводит в Console, также записывается в файл журнала.
Режим Play в Unity Editor В окне Game отображается изображение с одной или нескольких камер приложения; оно показывает итоговый вид опубликованного приложения. Любые изменения, внесённые в режиме Play, временны и сбрасываются после выхода из него. Интерфейс Unity Editor затемняется, напоминая, что изменения в режиме Play не сохраняются. Помните: чтобы управлять тем, что игрок видит во время выполнения, потребуется одна или несколько камер. Дополнительные сведения приведены на странице компонента Camera.
Более подробные сведения о каждой части интерфейса можно найти в соответствующем обзоре Unity Learn.
Editor interface Unity has a flexible, modular user interface. If you’ve never used the Unity Editor before, refer to this quick overview of the main windows.
The Editor’s main windows
The main windows Game view: This previews the game’s main camera and how a player will interact with the game. This includes the Rendering statistics window in the top right, which shows graphics and audio stats to help you optimize your application. In the top left, Aspect Ratio allows you to preview multiple screen resolutions or define your own target resolution.
Rendering statistics
Aspect ratio
Scene view: This view shows the objects that comprise each scene. You will primarily work here in the Editor to place models, lights, physics bodies, and so on. Use the control bar to change the Draw Mode, useful for troubleshooting and quick diagnostics. The Gizmos menu controls icons and overlay graphics for certain GameObjects.
Draw Mode and Gizmos menus
Hierarchy window: This window shows objects in the currently active scene and how they relate to one another in parent-child relationships. The Hierarchy includes a useful interface to override the visibility and pickability of objects in the Scene view. This UI does not affect the Game view. It’s designed to help you navigate complex scenes with a large number of GameObjects.
Scene visibility and pickability overrides Scene view
Inspector window: This shows properties and settings for the selected objects and offers powerful options for customization. Focused Inspectors can help you open an Inspector window for any specific GameObject, asset, or component to simplify comparison of gameplay variables or scene objects. Inspectors allow you to adjust them at runtime without needing to go into the code each time, making playtesting more interactive and facilitating a faster workflow. Project window: Unity stores all assets that create the game (Prefabs, Textures, models, animations, scripts) as files on disk. The Project window gives you easy access to these files – think of this as a content directory or library where your ingame resources reside. Use the Search bar to locate specific assets or types. Toolbar: This appears at the top of the Editor, locked to the Application window’s title bar. Use the buttons here to control the Editor Play mode and see how your published application plays. The Hand tool pans the scene, while the Move/Rotate/Scale/Rect Transform/Transform tools allow you to manipulate GameObjects. The Console window: The Console window is used for debugging and shows errors, warnings, and other messages generated by Unity (see the Debug class). Everything written to the Console window, either by Unity or by your own code, also outputs to a Log File.
Editor Play mode The Game view is rendered from the Camera(s) in your application. It represents your final, published application. In Play mode, any changes you make are temporary, and they are reset when you exit Play mode. The Editor UI darkens to remind you that any changes you make in Play mode are not saved. Remember that you will need to use one or more Cameras to control what the player sees at runtime. For more information, see the Camera component page.
For more specific information about each part of the interface, Unity Learn also includes an overview.