Ввод
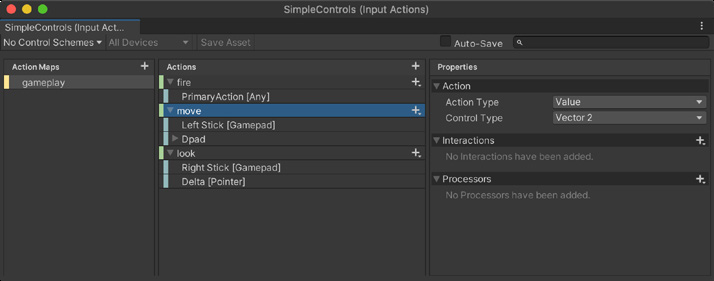
Ввод В Unity есть две основные системы обработки ввода: Input System, устанавливаемая через Package Manager, и встроенный класс Input. Input System Input System ориентирована на простоту использования, гибкость и единообразную работу на разных устройствах и платформах. Она заменяет встроенный класс Input. Хотя ввод по-прежнему можно получать непосредственно от устройства, преимущества Input System особенно заметны, когда для управления взаимодействием игрока создаётся набор абстрактных действий. Затем можно создать actionMap - набор привязок и действий. Карта действий связывает эти действия с конкретными устройствами.
Input System доступна через Package Manager.
Чтобы адаптировать управление к новым устройствам, создавайте дополнительные карты действий, а не жёстко привязывайте код к определённым кнопкам устройства, клавишам клавиатуры и т. п. Настройте функции обратного вызова и действия один раз, а затем добавляйте новые сопоставления для поддержки других устройств.
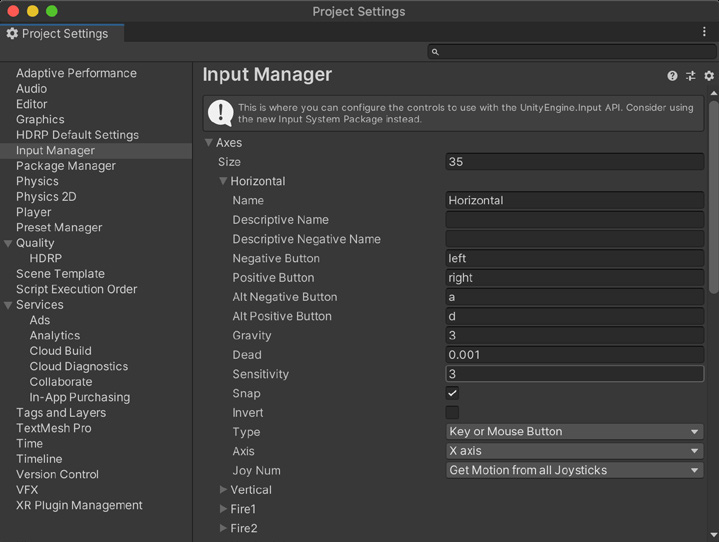
Карты действий также позволяют переключать схему ввода в зависимости от игрового контекста. Например, управление игроком может работать по-разному при вождении, ходьбе и беге. Обязательно ознакомьтесь с кратким руководством по Input System и установите примеры, доступные через Package Manager. Встроенный класс Input В качестве альтернативы используйте встроенный класс Input и Input Manager (Edit > Project Settings > Input Manager) с виртуальными осями
для клавиш, кнопок и других устройств ввода. Он также поддерживает мультитач-ввод и данные акселерометра на мобильных устройствах. Обратите внимание: при включении пакета Input System описанный выше встроенный Input Manager отключается.
Встроенный Input Manager
Ниже перечислены полезные классы и методы для работы с вводом: Input
Читает оси Conventional Game Input и предоставляет доступ к мультитач-вводу и акселерометру на мобильных устройствах.
Input.GetAxis
Возвращает сглаженное значение виртуальной оси axisName: от -1 до 1 для клавиатуры и джойстика; для мыши - текущее смещение, умноженное на чувствительность оси.
Input.GetAxisRaw
Аналог Input.GetAxis без сглаживания.
Input.GetButton
Возвращает true, пока виртуальная кнопка buttonName удерживается.
Input.GetButtonDown
Возвращает true в кадре нажатия виртуальной кнопки buttonName.
Input.GetKey
Возвращает true, пока пользователь удерживает клавишу name.
Input.GetKeyDown
Возвращает true в кадре начала нажатия клавиши name.
Input.touches
Доступный только для чтения список касаний за предыдущий кадр.
Touch
Описывает состояние пальца, касающегося экрана.
KeyCode
Перечисляет варианты клавиш, кнопок мыши и джойстика.
Обзор встроенной системы ввода см. на странице Input Manual.
Input Unity has two main systems for handling input, the Input System from the Package Manager and the built-in Input class. Input System The Input System is focused on ease of use, flexibility, and consistency across devices and platforms. It replaces the built-in Input class. While you can still get input directly from a device, the Input System shines when you create a series of indirect actions to drive player interaction. Then you can create an actionMap, a collection of bindings and actions. The action map can then relate those actions to the actual devices.
The Input System is available via the Package Manager.
If you want to adapt the input to more devices, you create more action maps rather than hard coding specific device buttons, keyboard keys, etc. Set up your callbacks and actions just once, then add additional mappings later to support more devices. Action maps also assist with switching input depending on your in-game context. For example, your player input can behave differently when driving a vehicle versus walking or running. Be sure to check out the Input System Quick start guide, and install some of the samples available through the Package Manager. Built-in input class You can alternatively use the original built-in Input class. This lets you utilize the Input Manager (Edit > Project Settings > Input Manager) to set up virtual axes for your keys, buttons, and other input devices. It also supports multitouch and accelerometer data on mobile devices. Note that enabling the Input System package (above) disables this built-in Input Manager.
The built-in Input Manager
Here are some useful classes and methods for input: Input
Used to read the axes set up in the Conventional Game Input and access multitouch/accelerometer data on mobile devices
Input.GetAxis
Returns the smoothed value for the virtual axis identified by axisName (value between -1 and 1 for keyboard/joystick devices); for a mouse device, returns the current mouse delta multiplied by the axis sensitivity
Input.GetAxisRaw
Like Input.GetAxis without the smoothing filter
Input.GetButton
Returns true while the virtual button identified by buttonName is held down
Input.GetButtonDown
Returns true during the frame the user pressed down the virtual button identified by buttonName
Input.GetKey
Returns true while the user holds down the key identified by name
Input.GetKeyDown
Returns true during the frame the user starts pressing down the key identified by name
Input.touches
A read-only list of objects representing status of all touches during the last frame
Touch
Structure describing the status of a finger touching the screen
KeyCode
Lists all of the key press, mouse and joystick options
For an overview of the built-in Input system, see the Input Manual page.