Настройка первого проекта Netcode
Setting up your first Netcode project
If you haven’t already tried Unity’s networking solutions, setting up a basic Netcode project involves importing the necessary networking packages and then configuring the necessary multiplayer components. This chapter will walk through your first steps to add networking to a sample project using Netcode for GameObjects. Remember that in Unity 6 you can use Multiplayer Center to set up a new multiplayer project, and Multiplayer Widgets for integrating additional Unity services into the project.
Before you begin Make sure you have the following: —
An active Unity account with a valid license
The Unity Hub
A supported version of the Unity Editor; some features demonstrated here require Unity 6 or higher, refer to the Netcode for GameObjects requirements
A connection to the Unity Cloud dashboard to connect to the Unity services your project will need; you can do this via the Unity Hub
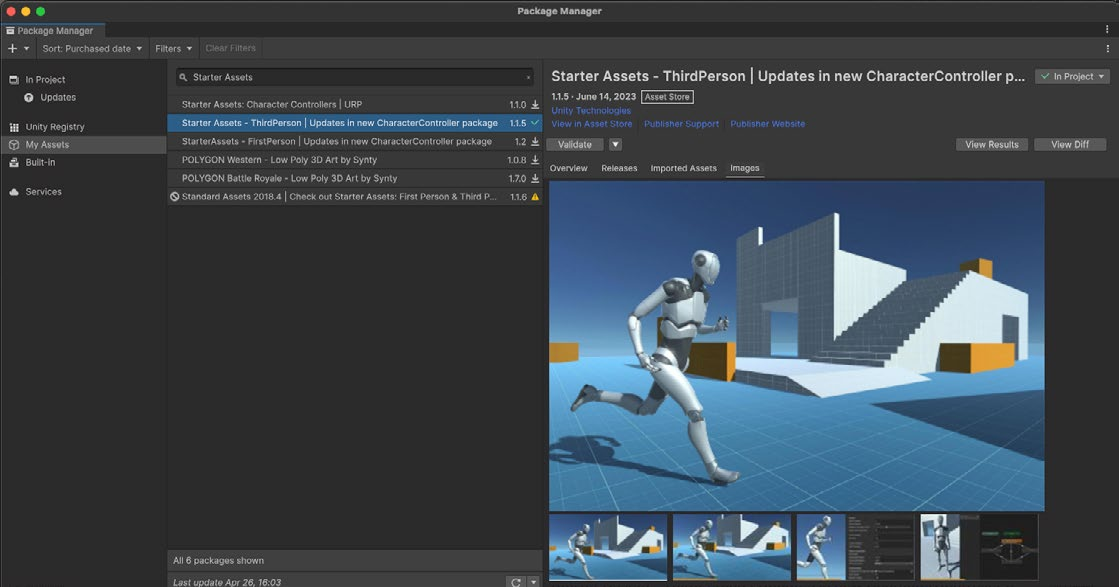
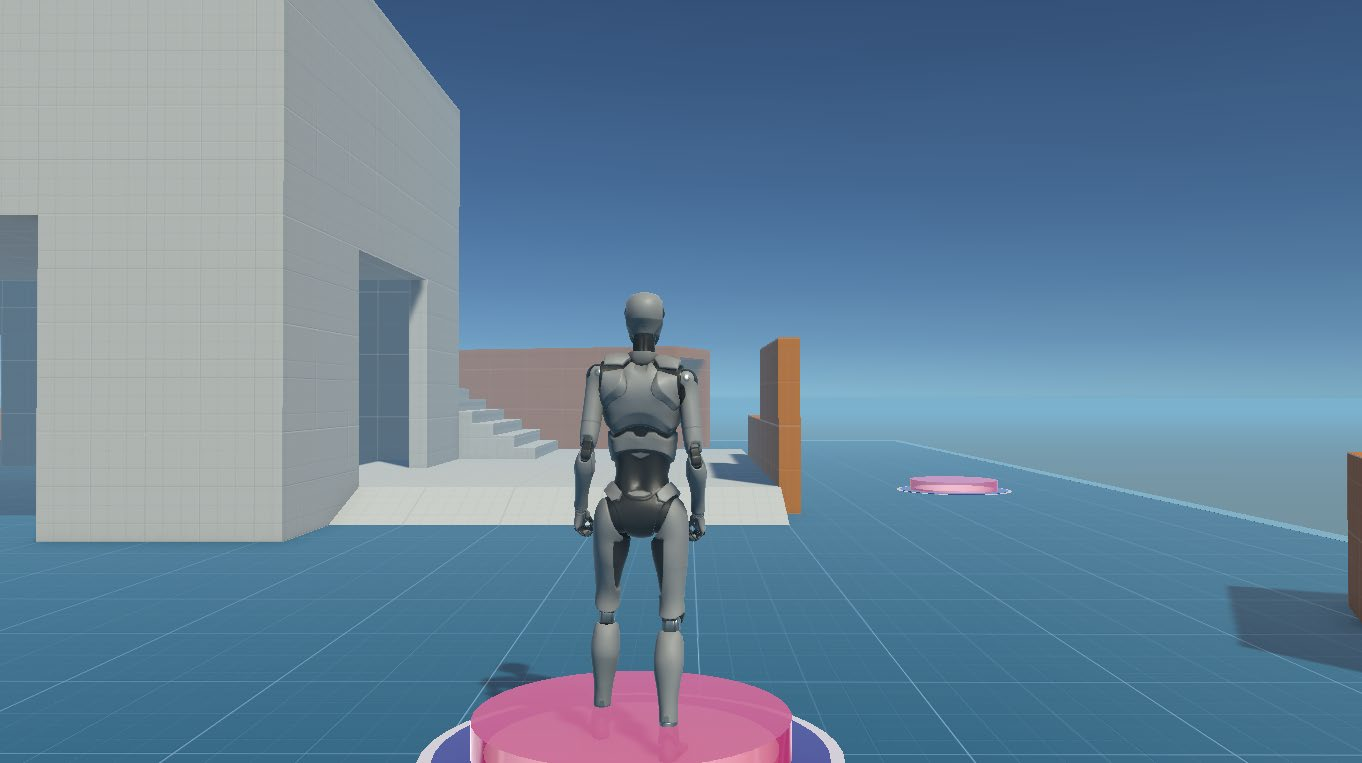
Sample project setup It’s helpful to demo these netcode tools on an existing project with single-player locomotion. In this guide, we’ll use the Starter Assets – ThirdPerson package from the Unity Asset Store. This simulates simple 3D gameplay with a humanoid character using the Universal Render Pipeline (URP). Get this free asset from the Unity Asset Store and then import it using the Package Manager.
The Starter Assets package from the Asset Store
This demo project includes a small testing playground scene and a configurable third-person controller. The goal is to run multiple copies of this application and then have different clients interact in the same environment.
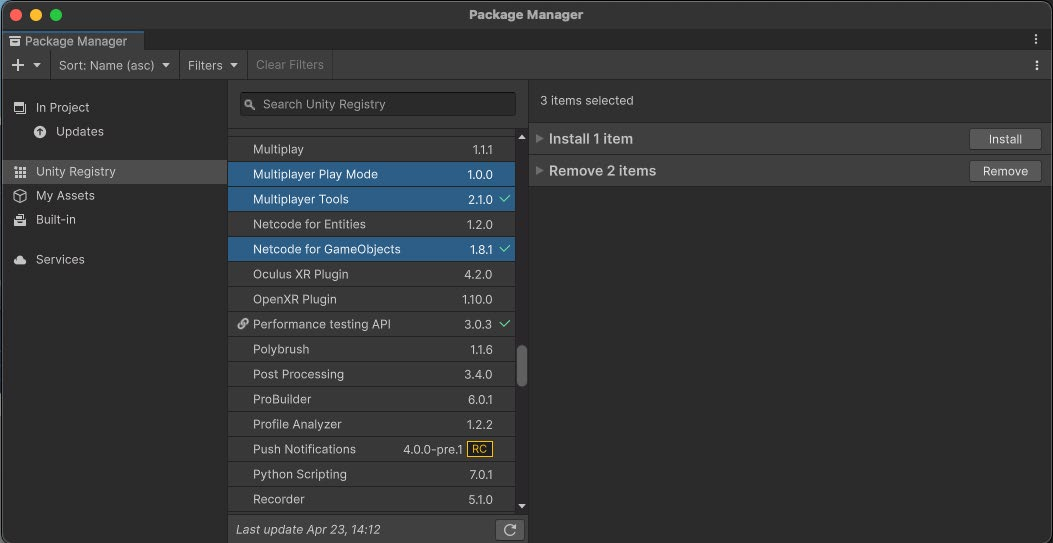
Installing Netcode for GameObjects In the Package Manager (Window > Package Manager), filter for the Unity Registry. Then install the following packages: —
Netcode for GameObjects: This is a foundational networking library that adds multiplayer capabilities to the existing GameObject/MonoBehaviour workflow. It streamlines multiplayer game development and is a great starting point for working with networked multiplayer.
Multiplayer Tools Window: This is an extra suite of five new tools introduced in Unity 6 that improve workflows for multiplayer development:
The Multiplayer Tools Window provides convenient access to all of the multiplayer tools and their documentation in one place.
The Network Simulator replicates real-world network conditions, such as packet delay, loss, and disconnections to identify potential issues before going live.
The Runtime Network Stats Monitor (RNSM) displays real-time network statistics, providing configurable onscreen monitoring of network performance.
Network Scene Visualization enhances debugging by visually displaying network activity and object ownership in the scene view.
The Hierarchy Network Debug view provides an overlay on the right-hand side of your Hierarchy window that identifies which objects are networked (with a small network cube logo).
Multiplayer Play Mode: This Unity 6 package enables you to test multiplayer functionality without leaving the Unity Editor. You can simulate up to four players (the Main Editor Player plus three Virtual Players) for faster playtesting.
Install Netcode for GameObjects and its supporting packages.
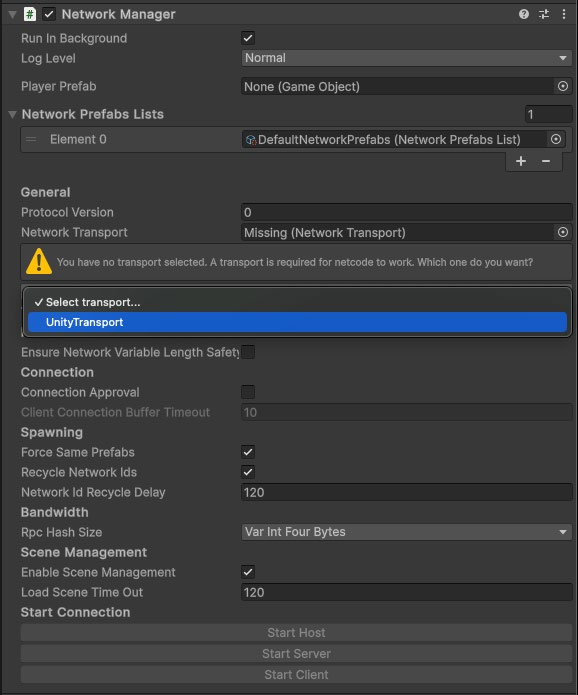
Adding the NetworkManager Every project will need a NetworkManager component to support networked multiplayer. This essential component manages the network state of your project, handling connections and network configurations. To add a NetworkManager to your scene, create a new GameObject in the Hierarchy and add the NetworkManager component (Netcode > NetworkManager). In the NetworkManager component, configure the Network Transport layer. Choose Unity Transport.
Select a transport layer in the NetworkManager.
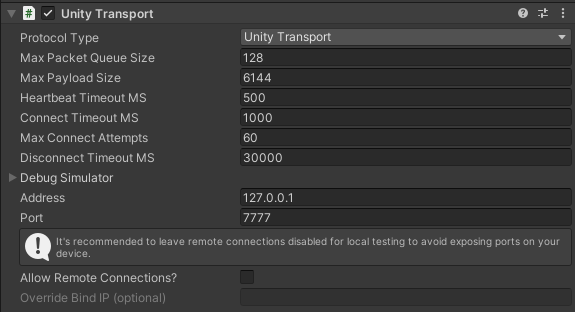
This attaches a UnityTransport component to the GameObject. The transport layer is responsible for low-level networking tasks, such as connection management, data transmission, and packet encryption.
The UnityTransport component
Though you don’t need to modify these settings yet, this component can help simulate network conditions (e.g., latency, packet loss, and jitter) for testing and debugging in the Editor. Save the scene and go to File > Build Settings and make sure your current scene is added to the Scenes in Build list. This ensures the new NetworkManager is included in the game build.
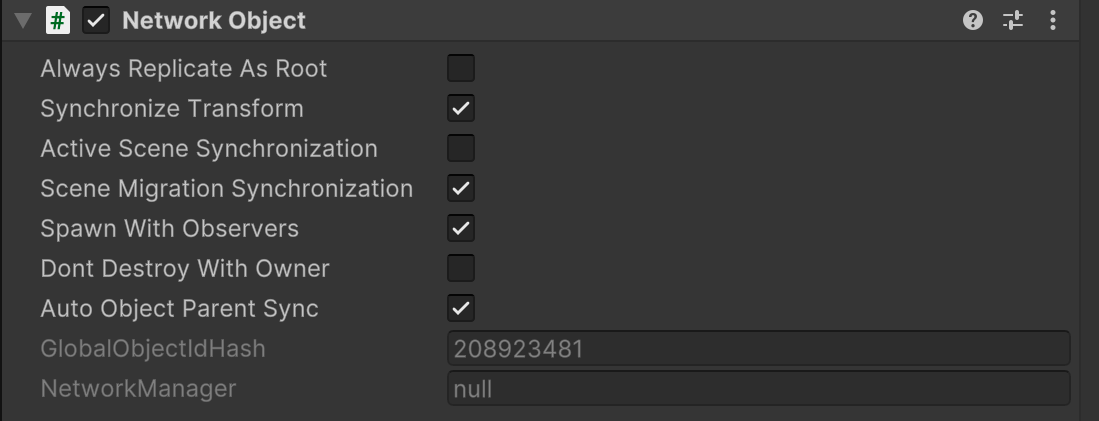
NetworkObjects NetworkObject is a required component for any GameObject that needs to be networked or synchronized across different clients in a multiplayer game. When you add a NetworkObject component to a GameObject, it becomes “networkable,” meaning that its state and behavior can be shared and updated across the network.
The NetworkObject component and its unique ID
Each NetworkObject has a few identifiers: —
The GlobalObjectIdHash identifies the prefab asset in the project.
The NetworkObjectId is the unique identifier that differentiates instances of the same prefab asset.
The OwnerClientId represents the client that “owns” the object (see Authority below).
These identifiers help the NetworkManager keep track of it and ensure that its state is consistent across all connected clients. NetworkObjects can be dynamically created (spawned) or destroyed during gameplay. Spawning a NetworkObject makes it appear on all connected clients. Each NetworkObject has an owner, typically the client that controls its behavior and state.
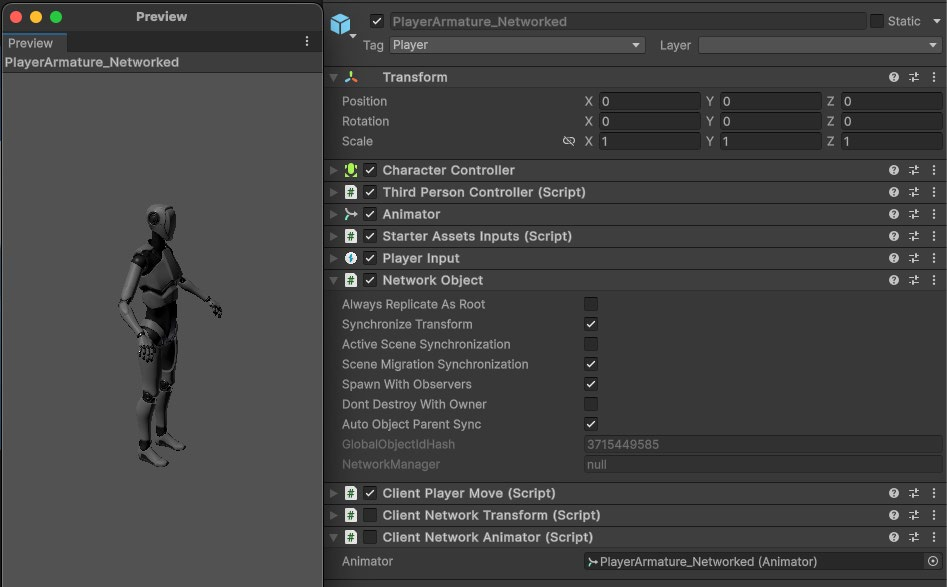
Player NetworkObjects Each player can optionally have their own prefab called a Player NetworkObject. This is a special type of NetworkObject that often contains the character controller and visual representation of the player in the game.
The Player NetworkObject in the sample project
Player NetworkObjects often store and sync player-specific data, such as the player’s name, score, inventory, or other relevant information. This data is synchronized across the network to ensure that all connected players have a consistent view of the game state. When a client connects, the NetworkManager creates a Player NetworkObject that is “owned” by the corresponding player. This means that the player has authority over their PlayerObject and can control its behavior and state. To set up a Player NetworkObject, start by creating a standard prefab GameObject in your project. This prefab acts as a template for the PlayerObject, containing the necessary components and scripts that define the player’s behavior and appearance.
Then, add the appropriate netcode components. These might include: —
NetworkObject: Every object that will be networkable needs a NetworkObject component. This contains properties and events related to spawning, despawning, and ownership.
NetworkBehaviours: These scripts add networking behavior to their MonoBehaviour base class. NetworkBehaviours contain network variables, remote procedure calls (RPCs), and network callbacks.
NetworkAnimators: This component syncs animation states and parameters between clients.
NetworkTransform: This component ensures that the player’s position, rotation, and scale are replicated in real-time from the server to all connected clients.
Player NetworkObjects are often responsible for handling player input. When a player performs an action, such as moving or interacting with the game world, the input is processed and then propagated to other connected players as needed. Player logic involves a combination of MonoBehaviours for direct game mechanics and NetworkBehaviours for managing network states. Non-networked components, such as character controllers and animators, function normally on each player’s local instance. Using these components locally not only optimizes performance but also reduces network traffic, which can be important when working with limited bandwidth between your clients.
Creating a Player NetworkObject Load up the Playground scene from the sample project.
The Starter Assets bundle includes a Playground scene.
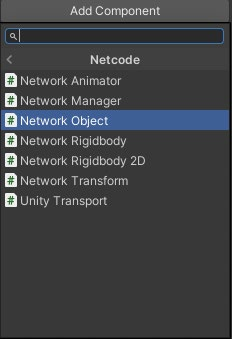
The Hierarchy includes a PlayerArmature that drives the game character. To convert this into a Player NetworkObject, drag it from the Hierarchy to create a new Original Prefab or modify a copy of the existing prefab in the project. In the Hierarchy window, locate the PlayerArmature GameObject. Delete it to remove the PlayerArmature and its child objects from the scene, leaving only the game environment in the scene. Then, edit the prefab in the Inspector. Add the NetworkObject component. This component is required for the object to be recognized and managed across the network.
Add the NetworkObject to the prefab.
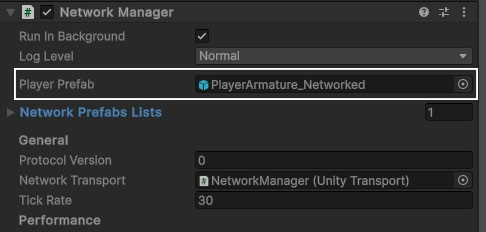
Register the Player NetworkObject in the Player Prefab field of the NetworkManager.
Register the Player NetworkObject in the NetworkManager.
Play mode only shows the game environment. The Player NetworkObject will only appear when a client connects. Select the NetworkManager, which now appears under DontDestroyOnLoad in the Hierarchy.
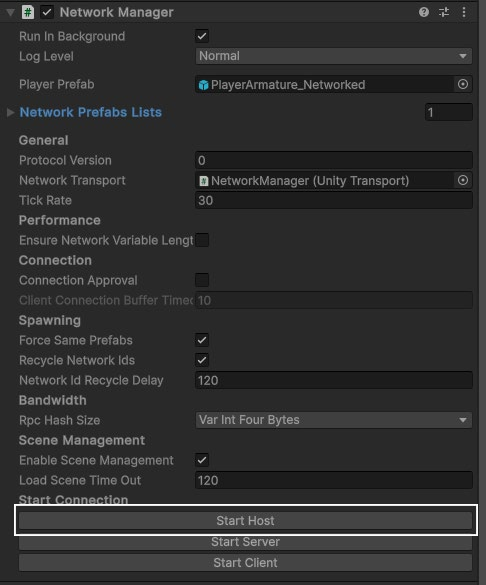
Start the host on the NetworkManager.
Select Start Host. This spawns the Player NetworkedObject. The PlayerArmature_Network object appears in the Hierarchy. The game is playable once again (though the camera target is disabled). Use the WASD controls to test the player movement. Exit Play mode and the player character disappears. The NetworkManager now spawns and manages this specific player character at runtime. Keep in mind that the networked aspect of the game won’t be apparent until you have multiple clients connected. We’ll need to test with several clients to understand how this works in a multiplayer scene.
Multiplayer Play Mode Testing multiplayer requires running the application across separate runtime processes. Previously, this involved making a separate game build and running it alongside the Unity Editor. While you still have that option, Unity 6 includes Multiplayer Play Mode (MPPM). MPPM enables developers to open multiple instances of the Unity Editor simultaneously, replicating a multiplayer environment. This streamlines the multiplayer testing process. Install Multiplayer Play Mode via the Package Manager. Then, you won’t need to build the application every time you need to test a new feature. Open Multiplayer Play Mode (Window > Multiplayer Play Mode).
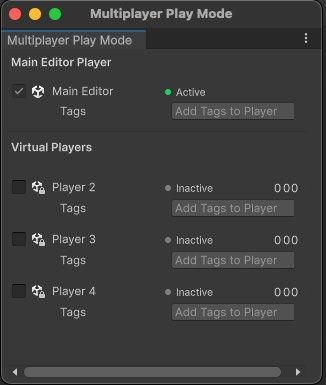
The Multiplayer Play Mode window
Then, check at least one additional Virtual Player from the list in the above screenshot, so you can test a minimum of one host and client. Remember that the host is a client that is also running on the server. When entering Play mode, a second session of the application starts running in a cloned window.
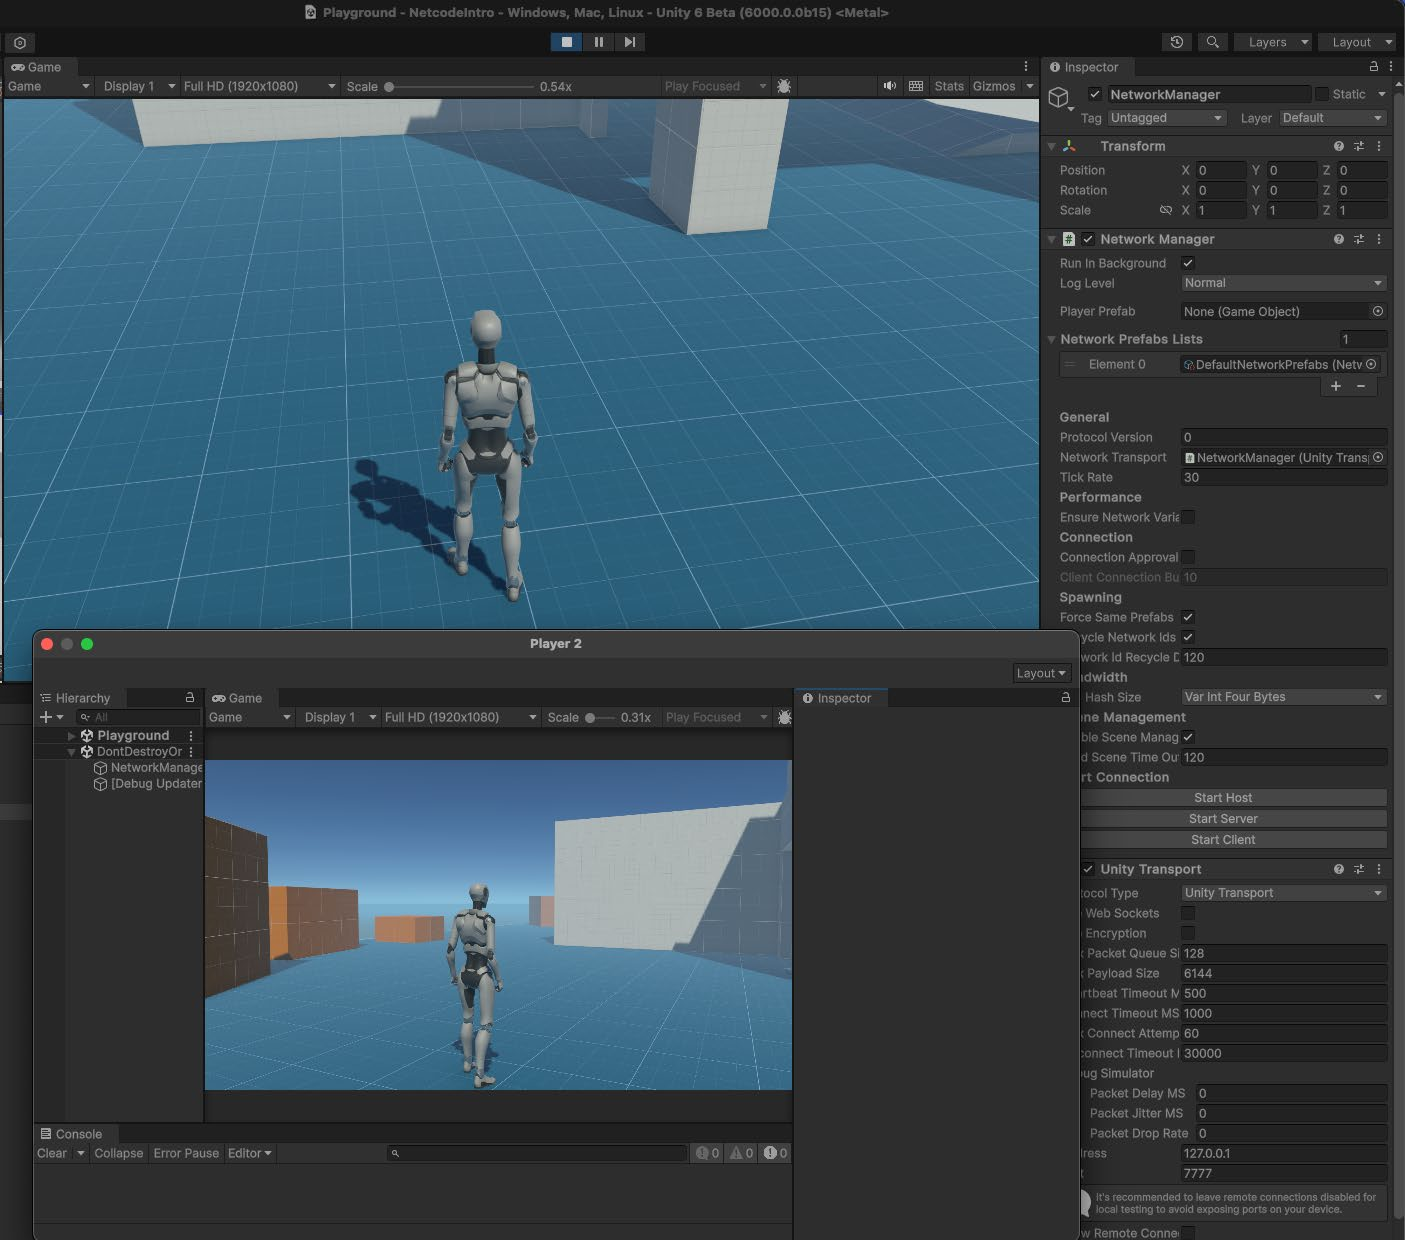
Multiplayer Player Mode clones a Virtual Player.
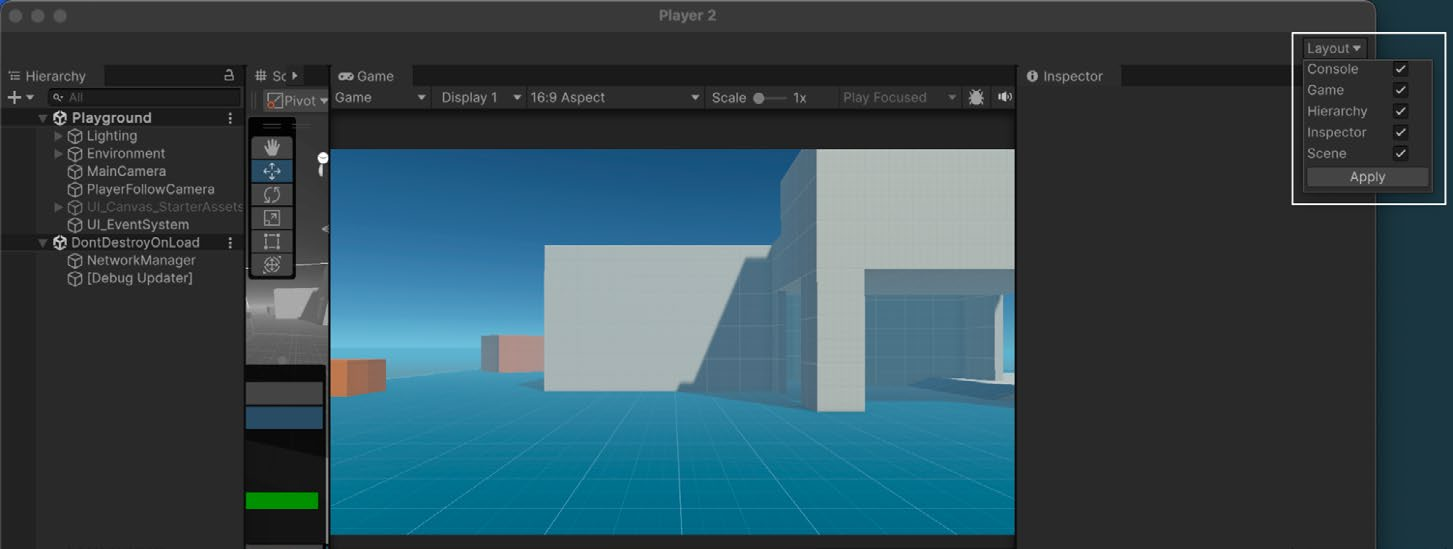
Select the NetworkManager in the Hierarchy. Under Start Connection in the Inspector, select Start Host. The PlayerArmature_Networked object appears in the Game view. Use the Layout button in the second window to enable the Inspector and Hierarchy – much like a second session of the Editor. Select the user interface components to enable and press Apply.
Enable the Layouts in the cloned window.
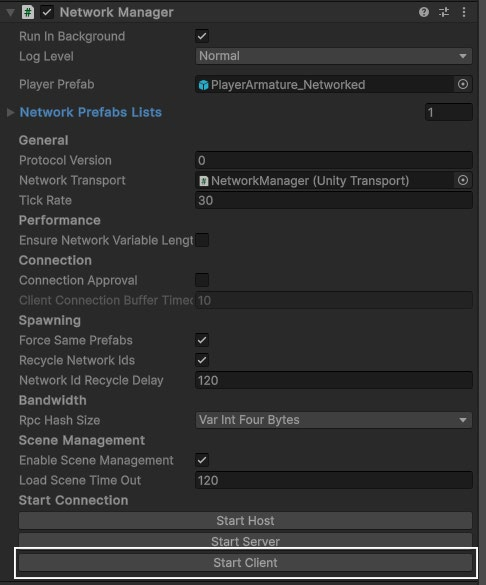
In the cloned Editor window, locate the NetworkManager under DontDestroyOnLoad in the Hierarchy. In the Inspector pane, under Start Connection, select Start Client.
The NetworkManager contains buttons to connect the client.
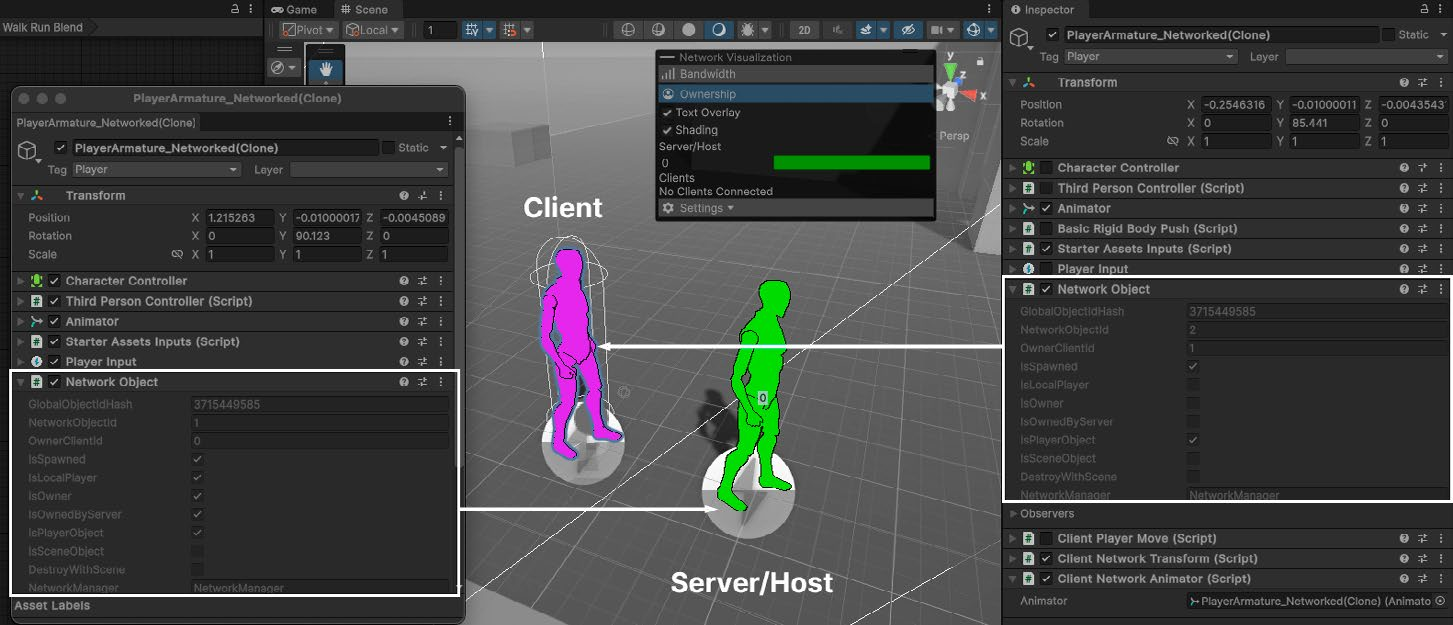
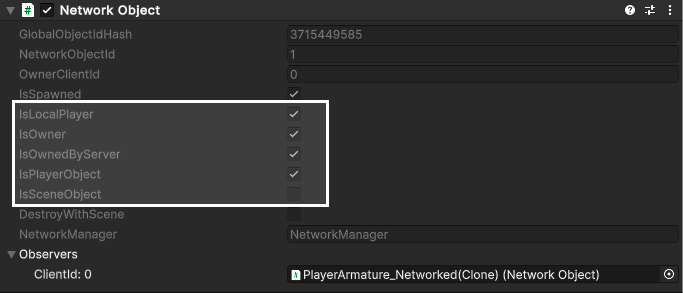
Two instances of PlayerArmature_Networked now appear in the Hierarchy. In the Scene view, they appear on top of one another. Using the keyboard or gamepad, move one player instance away from the other to separate them. Select a PlayerArmature_Networked instance in the Hierarchy to inspect its NetworkObject component. At runtime, note how each instance is identified by its GlobalObjectIdHash (project asset ID) together with its NetworkObjectId (unique instance index). Below that, the OwnerClientId indicates whether the host or the client controls the instance. Switch between the two instances to compare the flags: IsSpawned, IsLocalPlayer, IsOwner, IsOwnerByServer, etc.
Compare the NetworkObject settings between the two instances.
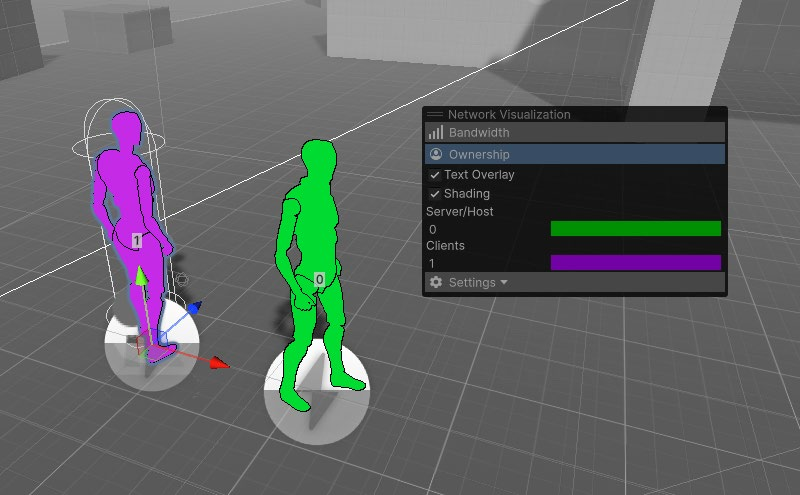
Use the Network Visualization panel to distinguish between the two instances more clearly. This handy diagnostic tool appears in the Scene view once you’ve installed the Multiplayer Tools package. The two instances are color coded by Bandwidth (how much data is being transmitted) or Ownership (which client has authority over the Player NetworkObject).
Network Visualization helps to debug the network objects.
Though the NetworkManager creates separate instances for each client, each independently controls the same character. In the Scene view, the character movements driven by WASD controls are not synchronized between the client and host. Although the NetworkManager initially synchronizes their positions at coordinates (0, 0, 0) when players first connect, their subsequent movements are not. Currently several local components drive the character’s behavior: —
A CharacterController allows for the player to move while interacting with the game environment, without requiring complex physics calculations.
An Animator enables animation based on a state machine. The Animator controls the transitions and blending between running, jumping, or idle states.
PlayerInput handles per-player input management, device pairing, and event notifications, providing a high-level wrapper around the Unity Input System.
StarterAssetsInputs translates that input into values for the character’s movement, look, jump, and sprint inputs.
These are single-player components. To make these work in a multiplayer application, we need to add some networked scripting.
Creating your own UI start buttons To create a more user-friendly way to start network sessions at runtime, you can add onscreen buttons that replicate the functionality of the NetworkManager’s Inspector buttons. This can be achieved using either Unity UI (UGUI) or UI Toolkit. In your UI of choice, create three buttons labeled Client, Host, and Server. Then, have them invoke these respective callbacks from the NetworkManager singleton: —
NetworkManager.Singleton.StartClient
NetworkManager.Singleton.StartHost
NetworkManager.Singleton.StartServer
These callbacks allow you to start the network session without using the buttons from the Inspector window.
Adding NetworkBehaviour To manage the MonoBehaviours on the PlayerArmature_Networked, we can use a NetworkBehaviour. A NetworkBehaviour is a specialized type of MonoBehaviour, designed for networked logic. It provides the framework necessary for synchronizing actions and states across different game clients. NetworkBehaviour shares the same lifecycle events as MonoBehaviours but also incorporates several network-specific features: RPC Methods: NetworkBehaviours can utilize remote procedure calls (RPCs) to handle communications across the network. These methods are annotated with the [Rpc] attribute. To send an Rpc to a server or client, call [Rpc(SendTo.Server)] and [Rpc(SendTo. Client)], respectively. —
NetworkVariable: This is a specialized variable designed for synchronized state management across the network. Changes to a NetworkVariable on the server are automatically propagated to all clients.
OnNetworkSpawn and OnNetworkDespawn: These lifecycle methods are triggered when a NetworkBehaviour is instantiated or destroyed. OnNetworkSpawn is used for initialization (think of OnEnable or Start except for networked behavior). OnNetworkDespawn handles cleanup before an object is removed from the network (e.g., analogous to OnDestroy or OnDisable).
Ownership: NetworkBehaviour allows specific clients (or the server) to have ownership over certain objects. This concept of authority, where either a client or the server can “own” a NetworkObject, ensures that only designated players should be able to control or interact with specific objects.
We can implement a NetworkBehaviour called ClientPlayerMove to manage the player movement. This can make sure that input from the host and the client only works on their respective player objects. Here’s the example setup:
using Unity.Netcode;
using StarterAssets;
using UnityEngine;
using UnityEngine.InputSystem;
namespace NetcodeDemo {
    public class ClientPlayerMove: NetworkBehaviour {
        [SerializeField] CharacterController m_CharacterController;
        [SerializeField] ThirdPersonController m_ThirdPersonController;
        [SerializeField] PlayerInput m_PlayerInput;
        [SerializeField] Transform m_CameraFollow;
        private void Awake() {
            m_PlayerInput.enabled = false;
            m_ThirdPersonController.enabled = false;
            m_CharacterController.enabled = false;
        }
        public override void OnNetworkSpawn() {
            base.OnNetworkSpawn();
            enabled = IsClient;
            // Enable if this is a client. if (!IsOwner) {

                // Disable if this is not the owner enabled = false;

                m_PlayerInput.enabled = false;
                m_CharacterController.enabled = false;
                m_ThirdPersonController.enabled = false;
                return;
            }
            // Enable if this is an owner m_PlayerInput.enabled = true;

            m_CharacterController.enabled = true;
            m_ThirdPersonController.enabled = true;
        }
    }
}
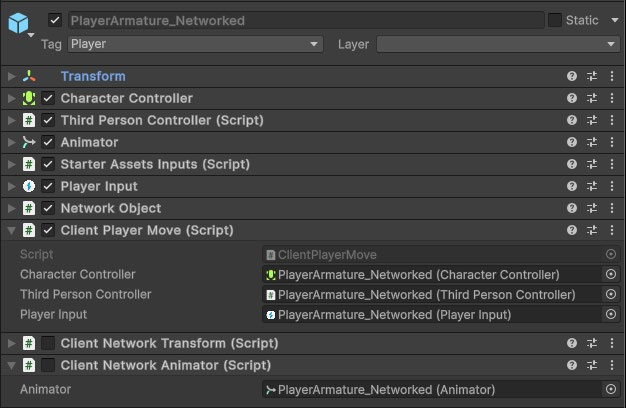
Add this to the PlayerArmature_Networked prefab. Then fill out the appropriate fields in the Inspector.
Fill out the ClientPlayerMove fields in the Inspector.
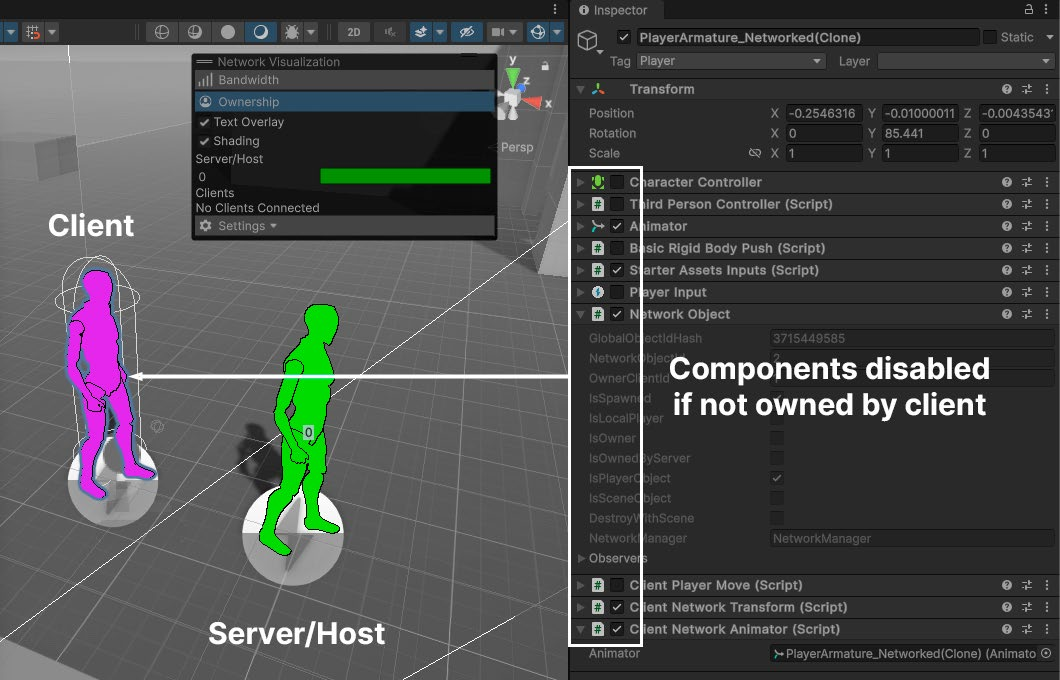
Once this script is applied to the prefab, connect the host and client sessions. When clients connect to the NetworkManager, certain components of the player object are disabled by default due to the IsOwner property, which checks if the local player is the owner of the instance. In the Hierarchy, toggle the selection between the two instances of PlayerArmature_ Networked.
Several components disable themselves if not the owner.
Note how several components (like the PlayerInput) now appear deactivated on player instances not owned by the respective client. For the host, this setup allows control over one of the player instances, and for the client, control over the other. However, though we can control different player instances, their movements are not synchronized across the network. To make the movement match from host to client, we’ll need to add additional network components like NetworkTransform.
Authority and ownership properties By default, the server owns NetworkObjects, although connected and approved clients can also own NetworkObjects using the SpawnWithOwnership method. Netcode for GameObjects is server-authoritative, which means that only the server is authorized to spawn and despawn NetworkObjects. NetworkBehaviour includes some quick ways to determine the authority and ownership of an instance: —
IsClient indicates if the instance is running on a client.
IsServer indicates if the instance is running on a server.
IsHost indicates if the instance is running on a host, which is both a server and a client.
IsLocalPlayer indicates if the associated NetworkObject is the local player object.
IsOwner indicates if the local player owns the object or if the object is the local player object.
IsPlayerObject indicates if the GameObject represents a network player, typically controlled by a specific client.
IsSceneObject indicates if the GameObject is part of the scene by default and not spawned dynamically during gameplay. A scene object is usually managed by the server for consistent state across the network.
Inspecting the NetworkObject at runtime shows some of these properties.
The NetworkObject settings
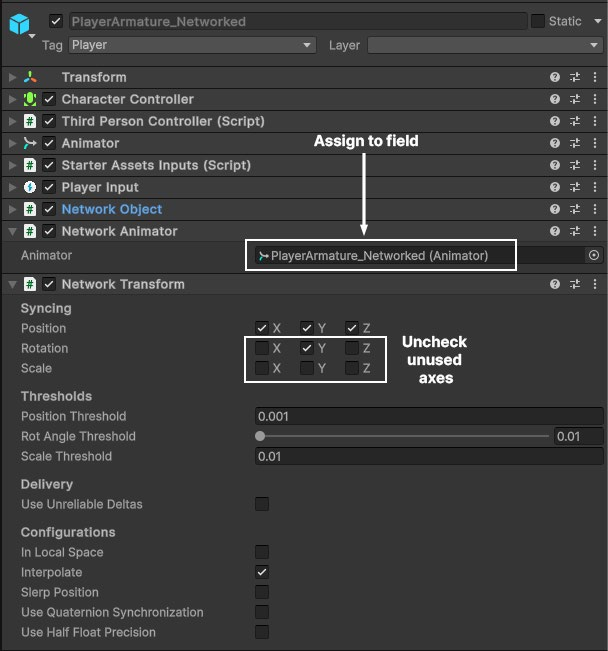
Sync using a NetworkTransform and NetworkAnimator Though the NetworkBehaviour lets us spawn the same player instance on multiple clients, synchronizing its movements across the network requires additional components. Add a NetworkTransform component to the PlayerArmature_Networked prefab. Uncheck any axes which won’t affect gameplay; in this case, uncheck all scales, as well as x rotation and z rotation axes. Because synchronization uses bandwidth, it’s essential to minimize syncing any superfluous data. In Multiplayer Play Mode, focusing on the host window allows you to move the player using the controls and watch it sync to the client. This demonstrates the beginning of networked play. Next add the NetworkAnimator component to the PlayerAramature_Networked. Drag the existing Animator component into the empty field.
Add a NetworkTransform and NetworkAnimator component.
The client window represents a second machine that is connected to the host. Ideally, any actions performed on the host are reflected on the client and vice versa. The NetworkTransform allows you to sync the position, rotation, and scale of a Transform, while the NetworkAnimator syncs the animation states. Now when your host player runs around the playground environment, its movements transfer to the client in Multiplayer Play Mode. However, not everything works as expected. Switch focus to the client window and try using the controls. While the host syncs correctly to the client, the client’s movements may not reflect on the host.
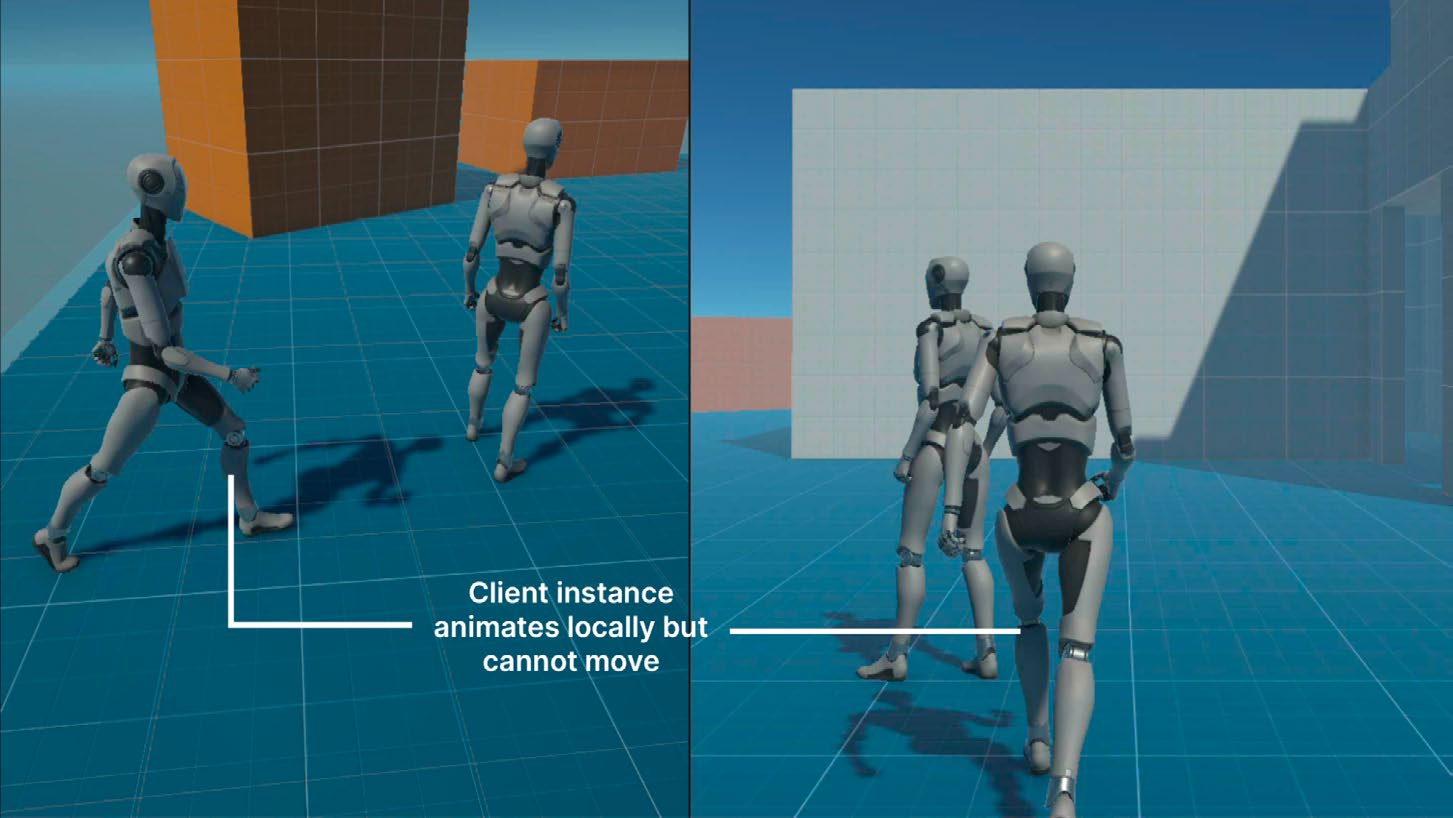
The player appears to run in place.
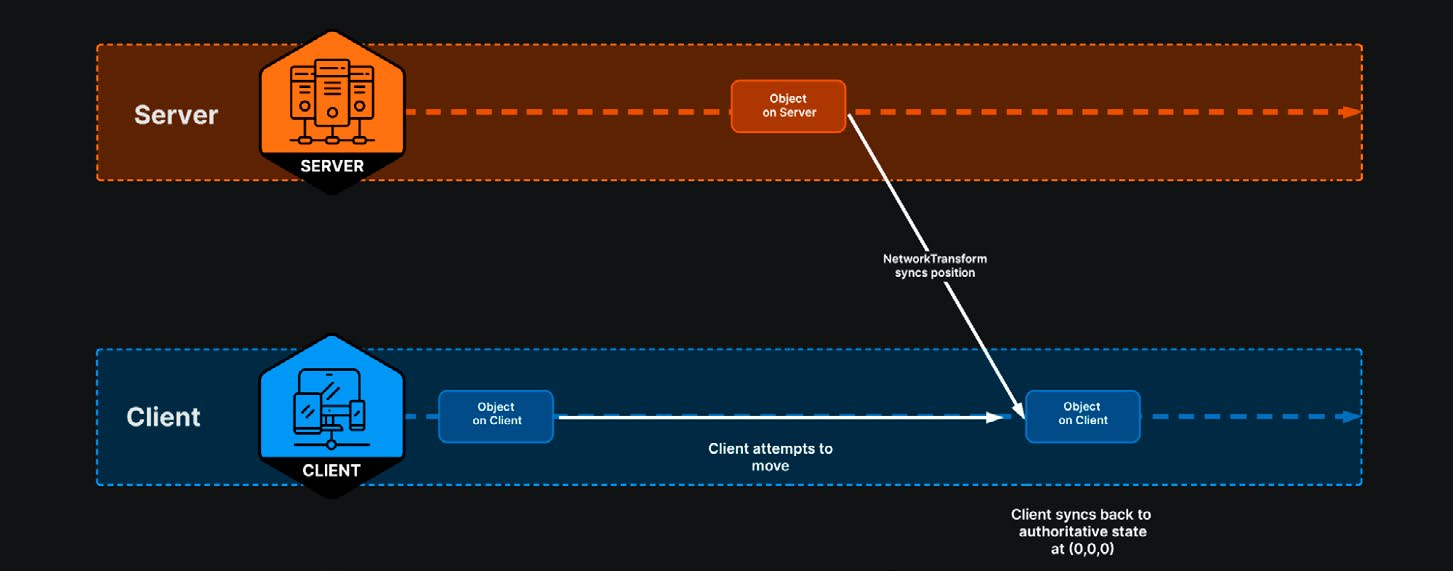
The client receives input, as indicated by the character animating in place, but the player instance doesn’t move. This happens because the NetworkTransform operates under server authority, syncing only the server’s position to the client. When you try to move the player on the client, the server overrides the client’s desired position, resetting it to (0, 0, 0).
Applying client authority By default, NetworkTransform operates in server authoritative mode. Changes to the transform axis are detected on the server-side and pushed to connected clients. In our example, trying to transform the player on the client fails because the server – maintaining an authoritative state with the transform set to (0,0,0) – overrides these client-side changes.
Server authority overrides the client.
To resolve this, one approach is to transfer authority from the server to the client. This allows the client to control its own transform without being overridden by the server. To implement this behavior, we can create a ClientNetworkTransform component, as seen in the following code example, that switches the server authority for owner authority:
using Unity.Netcode.Components;
using UnityEngine;
namespace NetcodeDemo {
    [DisallowMultipleComponent] public class ClientNetworkTransform : NetworkTransform {
        protected override bool OnIsServerAuthoritative() { return false; }
    }
}
This overrides the OnIsServerAuthoritative method and returns false. On the Player NetworkObject prefab, replace the NetworkTransform with the custom ClientNetworkTransform. Similarly, we can also create a client-driven NetworkAnimator:
using Unity.Netcode.Components;
using UnityEngine;
namespace NetcodeDemo {
    [DisallowMultipleComponent] public class ClientNetworkAnimator: NetworkAnimator {
        protected override bool OnIsServerAuthoritative() { return false; }
    }
}
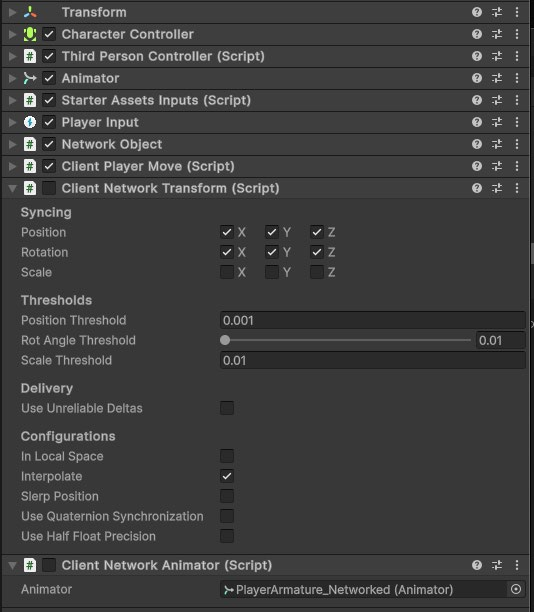
Replace the NetworkAnimator with the ClientNetworkAnimator. Remember to set the Animator field in the Inspector.
The ClientNetworkTransform and ClientNetworkAnimator.
In Multiplayer Play Mode, you can now move the player from the client and its position and animation states should sync properly to the host. Client-driven behaviors are also a way to reduce latency in networked applications. In “owner authoritative mode,” networked behaviors can act immediately and responsively. The client doesn’t need to wait for a packet to make a round trip to the server and back. However, exercise care when creating such client-driven behaviors: they can improve the user experience for each player, but also introduce security risks. Owner authoritative mode opens your application to mods or hacks; in any online competitive game, players will cheat if given the chance. To prevent this and make your application more secure, opt for server authority.
Owner authoritative mode components Though you can create the scripts in the above examples yourself, you can also get prebuilt ClientNetworkTransform and ClientNetworkAnimator components from the Multiplayer Samples Utilities package in the Unity project, Boss Room. (com.unity. multiplayer.samples.coop). Note that this implementation of the ClientNetworkTransform comes with potential issues: —
Ownership transfer: Ownership doesn’t always switch smoothly, sometimes causing objects to jump or even get out of sync.
Hierarchical ownership: There’s no support for a ClientNetworkTransform as a child under a server-managed NetworkTransform.
Update rejection: Servers can’t reject updates from clients since the system only recognizes client ownership, not joint client-server ownership.
Object movement at instantiation: The server can’t move an object when it’s first created under client ownership.
In many cases, the ClientNetworkTransform can be a viable way to handle client ownership transforms. However, consider these limitations before implementing them as part of your project.
Syncing with server authority Though you can allow some client authority for responsive gameplay, some movements can only be done on the server side. Generally, you should use server authority to prevent any potential imbalances or unfair advantages that could arise from client-controlled actions. For instance, allowing clients to choose their spawn locations on the game map could give them an undue advantage, depending on the layout of the map. Instead, it’s more equitable to have the server randomly assign them to one of a set of predetermined spawn points.
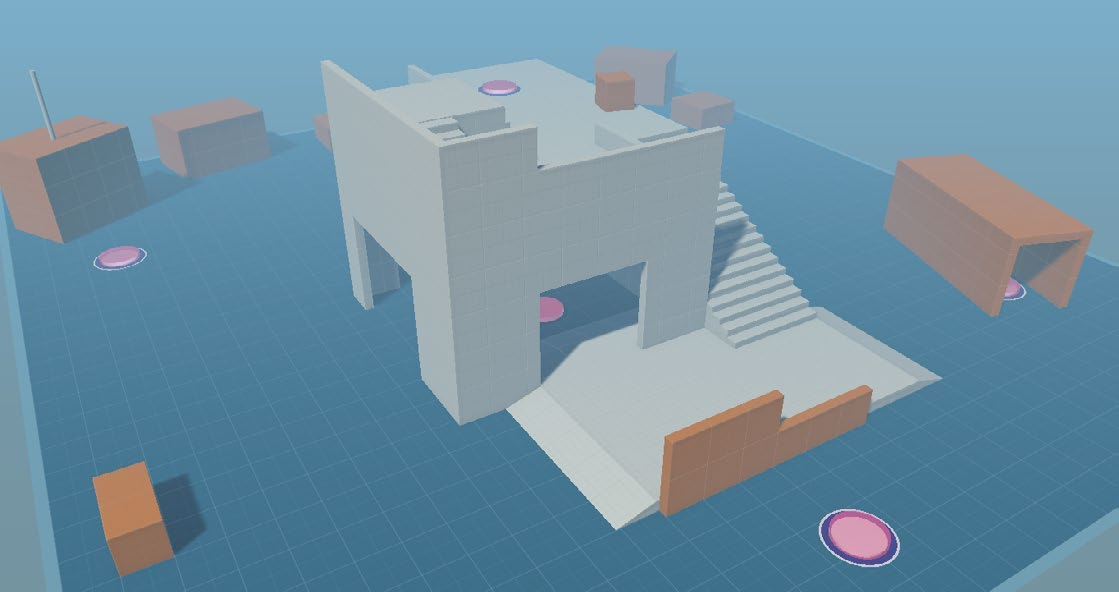
To manage this, define some objects with some simple visuals and then scatter them where you want players potentially to spawn.
Spawn points are strategically placed throughout the level.
A non-networked MonoBehaviour can manage them. Here, the ServerPlayerSpawnPoints class contains a list called m_SpawnPoints that references each spawn point GameObject. This sample implementation also uses a generic singleton pattern, borrowed from the Unitymade Asset Store project Level up your code with design patterns and SOLID:
public class ServerPlayerSpawnPoints : Singleton<ServerPlayerSpawnPoints> {
    [SerializeField] private List<GameObject> m_SpawnPoints;
    public GameObject GetRandomSpawnPoint() {
        if (m_SpawnPoints.Count == 0) return null;
        return m_SpawnPoints[Random.Range(0, m_SpawnPoints.Count)];
    }
}
A NetworkBehaviour called ServerPlayerMove can then use the instance of ServerPlayerSpawnPoints to pick a spawn point at random.
using Unity.Netcode;
using UnityEngine;
[DefaultExecutionOrder(0)] // Execute before ClientNetworkTransform

public class ServerPlayerMove : NetworkBehaviour {
    public override void OnNetworkSpawn() {
        // Only execute on the Server if (!IsServer) { enabled = false; return; }

        SpawnPlayer();
        base.OnNetworkSpawn();
    }
    // Move to the next available position when spawning

    void SpawnPlayer() {
        var spawnPoint = ServerPlayerSpawnPoints.Instance.GetRandomSpawnPoint();
        var spawnPosition = spawnPoint ? spawnPoint.transform.position : Vector3.zero;
        transform.position = spawnPosition;
    }
}
All of the logic happens in OnNetworkSpawn. Every time a client connects, a call to SpawnPlayer starts the player at a randomly selected spawn. The IsServer check makes sure that this only happens on the server, which maintains the authoritative game state. Add the ServerPlayerMove script to the PlayerArmature_Networked prefab. When you enter Multiplayer Play Mode, each client will connect and spawn at a random point within the playground environment. This implementation shows how NetworkBehaviours can interact with elements in the scene that aren’t network-controlled. Here, it leverages static data and scene objects already set up in the Hierarchy. When a client connects, the ServerPlayerMove only needs to retrieve one random spawn point from the existing gameplay scene. This limits the amount of data transmitted over the network.
The player appears at a random spawn point.
Some important points: —
Because the ClientNetworkTransform is owner authoritative, it’s important to disable the CharacterController component during Awake. Re-enable the CharacterController after ServerPlayerMove positions the player to prevent it from overriding the calculated values and resetting to world center.
Likewise, fill out the m_SpawnPoints in the Inspector to prevent the players from spawning at (0,0,0).
Set the DefaultExecutionOrder attribute with a lower value to ensure that ServerPlayerMove executes before ClientPlayerMove. For example, using [DefaultExecutionOrder(0)] prioritizes ServerPlayerMove, allowing it to run first.
Our multiplayer project now has the capability of connecting multiple clients to a host. In the game, third-person player characters are able to spawn at designated positions within the level and synchronize their movements and animations in real-time. This synchronization is essential for the multiplayer experience. Components such as NetworkTransform and NetworkAnimator facilitate this process right out of the box, but for gameplay, you’ll need to customize your own NetworkBehaviours as well.
Next, let’s explore additional methods for synchronizing data and game states across the network.
Singleton design pattern A singleton provides a convenient means of accessing a unique instance of a particular type at runtime. However, singletons can introduce extra dependencies, so be aware of their drawbacks. In Netcode for GameObjects, you’ll use singletons every time you refer to the NetworkManager.Singleton. The sample project also includes an example of a generic singleton for use with any MonoBehaviour type. For a deeper understanding of singletons, refer to the e-book Level up your code with design patterns and SOLID. This guidebook also demonstrates alternative patterns like events or event channels for object communication in your scene.
Get the free Unity e-book on design patterns. See the Unity best practices hub for all advanced guides for programmers, technical artists, artists, and designers.