Настройка первого проекта Netcode
Настройка первого проекта Netcode
Если вы еще не работали с сетевыми решениями Unity, для создания базового проекта Netcode потребуется импортировать необходимые сетевые пакеты и настроить многопользовательские компоненты. В этой главе мы добавим сетевое взаимодействие в демонстрационный проект с помощью Netcode for GameObjects. Напомним, что в Unity 6 новый многопользовательский проект можно настроить через Multiplayer Center, а дополнительные сервисы Unity интегрировать с помощью Multiplayer Widgets.
Прежде чем начать Убедитесь, что у вас есть: - Активная учетная запись Unity с действующей лицензией. - Unity Hub - Поддерживаемая версия Unity Editor. Для некоторых показанных возможностей требуется Unity 6 или новее; подробности см. в требованиях Netcode for GameObjects.
- Доступ к Unity Cloud Dashboard для подключения необходимых проекту сервисов Unity; настроить его можно через Unity Hub.
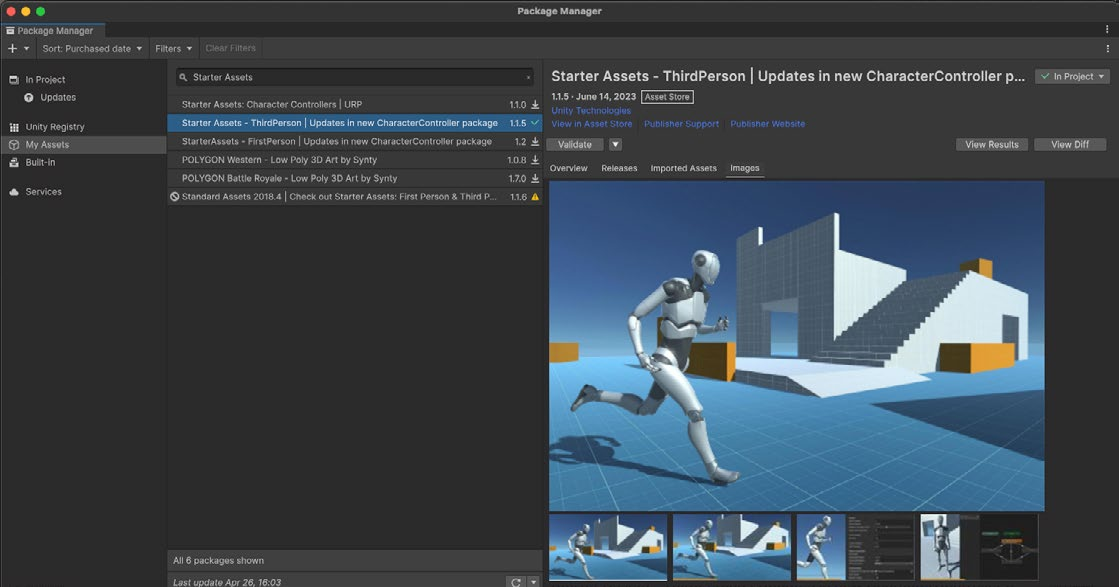
Настройка демонстрационного проекта Удобнее всего знакомиться с инструментами сетевого кода на существующем проекте с однопользовательским управлением персонажем. В этом руководстве используется пакет Starter Assets - ThirdPerson из Unity Asset Store. Он демонстрирует простой трехмерный игровой процесс с гуманоидным персонажем на Universal Render Pipeline (URP). Загрузите этот бесплатный ресурс из Unity Asset Store, затем импортируйте его с помощью Package Manager.
Пакет Starter Assets из Unity Asset Store
Демонстрационный проект включает небольшую тестовую сцену и настраиваемый контроллер от третьего лица. Наша цель - запустить несколько экземпляров приложения, чтобы разные клиенты могли взаимодействовать в общей среде.
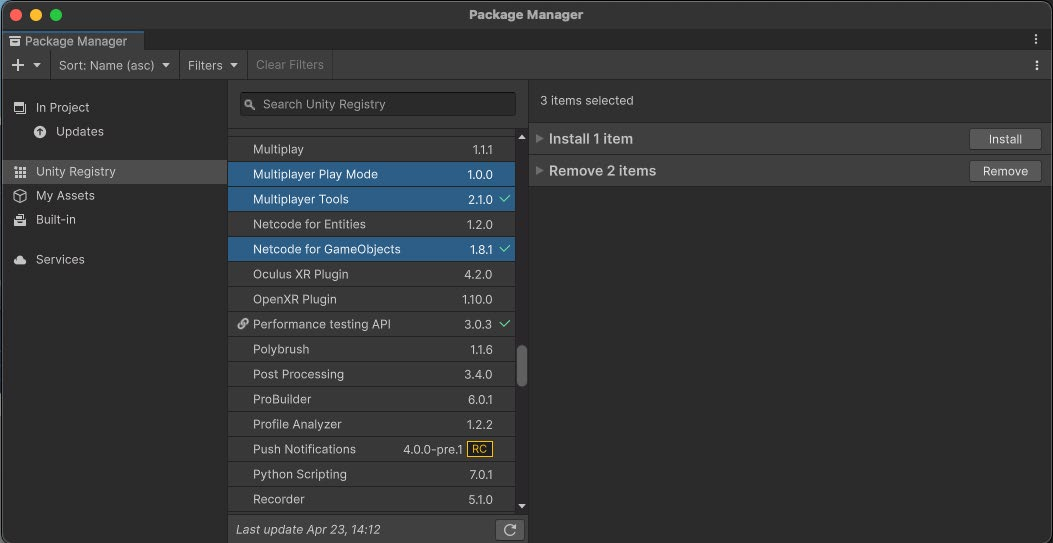
Установка Netcode for GameObjects В Package Manager (Window > Package Manager) установите фильтр Unity Registry, затем установите следующие пакеты: - Netcode for GameObjects: базовая сетевая библиотека, которая добавляет многопользовательские возможности в существующий рабочий процесс GameObject/MonoBehaviour. Она упрощает разработку сетевых игр и служит отличной отправной точкой. - Multiplayer Tools Window: дополнительный набор из пяти инструментов Unity 6, улучшающих рабочие процессы многопользовательской разработки: - Multiplayer Tools Window предоставляет в одном месте удобный доступ ко всем многопользовательским инструментам и их документации. - Network Simulator воспроизводит реальные сетевые условия - задержку и потерю пакетов, разрывы соединения - и помогает выявить проблемы до выпуска игры. - Runtime Network Stats Monitor (RNSM) отображает сетевую статистику в реальном времени и позволяет настраивать экранный мониторинг производительности сети.
- Network Scene Visualization упрощает отладку, наглядно отображая сетевую активность и владение объектами в окне Scene. - Hierarchy Network Debug добавляет в правую часть окна Hierarchy слой, который отмечает сетевые объекты небольшим значком сетевого куба.
- Multiplayer Play Mode: пакет Unity 6 для тестирования многопользовательских возможностей без выхода из Unity Editor. Он позволяет имитировать до четырех игроков - Main Editor Player и трех Virtual Players - и ускоряет проверку игрового процесса.
Установите Netcode for GameObjects и его вспомогательные пакеты.
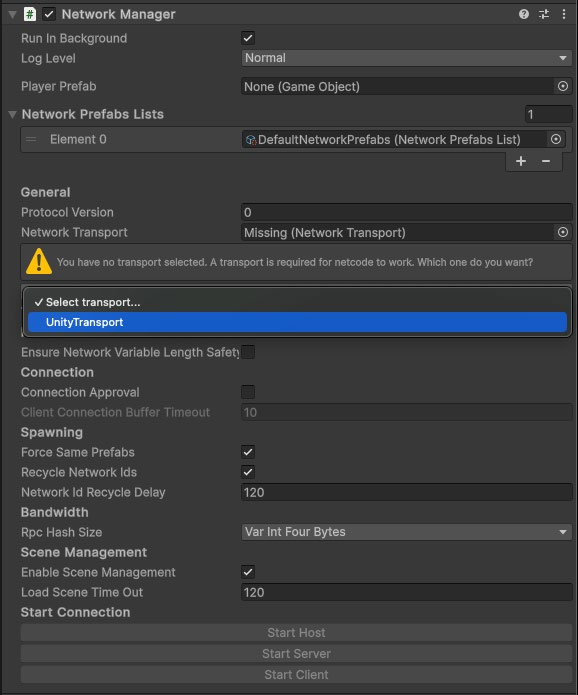
Добавление NetworkManager Для поддержки сетевой многопользовательской игры каждому проекту нужен компонент NetworkManager. Он управляет сетевым состоянием проекта, соединениями и параметрами сети. Чтобы добавить NetworkManager в сцену, создайте в окне Hierarchy новый GameObject и добавьте компонент NetworkManager (Netcode > NetworkManager). В компоненте NetworkManager настройте сетевой транспорт, выбрав Unity Transport.
Транспорт не выбран. Для работы Netcode нужен транспорт. Какой вариант использовать?
Выберите транспортный слой в NetworkManager.
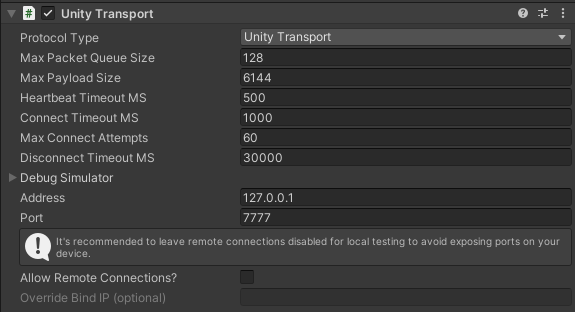
К GameObject будет добавлен компонент UnityTransport. Транспортный слой отвечает за низкоуровневые сетевые задачи, включая управление соединениями, передачу данных и шифрование пакетов.
Для локального тестирования отключайте удалённые подключения, чтобы не открывать порты устройства.
Компонент UnityTransport
Пока изменять эти параметры не требуется, но с помощью компонента можно имитировать сетевые условия - задержку, потерю пакетов и jitter - при тестировании и отладке в Unity Editor. Сохраните сцену, откройте File > Build Settings и убедитесь, что текущая сцена добавлена в список Scenes in Build. Тогда новый NetworkManager войдет в сборку игры.
NetworkObjects NetworkObject - обязательный компонент любого GameObject, который должен быть доступен по сети или синхронизироваться между клиентами многопользовательской игры. После добавления NetworkObject объект становится сетевым: его состояние и поведение можно передавать и обновлять по сети.
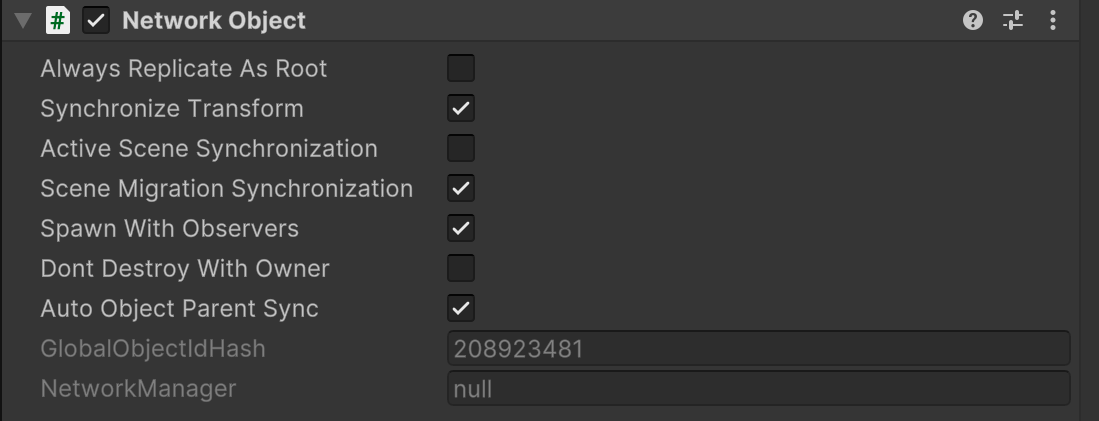
Компонент NetworkObject и его уникальный идентификатор
У каждого NetworkObject есть несколько идентификаторов: - GlobalObjectIdHash идентифицирует ресурс префаба в проекте. - NetworkObjectId - уникальный идентификатор, различающий экземпляры одного и того же префаба. - OwnerClientId указывает клиента, которому принадлежит объект (см. раздел о полномочиях ниже).
Эти идентификаторы позволяют NetworkManager отслеживать объект и поддерживать согласованность его состояния у всех подключенных клиентов. Объекты NetworkObject можно динамически создавать (spawn) и уничтожать во время игры. При создании NetworkObject появляется у всех подключенных клиентов. У каждого такого объекта есть владелец - обычно клиент, управляющий его поведением и состоянием.
Объекты Player NetworkObject У каждого игрока может быть собственный префаб Player NetworkObject. Это особый вид NetworkObject, который обычно содержит контроллер персонажа и его визуальное представление в игре.
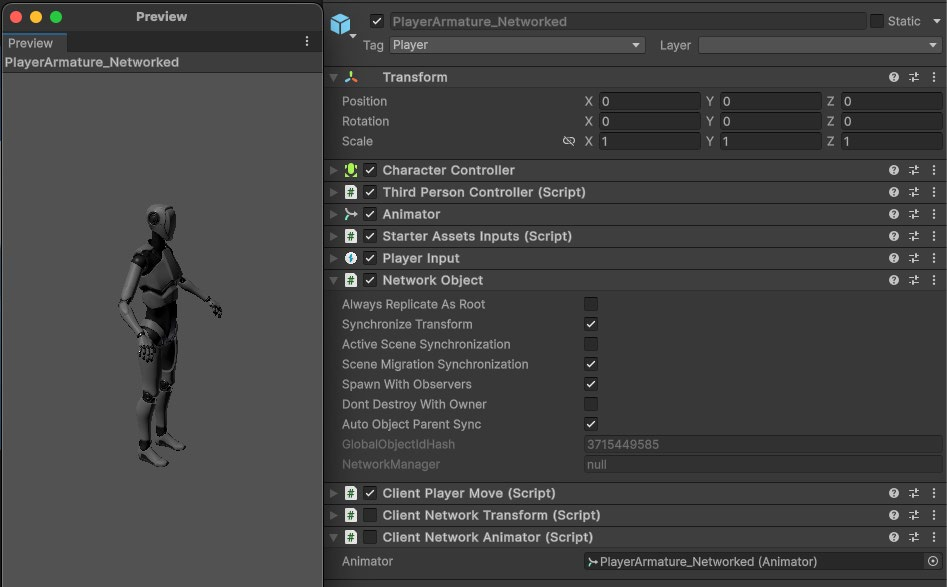
Player NetworkObject в демонстрационном проекте
Объекты Player NetworkObject часто хранят и синхронизируют данные конкретного игрока: имя, счет, инвентарь и другие сведения. Синхронизация по сети обеспечивает всем подключенным игрокам согласованное представление состояния игры. При подключении клиента NetworkManager создает принадлежащий соответствующему игроку Player NetworkObject. Игрок получает полномочия над своим PlayerObject и может управлять его поведением и состоянием. Чтобы настроить Player NetworkObject, сначала создайте в проекте обычный префаб GameObject. Он станет шаблоном PlayerObject и будет содержать компоненты и скрипты, определяющие поведение и внешний вид игрока.
Затем добавьте необходимые компоненты Netcode. Например: - NetworkObject: каждому сетевому объекту требуется компонент NetworkObject. Он содержит свойства и события, связанные с созданием, удалением и владением объектом. - NetworkBehaviour: эти скрипты добавляют сетевую логику к базовому классу MonoBehaviour. Они содержат NetworkVariable, удалённые вызовы процедур (RPC) и сетевые обратные вызовы. - NetworkAnimator: этот компонент синхронизирует состояния и параметры анимации между клиентами. - NetworkTransform: этот компонент обеспечивает репликацию позиции, поворота и масштаба игрока с сервера на все подключённые клиенты в реальном времени. NetworkObject игрока часто отвечает за обработку его ввода. Когда игрок выполняет действие - например, перемещается или взаимодействует с игровым миром, - ввод обрабатывается и при необходимости передаётся другим подключённым игрокам. Логика игрока сочетает MonoBehaviour для обычной игровой механики и NetworkBehaviour для управления сетевым состоянием. Несетевые компоненты, такие как контроллер персонажа и Animator, работают обычным образом в локальном экземпляре каждого игрока. Локальная работа этих компонентов не только повышает производительность, но и сокращает сетевой трафик, что особенно важно при ограниченной пропускной способности соединений между клиентами.
Создание NetworkObject игрока Откройте сцену Playground из примера проекта.
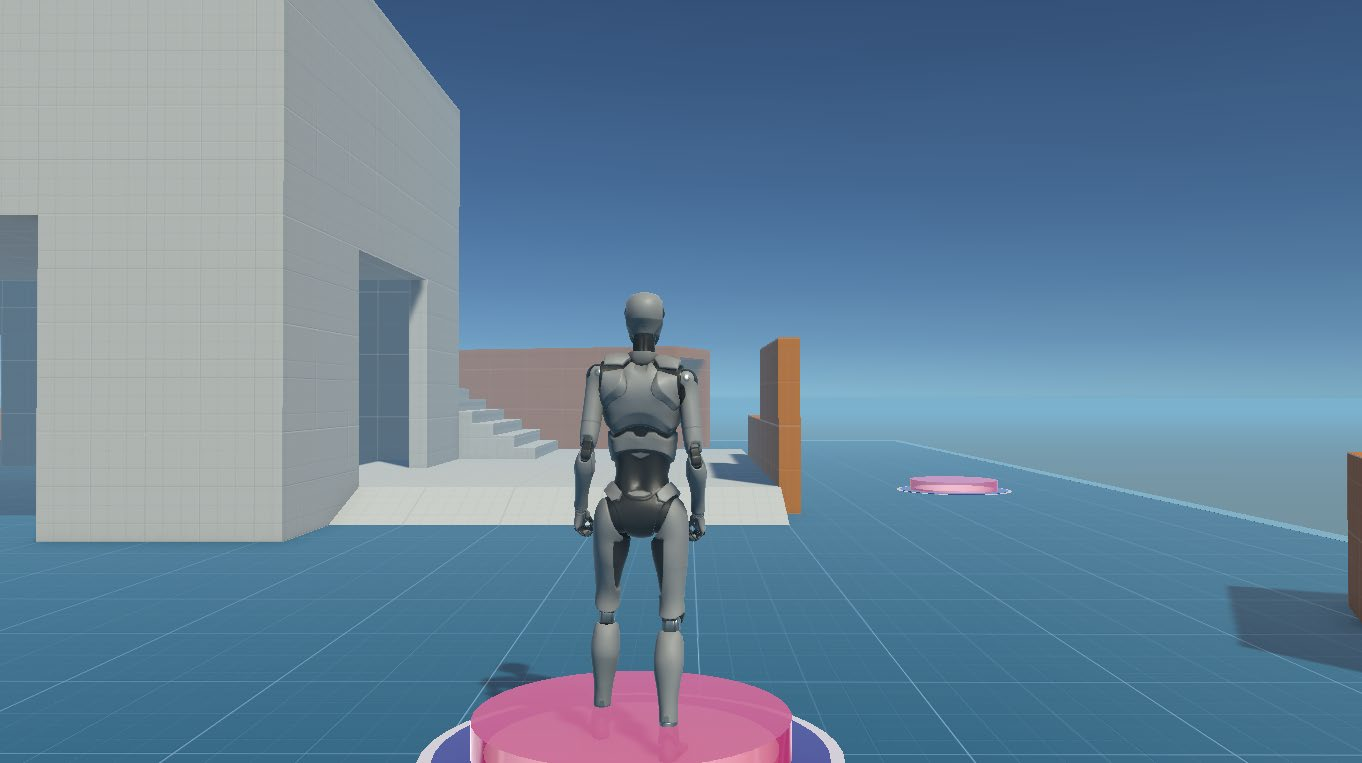
Пакет Starter Assets содержит сцену Playground.
В Hierarchy находится объект PlayerArmature, который управляет игровым персонажем. Чтобы превратить его в NetworkObject игрока, перетащите объект из Hierarchy и создайте новый Original Prefab либо измените копию существующего префаба проекта. Найдите GameObject PlayerArmature в окне Hierarchy. Удалите его вместе с дочерними объектами, чтобы в сцене осталось только игровое окружение.
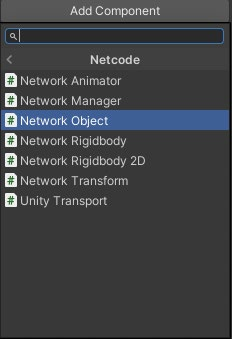
Затем откройте префаб в Inspector и добавьте компонент NetworkObject. Благодаря ему объект распознаётся и управляется по сети.
Добавьте компонент NetworkObject в префаб.
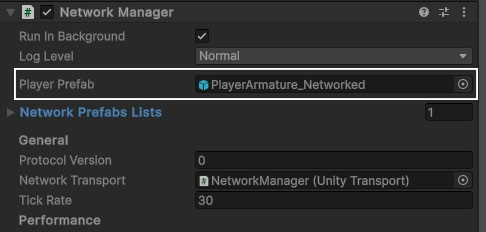
Укажите NetworkObject игрока в поле Player Prefab компонента NetworkManager.
Зарегистрируйте NetworkObject игрока в NetworkManager.
В Play mode отображается только игровое окружение. NetworkObject игрока появится лишь после подключения клиента. Выберите NetworkManager, который теперь находится в разделе DontDestroyOnLoad окна Hierarchy.
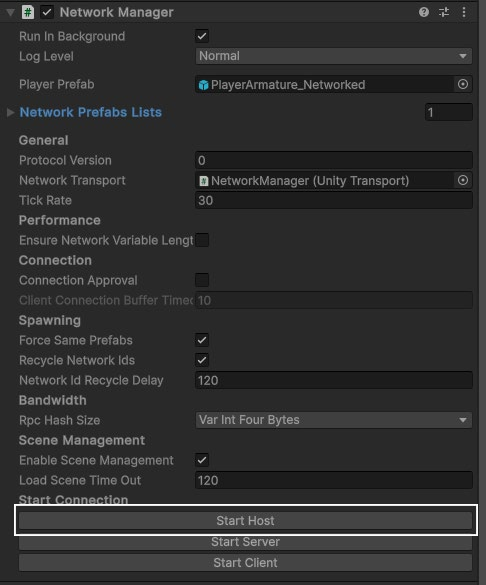
Запустите хост через NetworkManager.
Нажмите Start Host. После этого будет создан сетевой объект игрока.
В Hierarchy появится объект PlayerArmature_Network. Игрой снова можно управлять, хотя цель камеры отключена. Проверьте перемещение игрока клавишами WASD.
После выхода из Play mode персонаж исчезнет. Теперь NetworkManager создаёт этого персонажа во время выполнения и управляет им. Сетевую составляющую игры невозможно оценить, пока не подключено несколько клиентов. Чтобы увидеть работу многопользовательской сцены, протестируем проект с несколькими клиентами.
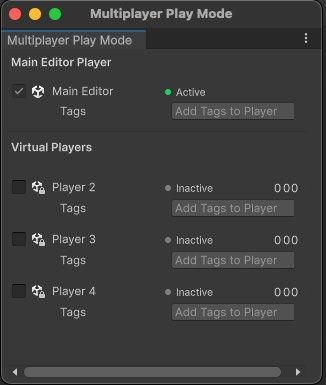
Multiplayer Play Mode Для тестирования многопользовательской игры приложение должно работать в нескольких отдельных процессах. Раньше для этого приходилось создавать отдельную сборку игры и запускать её параллельно с Unity Editor. Этот способ по-прежнему доступен, однако в Unity 6 есть Multiplayer Play Mode (MPPM). Он позволяет одновременно открыть несколько экземпляров Unity Editor и воспроизвести многопользовательскую среду, тем самым упрощая тестирование. Установите Multiplayer Play Mode через Package Manager. После этого для проверки каждой новой функции не придётся заново собирать приложение. Откройте Multiplayer Play Mode: Window > Multiplayer Play Mode.
Окно Multiplayer Play Mode
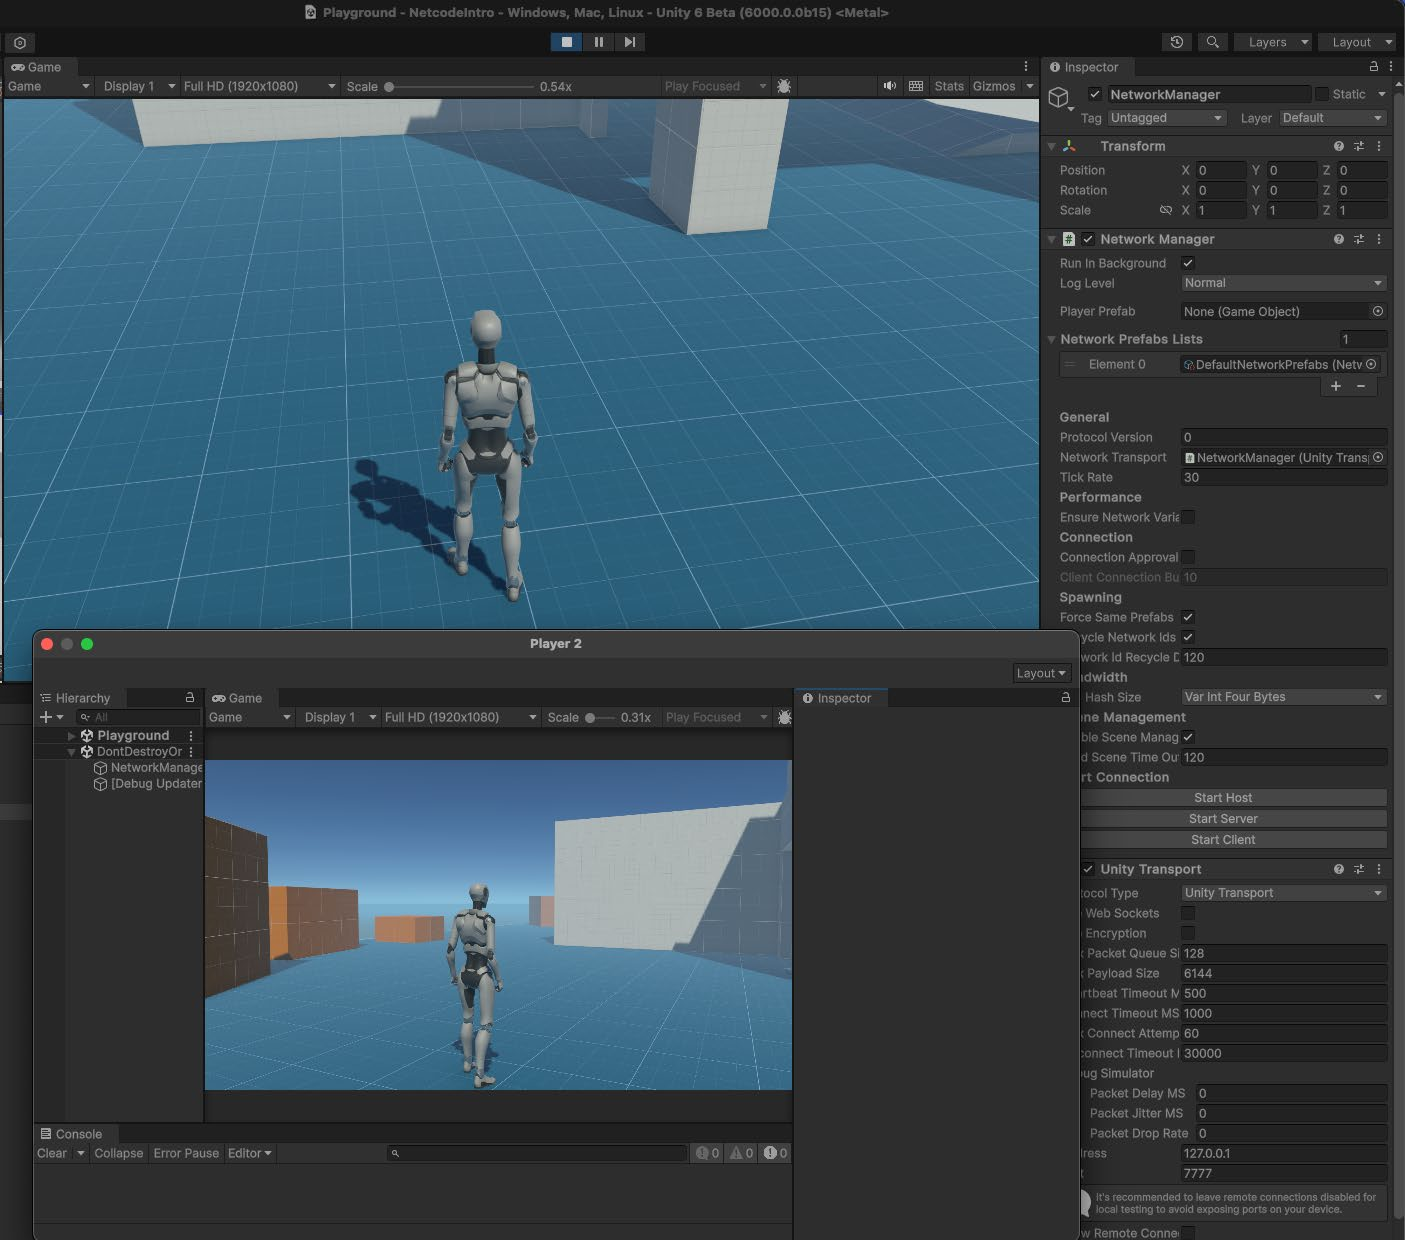
Затем включите в списке на снимке выше хотя бы один дополнительный Virtual Player. Так вы сможете протестировать как минимум один хост и один клиент. Помните: хост это клиент, который одновременно выполняет роль сервера. При переходе в Play mode второй сеанс приложения запускается в клонированном окне.
Multiplayer Play Mode клонирует Virtual Player.
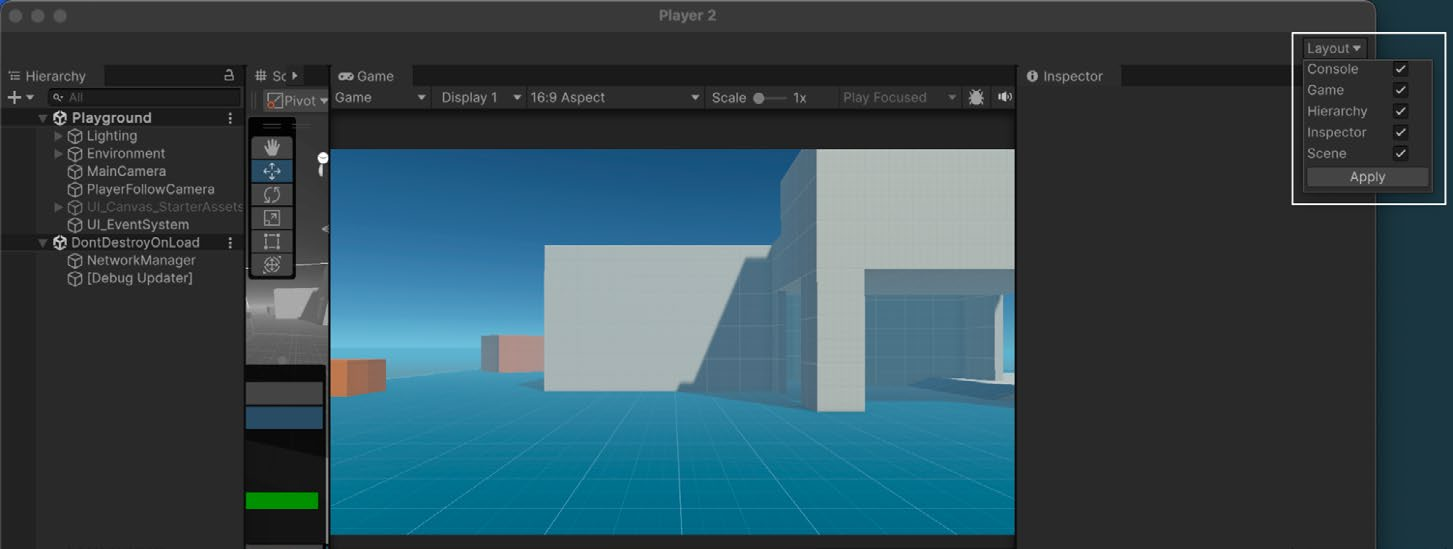
Выберите NetworkManager в Hierarchy. В разделе Start Connection окна Inspector нажмите Start Host. В окне Game появится объект PlayerArmature_Networked. Во втором окне нажмите Layout и включите Inspector и Hierarchy, чтобы оно выглядело как ещё один сеанс Editor. Выберите нужные элементы интерфейса и нажмите Apply.
Включите нужные Layouts в клонированном окне.
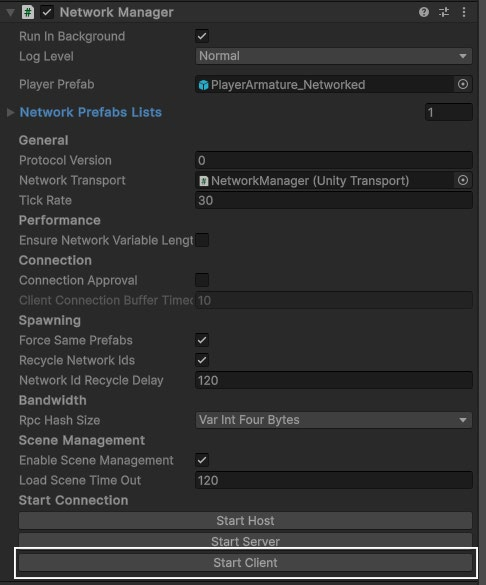
В клонированном окне Editor найдите NetworkManager в разделе DontDestroyOnLoad окна Hierarchy. В Inspector, в разделе Start Connection, нажмите Start Client.
NetworkManager содержит кнопки для подключения клиента.
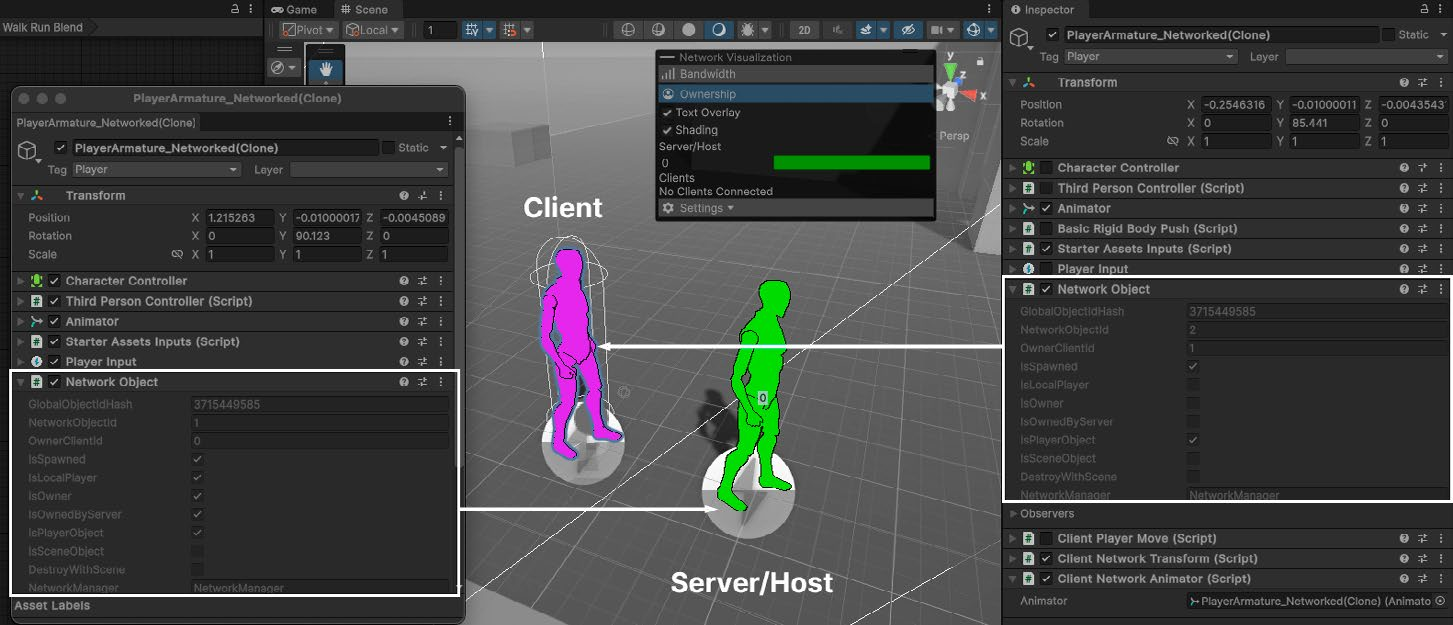
Теперь в Hierarchy отображаются два экземпляра PlayerArmature_Networked. В окне Scene они расположены друг на друге. Переместите один экземпляр с помощью клавиатуры или геймпада, чтобы разделить игроков. Выберите экземпляр PlayerArmature_Networked в Hierarchy и изучите его компонент NetworkObject. Во время выполнения каждый экземпляр определяется сочетанием GlobalObjectIdHash идентификатора ресурса проекта - и NetworkObjectId - уникального индекса экземпляра. Ниже свойство OwnerClientId показывает, кто управляет экземпляром: хост или клиент.
Переключайтесь между экземплярами и сравните флаги IsSpawned, IsLocalPlayer, IsOwner, IsOwnerByServer и другие.
Клиент
Сервер/хост Сравните настройки NetworkObject двух экземпляров.
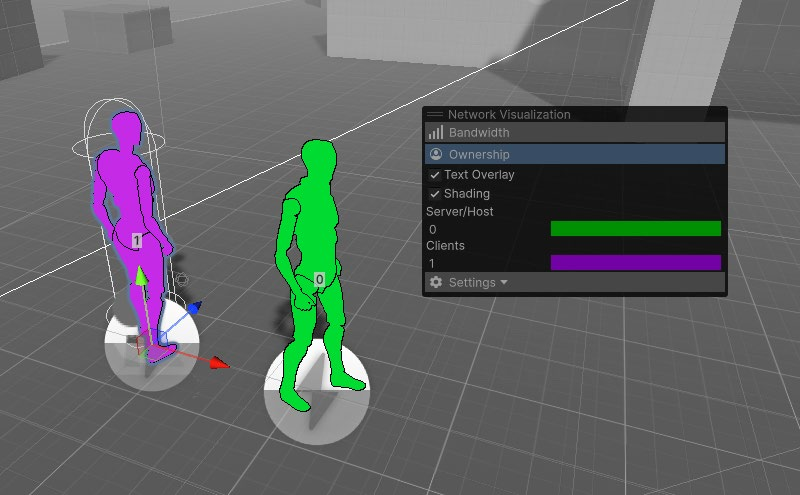
Чтобы легче различать экземпляры, используйте панель Network Visualization. Этот удобный диагностический инструмент появляется в окне Scene после установки пакета Multiplayer Tools. Экземпляры кодируются цветом по объёму трафика - Bandwidth - или по владению Ownership, которое показывает, какой клиент имеет полномочия над NetworkObject игрока.
Network Visualization помогает отлаживать сетевые объекты.
NetworkManager создаёт отдельный экземпляр для каждого клиента, однако каждый из них независимо управляет одним и тем же персонажем. Перемещение с помощью WASD в окне Scene пока не синхронизируется между клиентом и хостом. При первом подключении игроков NetworkManager синхронизирует их позиции в точке (0, 0, 0), но дальнейшие перемещения уже не синхронизируются. Сейчас поведением персонажа управляют несколько локальных компонентов:
- CharacterController позволяет игроку перемещаться и взаимодействовать с игровым окружением без сложных физических расчётов. - Animator воспроизводит анимацию на основе машины состояний и управляет переходами и смешиванием состояний бега, прыжка и бездействия. - PlayerInput управляет вводом отдельно для каждого игрока, сопряжением устройств и уведомлениями о событиях, предоставляя высокоуровневую оболочку над Unity Input System.
- StarterAssetsInputs преобразует этот ввод в значения перемещения, обзора, прыжка и спринта персонажа. Это компоненты для одиночной игры. Чтобы они работали в многопользовательском приложении, необходимо добавить сетевую логику.
Создание собственных кнопок запуска сеанса Чтобы удобнее запускать сетевые сеансы во время выполнения, добавьте экранные кнопки, которые повторяют функции кнопок NetworkManager в Inspector. Для этого подойдут Unity UI (UGUI) или UI Toolkit. Создайте в выбранной системе интерфейса три кнопки: Client, Host и Server. Назначьте им соответствующие методы синглтона NetworkManager: - NetworkManager.Singleton.StartClient - NetworkManager.Singleton.StartHost - NetworkManager.Singleton.StartServer Эти методы позволяют запускать сетевой сеанс без кнопок в окне Inspector.
Добавление NetworkBehaviour Для управления компонентами MonoBehaviour объекта PlayerArmature_Networked можно использовать NetworkBehaviour. NetworkBehaviour - специализированный тип MonoBehaviour для сетевой логики. Он предоставляет средства синхронизации действий и состояний между игровыми клиентами. NetworkBehaviour поддерживает те же события жизненного цикла, что и MonoBehaviour, а также предоставляет сетевые возможности: Методы RPC: NetworkBehaviour может использовать удалённые вызовы процедур (RPC) для обмена данными по сети. Такие методы помечаются атрибутом [Rpc]. Для отправки RPC на сервер или клиент используются соответственно [Rpc(SendTo.Server)] и [Rpc(SendTo.Client)].
- NetworkVariable: специализированная переменная для синхронного управления состоянием по сети. Изменения NetworkVariable на сервере автоматически передаются всем клиентам. - OnNetworkSpawn и OnNetworkDespawn: методы жизненного цикла, вызываемые при создании и удалении NetworkBehaviour. OnNetworkSpawn выполняет инициализацию - подобно OnEnable или Start, но для сетевого поведения. OnNetworkDespawn очищает ресурсы перед удалением объекта из сети, аналогично OnDestroy или OnDisable. - Владение: NetworkBehaviour позволяет назначить определённые объекты конкретным клиентам или серверу. Такая модель полномочий, при которой NetworkObject принадлежит клиенту либо серверу, гарантирует, что управлять объектом и взаимодействовать с ним смогут только назначенные игроки.
Для управления перемещением игрока реализуем NetworkBehaviour с именем ClientPlayerMove. Он гарантирует, что ввод хоста и клиента воздействует только на соответствующие им объекты игроков. Ниже приведён пример настройки:
using Unity.Netcode;
using StarterAssets;
using UnityEngine;
using UnityEngine.InputSystem;
namespace NetcodeDemo {
    public class ClientPlayerMove: NetworkBehaviour {
        [SerializeField] CharacterController m_CharacterController;
        [SerializeField] ThirdPersonController m_ThirdPersonController;
        [SerializeField] PlayerInput m_PlayerInput;
        [SerializeField] Transform m_CameraFollow;
        private void Awake() {
            m_PlayerInput.enabled = false;
            m_ThirdPersonController.enabled = false;
            m_CharacterController.enabled = false;
        }
        public override void OnNetworkSpawn() {
            base.OnNetworkSpawn();
            ∕∕ Enable Включить клиенте. enabled = IsClient;
            // if на this is a client. if (!IsOwner) {

                ∕∕ клиенту // Отключить, Disable if если this объект is not не theпринадлежит owner enabled = false;

                m_PlayerInput.enabled = false;
                m_CharacterController.enabled = false;
                m_ThirdPersonController.enabled = false;
                return;
            }
            ∕∕ Enable Включить, если is объект принадлежит клиенту // if this an owner m_PlayerInput.enabled = true;

            m_CharacterController.enabled = true;
            m_ThirdPersonController.enabled = true;
        }
    }
}
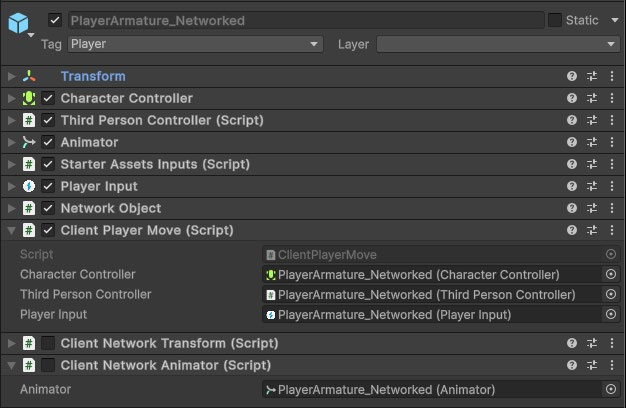
Добавьте этот компонент в префаб PlayerArmature_Networked, затем заполните нужные поля в Inspector.
Заполните поля ClientPlayerMove в Inspector.
Добавив скрипт в префаб, подключите сеансы хоста и клиента. При подключении клиентов к NetworkManager некоторые компоненты объекта игрока по умолчанию отключаются на основании свойства IsOwner: оно проверяет, принадлежит ли экземпляр локальному игроку.
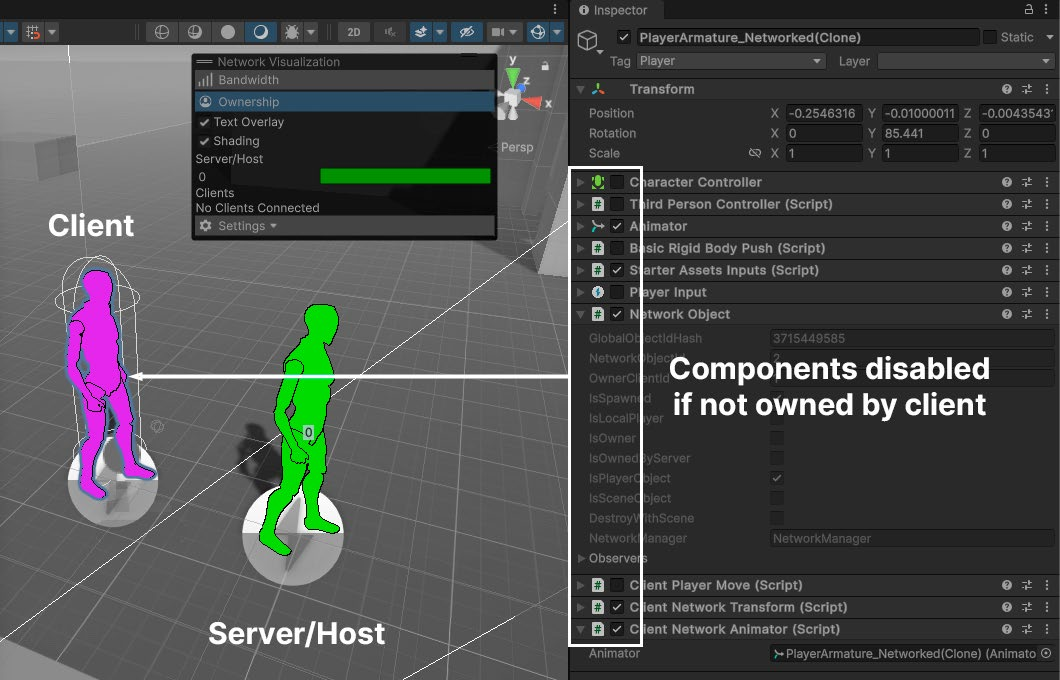
В Hierarchy поочерёдно выбирайте два экземпляра PlayerArmature_Networked.
Клиент
Компоненты отключены, если клиент не владелец
Сервер/хост Некоторые компоненты отключаются, если экземпляр не принадлежит локальному клиенту.
Обратите внимание: у экземпляров игрока, которыми не владеет соответствующий клиент, теперь отключены некоторые компоненты, например PlayerInput. Хост управляет одним экземпляром игрока, а клиент - другим. Теперь разными экземплярами игроков можно управлять независимо, однако их перемещение ещё не синхронизируется по сети. Чтобы хост и клиент видели одинаковое движение, добавим сетевые компоненты, например NetworkTransform.
Свойства полномочий и владения По умолчанию NetworkObject принадлежат серверу, однако подключённый и одобренный клиент тоже может получить объект во владение с помощью метода SpawnWithOwnership. В Netcode for GameObjects сервер является авторитетной стороной: только он может создавать и удалять NetworkObject.
NetworkBehaviour предоставляет несколько свойств для быстрой проверки полномочий и владельца экземпляра: - IsClient показывает, выполняется ли экземпляр на клиенте. - IsServer показывает, выполняется ли экземпляр на сервере.
- IsHost показывает, выполняется ли экземпляр на хосте, который одновременно является сервером и клиентом. - IsLocalPlayer показывает, является ли связанный NetworkObject объектом локального игрока.
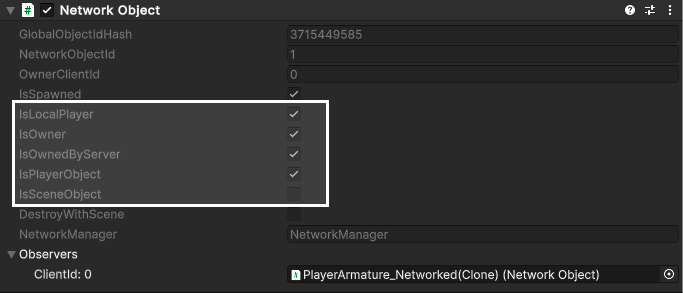
- IsOwner показывает, владеет ли локальный игрок этим объектом либо является ли объект локальным игроком. - IsPlayerObject показывает, представляет ли GameObject сетевого игрока, которым обычно управляет определённый клиент. - IsSceneObject показывает, является ли GameObject изначально частью сцены, а не создаётся динамически во время игры. Обычно сервер управляет объектами сцены, чтобы их состояние оставалось согласованным по сети. При проверке NetworkObject во время выполнения отображаются некоторые из этих свойств.
Настройки NetworkObject
Синхронизация с помощью NetworkTransform и NetworkAnimator NetworkBehaviour позволяет создать одинаковый экземпляр игрока на нескольких клиентах, но для синхронизации его перемещения нужны дополнительные компоненты.
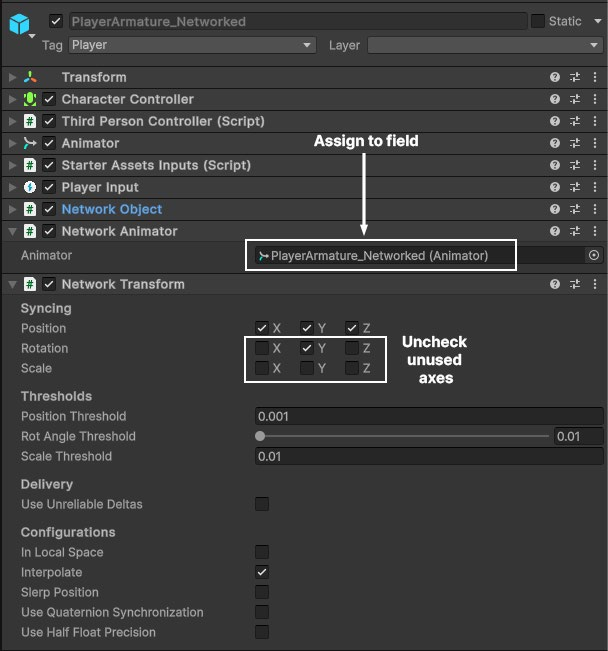
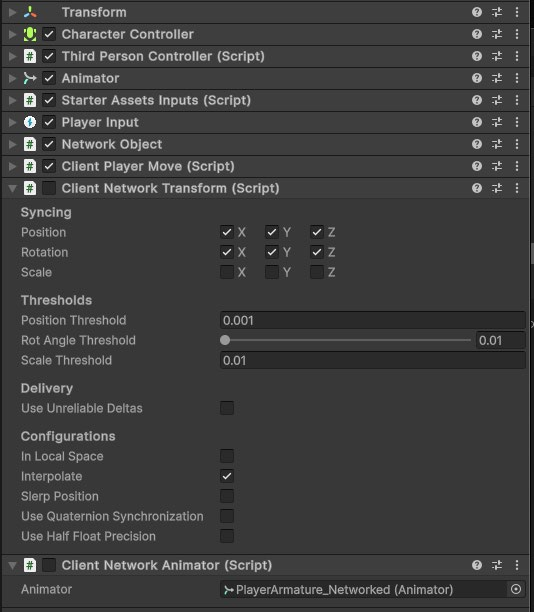
Добавьте компонент NetworkTransform в префаб PlayerArmature_Networked. Отключите оси, которые не влияют на игровой процесс: в этом примере - синхронизацию масштаба, а также поворота по осям X и Z. Синхронизация расходует пропускную способность, поэтому не передавайте лишние данные.
В Multiplayer Play Mode активируйте окно хоста: теперь можно управлять игроком и наблюдать, как его движение синхронизируется с клиентом. Это первый шаг к сетевой игре.
Затем добавьте компонент NetworkAnimator в PlayerArmature_Networked и перетащите существующий компонент Animator в пустое поле.
Укажите в поле
Снимите флажки с ненужных осей
Добавьте компоненты NetworkTransform и NetworkAnimator.
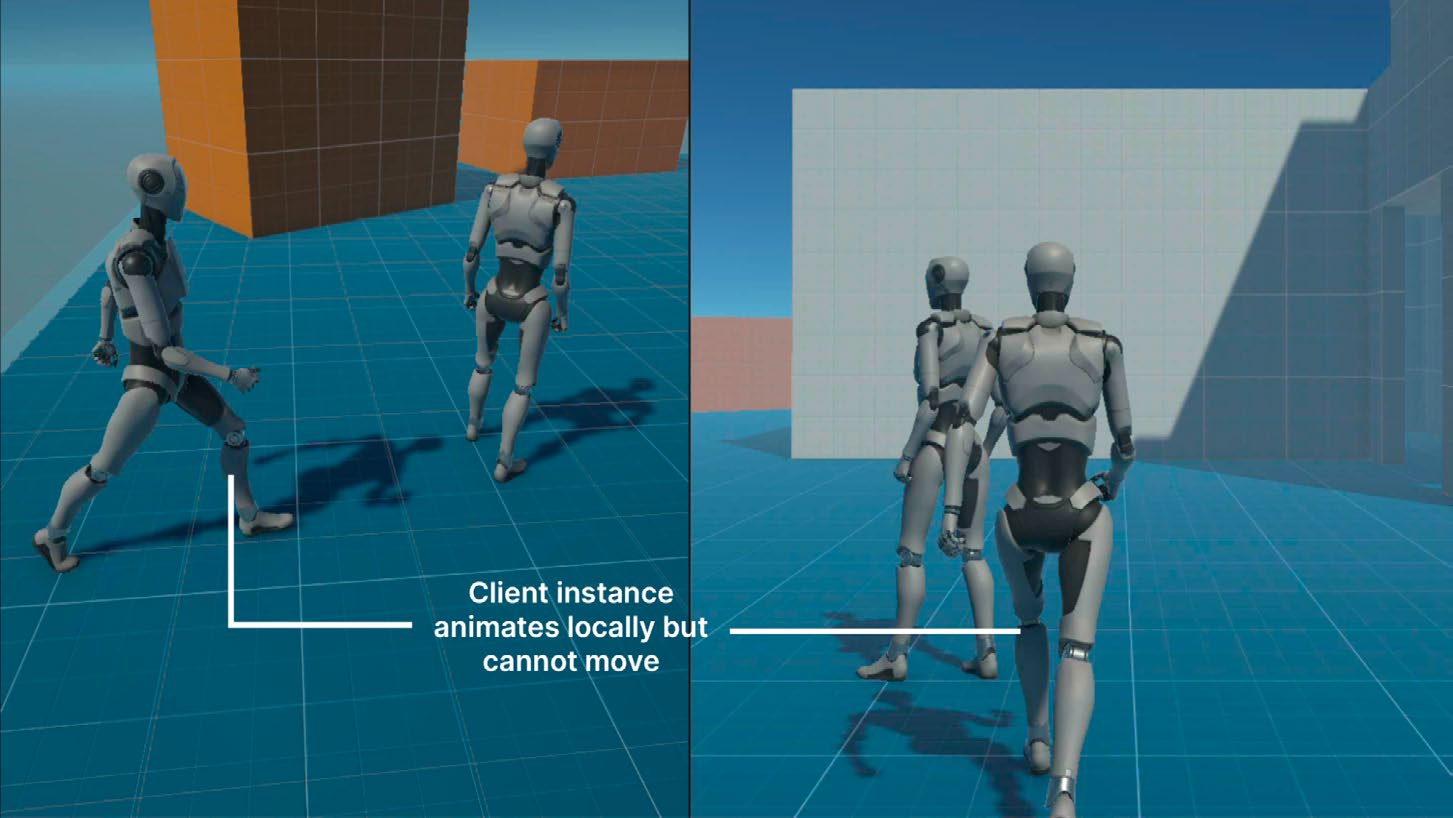
Окно клиента представляет второе устройство, подключённое к хосту. В идеале любое действие на хосте должно отображаться на клиенте и наоборот. NetworkTransform синхронизирует позицию, поворот и масштаб Transform, а NetworkAnimator - состояния анимации. Теперь перемещения игрока-хоста по сцене Playground передаются клиенту в Multiplayer Play Mode. Однако не всё работает как ожидается. Переключитесь на окно клиента и попробуйте управлять персонажем. Хост корректно синхронизируется с клиентом, но перемещения клиента могут не отображаться на хосте.
Экземпляр клиента анимируется локально, но не перемещается
Игрок словно бежит на месте.
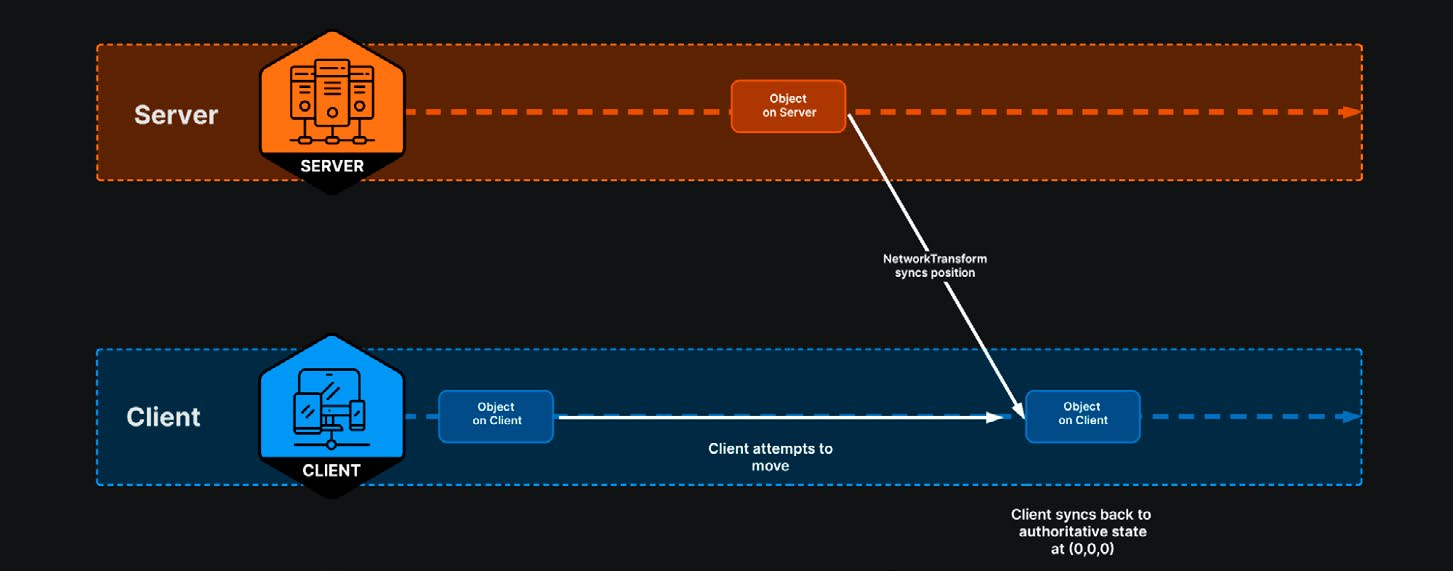
Клиент получает ввод - это видно по анимации бега на месте, - но экземпляр игрока не перемещается. Причина в том, что NetworkTransform подчиняется серверу и синхронизирует с клиентом только позицию сервера. При попытке переместить игрока на клиенте сервер переопределяет требуемую позицию и возвращает объект в точку (0, 0, 0).
Передача полномочий клиенту По умолчанию NetworkTransform работает в режиме серверных полномочий. Изменения осей Transform отслеживаются на сервере и передаются подключённым клиентам.
В нашем примере переместить игрока на клиенте не удаётся: сервер сохраняет авторитетное состояние с Transform в точке (0, 0, 0) и переопределяет изменения клиента.
Объект на сервере
Сервер СЕРВЕР
NetworkTransform синхронизирует позицию
Клиент
Объект на клиенте
Объект на клиенте
Клиент пытается переместить объект
КЛИЕНТ
Клиент возвращается к авторитетному состоянию в точке (0, 0, 0)
Серверные полномочия переопределяют состояние клиента.
Один из способов решить проблему - передать полномочия от сервера клиенту. Тогда клиент сможет управлять собственным Transform, а сервер не будет переопределять изменения.
Для этого создадим компонент ClientNetworkTransform, как в следующем примере кода. Он заменяет серверные полномочия полномочиями владельца:
using Unity.Netcode.Components;
using UnityEngine;
namespace NetcodeDemo {
    [DisallowMultipleComponent] public class ClientNetworkTransform : NetworkTransform {
        protected override bool OnIsServerAuthoritative() { return false; }
    }
}
Этот код переопределяет метод OnIsServerAuthoritative и возвращает false. В префабе NetworkObject игрока замените NetworkTransform пользовательским ClientNetworkTransform. Аналогичным образом можно создать NetworkAnimator, управляемый клиентом:
using Unity.Netcode.Components;
using UnityEngine;
namespace NetcodeDemo {
    [DisallowMultipleComponent] public class ClientNetworkAnimator: NetworkAnimator {
        protected override bool OnIsServerAuthoritative() { return false; }
    }
}
Замените NetworkAnimator компонентом ClientNetworkAnimator и не забудьте назначить поле Animator в Inspector.
Компоненты ClientNetworkTransform и ClientNetworkAnimator.
Теперь в Multiplayer Play Mode можно управлять игроком с клиента: его позиция и состояния анимации должны корректно синхронизироваться с хостом. Поведение под управлением клиента также снижает задержку в сетевых приложениях. В режиме полномочий владельца сетевые действия выполняются сразу и ощущаются отзывчивыми: клиенту не нужно ждать, пока пакет дойдёт до сервера и вернётся обратно.
Однако применять такое поведение следует осторожно. Оно улучшает отзывчивость для игрока, но создаёт риски безопасности: режим полномочий владельца упрощает модификацию и взлом приложения, а в соревновательной онлайн-игре этим обязательно воспользуются. Для большей безопасности выбирайте серверные полномочия.
Компоненты в режиме полномочий владельца Скрипты из примеров выше можно написать самостоятельно либо взять готовые ClientNetworkTransform и ClientNetworkAnimator из пакета Multiplayer Samples Utilities проекта Unity Boss Room (com.unity.multiplayer.samples.coop).
У этой реализации ClientNetworkTransform есть потенциальные проблемы: - Передача владения: смена владельца не всегда проходит плавно, из-за чего объекты могут скачкообразно перемещаться или рассинхронизироваться. - Иерархическое владение: ClientNetworkTransform нельзя использовать как дочерний объект NetworkTransform, управляемого сервером. - Отклонение обновлений: сервер не может отклонять обновления клиента, поскольку система поддерживает только владение клиентом, но не совместное владение клиента и сервера.
- Перемещение при создании: сервер не может переместить объект сразу после его создания во владении клиента. Во многих случаях ClientNetworkTransform подходит для управления Transform, принадлежащим клиенту. Однако перед внедрением учитывайте перечисленные ограничения.
Синхронизация с серверными полномочиями Часть полномочий можно передать клиенту ради отзывчивости, однако некоторые перемещения должны выполняться только на сервере. Как правило, серверные полномочия помогают избежать дисбаланса и нечестных преимуществ, которые дают управляемые клиентом действия.
Например, если клиенты сами выбирают место появления на карте, её планировка может дать им несправедливое преимущество. Лучше, чтобы сервер случайным образом назначал одну из заранее заданных точек появления.
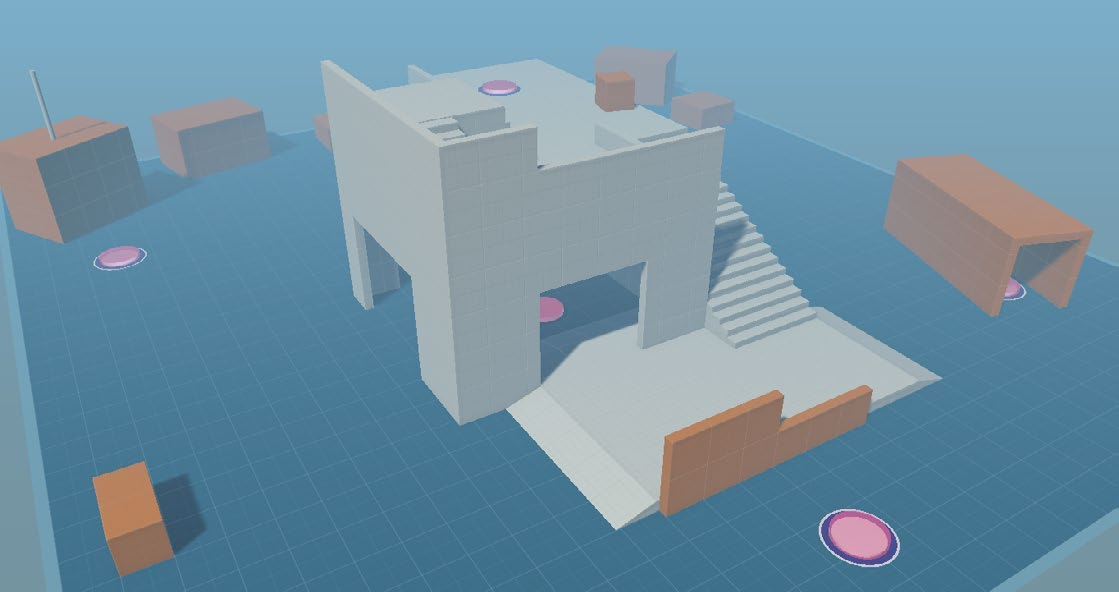
Для этого создайте простые визуальные объекты и расставьте их в возможных местах появления игроков.
Точки появления стратегически размещены по всему уровню.
Управлять ими может несетевой MonoBehaviour. В данном примере класс ServerPlayerSpawnPoints содержит список m_SpawnPoints со ссылками на GameObject каждой точки появления.
В примере также используется универсальный шаблон Singleton из проекта Unity для Asset Store Level up your code with design patterns and SOLID:
public class ServerPlayerSpawnPoints : Singleton<ServerPlayerSpawnPoints> {
    [SerializeField] private List<GameObject> m_SpawnPoints;
    public GameObject GetRandomSpawnPoint() {
        if (m_SpawnPoints.Count == 0) return null;
        return m_SpawnPoints[Random.Range(0, m_SpawnPoints.Count)];
    }
}
Затем NetworkBehaviour с именем ServerPlayerMove может использовать экземпляр ServerPlayerSpawnPoints для случайного выбора точки появления.
using Unity.Netcode;
using UnityEngine;
до ClientNetworkTransform [DefaultExecutionOrder(0)] ∕∕ // Выполнить Execute before ClientNetworkTransform

public class ServerPlayerMove : NetworkBehaviour {
    public override void OnNetworkSpawn() {
        ∕∕ только на сервере // Выполнять Only execute on the Server if (!IsServer) { enabled = false; return; }

        SpawnPlayer();
        base.OnNetworkSpawn();
    }
    ∕∕ следующей свободной точке при // Перейти Move to к the next available position whenпоявлении spawning

    void SpawnPlayer() {
        var spawnPoint = ServerPlayerSpawnPoints.Instance.GetRandomSpawnPoint();
        var spawnPosition = spawnPoint ? spawnPoint.transform.position : Vector3.zero;
        transform.position = spawnPosition;
    }
}
Вся логика выполняется в OnNetworkSpawn. При каждом подключении клиента вызов SpawnPlayer помещает игрока в случайно выбранную точку появления. Проверка IsServer гарантирует, что это происходит только на сервере, который поддерживает авторитетное состояние игры.
Добавьте скрипт ServerPlayerMove в префаб PlayerArmature_Networked. В Multiplayer Play Mode каждый клиент подключится и появится в случайной точке сцены Playground.
Этот пример показывает, как NetworkBehaviour взаимодействует с элементами сцены, не управляемыми по сети. Он использует статические данные и объекты, заранее настроенные в Hierarchy. При подключении клиента ServerPlayerMove достаточно получить одну случайную точку появления из существующей игровой сцены. Это сокращает объём передаваемых по сети данных.
Игрок появляется в случайной точке.
Несколько важных моментов: - Поскольку ClientNetworkTransform использует полномочия владельца, компонент CharacterController необходимо отключить в Awake. Снова включите CharacterController после того, как ServerPlayerMove задаст позицию игрока, иначе компонент переопределит рассчитанные координаты и вернёт объект в центр мира. - Также заполните список m_SpawnPoints в Inspector, чтобы игроки не появлялись в точке (0, 0, 0). - Задайте атрибуту DefaultExecutionOrder меньшее значение, чтобы ServerPlayerMove выполнялся раньше ClientPlayerMove. Например, [DefaultExecutionOrder(0)] повышает приоритет ServerPlayerMove и позволяет ему запуститься первым.
Теперь к хосту нашего многопользовательского проекта могут подключаться несколько клиентов. Персонажи от третьего лица появляются в заданных местах уровня и синхронизируют перемещение и анимацию в реальном времени. Такая синхронизация необходима для многопользовательской игры. Компоненты NetworkTransform и NetworkAnimator обеспечивают её из коробки, но игровая логика также потребует собственных NetworkBehaviour.
Теперь рассмотрим другие способы синхронизации данных и игровых состояний по сети.
Шаблон проектирования Singleton Singleton предоставляет удобный доступ к единственному экземпляру определённого типа во время выполнения. Однако он создаёт дополнительные зависимости, поэтому учитывайте недостатки этого шаблона. В Netcode for GameObjects Singleton используется при каждом обращении к NetworkManager.Singleton. В примере проекта также есть универсальная реализация Singleton для любого типа MonoBehaviour. Подробнее о Singleton рассказывает электронная книга Level up your code with design patterns and SOLID. В ней также показаны альтернативные способы взаимодействия объектов сцены, например обычные события и каналы событий.
ВЫВЕДИТЕ КОД НА НОВЫЙ УРОВЕНЬ С ПОМОЩЬЮ ШАБЛОНОВ ИГРОВОГО ПРОГРАММИРОВАНИЯ Принципы SOLID Шаблоны проектирования
ШАБЛОНЫ ПРОЕКТИРОВАНИЯ
Другие ресурсы Шаблоны проектирования повторно используемые решения распространённых задач проектирования ПО.
Скачайте бесплатную электронную книгу Unity о шаблонах проектирования. Другие углублённые руководства для программистов, технических художников, художников и дизайнеров собраны в центре лучших практик Unity.
Setting up your first Netcode project
If you haven’t already tried Unity’s networking solutions, setting up a basic Netcode project involves importing the necessary networking packages and then configuring the necessary multiplayer components. This chapter will walk through your first steps to add networking to a sample project using Netcode for GameObjects. Remember that in Unity 6 you can use Multiplayer Center to set up a new multiplayer project, and Multiplayer Widgets for integrating additional Unity services into the project.
Before you begin Make sure you have the following: —
An active Unity account with a valid license
The Unity Hub
A supported version of the Unity Editor; some features demonstrated here require Unity 6 or higher, refer to the Netcode for GameObjects requirements
A connection to the Unity Cloud dashboard to connect to the Unity services your project will need; you can do this via the Unity Hub
Sample project setup It’s helpful to demo these netcode tools on an existing project with single-player locomotion. In this guide, we’ll use the Starter Assets – ThirdPerson package from the Unity Asset Store. This simulates simple 3D gameplay with a humanoid character using the Universal Render Pipeline (URP). Get this free asset from the Unity Asset Store and then import it using the Package Manager.
The Starter Assets package from the Asset Store
This demo project includes a small testing playground scene and a configurable third-person controller. The goal is to run multiple copies of this application and then have different clients interact in the same environment.
Installing Netcode for GameObjects In the Package Manager (Window > Package Manager), filter for the Unity Registry. Then install the following packages: —
Netcode for GameObjects: This is a foundational networking library that adds multiplayer capabilities to the existing GameObject/MonoBehaviour workflow. It streamlines multiplayer game development and is a great starting point for working with networked multiplayer.
Multiplayer Tools Window: This is an extra suite of five new tools introduced in Unity 6 that improve workflows for multiplayer development:
The Multiplayer Tools Window provides convenient access to all of the multiplayer tools and their documentation in one place.
The Network Simulator replicates real-world network conditions, such as packet delay, loss, and disconnections to identify potential issues before going live.
The Runtime Network Stats Monitor (RNSM) displays real-time network statistics, providing configurable onscreen monitoring of network performance.
Network Scene Visualization enhances debugging by visually displaying network activity and object ownership in the scene view.
The Hierarchy Network Debug view provides an overlay on the right-hand side of your Hierarchy window that identifies which objects are networked (with a small network cube logo).
Multiplayer Play Mode: This Unity 6 package enables you to test multiplayer functionality without leaving the Unity Editor. You can simulate up to four players (the Main Editor Player plus three Virtual Players) for faster playtesting.
Install Netcode for GameObjects and its supporting packages.
Adding the NetworkManager Every project will need a NetworkManager component to support networked multiplayer. This essential component manages the network state of your project, handling connections and network configurations. To add a NetworkManager to your scene, create a new GameObject in the Hierarchy and add the NetworkManager component (Netcode > NetworkManager). In the NetworkManager component, configure the Network Transport layer. Choose Unity Transport.
Select a transport layer in the NetworkManager.
This attaches a UnityTransport component to the GameObject. The transport layer is responsible for low-level networking tasks, such as connection management, data transmission, and packet encryption.
The UnityTransport component
Though you don’t need to modify these settings yet, this component can help simulate network conditions (e.g., latency, packet loss, and jitter) for testing and debugging in the Editor. Save the scene and go to File > Build Settings and make sure your current scene is added to the Scenes in Build list. This ensures the new NetworkManager is included in the game build.
NetworkObjects NetworkObject is a required component for any GameObject that needs to be networked or synchronized across different clients in a multiplayer game. When you add a NetworkObject component to a GameObject, it becomes “networkable,” meaning that its state and behavior can be shared and updated across the network.
The NetworkObject component and its unique ID
Each NetworkObject has a few identifiers: —
The GlobalObjectIdHash identifies the prefab asset in the project.
The NetworkObjectId is the unique identifier that differentiates instances of the same prefab asset.
The OwnerClientId represents the client that “owns” the object (see Authority below).
These identifiers help the NetworkManager keep track of it and ensure that its state is consistent across all connected clients. NetworkObjects can be dynamically created (spawned) or destroyed during gameplay. Spawning a NetworkObject makes it appear on all connected clients. Each NetworkObject has an owner, typically the client that controls its behavior and state.
Player NetworkObjects Each player can optionally have their own prefab called a Player NetworkObject. This is a special type of NetworkObject that often contains the character controller and visual representation of the player in the game.
The Player NetworkObject in the sample project
Player NetworkObjects often store and sync player-specific data, such as the player’s name, score, inventory, or other relevant information. This data is synchronized across the network to ensure that all connected players have a consistent view of the game state. When a client connects, the NetworkManager creates a Player NetworkObject that is “owned” by the corresponding player. This means that the player has authority over their PlayerObject and can control its behavior and state. To set up a Player NetworkObject, start by creating a standard prefab GameObject in your project. This prefab acts as a template for the PlayerObject, containing the necessary components and scripts that define the player’s behavior and appearance.
Then, add the appropriate netcode components. These might include: —
NetworkObject: Every object that will be networkable needs a NetworkObject component. This contains properties and events related to spawning, despawning, and ownership.
NetworkBehaviours: These scripts add networking behavior to their MonoBehaviour base class. NetworkBehaviours contain network variables, remote procedure calls (RPCs), and network callbacks.
NetworkAnimators: This component syncs animation states and parameters between clients.
NetworkTransform: This component ensures that the player’s position, rotation, and scale are replicated in real-time from the server to all connected clients.
Player NetworkObjects are often responsible for handling player input. When a player performs an action, such as moving or interacting with the game world, the input is processed and then propagated to other connected players as needed. Player logic involves a combination of MonoBehaviours for direct game mechanics and NetworkBehaviours for managing network states. Non-networked components, such as character controllers and animators, function normally on each player’s local instance. Using these components locally not only optimizes performance but also reduces network traffic, which can be important when working with limited bandwidth between your clients.
Creating a Player NetworkObject Load up the Playground scene from the sample project.
The Starter Assets bundle includes a Playground scene.
The Hierarchy includes a PlayerArmature that drives the game character. To convert this into a Player NetworkObject, drag it from the Hierarchy to create a new Original Prefab or modify a copy of the existing prefab in the project. In the Hierarchy window, locate the PlayerArmature GameObject. Delete it to remove the PlayerArmature and its child objects from the scene, leaving only the game environment in the scene. Then, edit the prefab in the Inspector. Add the NetworkObject component. This component is required for the object to be recognized and managed across the network.
Add the NetworkObject to the prefab.
Register the Player NetworkObject in the Player Prefab field of the NetworkManager.
Register the Player NetworkObject in the NetworkManager.
Play mode only shows the game environment. The Player NetworkObject will only appear when a client connects. Select the NetworkManager, which now appears under DontDestroyOnLoad in the Hierarchy.
Start the host on the NetworkManager.
Select Start Host. This spawns the Player NetworkedObject. The PlayerArmature_Network object appears in the Hierarchy. The game is playable once again (though the camera target is disabled). Use the WASD controls to test the player movement. Exit Play mode and the player character disappears. The NetworkManager now spawns and manages this specific player character at runtime. Keep in mind that the networked aspect of the game won’t be apparent until you have multiple clients connected. We’ll need to test with several clients to understand how this works in a multiplayer scene.
Multiplayer Play Mode Testing multiplayer requires running the application across separate runtime processes. Previously, this involved making a separate game build and running it alongside the Unity Editor. While you still have that option, Unity 6 includes Multiplayer Play Mode (MPPM). MPPM enables developers to open multiple instances of the Unity Editor simultaneously, replicating a multiplayer environment. This streamlines the multiplayer testing process. Install Multiplayer Play Mode via the Package Manager. Then, you won’t need to build the application every time you need to test a new feature. Open Multiplayer Play Mode (Window > Multiplayer Play Mode).
The Multiplayer Play Mode window
Then, check at least one additional Virtual Player from the list in the above screenshot, so you can test a minimum of one host and client. Remember that the host is a client that is also running on the server. When entering Play mode, a second session of the application starts running in a cloned window.
Multiplayer Player Mode clones a Virtual Player.
Select the NetworkManager in the Hierarchy. Under Start Connection in the Inspector, select Start Host. The PlayerArmature_Networked object appears in the Game view. Use the Layout button in the second window to enable the Inspector and Hierarchy – much like a second session of the Editor. Select the user interface components to enable and press Apply.
Enable the Layouts in the cloned window.
In the cloned Editor window, locate the NetworkManager under DontDestroyOnLoad in the Hierarchy. In the Inspector pane, under Start Connection, select Start Client.
The NetworkManager contains buttons to connect the client.
Two instances of PlayerArmature_Networked now appear in the Hierarchy. In the Scene view, they appear on top of one another. Using the keyboard or gamepad, move one player instance away from the other to separate them. Select a PlayerArmature_Networked instance in the Hierarchy to inspect its NetworkObject component. At runtime, note how each instance is identified by its GlobalObjectIdHash (project asset ID) together with its NetworkObjectId (unique instance index). Below that, the OwnerClientId indicates whether the host or the client controls the instance. Switch between the two instances to compare the flags: IsSpawned, IsLocalPlayer, IsOwner, IsOwnerByServer, etc.
Compare the NetworkObject settings between the two instances.
Use the Network Visualization panel to distinguish between the two instances more clearly. This handy diagnostic tool appears in the Scene view once you’ve installed the Multiplayer Tools package. The two instances are color coded by Bandwidth (how much data is being transmitted) or Ownership (which client has authority over the Player NetworkObject).
Network Visualization helps to debug the network objects.
Though the NetworkManager creates separate instances for each client, each independently controls the same character. In the Scene view, the character movements driven by WASD controls are not synchronized between the client and host. Although the NetworkManager initially synchronizes their positions at coordinates (0, 0, 0) when players first connect, their subsequent movements are not. Currently several local components drive the character’s behavior: —
A CharacterController allows for the player to move while interacting with the game environment, without requiring complex physics calculations.
An Animator enables animation based on a state machine. The Animator controls the transitions and blending between running, jumping, or idle states.
PlayerInput handles per-player input management, device pairing, and event notifications, providing a high-level wrapper around the Unity Input System.
StarterAssetsInputs translates that input into values for the character’s movement, look, jump, and sprint inputs.
These are single-player components. To make these work in a multiplayer application, we need to add some networked scripting.
Creating your own UI start buttons To create a more user-friendly way to start network sessions at runtime, you can add onscreen buttons that replicate the functionality of the NetworkManager’s Inspector buttons. This can be achieved using either Unity UI (UGUI) or UI Toolkit. In your UI of choice, create three buttons labeled Client, Host, and Server. Then, have them invoke these respective callbacks from the NetworkManager singleton: —
NetworkManager.Singleton.StartClient
NetworkManager.Singleton.StartHost
NetworkManager.Singleton.StartServer
These callbacks allow you to start the network session without using the buttons from the Inspector window.
Adding NetworkBehaviour To manage the MonoBehaviours on the PlayerArmature_Networked, we can use a NetworkBehaviour. A NetworkBehaviour is a specialized type of MonoBehaviour, designed for networked logic. It provides the framework necessary for synchronizing actions and states across different game clients. NetworkBehaviour shares the same lifecycle events as MonoBehaviours but also incorporates several network-specific features: RPC Methods: NetworkBehaviours can utilize remote procedure calls (RPCs) to handle communications across the network. These methods are annotated with the [Rpc] attribute. To send an Rpc to a server or client, call [Rpc(SendTo.Server)] and [Rpc(SendTo. Client)], respectively. —
NetworkVariable: This is a specialized variable designed for synchronized state management across the network. Changes to a NetworkVariable on the server are automatically propagated to all clients.
OnNetworkSpawn and OnNetworkDespawn: These lifecycle methods are triggered when a NetworkBehaviour is instantiated or destroyed. OnNetworkSpawn is used for initialization (think of OnEnable or Start except for networked behavior). OnNetworkDespawn handles cleanup before an object is removed from the network (e.g., analogous to OnDestroy or OnDisable).
Ownership: NetworkBehaviour allows specific clients (or the server) to have ownership over certain objects. This concept of authority, where either a client or the server can “own” a NetworkObject, ensures that only designated players should be able to control or interact with specific objects.
We can implement a NetworkBehaviour called ClientPlayerMove to manage the player movement. This can make sure that input from the host and the client only works on their respective player objects. Here’s the example setup:
using Unity.Netcode;
using StarterAssets;
using UnityEngine;
using UnityEngine.InputSystem;
namespace NetcodeDemo {
    public class ClientPlayerMove: NetworkBehaviour {
        [SerializeField] CharacterController m_CharacterController;
        [SerializeField] ThirdPersonController m_ThirdPersonController;
        [SerializeField] PlayerInput m_PlayerInput;
        [SerializeField] Transform m_CameraFollow;
        private void Awake() {
            m_PlayerInput.enabled = false;
            m_ThirdPersonController.enabled = false;
            m_CharacterController.enabled = false;
        }
        public override void OnNetworkSpawn() {
            base.OnNetworkSpawn();
            enabled = IsClient;
            // Enable if this is a client. if (!IsOwner) {

                // Disable if this is not the owner enabled = false;

                m_PlayerInput.enabled = false;
                m_CharacterController.enabled = false;
                m_ThirdPersonController.enabled = false;
                return;
            }
            // Enable if this is an owner m_PlayerInput.enabled = true;

            m_CharacterController.enabled = true;
            m_ThirdPersonController.enabled = true;
        }
    }
}
Add this to the PlayerArmature_Networked prefab. Then fill out the appropriate fields in the Inspector.
Fill out the ClientPlayerMove fields in the Inspector.
Once this script is applied to the prefab, connect the host and client sessions. When clients connect to the NetworkManager, certain components of the player object are disabled by default due to the IsOwner property, which checks if the local player is the owner of the instance. In the Hierarchy, toggle the selection between the two instances of PlayerArmature_ Networked.
Several components disable themselves if not the owner.
Note how several components (like the PlayerInput) now appear deactivated on player instances not owned by the respective client. For the host, this setup allows control over one of the player instances, and for the client, control over the other. However, though we can control different player instances, their movements are not synchronized across the network. To make the movement match from host to client, we’ll need to add additional network components like NetworkTransform.
Authority and ownership properties By default, the server owns NetworkObjects, although connected and approved clients can also own NetworkObjects using the SpawnWithOwnership method. Netcode for GameObjects is server-authoritative, which means that only the server is authorized to spawn and despawn NetworkObjects. NetworkBehaviour includes some quick ways to determine the authority and ownership of an instance: —
IsClient indicates if the instance is running on a client.
IsServer indicates if the instance is running on a server.
IsHost indicates if the instance is running on a host, which is both a server and a client.
IsLocalPlayer indicates if the associated NetworkObject is the local player object.
IsOwner indicates if the local player owns the object or if the object is the local player object.
IsPlayerObject indicates if the GameObject represents a network player, typically controlled by a specific client.
IsSceneObject indicates if the GameObject is part of the scene by default and not spawned dynamically during gameplay. A scene object is usually managed by the server for consistent state across the network.
Inspecting the NetworkObject at runtime shows some of these properties.
The NetworkObject settings
Sync using a NetworkTransform and NetworkAnimator Though the NetworkBehaviour lets us spawn the same player instance on multiple clients, synchronizing its movements across the network requires additional components. Add a NetworkTransform component to the PlayerArmature_Networked prefab. Uncheck any axes which won’t affect gameplay; in this case, uncheck all scales, as well as x rotation and z rotation axes. Because synchronization uses bandwidth, it’s essential to minimize syncing any superfluous data. In Multiplayer Play Mode, focusing on the host window allows you to move the player using the controls and watch it sync to the client. This demonstrates the beginning of networked play. Next add the NetworkAnimator component to the PlayerAramature_Networked. Drag the existing Animator component into the empty field.
Add a NetworkTransform and NetworkAnimator component.
The client window represents a second machine that is connected to the host. Ideally, any actions performed on the host are reflected on the client and vice versa. The NetworkTransform allows you to sync the position, rotation, and scale of a Transform, while the NetworkAnimator syncs the animation states. Now when your host player runs around the playground environment, its movements transfer to the client in Multiplayer Play Mode. However, not everything works as expected. Switch focus to the client window and try using the controls. While the host syncs correctly to the client, the client’s movements may not reflect on the host.
The player appears to run in place.
The client receives input, as indicated by the character animating in place, but the player instance doesn’t move. This happens because the NetworkTransform operates under server authority, syncing only the server’s position to the client. When you try to move the player on the client, the server overrides the client’s desired position, resetting it to (0, 0, 0).
Applying client authority By default, NetworkTransform operates in server authoritative mode. Changes to the transform axis are detected on the server-side and pushed to connected clients. In our example, trying to transform the player on the client fails because the server – maintaining an authoritative state with the transform set to (0,0,0) – overrides these client-side changes.
Server authority overrides the client.
To resolve this, one approach is to transfer authority from the server to the client. This allows the client to control its own transform without being overridden by the server. To implement this behavior, we can create a ClientNetworkTransform component, as seen in the following code example, that switches the server authority for owner authority:
using Unity.Netcode.Components;
using UnityEngine;
namespace NetcodeDemo {
    [DisallowMultipleComponent] public class ClientNetworkTransform : NetworkTransform {
        protected override bool OnIsServerAuthoritative() { return false; }
    }
}
This overrides the OnIsServerAuthoritative method and returns false. On the Player NetworkObject prefab, replace the NetworkTransform with the custom ClientNetworkTransform. Similarly, we can also create a client-driven NetworkAnimator:
using Unity.Netcode.Components;
using UnityEngine;
namespace NetcodeDemo {
    [DisallowMultipleComponent] public class ClientNetworkAnimator: NetworkAnimator {
        protected override bool OnIsServerAuthoritative() { return false; }
    }
}
Replace the NetworkAnimator with the ClientNetworkAnimator. Remember to set the Animator field in the Inspector.
The ClientNetworkTransform and ClientNetworkAnimator.
In Multiplayer Play Mode, you can now move the player from the client and its position and animation states should sync properly to the host. Client-driven behaviors are also a way to reduce latency in networked applications. In “owner authoritative mode,” networked behaviors can act immediately and responsively. The client doesn’t need to wait for a packet to make a round trip to the server and back. However, exercise care when creating such client-driven behaviors: they can improve the user experience for each player, but also introduce security risks. Owner authoritative mode opens your application to mods or hacks; in any online competitive game, players will cheat if given the chance. To prevent this and make your application more secure, opt for server authority.
Owner authoritative mode components Though you can create the scripts in the above examples yourself, you can also get prebuilt ClientNetworkTransform and ClientNetworkAnimator components from the Multiplayer Samples Utilities package in the Unity project, Boss Room. (com.unity. multiplayer.samples.coop). Note that this implementation of the ClientNetworkTransform comes with potential issues: —
Ownership transfer: Ownership doesn’t always switch smoothly, sometimes causing objects to jump or even get out of sync.
Hierarchical ownership: There’s no support for a ClientNetworkTransform as a child under a server-managed NetworkTransform.
Update rejection: Servers can’t reject updates from clients since the system only recognizes client ownership, not joint client-server ownership.
Object movement at instantiation: The server can’t move an object when it’s first created under client ownership.
In many cases, the ClientNetworkTransform can be a viable way to handle client ownership transforms. However, consider these limitations before implementing them as part of your project.
Syncing with server authority Though you can allow some client authority for responsive gameplay, some movements can only be done on the server side. Generally, you should use server authority to prevent any potential imbalances or unfair advantages that could arise from client-controlled actions. For instance, allowing clients to choose their spawn locations on the game map could give them an undue advantage, depending on the layout of the map. Instead, it’s more equitable to have the server randomly assign them to one of a set of predetermined spawn points.
To manage this, define some objects with some simple visuals and then scatter them where you want players potentially to spawn.
Spawn points are strategically placed throughout the level.
A non-networked MonoBehaviour can manage them. Here, the ServerPlayerSpawnPoints class contains a list called m_SpawnPoints that references each spawn point GameObject. This sample implementation also uses a generic singleton pattern, borrowed from the Unitymade Asset Store project Level up your code with design patterns and SOLID:
public class ServerPlayerSpawnPoints : Singleton<ServerPlayerSpawnPoints> {
    [SerializeField] private List<GameObject> m_SpawnPoints;
    public GameObject GetRandomSpawnPoint() {
        if (m_SpawnPoints.Count == 0) return null;
        return m_SpawnPoints[Random.Range(0, m_SpawnPoints.Count)];
    }
}
A NetworkBehaviour called ServerPlayerMove can then use the instance of ServerPlayerSpawnPoints to pick a spawn point at random.
using Unity.Netcode;
using UnityEngine;
[DefaultExecutionOrder(0)] // Execute before ClientNetworkTransform

public class ServerPlayerMove : NetworkBehaviour {
    public override void OnNetworkSpawn() {
        // Only execute on the Server if (!IsServer) { enabled = false; return; }

        SpawnPlayer();
        base.OnNetworkSpawn();
    }
    // Move to the next available position when spawning

    void SpawnPlayer() {
        var spawnPoint = ServerPlayerSpawnPoints.Instance.GetRandomSpawnPoint();
        var spawnPosition = spawnPoint ? spawnPoint.transform.position : Vector3.zero;
        transform.position = spawnPosition;
    }
}
All of the logic happens in OnNetworkSpawn. Every time a client connects, a call to SpawnPlayer starts the player at a randomly selected spawn. The IsServer check makes sure that this only happens on the server, which maintains the authoritative game state. Add the ServerPlayerMove script to the PlayerArmature_Networked prefab. When you enter Multiplayer Play Mode, each client will connect and spawn at a random point within the playground environment. This implementation shows how NetworkBehaviours can interact with elements in the scene that aren’t network-controlled. Here, it leverages static data and scene objects already set up in the Hierarchy. When a client connects, the ServerPlayerMove only needs to retrieve one random spawn point from the existing gameplay scene. This limits the amount of data transmitted over the network.
The player appears at a random spawn point.
Some important points: —
Because the ClientNetworkTransform is owner authoritative, it’s important to disable the CharacterController component during Awake. Re-enable the CharacterController after ServerPlayerMove positions the player to prevent it from overriding the calculated values and resetting to world center.
Likewise, fill out the m_SpawnPoints in the Inspector to prevent the players from spawning at (0,0,0).
Set the DefaultExecutionOrder attribute with a lower value to ensure that ServerPlayerMove executes before ClientPlayerMove. For example, using [DefaultExecutionOrder(0)] prioritizes ServerPlayerMove, allowing it to run first.
Our multiplayer project now has the capability of connecting multiple clients to a host. In the game, third-person player characters are able to spawn at designated positions within the level and synchronize their movements and animations in real-time. This synchronization is essential for the multiplayer experience. Components such as NetworkTransform and NetworkAnimator facilitate this process right out of the box, but for gameplay, you’ll need to customize your own NetworkBehaviours as well.
Next, let’s explore additional methods for synchronizing data and game states across the network.
Singleton design pattern A singleton provides a convenient means of accessing a unique instance of a particular type at runtime. However, singletons can introduce extra dependencies, so be aware of their drawbacks. In Netcode for GameObjects, you’ll use singletons every time you refer to the NetworkManager.Singleton. The sample project also includes an example of a generic singleton for use with any MonoBehaviour type. For a deeper understanding of singletons, refer to the e-book Level up your code with design patterns and SOLID. This guidebook also demonstrates alternative patterns like events or event channels for object communication in your scene.
Get the free Unity e-book on design patterns. See the Unity best practices hub for all advanced guides for programmers, technical artists, artists, and designers.