2D
Спрайты В 2D-проекте визуальное представление создаётся с помощью спрайтов. Они могут использовать разные ассеты текстур, поэтому при неправильно настроенном батчинге может потребоваться много вызовов отрисовки. Для оптимизации ресурсов используйте Sprite Atlas (Asset > Create > Sprite Atlas): он позволяет объединять в один батч спрайты, использующие один материал и упакованную текстуру.
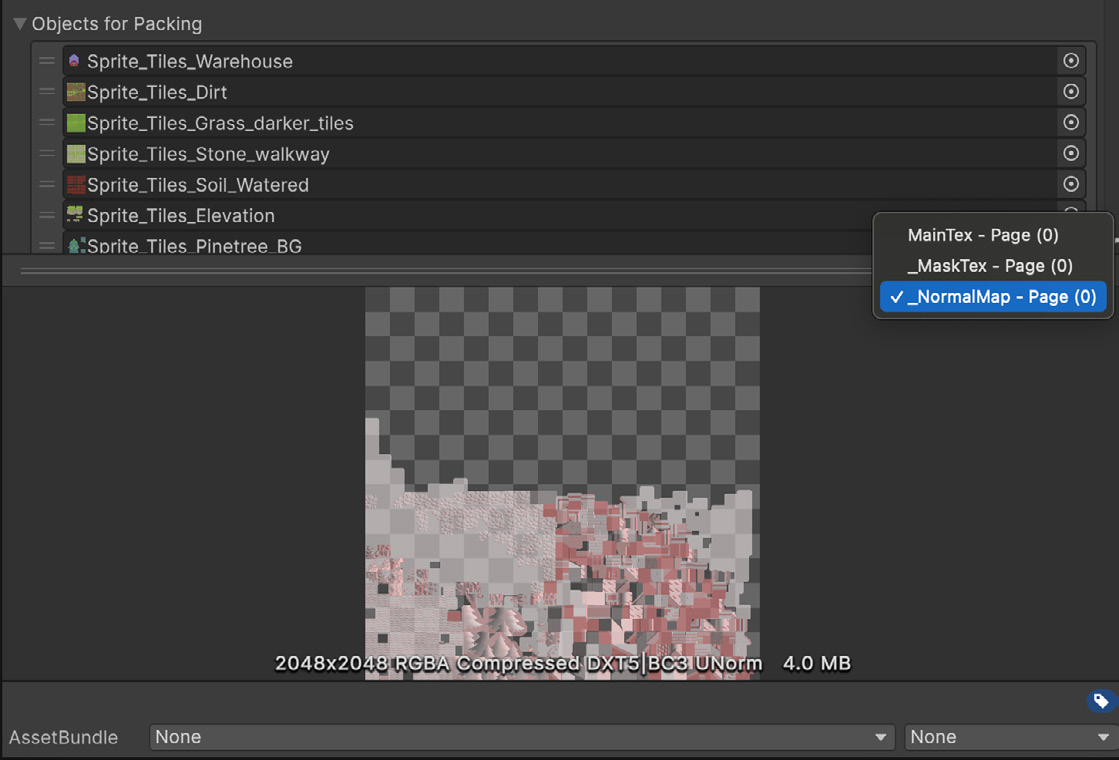
Избегайте дублирования ассетов при упаковке спрайтов В 2D URP спрайты могут содержать карты нормалей и карты-маски, которые также стоит упаковать в Sprite Atlas. Это важно для производительности и качества: такая упаковка позволяет рациональнее использовать память, сократить число вызовов отрисовки и ускорить загрузку. Если вы добавляете в Sprite Atlas целые папки, убедитесь, что в них находятся только обычные спрайты или текстуры альбедо. Карты нормалей и карты-маски автоматически попадут в соответствующие атласы, которые можно выбрать в раскрывающемся списке. Если же поместить такие карты в добавляемые папки, они без необходимости окажутся и в основном атласе, заняв в нём место. Чёткое разделение атласов карт нормалей и карт-масок позволяет независимо настраивать для них параметры сжатия. Например, разрешение карт нормалей можно уменьшить вдвое, а обычные спрайты оставить в полном разрешении либо подобрать другие параметры с учётом целевой платформы.
©2025UnityTechnologies
Три типа атласов при упаковке 2D-спрайтов
Структурируйте папки, чтобы поддерживать единообразие Продуманная структура папок для 2D-спрайтов упрощает поиск ассетов и управление ими, помогает контролировать использование памяти благодаря группировке ассетов по моменту загрузки, чётко разделяет разные элементы игры и даёт другие преимущества. Ниже приведён типичный вариант структуры папок для проекта Unity: - Sprites/Characters/[CharacterName]/Animations - Sprites/UI/[MenuType]/Elements - Sprites/Environment/[LevelName]/Background - Sprites/Effects/[EffectType] - Sprites/Common/SharedElements
Импортируйте пиксельную графику прямо в Unity с помощью Aseprite Importer Aseprite - редактор спрайтов и инструмент для создания пиксельной графики, ставший отраслевым стандартом среди DCC-приложений для пиксельных художников. С Unity Aseprite Importer не нужно по отдельности экспортировать сотни спрайтов в формате .PNG: файл .aseprite можно добавить непосредственно в проект.
©2025UnityTechnologies
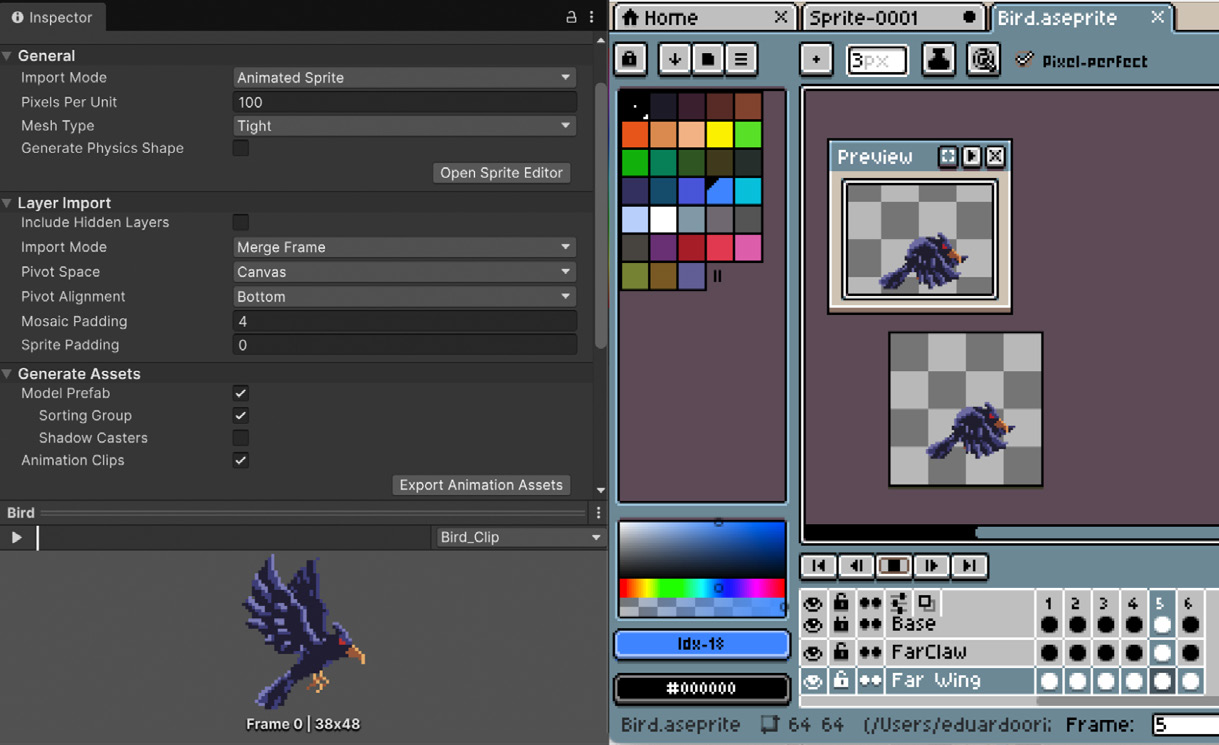
Работайте прямо в Aseprite, нажимайте Save и сразу просматривайте изменения в Unity. Aseprite Importer поддерживает перетаскивание файлов .aseprite, автоматически создаёт и настраивает готовые к использованию объекты GameObject и анимационные клипы, а также полностью интегрируется с набором 2D-функций Unity. В Unity 6 появилась автоматическая генерация ассетов Tilemap из файлов .aseprite с тайлмапами. Изменения исходного файла автоматически переносятся во все производные ассеты.
Aseprite Importer в окне Project в Unity: в этом фрагменте доклада Unite 2024 «Знакомьтесь: новые рабочие процессы 2D и улучшения на основе ИИ» показана работа Aseprite Importer
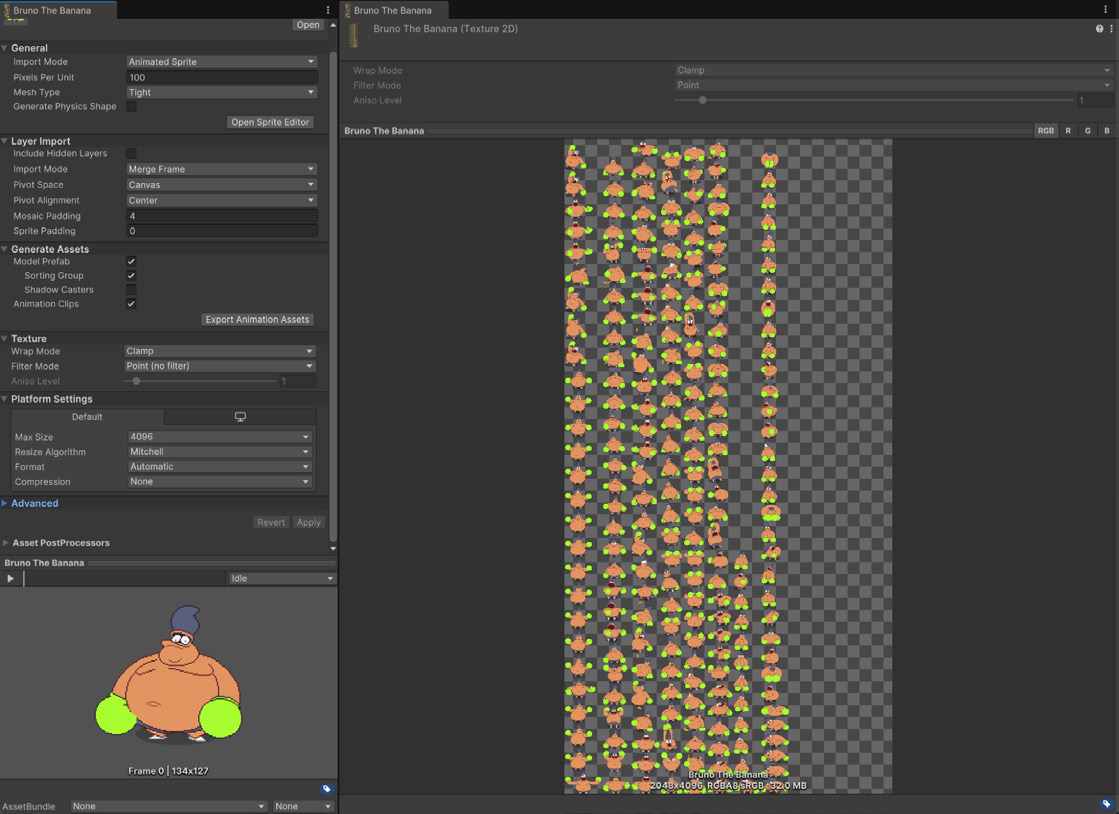
Импортируйте покадровую анимацию из Aseprite в Unity Один из самых полезных советов по работе с Aseprite Importer в Unity: перед импортом тщательно организуйте файлы Aseprite с помощью Tags и Slices. Эти средства позволяют корректно и автоматически обрабатывать анимации и нарезать изображения на спрайты прямо в редакторе. Например, определяйте и организуйте анимации с помощью тегов вроде Idle и Walk, а области спрайта или отдельные части, такие как голова и оружие, отмечайте с помощью Slices. Это упрощает импорт и экономит время.
©2025UnityTechnologies
Анимация, импортированная из Aseprite в Unity
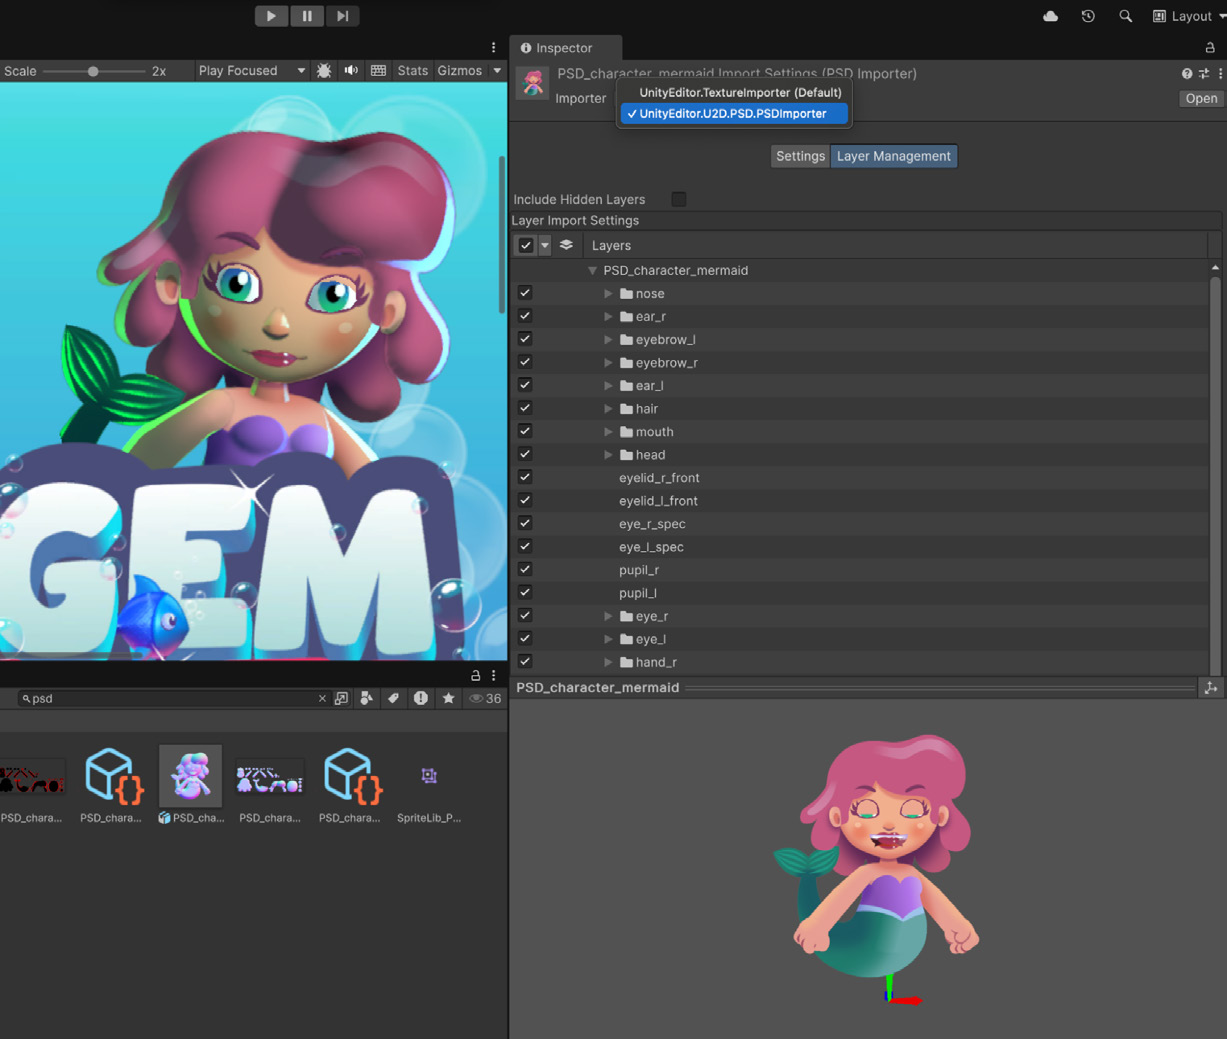
Ускорьте процесс повторного импорта с помощью PSD Importer PSD Importer импортирует файлы Adobe Photoshop в Unity и на основе исходного файла создаёт префаб из спрайтов. С PSD Importer можно ускорить импорт 2D-спрайтов, элементов UI и любых других ассетов, созданных в Photoshop. Раньше художникам приходилось экспортировать каждый слой файла Photoshop в отдельный файл .png для Unity, а после каждого изменения заново экспортировать все файлы .png. Теперь это не требуется: Unity поддерживает многослойный формат .psd. Анимированных 2D-персонажей, у которых каждая конечность или другая часть находится в отдельном слое, можно импортировать в Unity для дальнейшей работы в 2D Animation. PSD Importer подготовит персонажа к последующему риггингу и анимации. Если каждый слой PSD должен стать отдельным спрайтом, снимите флажок Character Rig. Тогда префаб создаваться не будет, а результатом станет обычный набор нарезанных спрайтов: каждый слой можно будет использовать как самостоятельный спрайт.
©2025UnityTechnologies
Импортируйте многослойные PSD-файлы именно через PSD Importer, а не через стандартный импортёр текстур, чтобы были доступны все возможности импортёра.
Другие полезные советы в действии смотрите в видеоруководстве «Из Photoshop в Unity с помощью PSD Importer».
Упростите работу с Rule Tile в Tilemap Editor в Unity 6.1 Система Tilemap в Unity хранит и обрабатывает ассеты Tile, предназначенные для создания 2D-уровней на сетке. Благодаря этому уровни легко создавать и итеративно дорабатывать прямо в Unity.
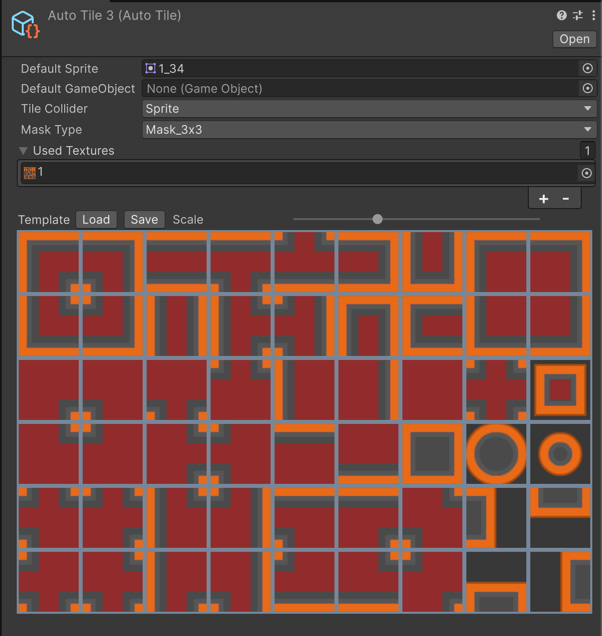
При работе с тайлами бывает сложно создать ассеты всех соседних вариантов тайла и назначить их ассету Rule Tile. В Unity 6.1 этот процесс упрощает новая функция AutoTile. Загрузите лист тайлов, выделите внутренние области и сохраните его: Unity создаст ассет тайла, который можно использовать в палитре тайлов.
©2025UnityTechnologies
Пример AutoTile
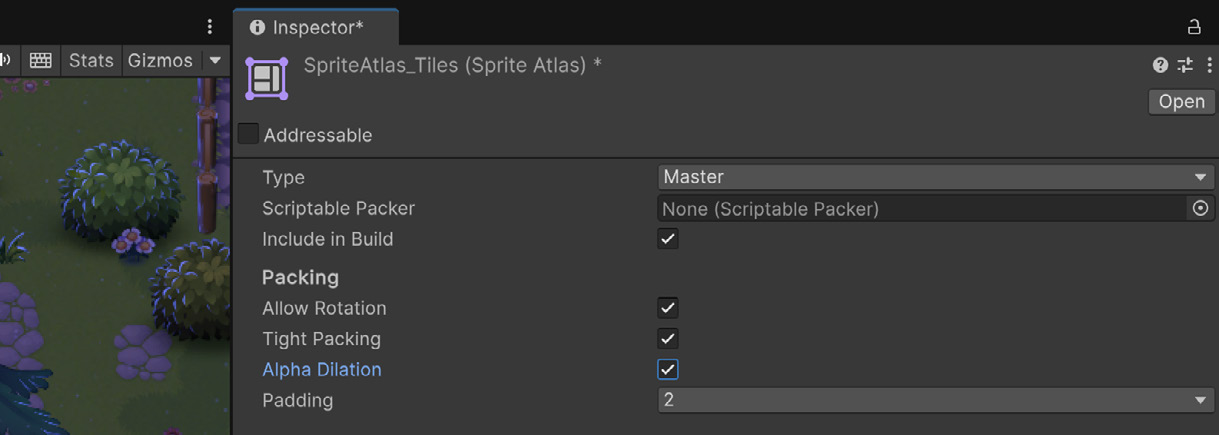
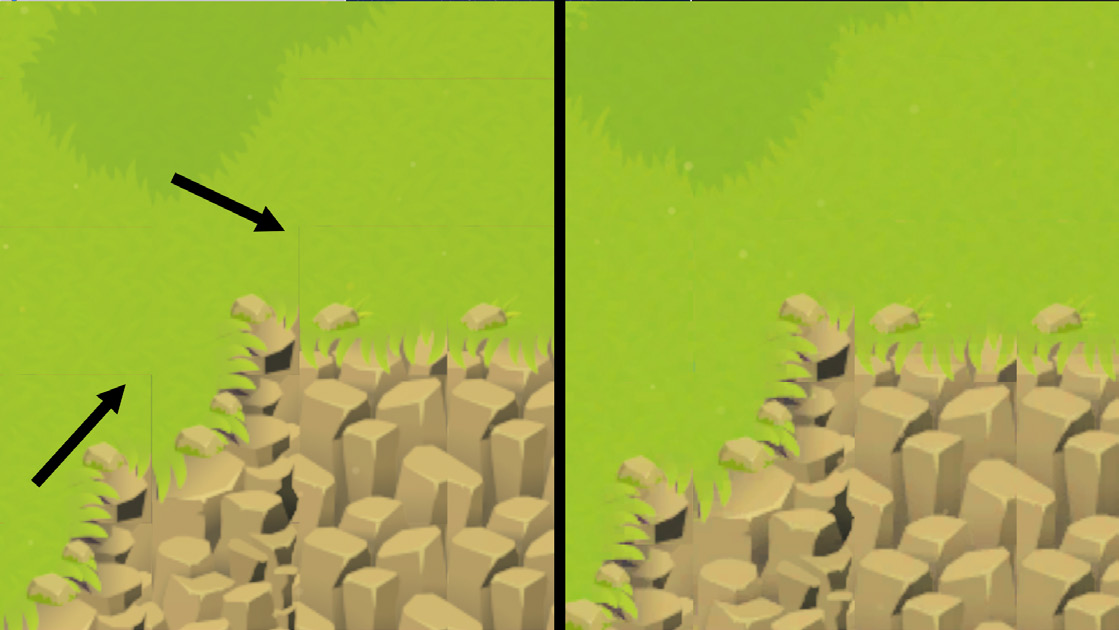
Избегайте затекания текстур и зазоров между тайлами После всей работы над графикой и тайлмапами важно не допустить просачивания текстуры и появления небольших зазоров между тайлами из-за интерполяции и сглаживания краёв. Для игр с пиксельной графикой, где спрайты не сглаживаются, эта проблема нехарактерна. Если вы не используете лист тайлов, рекомендуем упаковать спрайты в Sprite Atlas, чтобы сгладить стыки, и включить внутреннюю сортировку в TilemapRenderer. Это улучшит организацию проекта, производительность и творческий контроль. Настройки по умолчанию подходят большинству спрайтов, но для тайлмапов может потребоваться дополнительная настройка. Чтобы тайлы сохраняли чёткие края, при упаковке отключите Allow Rotation и используйте Alpha Dilation.
©2025UnityTechnologies
Параметр Alpha Dilation в Sprite Atlas
На левом изображении заметно просачивание по краям тайлов; проблему устранили, скорректировав настройки Sprite Atlas.
©2025UnityTechnologies
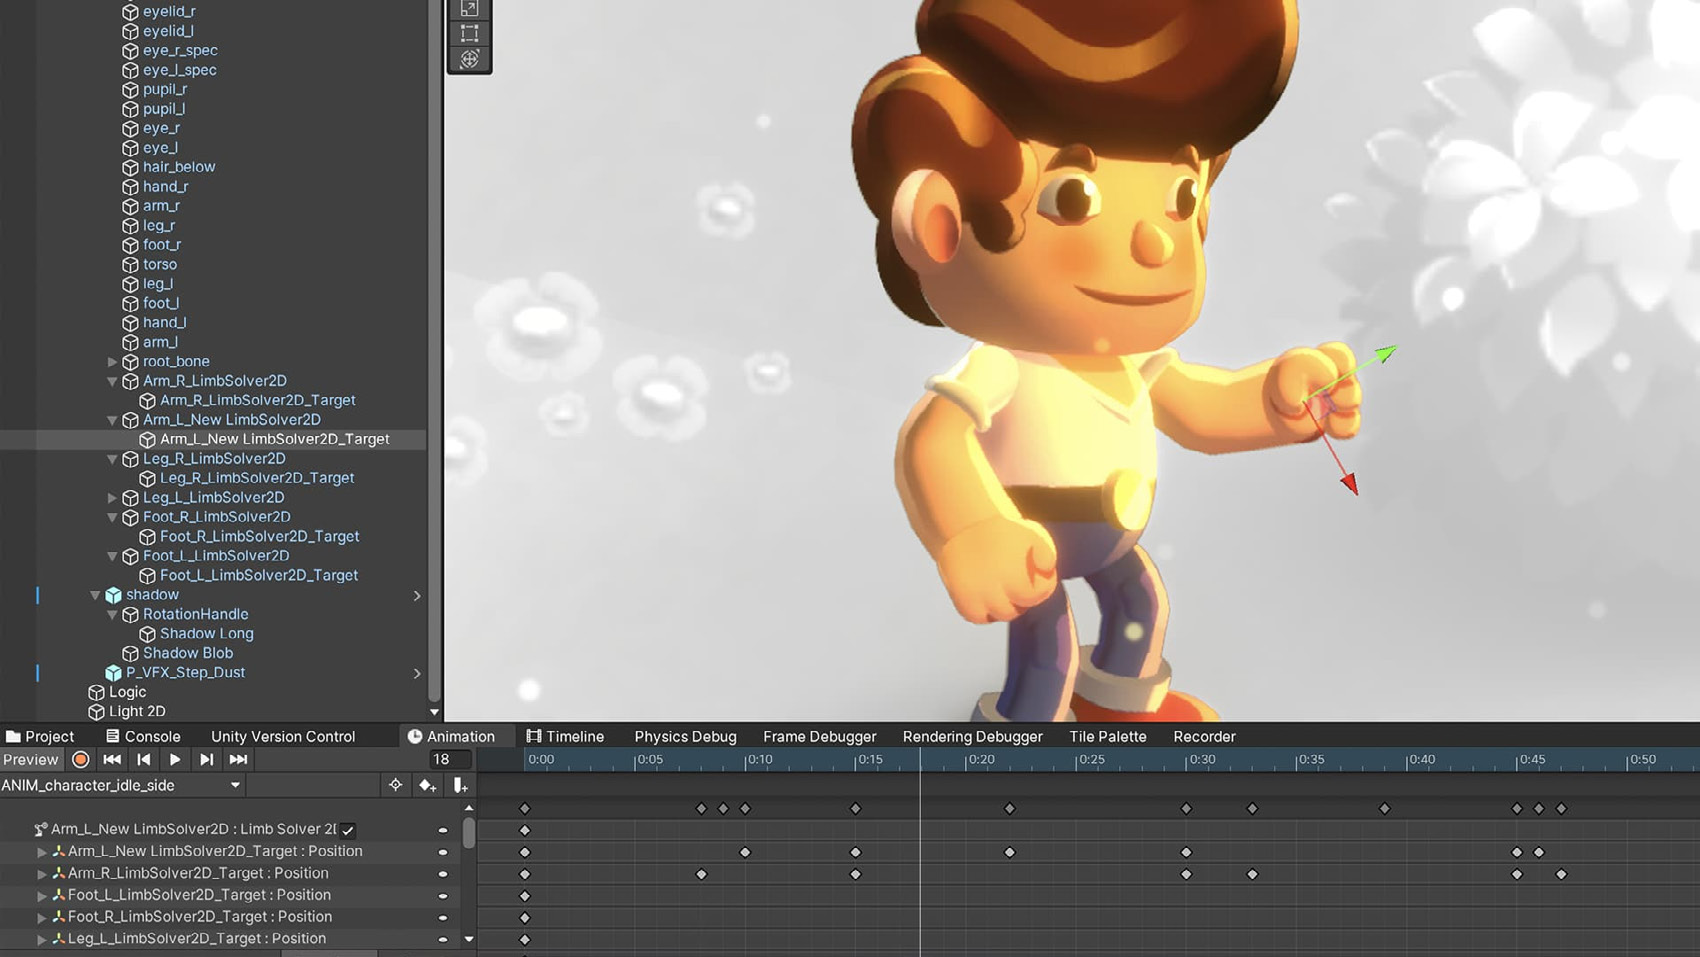
Используйте систему 2D Inverse Kinematics для создания естественных движений Unity включает комплексное решение для скелетной анимации под названием 2D Animation. Для управления движением рига используйте систему Unity 2D Inverse Kinematics (IK). С помощью IK можно создавать естественные и динамичные движения, например сгибание коленей или вытягивание руки, без ручной настройки каждой кости.
Использование 2D IK при анимации главного персонажа в демонстрационном проекте Happy Harvest
Тщательно проектируйте иерархии костей в Sprite Editor, чтобы обеспечить корректное управление. Например, сделайте кость кисти дочерней по отношению к кости руки. Проверьте иерархию на простых анимациях и убедитесь, что изменения кости верхнего уровня правильно влияют на её дочерние кости. Используйте Animation Blend Trees для плавных переходов между анимациями ходьбы, бега и покоя в зависимости от таких переменных, как скорость или направление ввода. Это позволяет добиться естественных анимаций без резких переключений между состояниями.
©2025UnityTechnologies
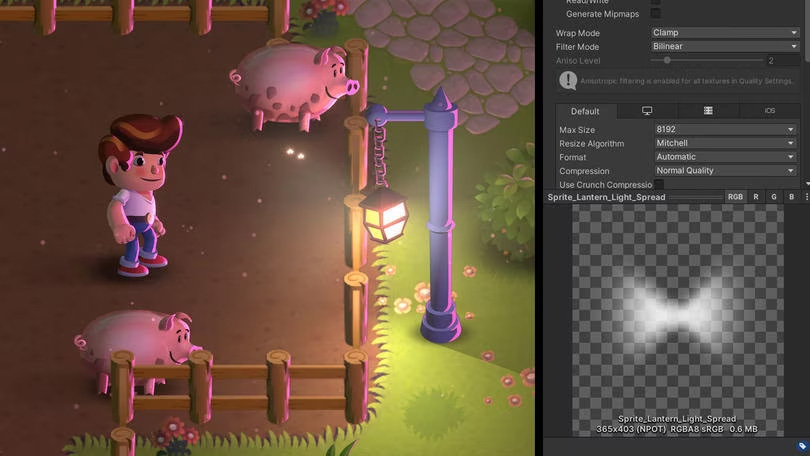
Имитируйте профили IES с помощью 2D-источников света В 3D-приложениях, например в HDRP, затухание света часто имитируют с помощью профилей IES. Система 2D-освещения Unity очень гибкая и предлагает удобные параметры настройки, включая цвет, интенсивность, затухание и эффекты смешивания. Если требуется точнее настроить характер затухания источника света, выберите для него тип Sprite и используйте созданный вами световой эффект.
Спрайт с ореолом вокруг подвесной лампы в демонстрационном проекте Happy Harvest
Дополнительные советы по 2D-освещению можно найти в этой статье Мартина Райнмана из Odd Bug Studio, а приёмы работы с 2D-светом и тенями в Universal Render Pipeline - на этой странице.
©2025UnityTechnologies
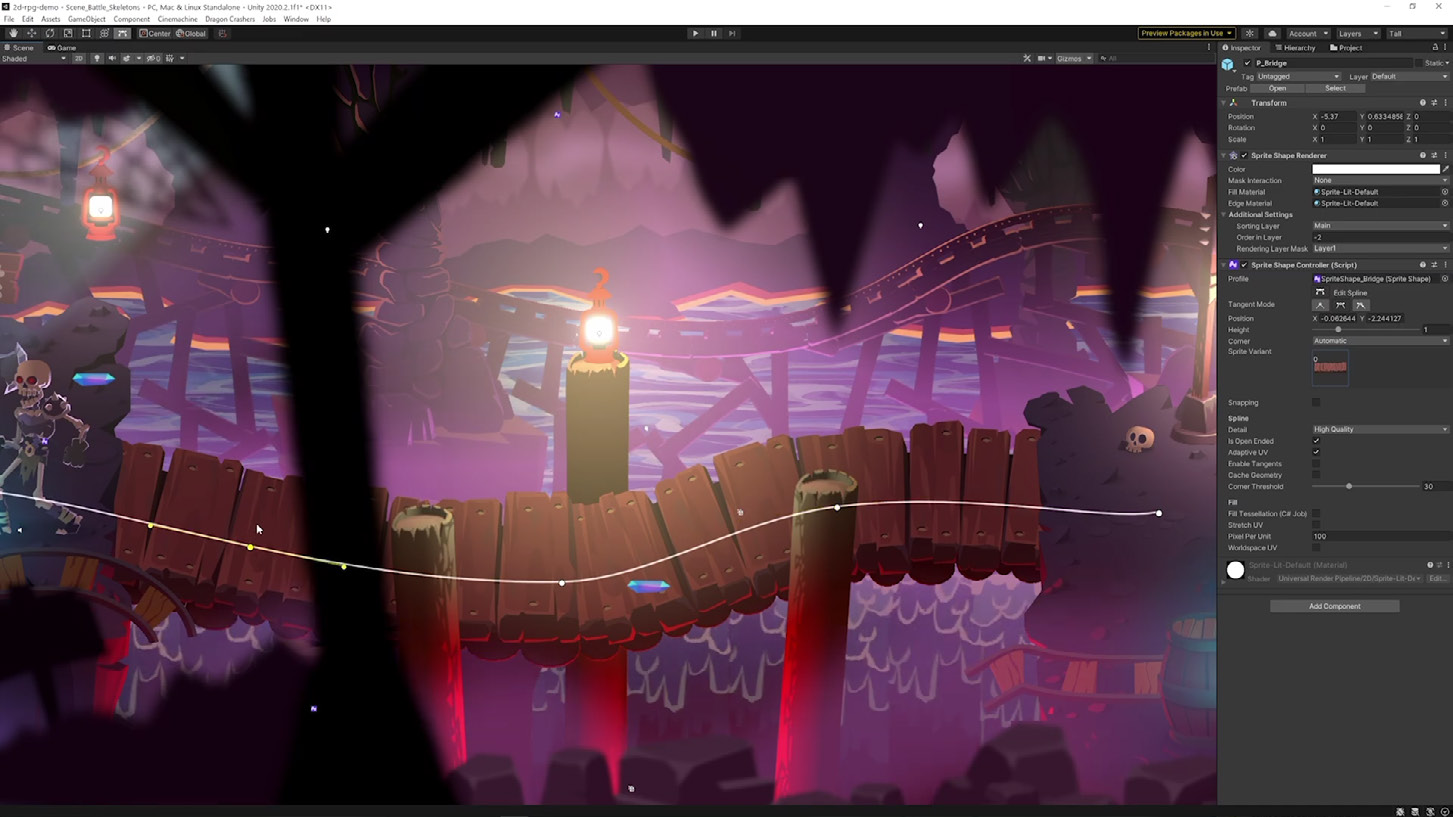
Создавайте детализированные 2D-окружения произвольной формы с помощью 2D Sprite Shape 2D Sprite Shape позволяет создавать детализированные 2D-окружения произвольной формы с помощью наглядного и интуитивно понятного рабочего процесса. Инструмент укладывает спрайты вдоль контура фигуры, автоматически деформируя и заменяя их в зависимости от угла контура.
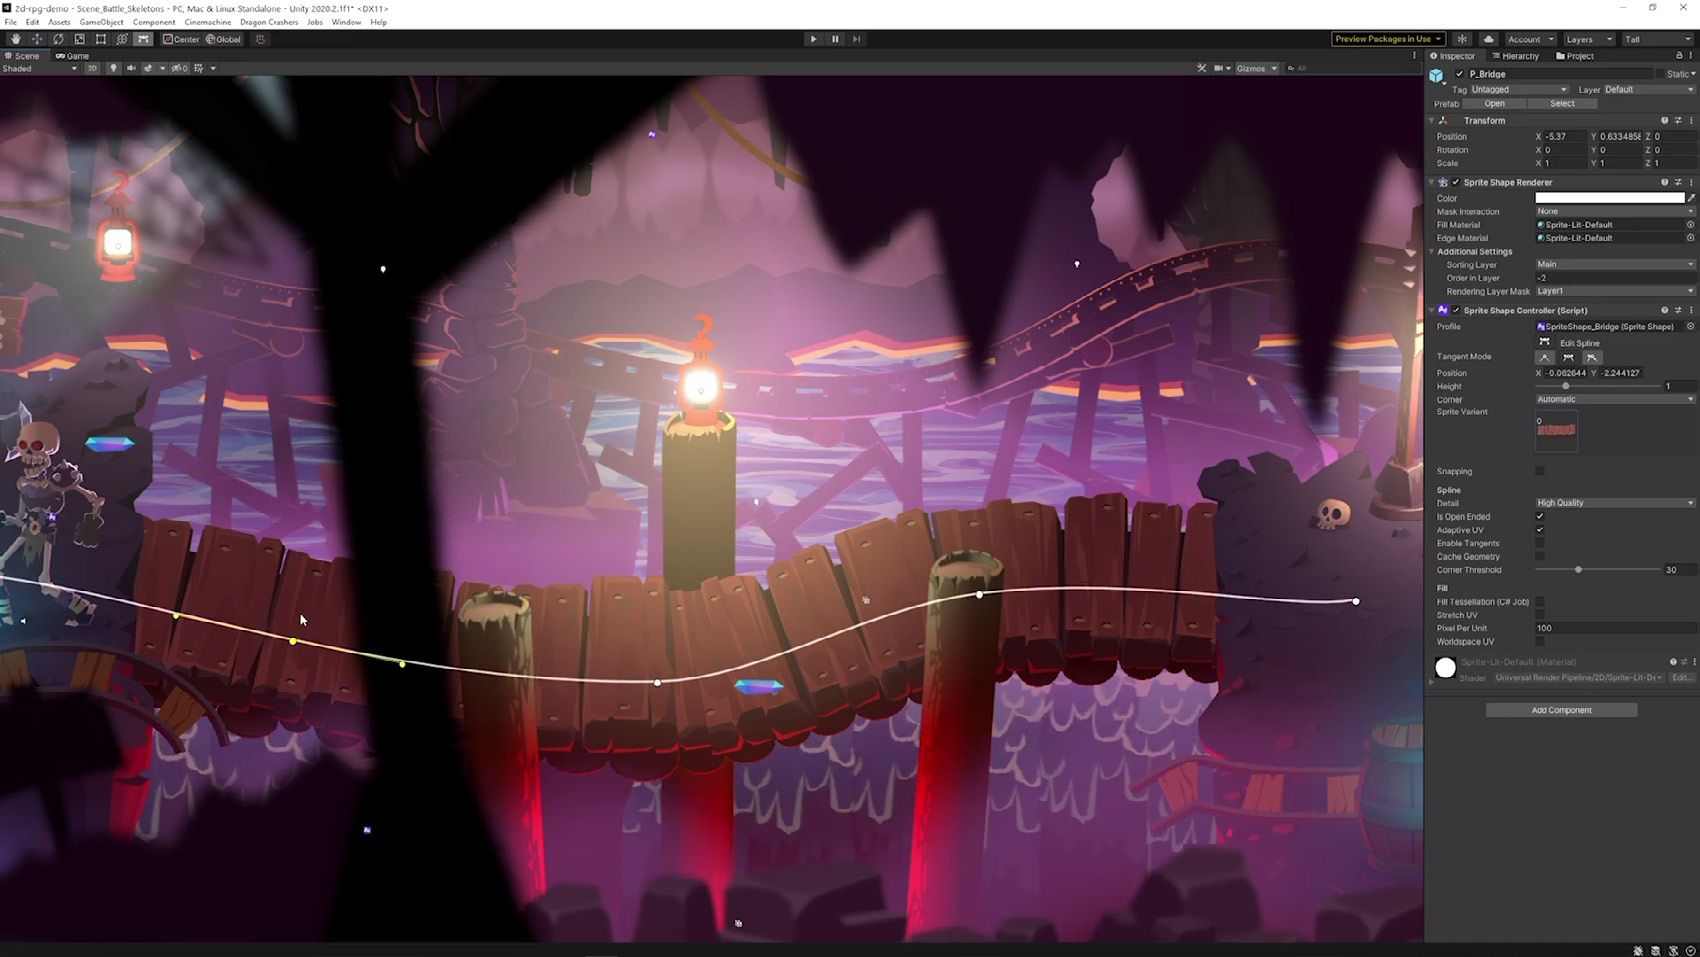
Пример использования 2D Sprite Shape в демонстрационном 2D-проекте Dragon Crashers
Sprite Shape также автоматически создает компонент Polygon Collider 2D, если вы хотите использовать контуры или фигуры в системе Physics 2D.
©2025UnityTechnologies
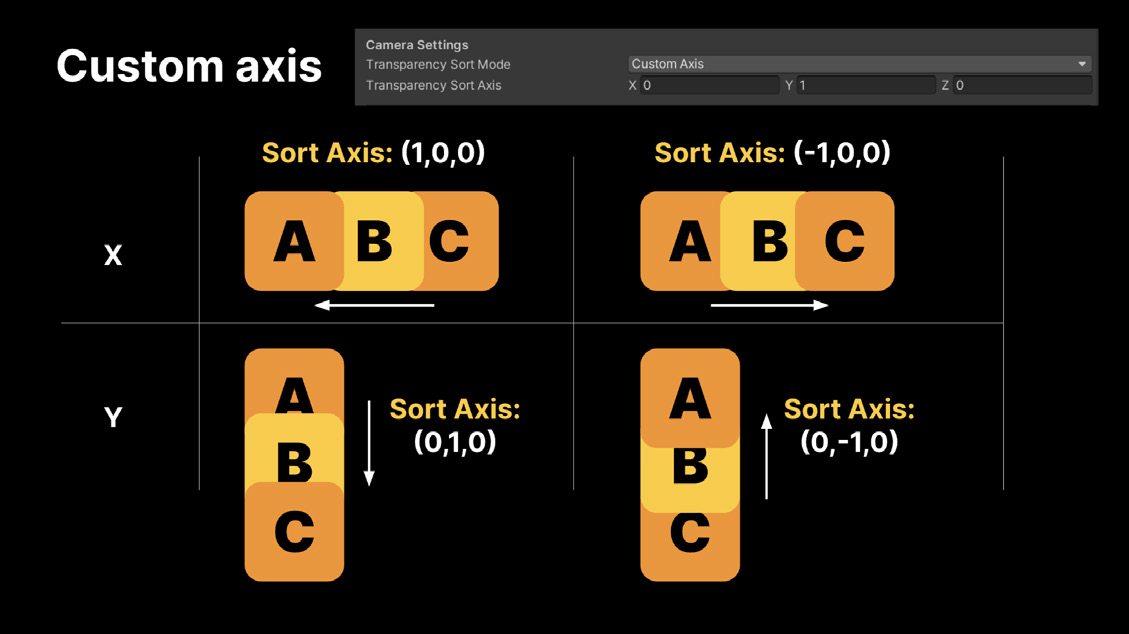
Пользовательская ось сортировки спрайтов Сортируйте спрайты в выбранном направлении. Это полезно, когда несколько спрайтов находятся на одном слое, имеют одинаковый порядок сортировки, но должны отрисовываться в определенной последовательности. Например, представьте карточную игру, где карты немного перекрываются: при этом карта в нижней части экрана должна отрисовываться поверх остальных. В URP откройте ассет 2D Renderer и выберите General > Transparency Sort Mode > Custom Axis. Например, задайте для Transparency Sort Axis значение (0, 1, 0), чтобы сортировать объекты вдоль оси Y сверху вниз.
Пример настройки Transparency Sort Mode и Transparency Sort Axis; дополнительные советы см. в этом видеоруководстве (оно создано для более ранней версии Unity, но по-прежнему актуально)
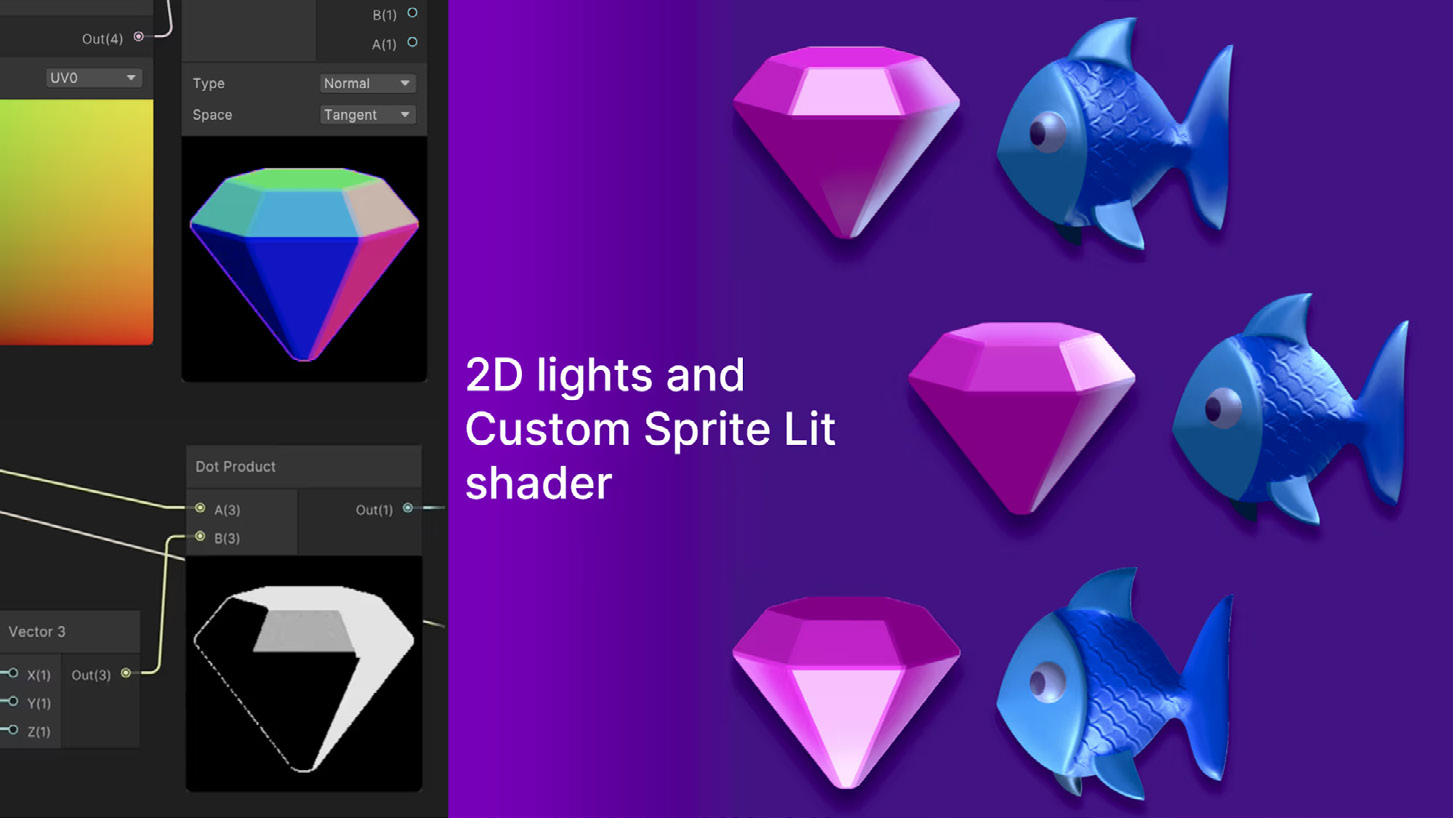
Создавайте освещение с шейдерами Sprite Custom Lit Если вам нужны эффекты освещения, не зависящие от глобального освещения сцены, рассмотрите возможность использования шейдера Sprite Custom Lit. Это один из приемов, использованных для создания визуальных эффектов в демонстрационном проекте Gem Hunter Match. Этот шейдер заменяет освещение сцены, позволяя команде изменять данные текстуры 2D-освещения и управлять освещением каждого игрового элемента. В результате спрайты получают выразительное освещение, например переливающийся блик, движущийся по игровым элементам. Данные о положении источника света передаются в шейдер, поэтому отдельные объекты источников света в сцене не нужны, а сама сцена остаётся чище. Инкапсулированное в шейдере освещение каждого объекта упрощает независимую настройку и массовое редактирование, а там, где возможна пакетная отрисовка, повышает производительность.
©2025UnityTechnologies
Шейдер Sprite Custom Lit в Gem Hunter Match
Узнайте из статьи в блоге «Сокровищница освещения и визуальных эффектов в новом match-3-примере Gem Hunter Match», как команда с помощью шейдера Custom Sprite Lit получила полный творческий контроль над освещением каждого 2D-спрайта.
©2025UnityTechnologies
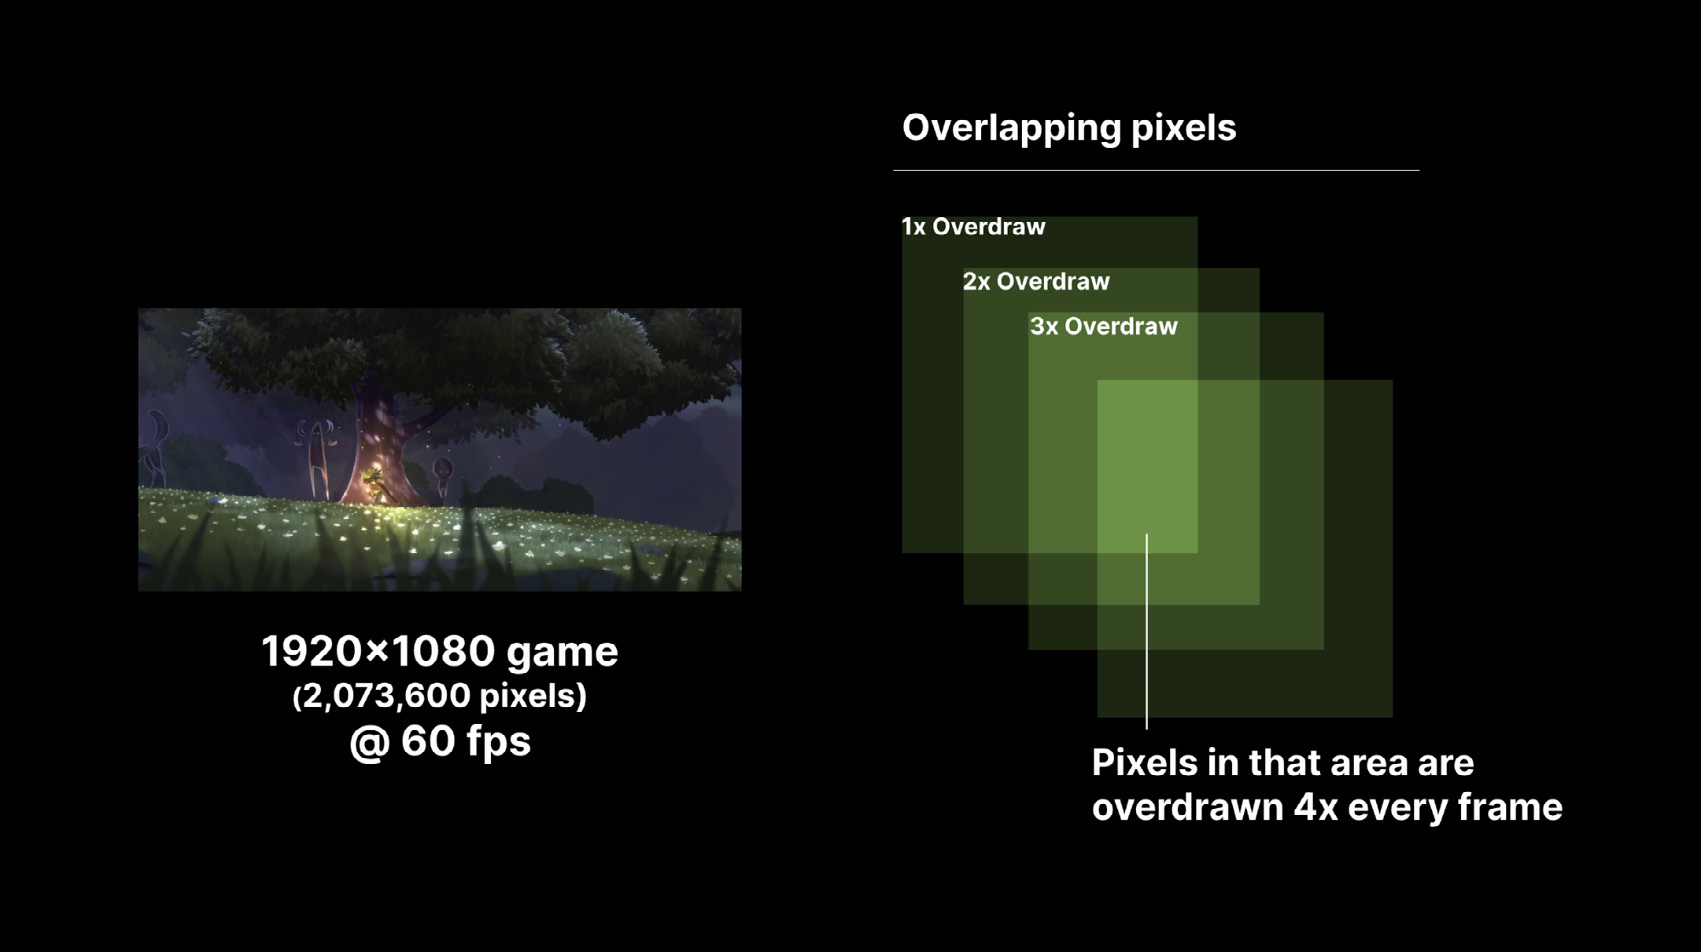
Сократите избыточную отрисовку прозрачных пикселей Чтобы повысить производительность, избегайте многократной отрисовки одних и тех же пикселей. В Import Settings установите для Mesh Type значение Tight (значение по умолчанию). По возможности объединяйте перекрывающуюся графику в один спрайт и отключайте спрайты в фоновых слоях, если они не используются в игре. Это уменьшит область избыточной отрисовки и вероятность перекрытия с соседними спрайтами.
Сокращение избыточной отрисовки между спрайтами .
©2025UnityTechnologies
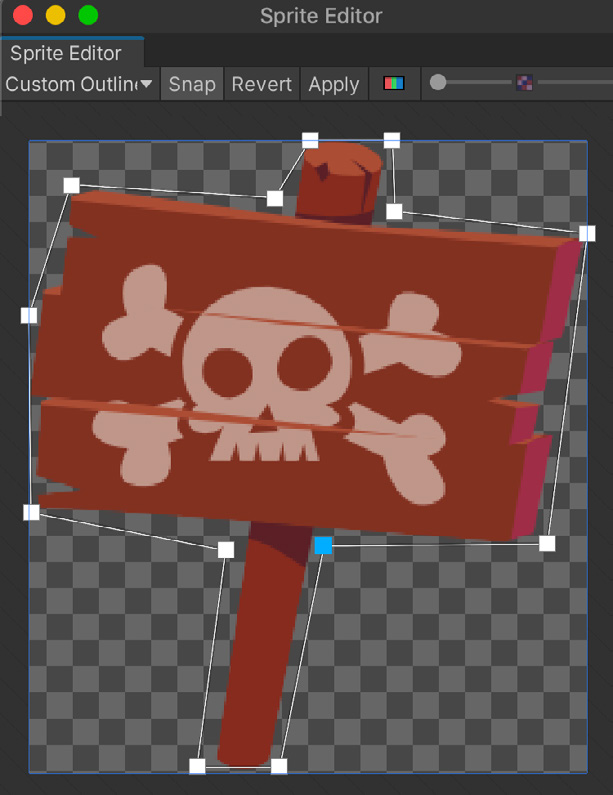
Сокращайте неиспользуемые области в Sprite Editor С помощью 2D Sprite Editor можно также задать пользовательский контур для каждого спрайта. Это позволяет свести к минимуму неиспользуемые области при упаковке спрайтов и избежать избыточной отрисовки.
Пользовательский контур в Sprite Editor
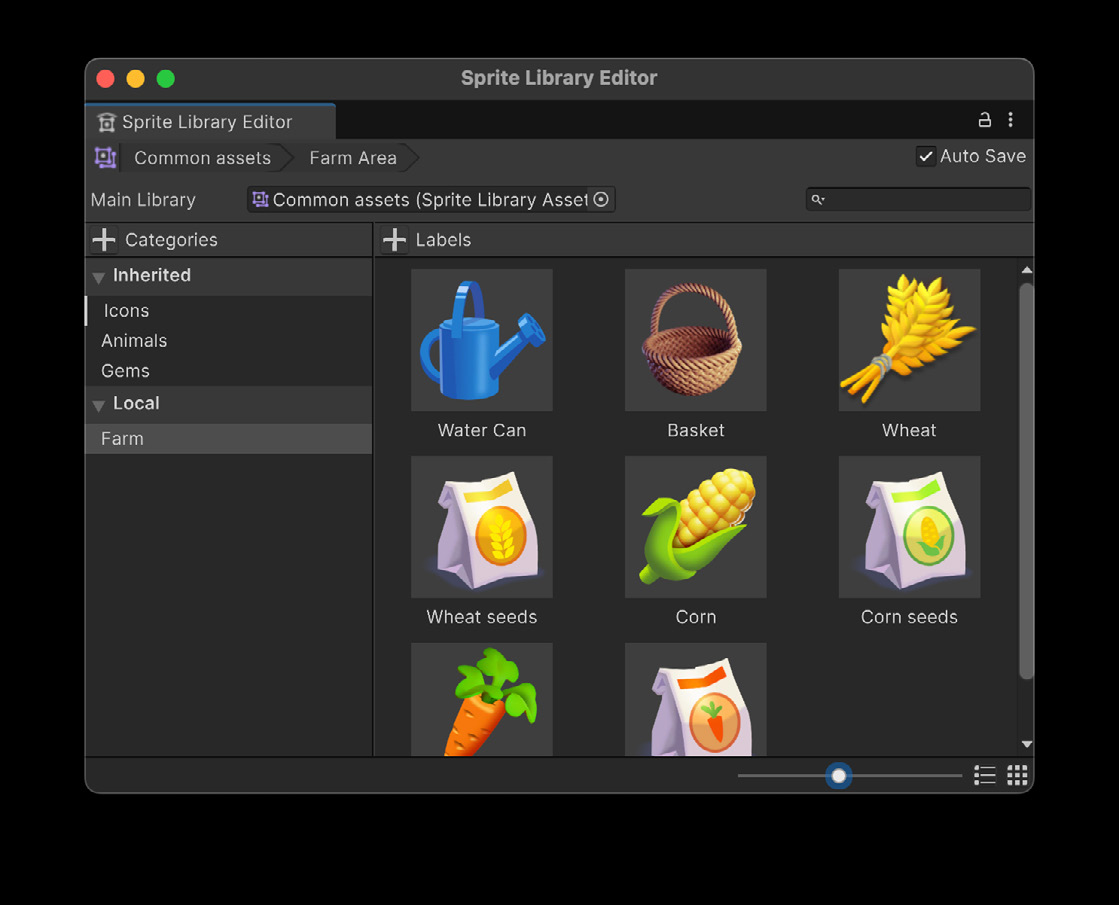
Организуйте спрайты и анимации проекта с помощью Sprite Libraries Используйте Sprite Libraries, чтобы удобно организовать спрайты для проектирования уровней и составных персонажей. Sprite Libraries отличаются от Sprite Atlases, предназначенных для группировки спрайтов с целью повышения производительности отрисовки. Поскольку Sprite Libraries, Sprite Atlases и Addressables совместимы, их можно использовать вместе, чтобы поддерживать порядок в крупных проектах.
©2025UnityTechnologies
Окно Sprite Library Editor
Изменение контрольных точек Sprite Shape Sprite Shape помогает проектировать естественно выглядящий 2D-ландшафт: холмы, динамически изменяемые дороги, тропы, гоночные трассы и водоемы, а также декоративные элементы.
С его помощью можно создавать и игровые механики: объедините Sprite Shape с системой Unity 2D Physics, чтобы создавать интерактивные области, которые способны адаптироваться и изменять форму в реальном времени, например разрушаемый ландшафт или деформируемые платформы. Контрольные точки Sprite Shape можно изменять, а API предоставляет к ним доступ как во время выполнения, так и в редакторе. Это влияет на производительность, но при продуманной интеграции может дать игре ощутимое преимущество.
©2025UnityTechnologies
Изменение контрольных точек Sprite Shape в демонстрационном проекте Dragon Crashers - 2D URP
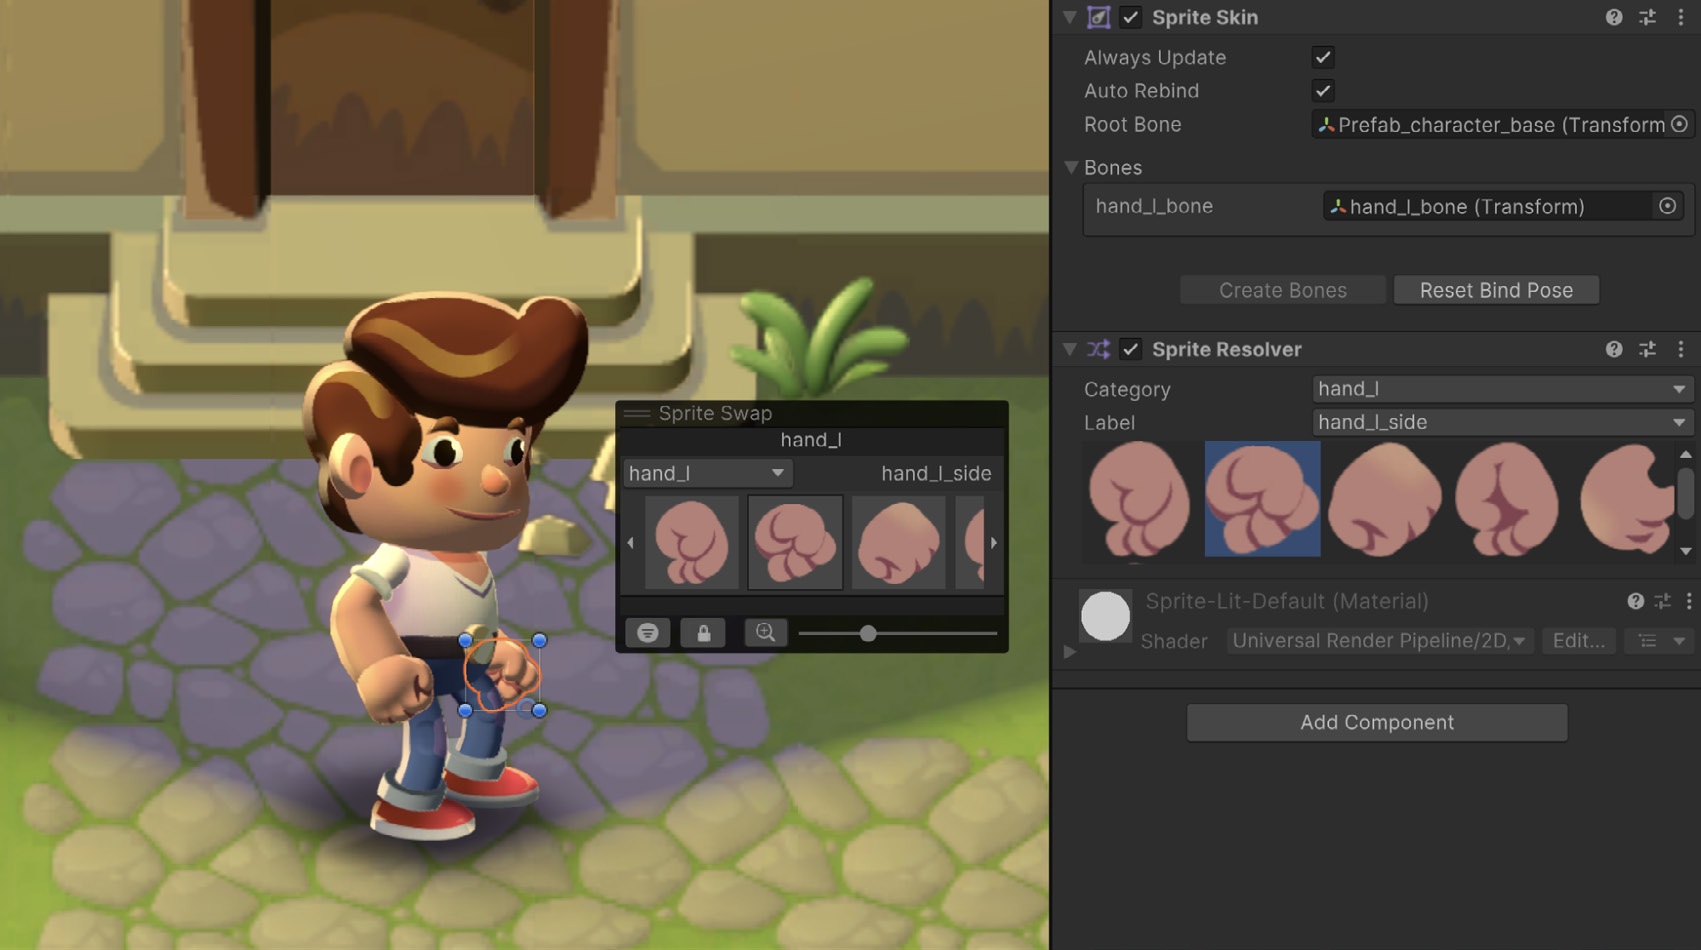
Удобно заменяйте спрайты через контекстное меню Sprite Resolver - компонент, который работает вместе с системой 2D Sprite Library и позволяет динамически переключаться между различными вариантами спрайта во время выполнения. Он позволяет менять спрайт объекта GameObject, не назначая его вручную в окне Inspector, что расширяет возможности управления спрайтами в проекте и делает его более гибким.
Вот несколько наиболее удачных сценариев использования Sprite Resolver: - Системы настройки внешнего вида персонажей - Динамическая смена выражений лица или настроения NPC и персонажей - Смена спрайтов окружения в зависимости от времени года или внутриигровых событий - Изменение внешнего вида объектов при улучшении или ухудшении их состояния - Более эффективная и упорядоченная замена спрайтов в анимациях
©2025UnityTechnologies
В Unity 6 компоненты Sprite Resolver можно использовать как в окне Inspector, так и в компоновке редактора.
Компонент Sprite Resolver в Sprite Library
©2025UnityTechnologies
Sprites A 2D project uses Sprites to create its visuals. These potentially contain different Texture assets and may thus require many draw calls if not batching properly. To optimize resources, use a Sprite Atlas (Asset > Create > Sprite Atlas) which will allow batching sprites using the same material and packed texture.
Avoid duplicated assets when packing sprites In 2D URP, sprites can contain normal maps or mask maps which you might also want to pack in a Sprite Atlas. This is important for performance and quality reasons, such as memory optimization, draw call reduction, and loading efficiency. If you add folders to the Sprite Atlas, make sure they only contain the normal sprite or albedo texture. Normal maps and mask maps will automatically be added to their respective atlases that you can view in the drop-down list. Otherwise, they would be added unnecessarily to the normal pack atlas, taking up space in it. Having neatly organized atlases for normal maps or mask maps allow you to fine-tune compression settings for each one. For example, normal maps can be half of the resolution, while the normal sprites can be in full resolution, or any other adjusting that you need based on the platform you’re developing for.
The three types of atlases when packing 2D sprites
Structure your folders to maintain consistency Folder structure within 2D sprites makes it easier to locate and manage assets, helps manage memory by organizing assets by load time, provides a clear separation of different game elements, and more. Here’s a common folder structure to help organize the folders your Unity project: —
Sprites/Characters/[CharacterName]/Animations
Sprites/UI/[MenuType]/Elements
Sprites/Environment/[LevelName]/Background
Sprites/Effects/[EffectType]
Sprites/Common/SharedElements
Bring your pixel art directly to Unity with Aseprite Importer Aseprite, a sprite editor and pixel art tool, has become an industry-standard DCC app for pixel artists. With Unity Aseprite Importer, you don’t have to export hundreds of .PNG sprites individually; you can add your .aseprite file directly to your project.
Work directly in Aseprite, click Save, and instantly see the changes in Unity. The Importer includes drag and drop support for .aseprite files, automatic setup of GameObjects and Animation clips so they’re ready to use, and a comprehensive 2D feature set integration. In Unity 6, we enabled auto-generation of Tilemap assets from .aseprite files containing tilemaps. Changes to the source propagate down automatically.
The Aseprite Importer in the Unity Project window: This section of the Unite 2024 talk Say hello to new 2D workflows and AI enhancements demonstrates the Aseprite Importer in action
Bring your frame-by-frame animations from Aseprite to Unity One of the most helpful tips for using the Aseprite Importer in Unity is to keep your Aseprite files well-organized with Tags and Slices before importing, as these features allow smooth and automatic handling of animations and sprite slicing directly in the Editor. For example, use tags such as “Idle”, “Walk”, etc., to define and organize animations, and use Slices by marking specific areas of your sprite or separate parts, such as head, weapon, etc. This can help with streamlining the importing process and save you time.
An imported animation into Unity from Aseprite
Speed up the roundtrip import process with the PSD Importer The PSD Importer imports Adobe Photoshop files into Unity and generates a prefab of sprites based on the imported source file. You can speed up the importing process for 2D sprites, UI elements, or any other Photoshopmade asset with the PSD importer. Traditionally, artists would export every layer in a Photoshop file, as a .png file to use in Unity, and then they’d have to reexport .png files with every change. This is no longer needed, as Unity supports the layered .psd format. Animated characters made for 2D, where each limb or part is in a different layer, can be imported to Unity for 2D Animation. It will set up the character so that you can rig it and animate it later. If every PSD layer is meant to be a standalone sprite, you can uncheck the Character Rig option, removing the prefab object, and get a simple sliced sprite with all the layers usable as standalone sprites.
Ensure that you import your layered PSD files with the PSD Importer, and not the default texture importer, so that you have access to all the importer features.
See more helpful tips in action in this From Photoshop to Unity with PSD Importer video tutorial.
Easier rule tiles with Tilemap Editor in Unity 6.1 Unity’s Tilemap system stores and handles Tile Assets for creating grid-based 2D levels, which makes it easy to create and iterate on level design cycles within Unity. One of the challenges when working with tiles is to create all the neighbouring tiles assets and assign them to a Rule Tile Asset. In Unity 6.1, a new option, called AutoTile, simplifies this process. Load a tile sheet, select the inner areas for it, and save it to generate a tile asset that you can use in your tile palette.
AutoTile example
Avoid texture bleeding or small gaps between tiles With all the effort put into art and tilemaps, you’ll want to avoid the appearance of bleeding or small gaps in between tiles due to interpolation and smoothing of edges (this isn’t an issue in pixel art games, where sprites are not smoothed). If you’re not using a tile sheet then we recommend packing the sprites with Sprite Atlas to help smoothen seams, and with internal sorting in the TilemapRenderer. This will provide better project organization, performance, and creative control. Some default settings can work for most sprites but tilemaps might require a bit more tweaking. Features like avoiding rotation of sprites when packed or alpha dilation helps tiles maintain their sharp edges.
Alpha Dilation option in the Sprite Atlas
In the left image you can see some bleeding edges on tiles, which was fixed by adjusting settings in the Sprite Atlas.
Use the 2D Inverse Kinematics system to create natural movements Unity comes with a complete solution for skeletal animation called 2D Animation. Use Unity’s 2D Inverse Kinematics (IK) system for rigging movement. Use IK to create natural and dynamic movements, such as bending knees or reaching out, without manually adjusting each bone.
Using 2D IK during the animation process for the main character in the Happy Harvest sample project
Carefully design bone hierarchies in the Sprite Editor to ensure proper control. For example, parent the hand bone to the arm bone. Test the hierarchy with simple animations to ensure that any adjustments to a higher-level bone also affect its children properly. Use Animation Blend Trees for smooth transitions between animations like walking, running, or idle states based on variables like speed or input direction. This results in natural-looking animations without abrupt changes between states.
Simulate IES profiles with 2D lights It’s common in 3D software to simulate the fall-off of lights with IES profiles, for example in HDRP. Unity’s 2D light system is very flexible with easy-to-configure parameters like light colors, intensity, fall-off, and blending effects. If you want to be more precise about the fall-off effect of a light source, use a light of the type sprite and use your custom-made light effect.
Using a sprite with a halo around a hanging lamp in the Happy Harvest sample project
Get more tips on 2D lighting from this article by Martin Reinmann of Odd Bug Studio, and this page on 2D light and shadow techniques in the Universal Render Pipeline.
Create rich free-form 2D environments with 2D Sprite Shape 2D Sprite Shape gives you the freedom to create rich free-form 2D environments with a visual and intuitive workflow. It tiles sprites along a shape’s outline, automatically deforming and swapping them based on the outline angle.
One example of how 2D Sprite Shape is used in the Dragon Crashers 2D sample project
Sprite Shape also autogenerates a Polygon Collider 2D if you want to use paths or shapes with the Physics 2D system.
Custom Sprite Sort Axis Sort your sprites based on your preferred direction. This can be helpful if you have a number of sprites within the same layer and sorting order and you need to resolve the sorting in a particular way. For example, imagine a card game where the individual cards overlap a bit and you want the card at the bottom of the screen to be rendered on top of the others. In URP, in the 2D Renderer Asset, select General > Transparency Sort Mode, and choose Custom Axis. For example, use (0, 1, 0) for the Transparency Sort Axis to sort along the Y axis from top to bottom.
Transparency Sort Mode and Sort Axis example; check this video tutorial for other tips (based on a previous Unity version but still applicable)
Create custom lighting with Sprite Custom Lit shaders If you’re looking to create lighting effects that are independent of global scene lights, consider using a Sprite Custom Lit shader. It’s one of the techniques used for creating the visual effects in the sample Gem Hunter Match. This shader substitutes for scene lighting, allowing the team to modify the 2D light texture information and control the lighting on each piece. The result is creative illumination of the sprites, like the shimmery effect that moves over the pieces. The light position data is moved into the shader, eliminating the need for actual light objects in the scene, which also helps to keep it neat. The encapsulated per-object lighting in the shader works well for better isolation and editing at scale and improves performance where batching is possible.
The Sprite Custom Lit Shader in Gem Hunter Match
Learn how the team used the Custom Sprite Lit Shader for full creative control with per-object lighting on 2D sprites in the Find a treasure trove of lighting and visual effects in our new match-3 sample Gem Hunter Match blog post.
Reduce overdraw of transparency pixels Avoid overdrawing of pixels to improve performance. Switch the Mesh Type to Tight (default option) in the Import Settings. Merge overlapping graphics in a single sprite whenever possible, and try to disable sprites that could be in a background layer with no use in the game. This reduces the overdraw area and potential overlap with neighboring sprites.
Reduce overdraw between sprites.
Minimize unused areas with the Sprite Editor You can also define a custom outline around each sprite using the 2D Sprite Editor; this can minimize the unused areas when packing the sprites and avoid overdraw.
The Sprite Editor with a custom outline
Organize your project sprites and animation with Sprite Libraries Make use of the Sprite Libraries to easily organize your sprites for level design and multi-part characters. Sprite Libraries are different from Sprite Atlases that are designed to group for rendering performance. However, because Sprite Libraries, Sprite Atlases, and Addressables are compatible, you can use them in combination to keep your larger projects organized.
The Sprite Library Editor window
Modifying Sprite Shapes control points The Sprite Shape can help you design organic 2D terrain, creating hills, dynamic roads, trails, racetracks, or bodies of water, as well as decorative elements. You can also create gameplay features – combine with Unity 2D physics to create interactive regions (e.g., destructible terrain or deformable platforms) that can adapt and reshape in real time. You can modify the control points of the sprite shape; the API gives you access to the points at runtime or Editor time. This has a performance cost, but when it’s carefully integrated it can give your game an extra edge.
Modifying Sprite Shapes control points in the Dragon Crashers - 2D URP sample project.
Swap sprites conveniently from the contextual menu The Sprite Resolver is a component that works alongside the 2D Sprite Library system and provides functionality to dynamically swap between different sprite visuals at runtime. It allows you to change the sprite of a GameObject without manually assigning it in the Inspector, enabling more powerful and flexible sprite management for your projects. Here are some of the best use cases for the Sprite Resolver: —
Character customization systems
Dynamic facial expressions or moods for NPCs or characters
Environmental sprite changes based on seasons or in-game events
Visual upgrades or degradations of objects
Streamlining sprite swaps in animations for greater efficiency and organization
In Unity 6 you can make use of Sprite Resolvers in the Inspector window, as well as in the Editor layout.
The Sprite Resolver component in the Sprite Library