Графика и художественные ассеты
Графика и художественные ассеты
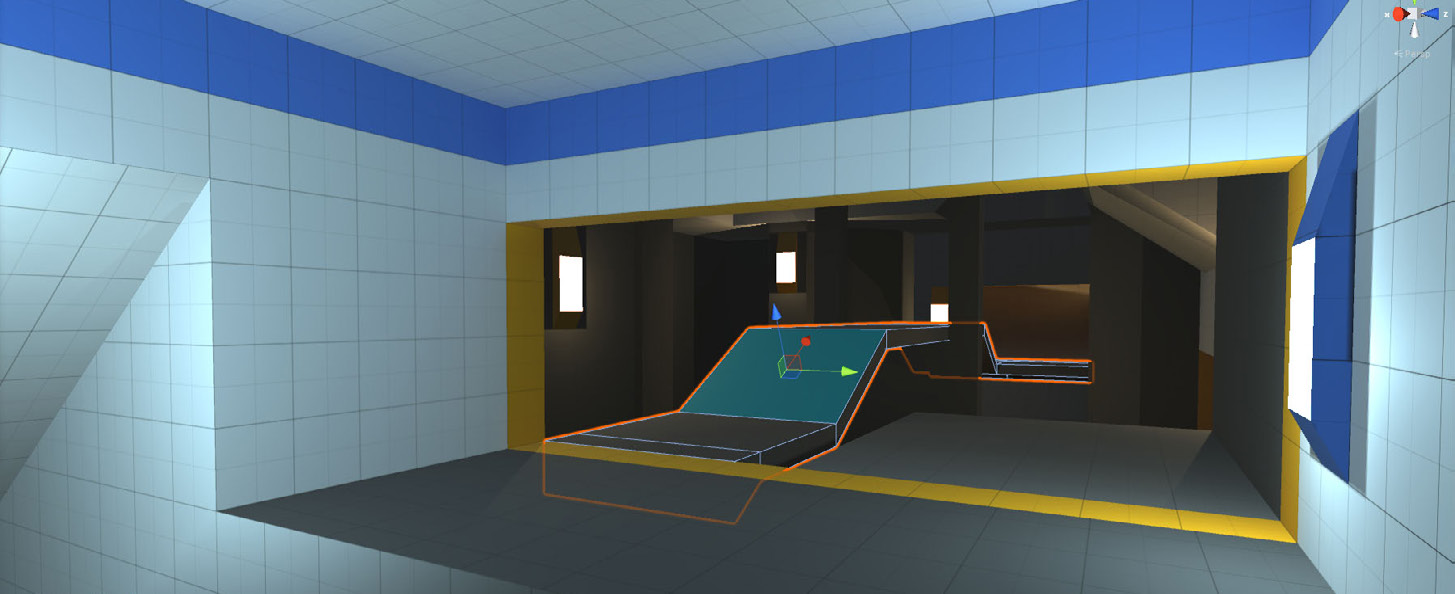
Утечки света при использовании световых зондов Утечки света часто возникают, когда геометрия получает освещение от светового зонда, не находящегося в прямой видимости, например расположенного по другую сторону стены.
Это сложная тема, но устранить утечки света могут помочь следующие приемы: - Сделайте стены толще - Добавьте в сцену Adaptive Probe Volumes Options Override - Включите Rendering Layers - Настройте свойства Baking Set - Используйте Probe Adjustment Volume
©2025UnityTechnologies
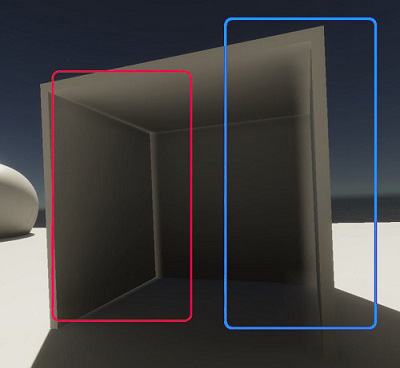
Пример утечки света
Настройте отдельные источники света для определённых объектов GameObject с помощью Rendering Layers Функция Rendering Layers позволяет настроить источники света так, чтобы они воздействовали только на определенные объекты GameObject. С помощью свойства Custom Shadow Layers можно настроить определенные объекты GameObject так, чтобы они отбрасывали тени только от указанных источников света, даже если сами эти источники на объекты GameObject не воздействуют.
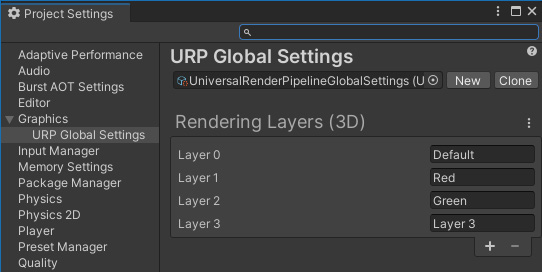
Rendering Layers в глобальных настройках URP
©2025UnityTechnologies
Добавляйте детали на меши с помощью Decal Projector Компонент Decal Projector - отличный способ добавить детали на меш. С его помощью можно создавать такие элементы, как следы от пуль и шагов, надписи, трещины и многое другое.
Благодаря проекционному принципу декали повторяют неровную или изогнутую поверхность. Чтобы использовать Decal Projector в URP, найдите ассет Renderer Data и добавьте Decal Renderer Feature.
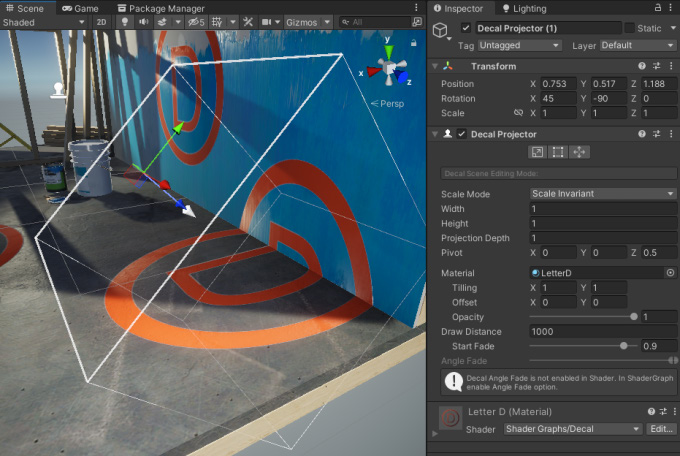
Decal Projector в окне Scene
Перенесите пользовательские шейдеры из Built-In Render Pipeline в URP Сверьтесь с этой таблицей в документации URP: в ней показано соответствие каждого шейдера URP его аналогу из Built-In Render Pipeline. Выберите один или несколько конвертеров, затем нажмите Initialize Converters или Initialize And Convert. В обоих случаях проект будет просканирован, а ассеты, требующие преобразования, появятся на панелях соответствующих конвертеров. Если выбрать Initialize Converters, можно ограничить набор преобразуемых элементов, сняв флажки рядом с ненужными. Затем нажмите Convert Assets, чтобы начать преобразование. При выборе Initialize And Convert преобразование начнется автоматически
©2025UnityTechnologies
после инициализации конвертеров. После завершения процесса Unity может предложить повторно открыть сцену, которая активна в редакторе.
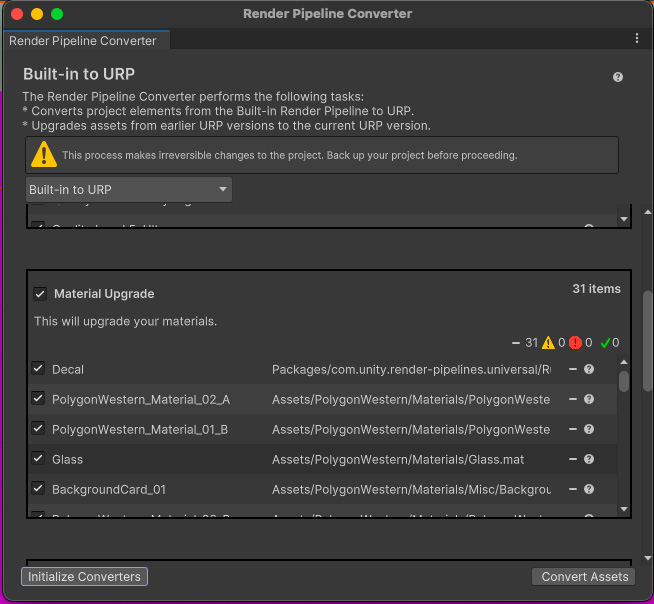
Render Pipeline Converter
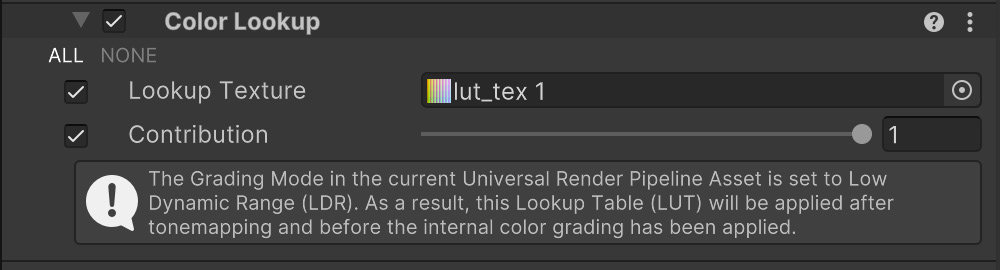
Выполняйте цветокоррекцию с помощью LUT-текстур Эффект Color Grading изменяет или корректирует цвет и яркость итогового изображения, создаваемого Unity. С его помощью можно изменить визуальный стиль и атмосферу проекта. Чтобы управлять действием Color Grading, используйте параметры Lookup Texture и Contribution в эффекте постобработки Color Lookup, который необходимо добавить в настройки Volume.
Параметры Lookup Texture и Contribution в Color Lookup
©2025UnityTechnologies
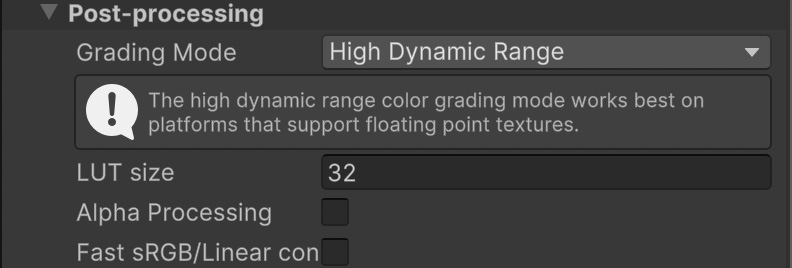
Поддерживается смешивание между несколькими LUT-текстурами низкого динамического диапазона (LDR), но оно работает корректно, только если все текстуры имеют одинаковый размер. Поэтому рекомендуется использовать во всем проекте LUT одного размера: 256x16 или 1024x32.
Настройка размера LUT в настройках ассета URP
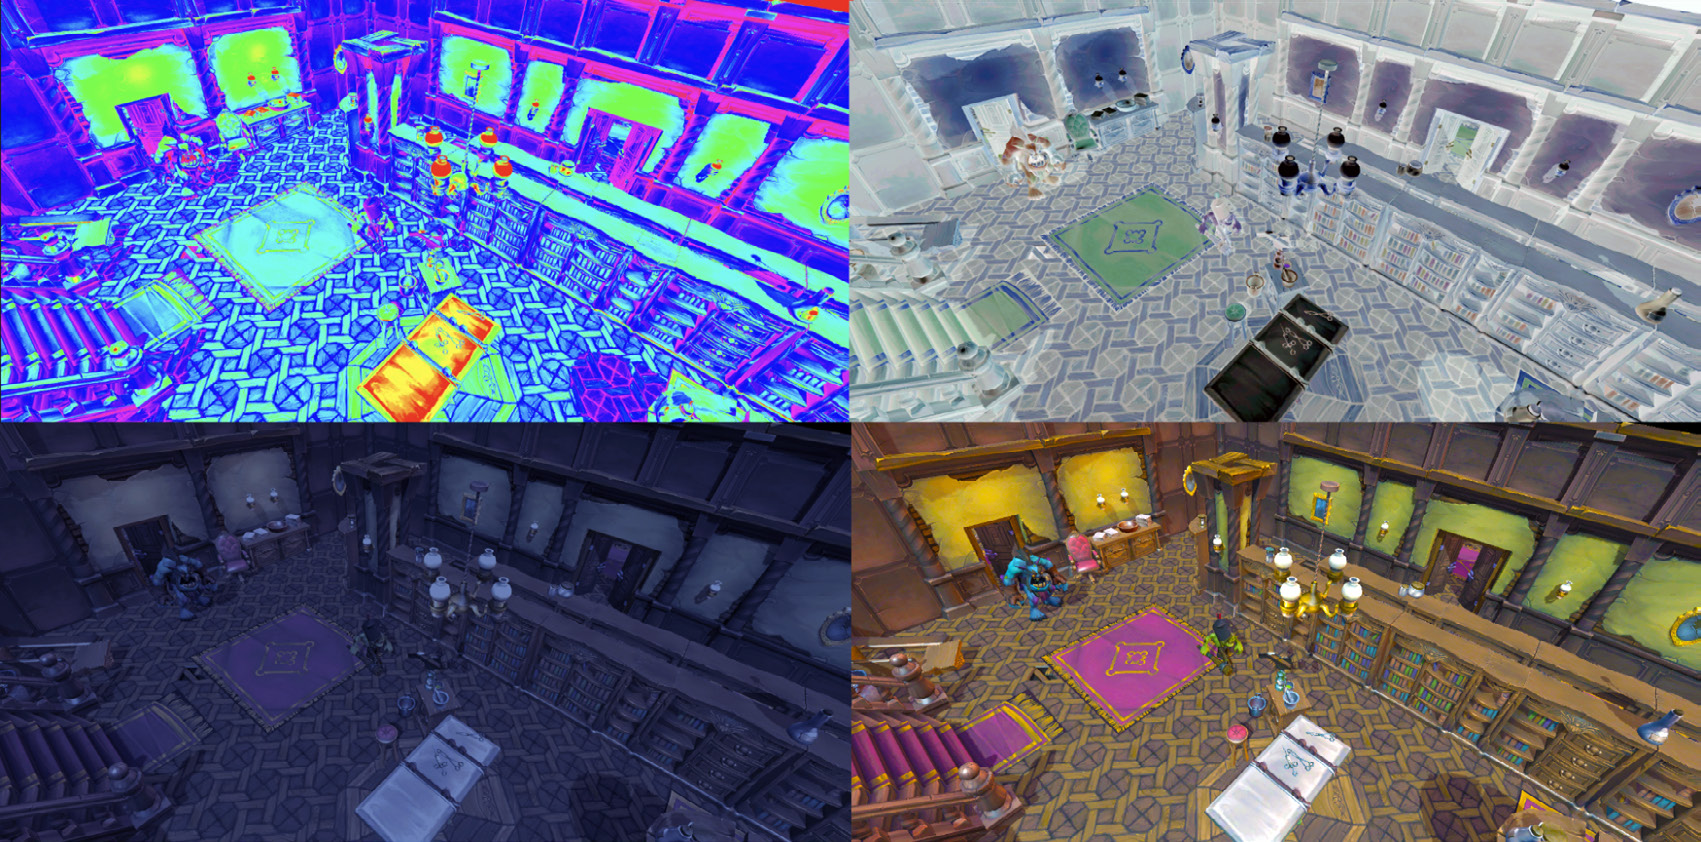
Использование различных LUT-текстур
©2025UnityTechnologies
Создавайте реалистичные оптические эффекты и стилизованный вид с помощью бликов объектива Блик объектива - это артефакт, возникающий, когда яркий свет попадает в объектив камеры. Он может выглядеть как один яркий засвет или как множество цветных многоугольных бликов, форма которых соответствует диафрагме камеры. Чтобы познакомиться с бликами объектива, установите примеры через Package Manager. В проект будет добавлен набор готовых ассетов Flare для создания эффектов бликов, а также тестовая сцена, где можно изучить эти эффекты и научиться создавать собственные.
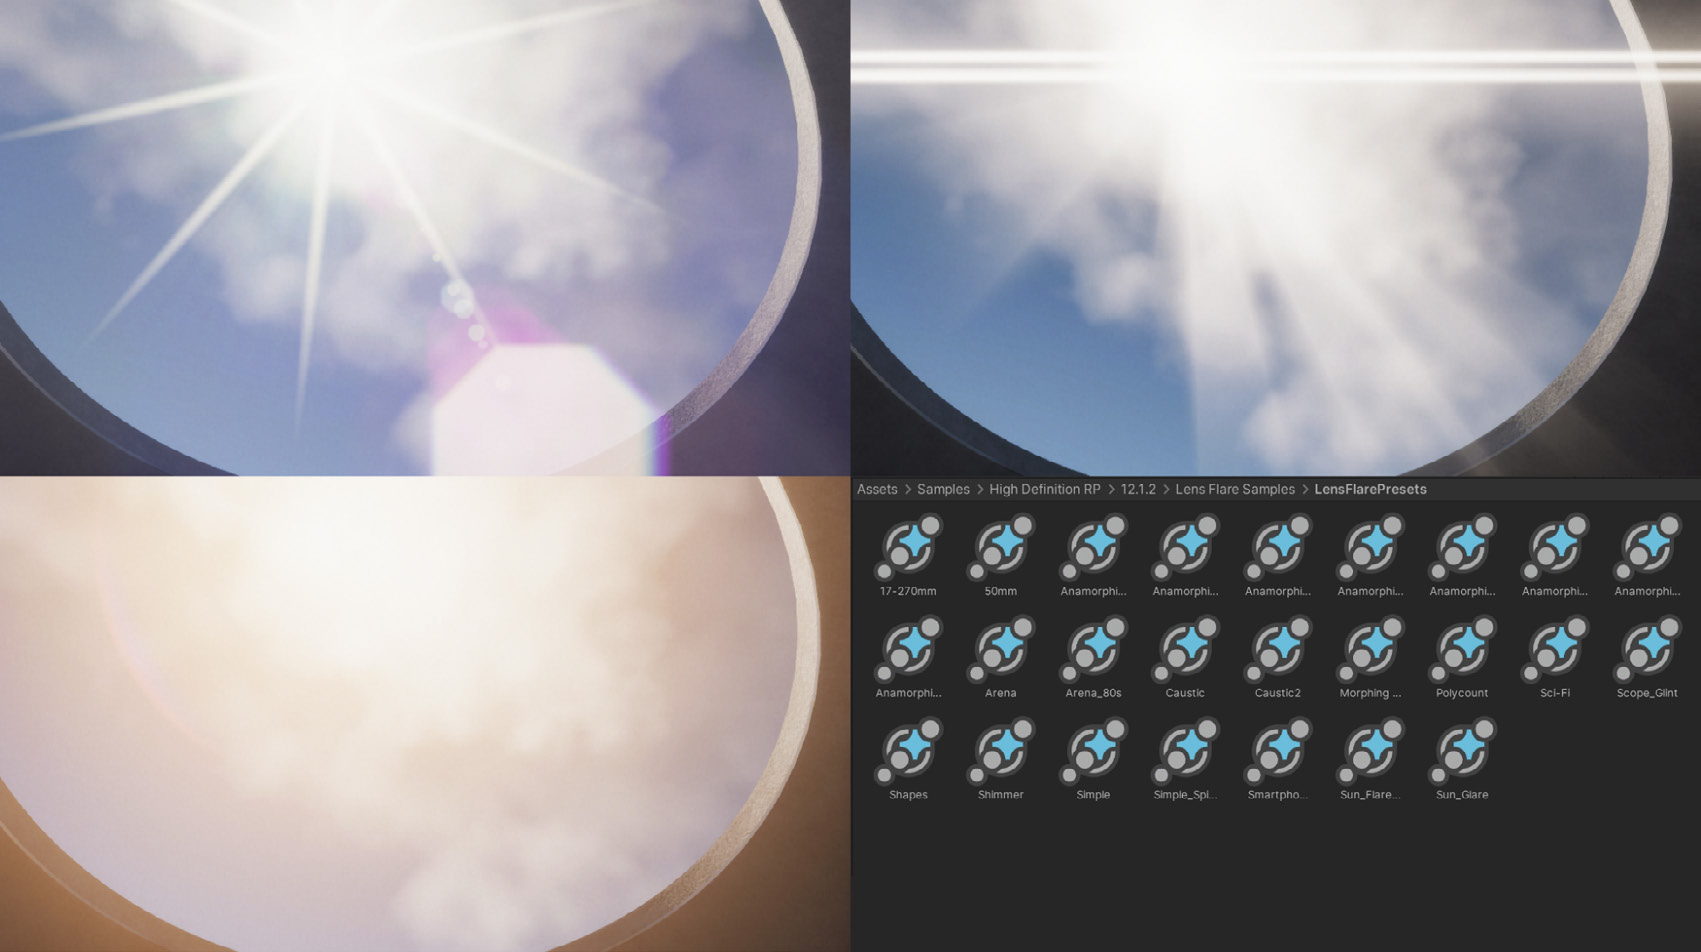
Примеры бликов объектива содержат наборы настроек - от реалистичных оптических эффектов до более стилизованных решений; здесь показан пример со сценой из HDRP Samples.
Блики объектива состоят из элементов Lens Flare. Каждый элемент представляет отдельный артефакт, создаваемый бликом. Формой элемента может быть многоугольник, круг или пользовательское изображение. Параметры элемента позволяют настраивать Color, положение Transform и деформацию, а также расположение, цвет и масштаб элемента в многоэлементном эффекте Lens Flare. Если эффект связан с источником света, его элементы могут использовать оттенок этого источника. Благодаря этому один и тот же ассет Flare можно применять с разными источниками света. Подробнее о принципах работы бликов объектива рассказывается в этом докладе с конференции . SIGGRAPH. ©2025UnityTechnologies
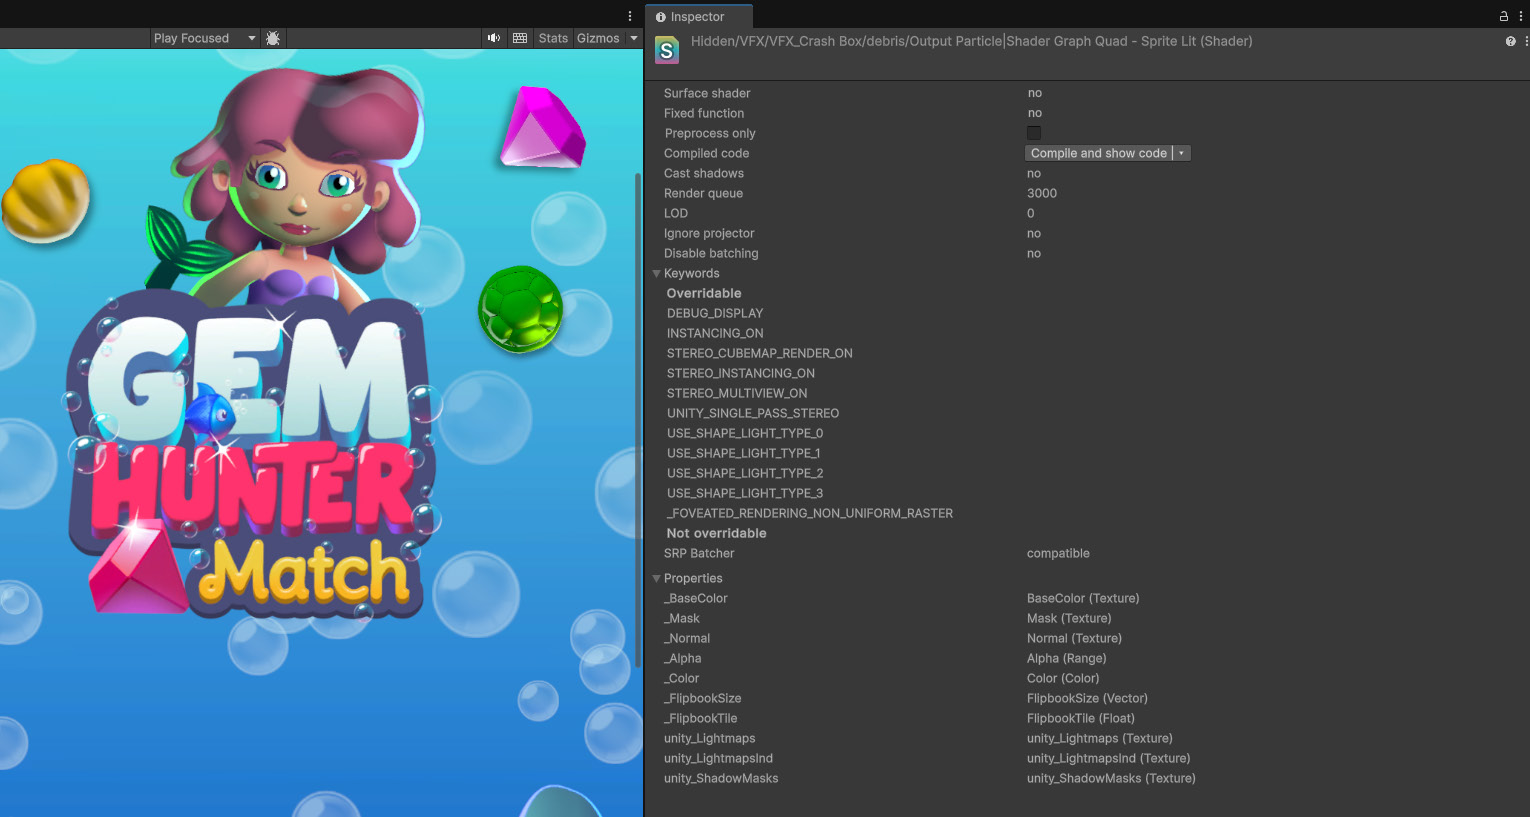
Управляйте вариантами шейдеров Чтобы сократить размер и время сборки, тщательно управляйте вариантами шейдеров. Если варианты нужны только определённым материалам, используйте #pragma shader_feature вместо #pragma multi_compile. Варианты shader_feature исключаются из сборки, если они не используются материалами и не включаются во время выполнения, тогда как варианты multi_compile включаются всегда. Проверяйте ключевые слова в окне Inspector шейдера.
Раздел Keywords в окне Universal Render Pipeline/Lit (Shader) в примере Gem Hunter Match
©2025UnityTechnologies
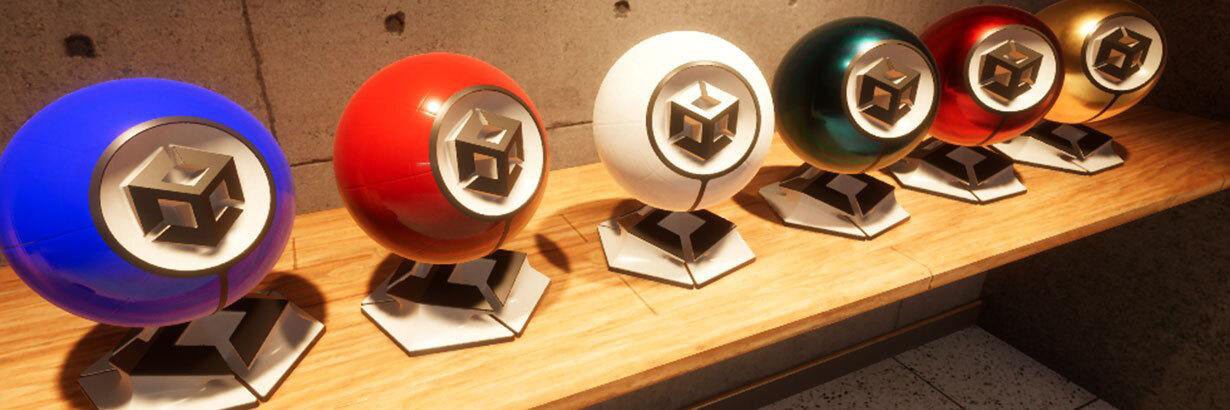
Создавайте варианты материалов Material Variants позволяют создавать шаблоны и префабы материалов. На основе базового шаблона можно создавать варианты, которые наследуют общие свойства шаблонного материала и переопределяют только отличающиеся свойства. Изменения общих непереопределённых свойств шаблонного материала автоматически отражаются в его вариантах. Кроме того, отдельные свойства материала можно заблокировать, чтобы варианты не могли их переопределять.
Пример Material Variants: все варианты используют один базовый материал и отличаются только свойством цвета
В более сложной конфигурации можно создавать варианты Material Variant. Иерархия наследования материалов способствует повторному использованию, ускоряет итерации и упрощает масштабирование процесса создания материалов в проекте.
Планируйте группы ассетов для эффективной работы На этапе подготовки к производству команда должна согласовать организацию работы с ассетами: составить список необходимых ассетов, определить их бюджет с учётом технических требований проекта и оценить стоимость разработки. Например, необходимые элементы уровня можно разделить на следующие группы: - Крупные элементы. Для таких элементов нельзя создавать уникальные текстуры: следует использовать тайловые текстуры или модульные элементы. К ним относятся стены, земля, скалы, крыши зданий и т. п.
- Объекты среднего размера. Это объекты с собственными листами текстур, например бочки, ящики, камни и двери. - Часто повторяющиеся мелкие элементы. Это предметы, которые помогают визуально связать объекты с окружением или передать масштаб: галька, листья, винты, болты и т. п.
©2025UnityTechnologies
Планируйте создание ассетов с учётом их типа, размера и формы
Определите для каждого ассета бюджет времени, число полигонов и разрешение текстур, а затем расставьте приоритеты задач. После этого создавайте второстепенные ассеты, а количество критически важных ассетов сведите к необходимому минимуму.
Автоматизируйте и ускорьте конвейер импорта с помощью API AssetPostProcessor Если в проекте используются тысячи ассетов, не настраивайте параметры каждого из них вручную в окне Inspector. Автоматизировать проверку файлов ассетов позволяет API AssetPostProcessor. С его помощью можно подключаться к конвейеру импорта и запускать скрипты до или после импорта ассетов: достаточно добавить ассеты, и скрипты внесут необходимые изменения. Параметры можно менять в одном скрипте, который автоматически повторно применит их ко всем ассетам проекта.
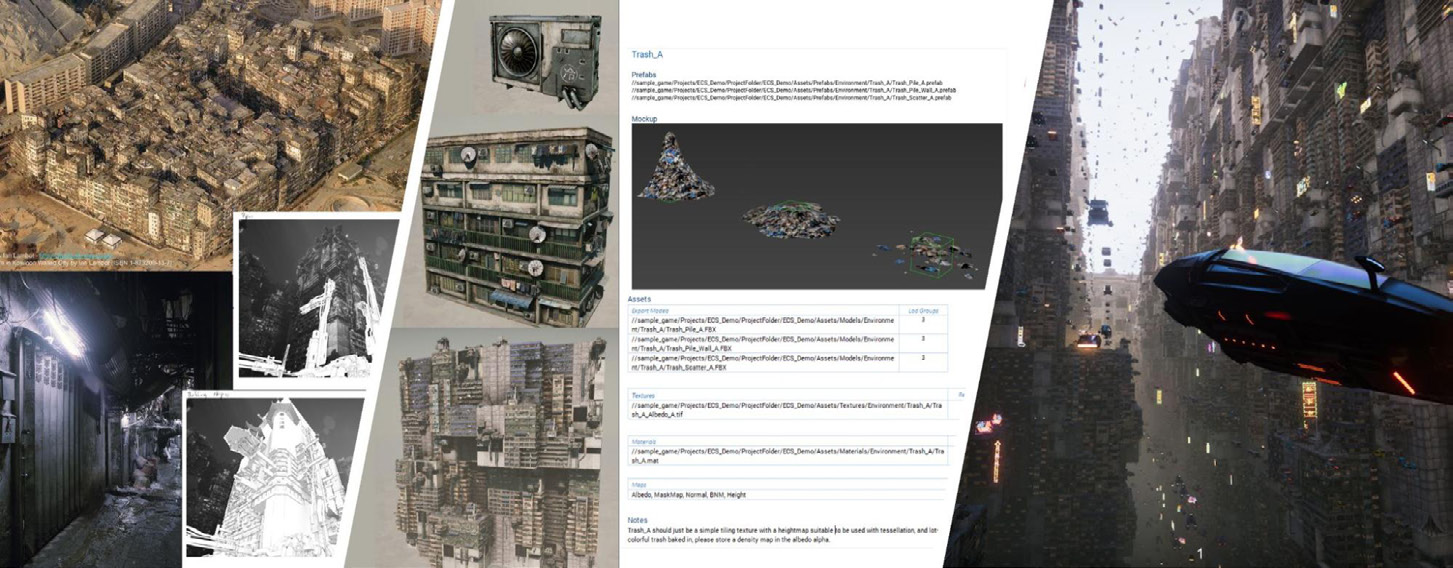
Слева направо: примеры мудборда, концепт-арта, ассетов префабов, стандартов структуры каталогов и именования с использованием AssetPostProcessor, а также итоговый вид демонстрационного проекта Unity Megacity
©2025UnityTechnologies
Эффективнее работайте в команде с вариантами префабов Ещё один важный этап импорта ассетов - создание префабов из 3D-моделей. Не рекомендуется во время производства напрямую преобразовывать FBX-модель в префаб: изменения FBX-файла, например изменение иерархии геометрии, могут нарушить префаб. Тогда все его экземпляры в сцене придётся заменять обновлённой версией. Эту проблему решают Prefab Variants.
Prefab Variants позволяют создавать художественные ассеты независимо от сцен, поэтому хорошо подходят для прототипирования. Их рекомендуется использовать при совместных итерациях во время построения игрового мира. Они сохраняют преимущества обычных префабов, например возможность создавать варианты исходной модели, но при этом служат «слабой» ссылкой на префаб FBX-модели. Благодаря этому элементы модели можно добавлять, разделять и удалять без пересоздания префаба. Художники могут изменять FBX-модели, а Prefab Variant будет обновляться автоматически. Кроме того, Prefab Variants позволяют художникам оценивать изменения графики в контексте, не меняя сам проект.
Одновременно с этим рассмотрите возможность использовать Nested Prefabs, чтобы упростить совместную работу над сценой.
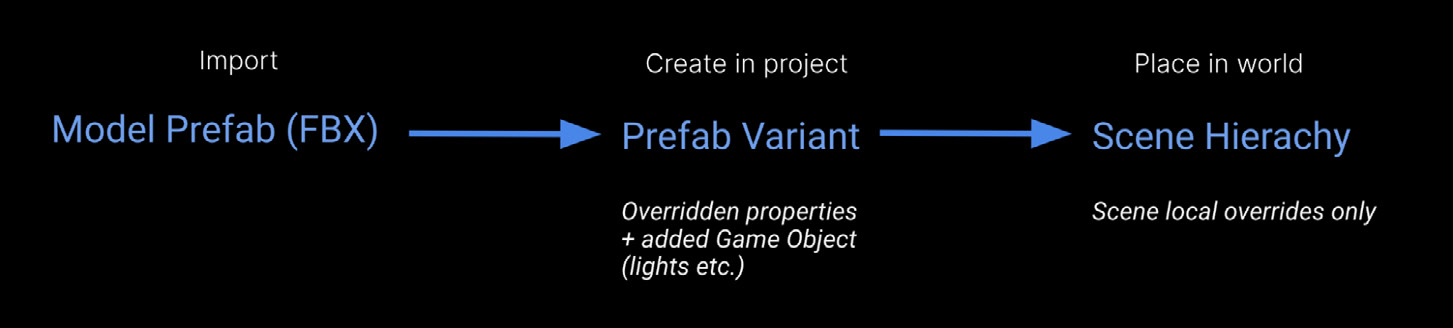
Рекомендуемый процесс работы с Prefab Variants в проектах с большим числом участников
Рекомендации по ассетам для XR и мобильной разработки Решения, принятые на раннем этапе создания или подбора художественных ассетов для XR- или мобильной игры, помогут сэкономить время в дальнейшем. Следуйте этим рекомендациям, чтобы эффективно создавать любые художественные ассеты - от небольших объектов до персонажей. - Начинайте с чёткого представления о том, что хотите создать. Особенно на ранних этапах концепцию можно проиллюстрировать простым рисунком от руки, чтобы быстро спланировать взаимодействия или визуальное оформление.
- В крупной студии идеи может воплощать концепт-художник; отдельным разработчикам и небольшим командам визуализировать замысел поможет ИИ. - Создавайте модель в программе для 3D-моделирования, например Blender, Autodesk Maya или 3ds Max. Следите за числом полигонов, поскольку оно влияет на производительность, особенно в мобильной AR. Сначала можно создать высокополигональную модель, а затем оптимизировать её.
©2025UnityTechnologies
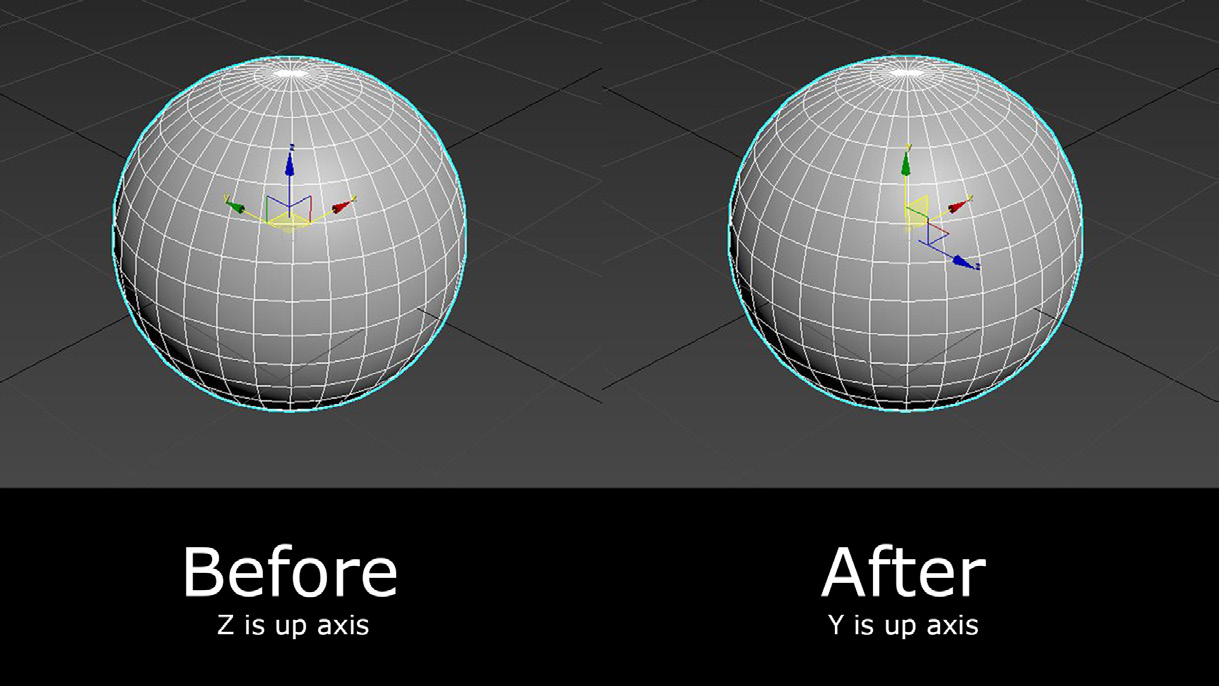
- Настройте опорную точку модели в программе для 3D-моделирования так, чтобы её ориентация соответствовала системе координат Unity. Ниже показано, как задать опорную точку в 3ds Max, где вертикальной является ось Z.
Настройка вертикальной оси
- Ориентацию модели также можно исправить в Unity, выполнив два действия: a. Создайте пустой объект GameObject в окне Hierarchy. b. Сделайте модель дочерней для этого GameObject и задайте ей Position 0, 0, 0 по всем
осям, чтобы точно выровнять её по центру. В результате модель будет привязана к родительскому объекту GameObject с нейтральным Rotation 0 по всем осям. Модель также будет правильно ориентирована: ось Z направлена вперёд, а Scale по всем осям равен 1. Кроме того, в Importer можно попробовать параметр Bake Axis Conversion.
- Наложите текстуры, чтобы придать модели реалистичный или стилизованный вид. Для детализированных текстур используйте UV-развёртку. В зависимости от выбранной стилистики игре могут потребоваться PBR-текстуры. - Шейдеры на основе физически корректного рендеринга (PBR) в Unity обычно поддерживают два основных процесса: Metallic-Roughness и Specular-Glossiness. Каждый из них отвечает за разные свойства материала. В результате 3D-сцены и объекты в играх и симуляциях на Unity выглядят более реалистично и динамично.
©2025UnityTechnologies
Заполняйте большие текстурированные области трим-листами
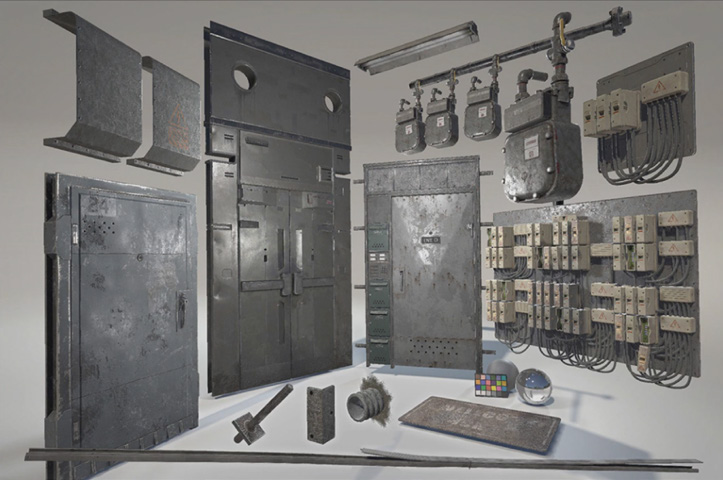
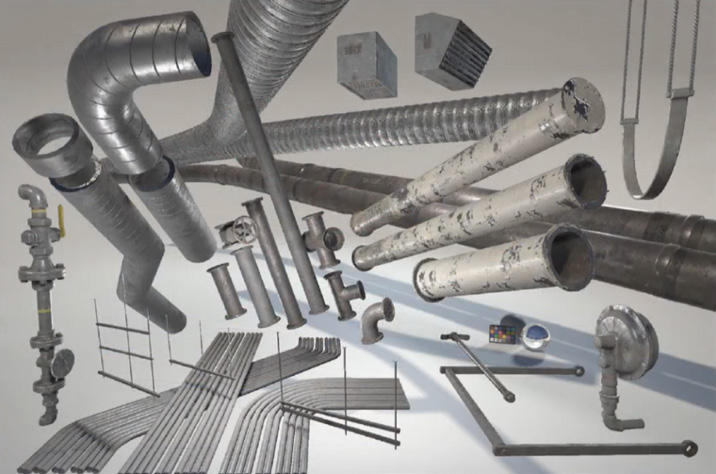
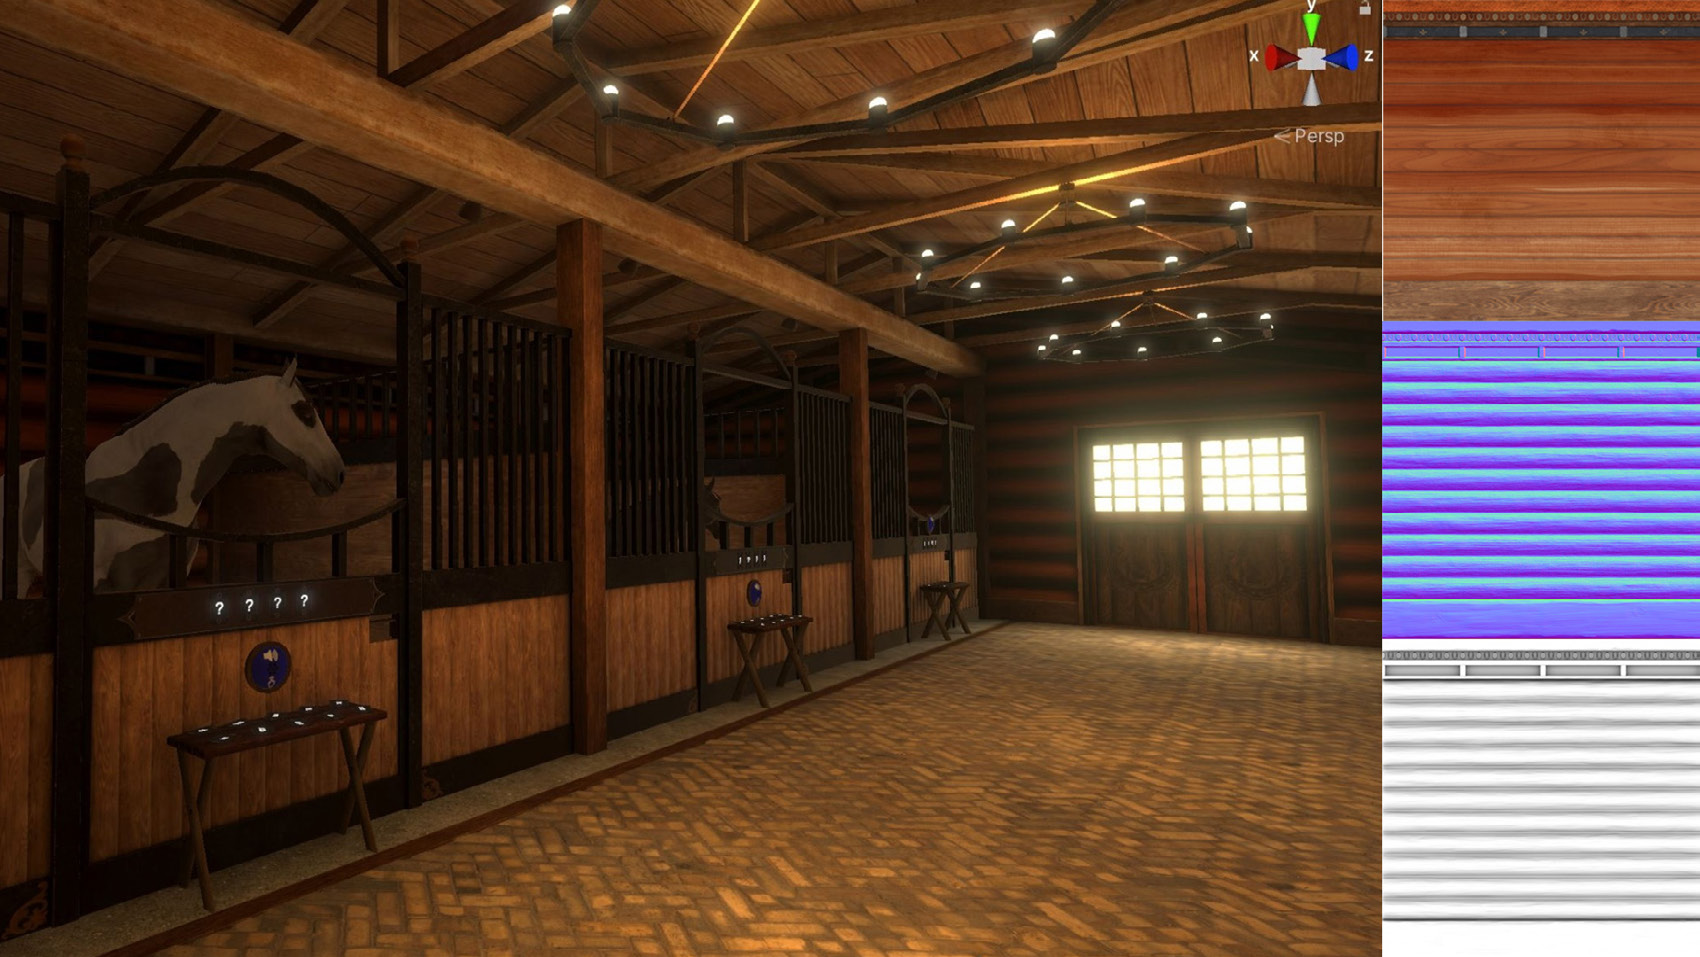
Использование одного трим-листа для разных мешей окружения .
Трим-лист - это средство текстурирования, применяемое в 3D-моделировании и разработке игр. Он представляет собой одну текстуру с набором декоративных узоров и деталей: молдингов, кромок, окантовок и т. п. Трим-листы помогают оптимизировать производительность игры: они сокращают количество отдельных текстур, но при этом позволяют создавать визуально сложное и разнообразное оформление моделей.
Экспортируйте 3D-модели с соблюдением масштаба при работе с AR и VR Создавать прототипы и моделировать 3D-меши можно в предпочитаемом DCC-приложении либо непосредственно в Unity с помощью ProBuilder, доступного в Package Manager. В ProBuilder можно быстро собрать макет уровня, задать масштаб объектов и проверить их вид в Unity. Добившись правильного масштаба, экспортируйте модели для дальнейшей доработки, а затем верните их в Unity.
©2025UnityTechnologies
В Unity используется интуитивная шкала измерений: 1 единица точно соответствует 1 метру. Чтобы оценить масштаб импортированного ассета, добавьте в сцену куб GameObject. Куб размером 1 × 1 × 1 м служит простой и точной мерой для сравнения масштаба любого ассета. При создании окружения и объектов важно найти баланс между эстетикой и производительностью, чтобы обеспечить плавную и увлекательную работу AR- или VR-приложения.
Уровни можно прототипировать в ProBuilder, а затем экспортировать с помощью FBX Exporter в программу для 3D-моделирования и доработать там.
©2025UnityTechnologies
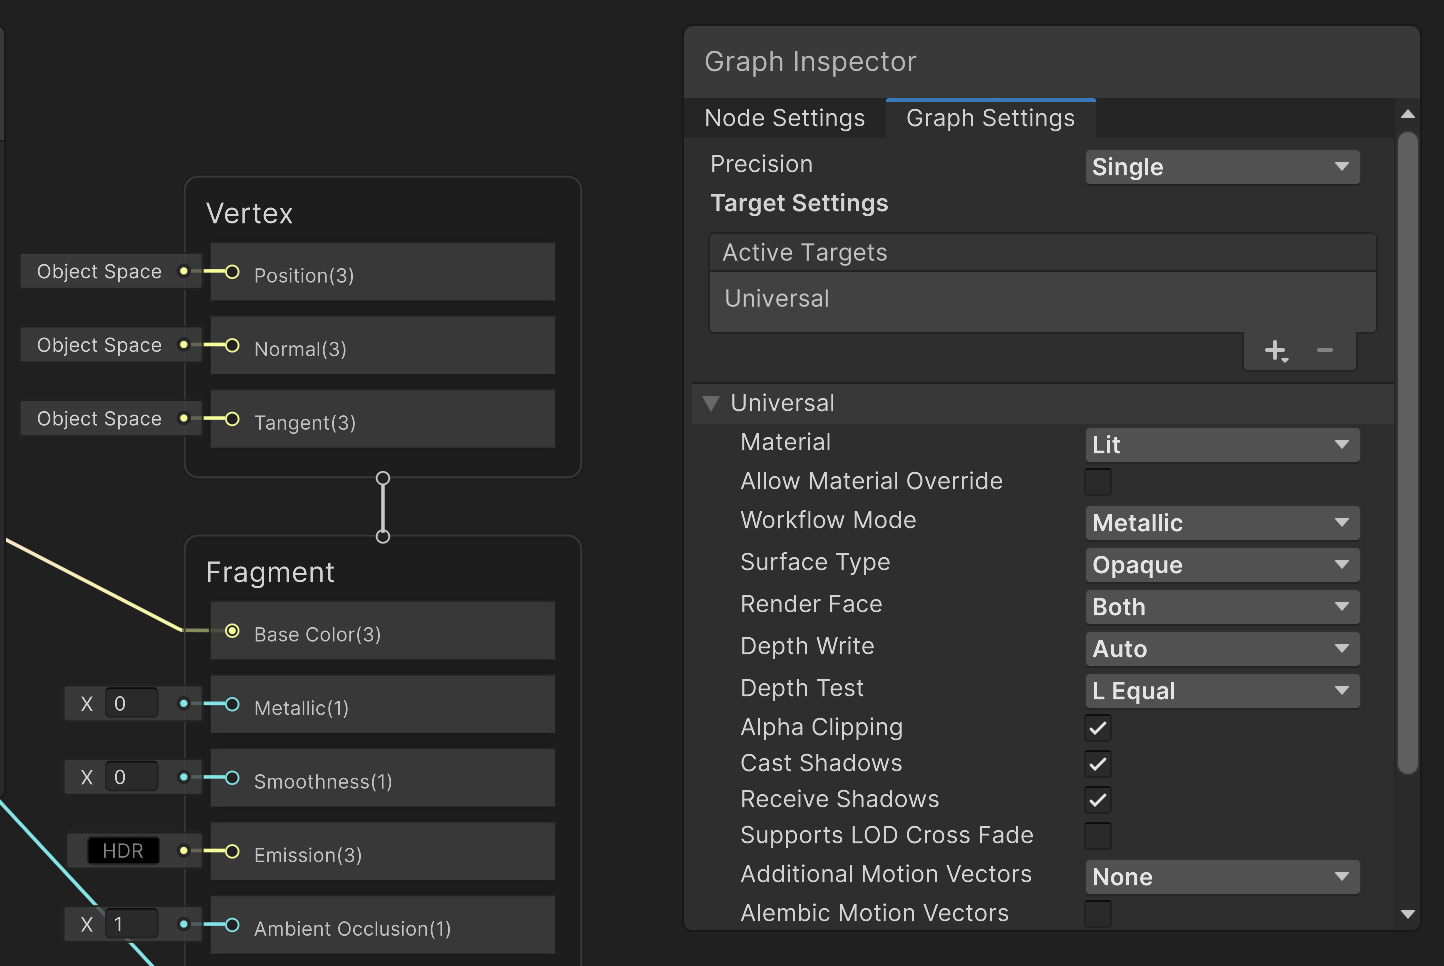
Shader Graph для проектов URP и HDRP Создавая шейдеры Lit и Unlit в Shader Graph, можно упростить адаптацию ассетов для проектов как на URP, так и на HDRP. В Shader Graph конвейер рендеринга задаётся в Master Node, а остальная логика остаётся неизменной. Благодаря этому проще создавать шейдеры, работающие в обоих конвейерах.
Master Stack
©2025UnityTechnologies
Graphics and art assets
Light leaks with light probes Light leaks often occur when geometry receives light from a light probe that isn’t visible to the geometry, for example due to the light probe being on the other side of a wall. This is a complex topic, but here are a few techniques that could help fix light leaks: —
Create thicker walls
Add an Adaptive Probe Volumes Options Override to your scene
Enable Rendering Layers
Adjust Baking Set properties
Use a Probe Adjustment Volume
An example of a light leak
Configure specific lights for specific GameObjects with Rendering Layers The Rendering Layers feature lets you configure certain lights to affect only specific GameObjects. With the Custom Shadow Layers property, you can configure certain GameObjects to cast shadows only from specific lights (even if those lights do not affect the GameObjects).
Rendering Layers in the URP Global settings
Add details to meshes with the Decal Projector The Decal Projector component provides you with a great way of adding detail to a mesh. Use them for elements such as bullet holes, footsteps, signage, cracks, and more. Because they use a projection framework, they conform to an uneven or curved surface. To use a Decal Projector with URP, you need to locate your Renderer Data asset and add the Decal Renderer Feature.
A Decal Projector in the Scene view
Convert custom shaders from the Built-In Render Pipeline to URP Refer to this table in the URP documentation to see how each URP shader maps to its Built-In Render Pipeline equivalent. Once you select one or more of the converters, either click Initialize Converters or Initialize And Convert. Whichever option you choose, the project will be scanned and those assets that need converting will be added to each of the converter panels. If you choose Initialize Converters you can limit the conversions by deselecting the items using the checkbox provided for each one. At this stage, click Convert Assets to start the conversion process. If you choose Initialize And Convert, the conversion starts automatically
after the converters are initialized. Once it’s complete you might be asked to reopen the scene that is active in the Editor.
The Render Pipeline Converter
Create color grading with LUT Textures The Color Grading effect alters or corrects the color and luminance of the final image that Unity produces. You can use this to alter the look and feel of your project. Use the Lookup Texture and Contribution settings to control how the Color Grading effect operates in the post-processing effect that you need to add to your Volume settings.
The Lookup Texture and Contribution settings in Color Lookup
Volume blending between multiple Low Dynamic Range (LDR) lookup textures is supported but only works correctly if they’re the same size. For this reason, it’s recommended to stick to a single LUT size for the whole project (256x16 or 1024x32).
Setting the LUT size in the URP Asset settings
Using various LUT textures
Create realistic lens effects and stylized looks with lens flares A lens flare is an artifact that appears when bright light is shining onto a camera lens. A lens flare can appear as one bright glare or as numerous colored polygonal flares matching the aperture of the camera. Get familiar with lens flares by installing the samples from the Package Manager. This will add a set of predefined Flare assets to include lens flare effects. It also contains a test scene to browse lens flares and help you build your own.
The lens flare samples come with presets ranging from realistic lens effects to more stylized looks, example using the HDRP sample scene.
Lens flares are made out of Lens Flare Elements. Each element represents the different artifacts that the flare produces. The element’s shape can be a polygon, circle, or a custom image. The element parameters allow you to tweak the Color, Transform position, and deformation, or how it’s positioned, colored, and scaled when the flare element is part of a Lens Flare effect with multiple elements. Remember that if it’s attached to a light source, the flare elements can use the tint color, making it possible to reuse the same Flare asset with many different light sources. Watch this SIGGRAPH talk to learn more about how lens flares work.
Manage shader variants To reduce build size and time manage shader variants carefully. Use #pragma shader_feature instead of #pragma multi_compile when variants are only needed by specific materials. shader_feature variants are stripped unless used by materials or enabled at runtime, while multi_compile variants are always included. Check the keywords in the shader’s Inspector.
Keywords section in the Universal Render Pipeline/Lit (Shader) window in the Gem Hunter Match sample
Create variants of a material With Material Variants, you can create templates or material prefabs. Based on a base template, you can create variants that share common properties with the template material and override only the properties that differ. If you change common and non-overridden properties in the template material, the changes automatically reflect in the variant material. You can also lock certain properties on materials so they can’t be overridden in the variants.
An example of Material Variants; these all share the same base material and only differ in the color property
In a more complex setup, you can create variations of a Material Variant. The material inheritance hierarchy promotes reusability and improves iteration speed and scalability of material authoring in your project.
Planning asset groups to improve your asset workflow As part of the preproduction planning, you and your team should agree on aspects of the asset workflow, such as the list of required assets to be created, the budget for them based on your project’s technical requirements, and the development cost. One way you can group required level elements is the following: —
Large elements: These elements can’t be authored with unique textures but must use tiling or modular elements, such as walls, the ground, cliffs, roofs of buildings, and so on.
Medium-sized props: These are props that have unique texture sheets, like barrels, crates, rocks, and doors.
Highly repetitive, small elements: Think of items used to ground objects or convey scale, including pebbles, leaves, screws, and bolts.
Planning asset production by type, size, and shape
Budget the time, poly count, and texture resolution of each asset, and prioritize the tasks accordingly. Then create non-essential assets and reduce the number of essential assets to the bare minimum.
Automate and speed up your import pipeline with the AssetPostProcessor API In a production involving thousands of assets, avoid relying on manually configuring the specifications of each asset from the Inspector. To automate the process of validating asset files, use the AssetPostProcessor API. This helps you hook into the import pipeline and run scripts prior to, or after, importing assets; just add assets for the scripts to make the necessary changes. You can change the settings from a single script that will automatically reapply the changes to the assets in the project.
From left to right: Examples of the mood board, concept art, prefab assets, directory, and naming standards using the AssetPostProcessor, and final visuals for the Megacity demo by Unity
Use Prefab Variants for more efficient team work Another critical aspect of the asset import workflow is the creation of prefabs from 3D models. Directly converting the FBX model into a prefab during production isn’t recommended as it will break the prefab if changes are made to the FBX file, such as hierarchy changes in the geometry. This will require you to replace all the instances of it in the scene with an updated version. The solution to this problem lies in Prefab Variants. Prefab Variants enable the scene-independent production of your art assets, making them ideal to use while prototyping. They are recommended for collaborative iteration while building the game world. They offer the benefit of regular prefabs, like making variations of the original model, but also act as a “weak” reference to the FBX model prefab. This allows you to conveniently add, split, or remove model elements without having to recreate the prefab. Production artists can make changes to the FBX models, and the Prefab Variant will update accordingly. Prefab Variants also allow artists to see art changes in context without altering the project itself. At the same time, consider using Nested Prefabs to facilitate collaboration on the scene.
A recommended Prefab Variant workflow for productions with many collaborators
Asset considerations for XR or mobile development Decisions that you take early on in the process of creating or sourcing the art assets for your XR or mobile games can save you time later in the development cycle. From small props to characters, follow these tips for efficient art asset creation. —
Start with a clear concept of what you want to create. Concepts can be illustrated with something as simple as hand drawings, particularly at an early stage, to quickly plan out interactions or visuals. —
In larger studios you might have a concept artist that can bring ideas to life; for individuals or small teams AI can help portray your idea.
Use 3D modeling software (like Blender or Autodesk’s Maya or 3ds Max) to build your model. Keep poly count (number of polygons) in mind for performance, especially for mobile AR. You can create high-poly models initially, and then optimize them later.
Set the pivot point of the model in your 3D modeling software so that its orientation matches that of Unity. Below is an example of how to set the pivot point in 3ds Max, which uses the z-axis as the up axis.
Adjusting the up axis
You can also correct the orientation of a model in Unity with these two steps: a. Create an empty GameObject in the Hierarchy. b. Nest your model within this GameObject, ensuring its position is set to 0,0,0 across all axes to achieve perfect centering. This method results in your model being anchored to a parent GameObject that maintains a neutral rotation of 0 across all axes. It also guarantees the model is oriented correctly with the z-axis facing forward and maintains a uniform scale of 1 on all axes. Additionally, you can also try the Bake Axis Conversion option in the Importer.
Apply textures to give your model a realistic or stylized look. Consider using UV mapping for detailed textures. Depending on what your aesthetic is for your game you might require PBR Textures.
Physically based (PBR) shaders in Unity typically involve two main components: Metallicroughness workflow and Specular-glossiness workflow, each handling different aspects of material properties. The result is a more lifelike and dynamic visual appearance, enhancing the realism of 3D scenes and objects in Unity-based games or simulations.
Populate large textured areas optimally with trim sheets
Use trim sheet for various meshes across an environment.
A trim sheet is a texturing tool used in 3D modeling and game development. It consists of a single texture containing a variety of trim patterns and details, like moldings, edges, and borders. You can use trim sheets for optimizing game performance, as it reduces the number of individual textures required, while still allowing for visually complex and varied designs on the models.
Export to your 3D models to scale when working in AR and VR You can prototype and model your 3D meshes in your preferred DCC or directly in Unity with ProBuilder, which is included in the Package Manager. You can mock up levels, scale objects, test how they look in Unity, and export, once the scale is correct, for further refinement to later bring them back to Unity.
In Unity, the measurement scale is intuitively designed, where 1 unit corresponds precisely to 1 meter. To gauge the scale of your imported assets, simply introduce a cube GameObject into your scene. This cube, with dimensions of 1m x 1m x 1m, serves as an immediate and accurate reference for assessing the scale of any asset. When creating your environments and props the key is to balance aesthetics and performance, ensuring a smooth and engaging AR/VR experience.
You can prototype levels with ProBuilder and then export them with FBX Exporter to 3D modeling software to tweak them.
Shader Graph for URP and HDRP projects Creating Lit and/or Unlit shaders in Shader Graph can help ensure your assets are more easily adaptable to use in both URP and HDRP projects. In Shader Graph you can define the render pipeline in the Master Node but keep the logic intact, making it easier to have shaders that work in both pipelines.
Master stack