Форматирование
Formatting
If you want your code to be easy to write, make it easy to read. – Robert C. Martin, author of Clean Code and Agile Software Development
The less you think about formatting, the more you can work on something else. Along with naming, formatting helps reduce guesswork and improves code clarity. By following a standardized style guide, code reviews become less about how the code looks and more about what it does. Omit, expand, or modify these example rules to fit your team’s needs. In all cases, consider how your team will implement each formatting rule and then have everyone apply it uniformly. Refer back to your team’s style to resolve any discrepancies. Consider each of the following code formatting suggestions when setting up your Unity dev style guide.
Properties A property provides a flexible mechanism to read, write, or compute class values. Properties behave as if they were public member variables, but in fact they’re special methods called accessors. Each property has a get and set method to access a private field, called a backing field. In this way, the property encapsulates the data, hiding it from unwanted changes by the user or external objects. The getter and setter each have their own access modifier, allowing your property to be read-write, read-only, or write-only. You can also use the accessors to validate or convert the data (e.g., verify that the data fits your preferred format or change a value to a particular unit). The syntax for properties can vary, so your style guide should define how to format them. Use these tips to keep properties consistent in your code: —
Use expression-bodied properties for single line read-only properties (=>): This returns the private backing field.
// EXAMPLE: expression bodied properties

public class PlayerHealth {
    // the

    private backing field private int m_maxHealth;
    // read-only, returns backing field

    public int MaxHealth => m_maxHealth;
    // equivalent to: //

    public int MaxHealth { get; private set; }
}
—Everything else uses the older { get; set; }
syntax: If you just want to expose a public property without specifying a backing field, use the Auto-Implemented property. Apply the expression-bodied syntax for the set and get accessors. Remember to make the setter private if you don’t want to give write access. Align the closing with the opening brace for multi-line code blocks.// EXAMPLE: expression bodied properties
public class PlayerHealth {
// backing field
private int m_maxHealth;
// explicitly implementing getter and setter
public int MaxHealth {
get => m_maxHealth;
set => m_maxHealth = value;
}
// write-only (not
using backing field) public int Health { private get; set; }
// write-only, without an explicit setter
public SetMaxHealth(int newMaxValue) => _maxHealth = newMaxValue;
}While you can also use functions to expose private data as in our example below, it’s generally recommended to use properties for simple get/set operations. For operations involving complex logic or computation, methods are generally recommended.
// EXAMPLE: expression bodied properties

public class PlayerHealth {
    // backing field

    private int m_maxHealth;
    public int GetMaxHealth { return m_maxHealth; }
}
Serialization Script serialization is the automatic process of transforming data structures or object states into a format that Unity can store and reconstruct later. For performance reasons, Unity handles serialization differently than in other programming environments. Serialized fields appear in the Inspector, but you cannot serialize static, constant, or readonly fields. They must be either public or tagged with the [SerializeField] attribute. Unity only serializes certain field types, so refer to the documentation page for the complete set of serialization rules. Observe a few basic guidelines when working with serialized fields: —
Use the [SerializeField] attribute: The SerializeField attribute can work with private or protected variables to make them appear in the Inspector. This encapsulates the data better than marking the variable public and prevents an external object from overwriting its values.
Use the Range attribute to set minimum and maximum values: The [Range(min, max)] attribute is handy if you want to limit what the user can assign to a numeric field. It also conveniently represents the field as a slider in the Inspector.
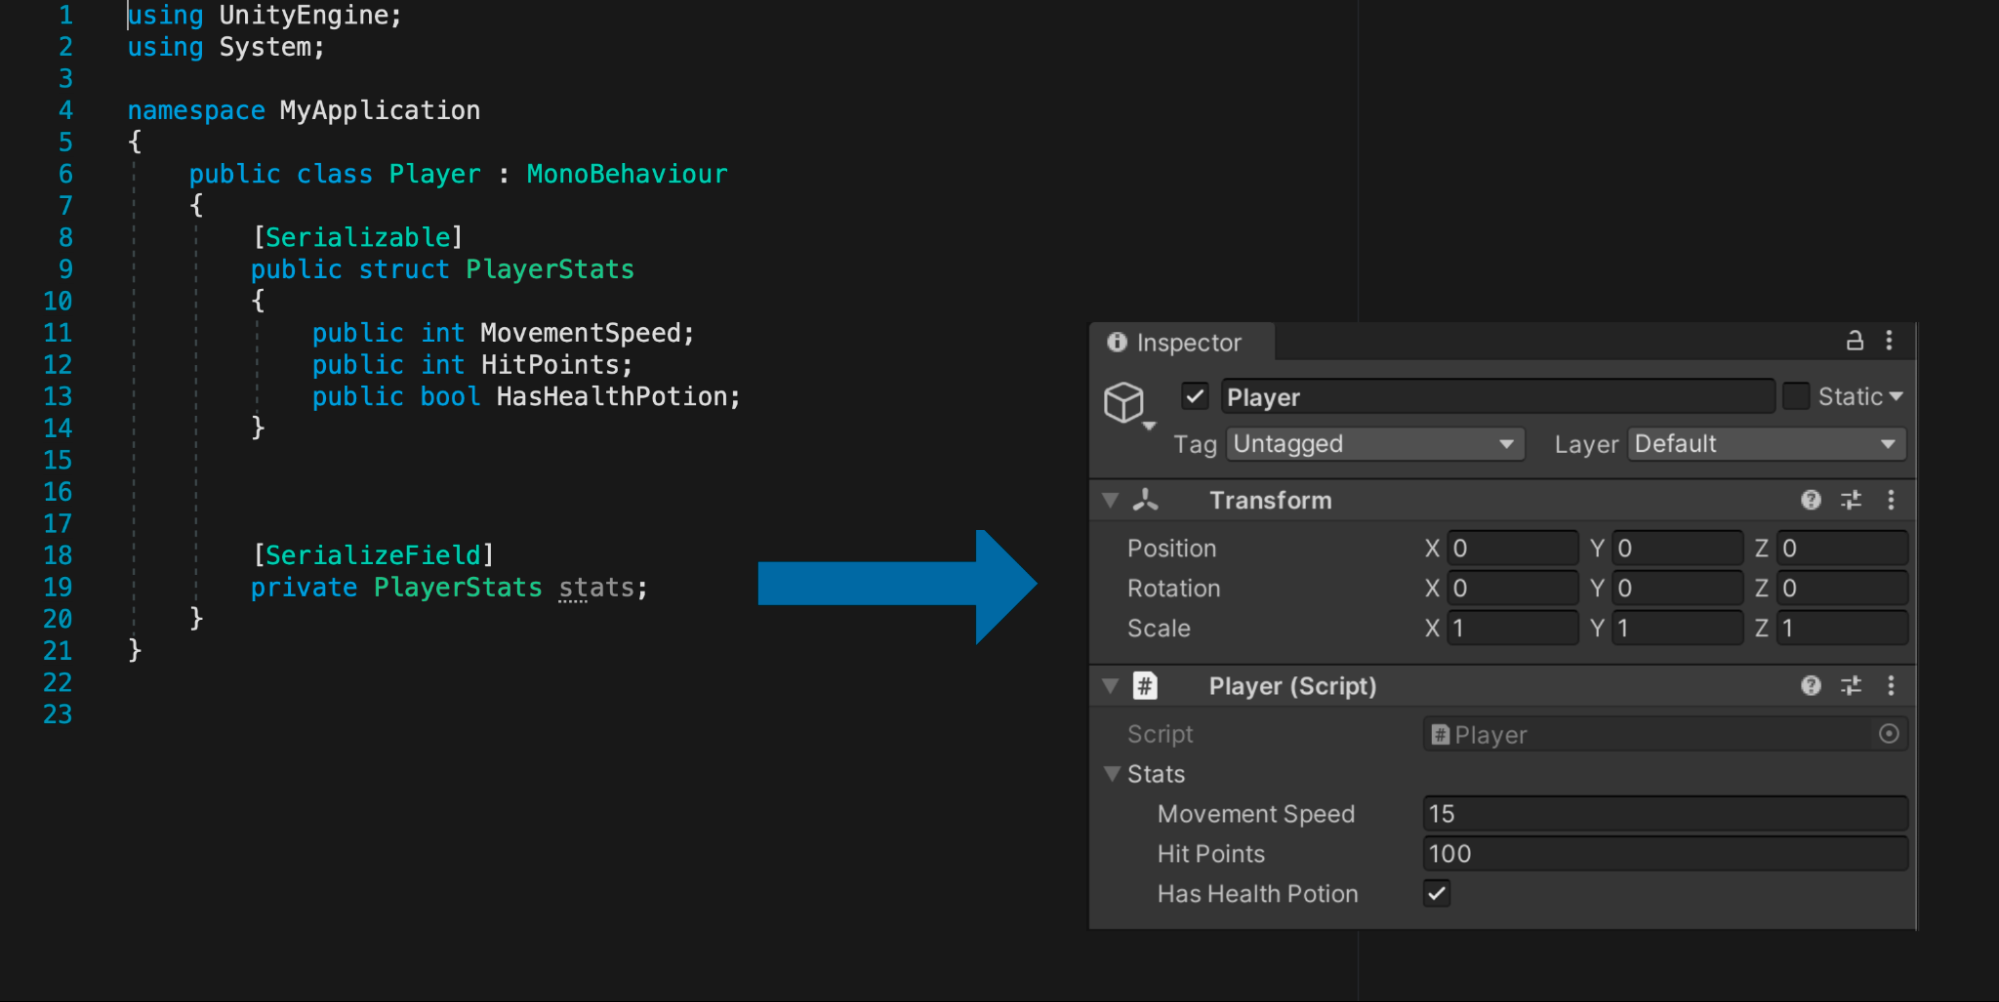
Group data in serializable classes or structs to clean up the Inspector: Define a public class or struct and mark it with the [Serializable] attribute. Define public variables for each type you want to expose in the Inspector.
// EXAMPLE: a serializable class for PlayerStats

using System;
using UnityEngine;
public class Player : MonoBehaviour {
    [Serializable] public struct PlayerStats {
        public int MovementSpeed;
        public int HitPoints;
        public bool HasHealthPotion;
    }
    // EXAMPLE: The

    private field is visible in the Inspector [SerializeField] private PlayerStats m_stats;
}
Reference this serializable class from another class. The resulting variables appear within collapsible units in the Inspector.
A serializable class or struct can help organize the Inspector.
Brace or indentation style There are two common indentation styles in C#: —
The Allman style places the opening curly braces on a new line, also known as the BSD style (from BSD Unix).
The K&R style, or “one true brace style,” keeps the opening brace on the same line as the previous header.
// EXAMPLE: Allman or BSD style puts opening brace on a new line.

void DisplayMouseCursor(bool showMouse) {
    if (!showMouse) {
        Cursor.lockState = CursorLockMode.Locked;
        Cursor.visible = false;
    }
    else {
Cursor.lockState = CursorLockMode.None; Cursor.visible = true; } }
// EXAMPLE: K&R style puts opening brace on the previous line.

void DisplayMouseCursor(bool showMouse) {
    if (!showMouse) {
        Cursor.lockState = CursorLockMode.Locked;
        Cursor.visible = false;
    }
    else {
        Cursor.lockState = CursorLockMode.None;
        Cursor.visible = true;
    }
}
There are variations on these indentation styles as well. The examples in this guide use the Allman style from the Microsoft Framework Design Guidelines. Regardless of which one you choose as a team, make sure everyone follows the same indentation and brace style. Try these tips: —
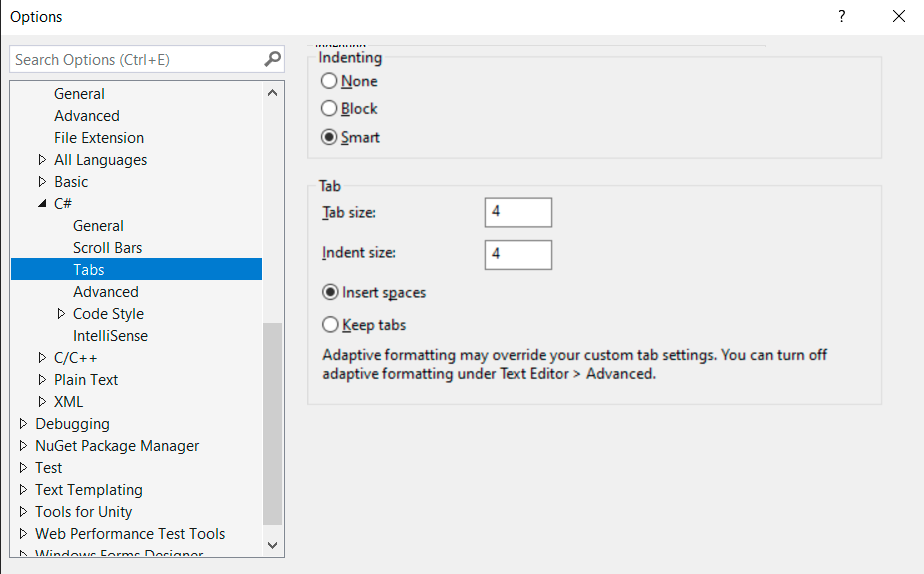
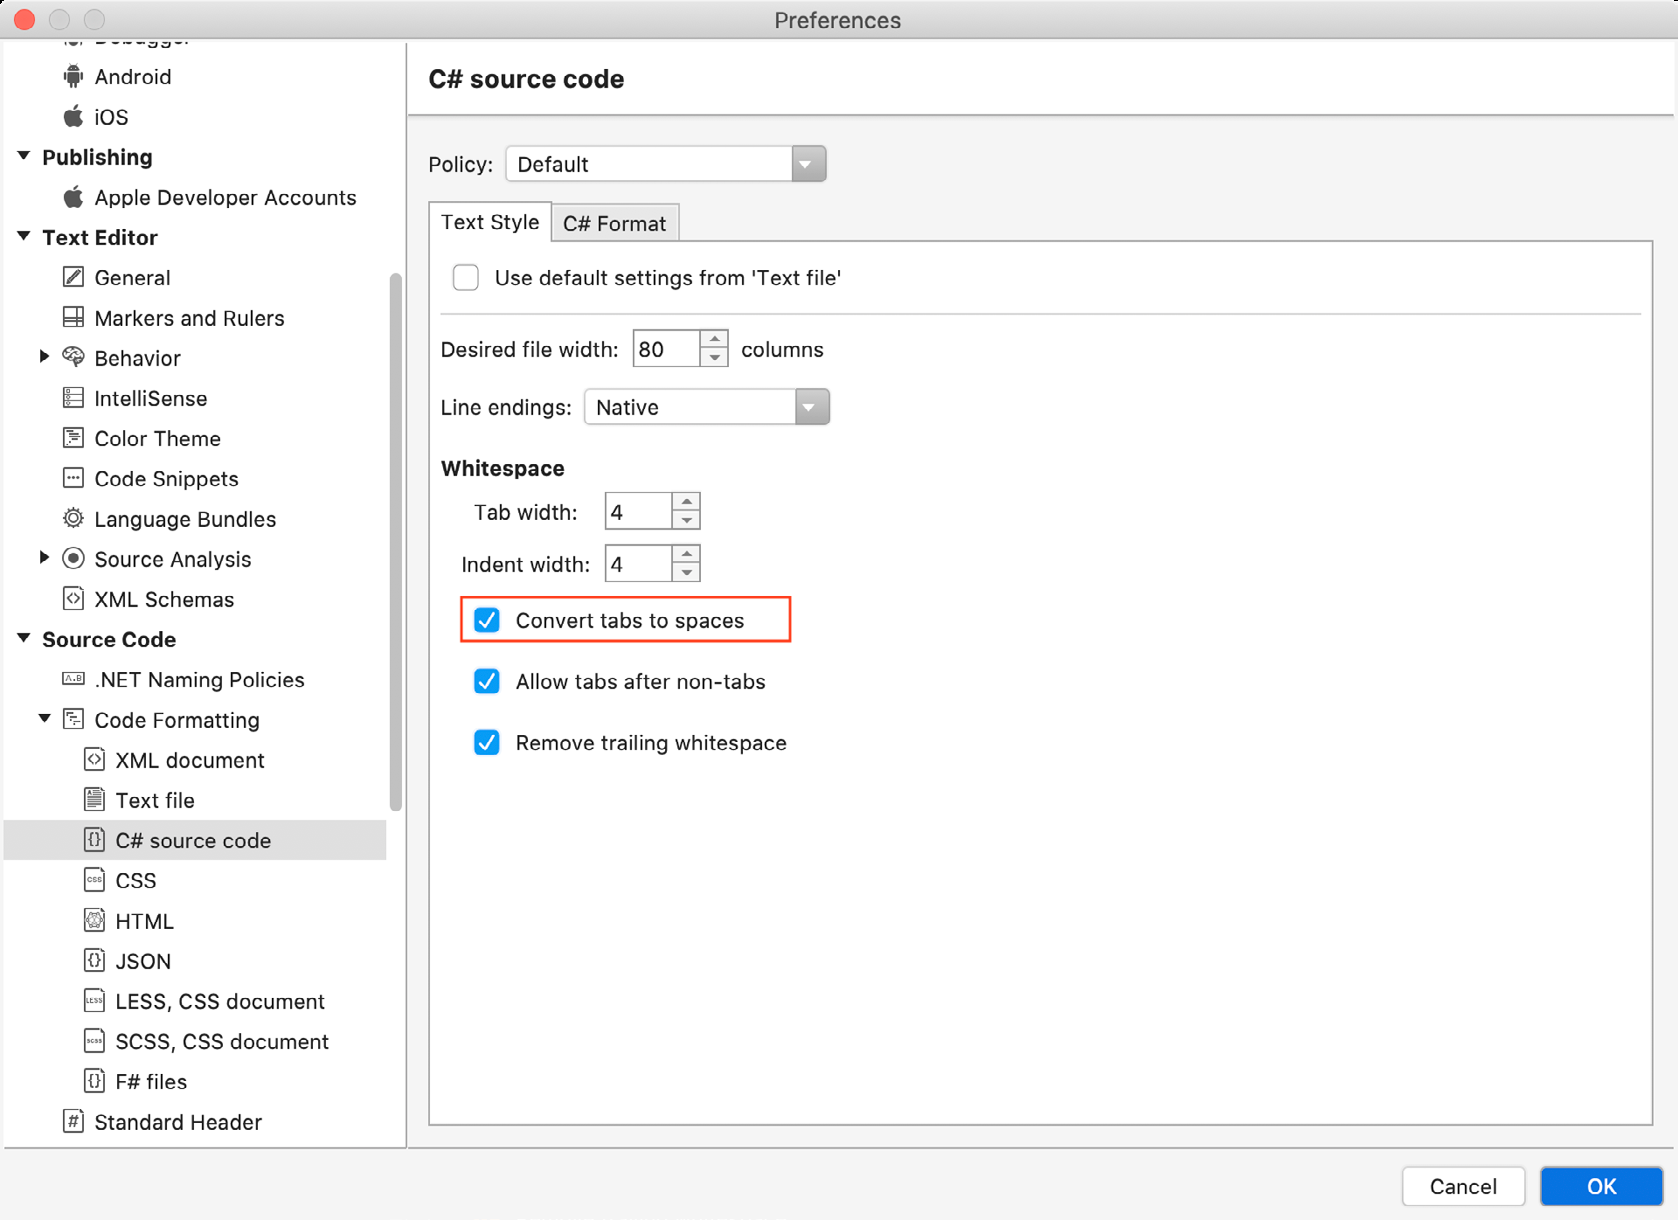
Decide on a uniform indentation: This is typically four or two spaces. Get everyone on your team to agree on a setting in your Editor preferences without igniting a tabs versus spaces flame war. Note that Visual Studio provides the option to convert tabs to spaces.
In Visual Studio (Windows), navigate to Tools > Options > Text Editor > C# > Tabs.
Tabs settings in Visual Studio
On Visual Studio for Mac, navigate to Preferences > Source Code > C# Source Code. Select the Text Style to adjust the settings.
Convert tabs to spaces to make indentation uniform.
Where possible, don’t omit braces, even for single-line statements: This increases consistency, keeping your code easier to read and maintain. In this example, the braces clearly separate the action, DoSomething, from the loop. If later you need to add a Debug line or to run DoSomethingElse, the braces will already be in place. Some programmers argue that keeping the clause on a separate line allows you to add a breakpoint easily.
// EXAMPLE: keep braces for clarity... for (int i = 0;

i < 100;
i++) { DoSomething(i); }
// … and/or keep the clause on a separate line. for (int i = 0;

i < 100;
i++) { DoSomething(i); }
// AVOID: omitting braces for (int i = 0;

i < 100;
i++) DoSomething(i);
—
Don’t remove braces from nested multi-line statements: Removing braces in this case won’t throw an error, but can be confusing. Apply braces for clarity, even if they are optional. Braces also ensure that modifications, such as adding new logic, can be done safely without needing to refactor the surrounding structure.
// EXAMPLE: keep braces for clarity for (int i = 0;

i < 10;
i++) {
    for (int j = 0;
    j < 10;
    j++) { ExampleAction(); }
}
// AVOID: removing braces from nested multi-line statements for (int i = 0;

i < 10;
i++) for (int j = 0;
j < 10;
j++) ExampleAction();
Standardize your switch statements: It’s generally advisable to replace longer if-else chains with a switch statement for better readability. Here is one example where you indent the case statements. It’s generally recommended to include a default case as well. Even if the default case is not needed (for example, in cases where all possibilities are covered), including one ensures that the code is prepared to handle unexpected values.
// EXAMPLE: indent cases from the switch statement switch (someExpression) {

    case 0: DoSomething();
    break;
    case 1: DoSomethingElse();
    break;
    case 2: int n = 1;
    DoAnotherThing(n);
    break;
    default: // Handle unexpected or default case break;

}
What is EditorConfig? Do you have multiple developers working on the same project with different editors and IDEs? Consider using an EditorConfig file. The EditorConfig file can help you define a coding style that works across your entire team. Many IDEs, like Visual Studio and Rider, come bundled with native support and do not require a separate plugin. EditorConfig files are easily readable and work with version control systems. You can see an example file here. The code styling from EditorConfig travels with your code and can enforce coding styles even outside of Visual Studio. EditorConfig settings take precedence over the global Visual Studio text editor settings. Your personal editor preferences still apply whenever you’re working in a codebase without a .editorconfig file, or when the .editorconfig file doesn’t override a particular setting. See the GitHub repo for some real-world samples.
Horizontal spacing Something as simple as spacing can enhance your code’s appearance on-screen. Your personal formatting preferences can vary, but try the following suggestions to improve readability: —
Add spaces to decrease code density: The extra whitespace can give a sense of visual separation between parts of a line improving readability.
// EXAMPLE: add spaces to make lines easier to read for (int i = 0;

i < 100;
i++) { DoSomething(i); }
// AVOID: no spaces for(inti=0;

i<100;
i++){DoSomething(i);}
—
Use a single space after a comma between function arguments.
// EXAMPLE: single space after comma between arguments CollectItem(myObject, 0, 1);
// AVOID: leaving out spacing CollectItem(myObject,0,1);

—
Don’t add a space after the parenthesis and function arguments.
// EXAMPLE: no space after the parenthesis and function arguments DropPowerUp(myPrefab, 0, 1);
//AVOID: DropPowerUp( myPrefab, 0, 1 );

—
Don’t use spaces between a function name and parenthesis.
// EXAMPLE: omit spaces between a function name and parenthesis. DoSomething() // AVOID DoSomething ()Avoid spaces inside brackets.
// EXAMPLE: omit spaces inside brackets x = dataArray[index];
// AVOID x = dataArray[ index ];
Use a single space before flow control conditions: Add a space between the flow comparison operator and the parentheses.
// EXAMPLE: space before condition;

separate parentheses with a space. while (x == y) // AVOID while(x==y) —
Use a single space before and after comparison operators.
// EXAMPLE: space before condition;

separate parentheses with a space. if (x == y) // AVOID if (x==y) —
Keep lines short. Consider horizontal whitespace: Decide on a standard line width (80120 characters). Break a long line into smaller statements rather than letting it overflow.
Maintain indentation/hierarchy: Indent your code to increase legibility.
Don’t use column alignment unless needed for readability: This type of spacing aligns the variables but can make it difficult to pair the type with the name. Column alignment, however, can be useful for bitwise expressions or structs with a lot of data. Just be aware that it may create more work for you to maintain the column alignment as you add more items. Some auto-formatters might also change which part of the column gets aligned.
// EXAMPLE: One space between type and name

public float Speed = 12f;
public float Gravity = -10f;
public float JumpHeight = 2f;
public Transform GroundCheck;
public float GroundDistance = 0.4f;
public LayerMask GroundMask;
// AVOID: column alignment
public float
Speed = 12f;
public float
Gravity = -10f;
public float
JumpHeight = 2f;
public Transform
GroundCheck;
public float
GroundDistance = 0.4f;
public LayerMask
GroundMask;
Vertical spacing You can use the vertical spacing to your advantage as well. Keep related parts of the script together and use blank lines to your advantage. Try these suggestions to organize your code from top to bottom: —
Group dependent and/or similar methods together: Code needs to be logical and coherent. Keep methods that do the same thing next to one another, so someone reading your logic doesn’t have to jump around the file.
Use the vertical whitespace to your advantage to separate distinct parts of your class: For example, you can add two blank lines between: —
Variable declarations and methods
Classes and Interfaces
if-then-else blocks (if it helps readability)
Keep this to a minimum and note on your style guide where applicable.
Regions The #region directive enables you to collapse and hide sections of code in C# files, making large files more manageable and easier to read. However, if you follow the general advice for Classes from this guide, your class size should be manageable and the #region directive superfluous. Break your code into smaller classes instead of hiding code blocks behind regions. You will be less inclined to add a region if the source file is short. Note: Many developers consider regions to be code smells or anti-patterns. Decide as a team on which side of the debate you fall.
Code formatting in Visual Studio Don’t despair if these formatting rules seem overwhelming. Modern IDEs make it efficient to set up and enforce them. You can create a template of formatting rules and then convert your project files at once. To set up formatting rules for the script editor: —
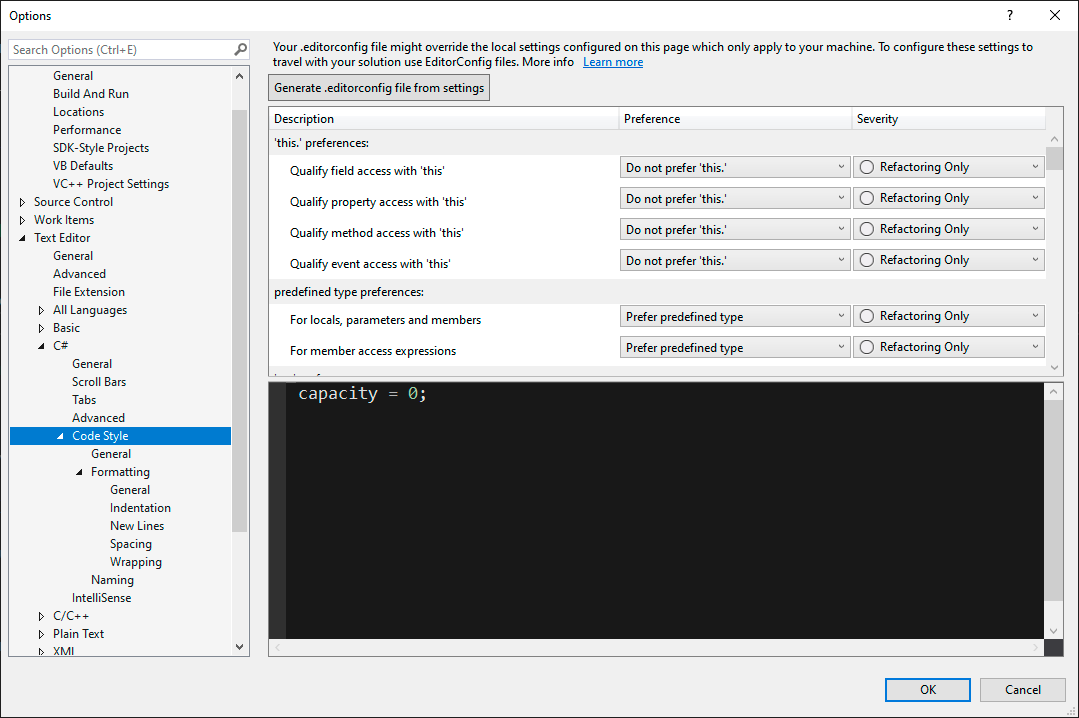
In Visual Studio (Windows), navigate to Tools > Options. Locate Text Editor > C# > Code Style Formatting. Use the settings to modify the General, Indentation, New Lines, Spacing, and Wrapping options.
Code style formatting options
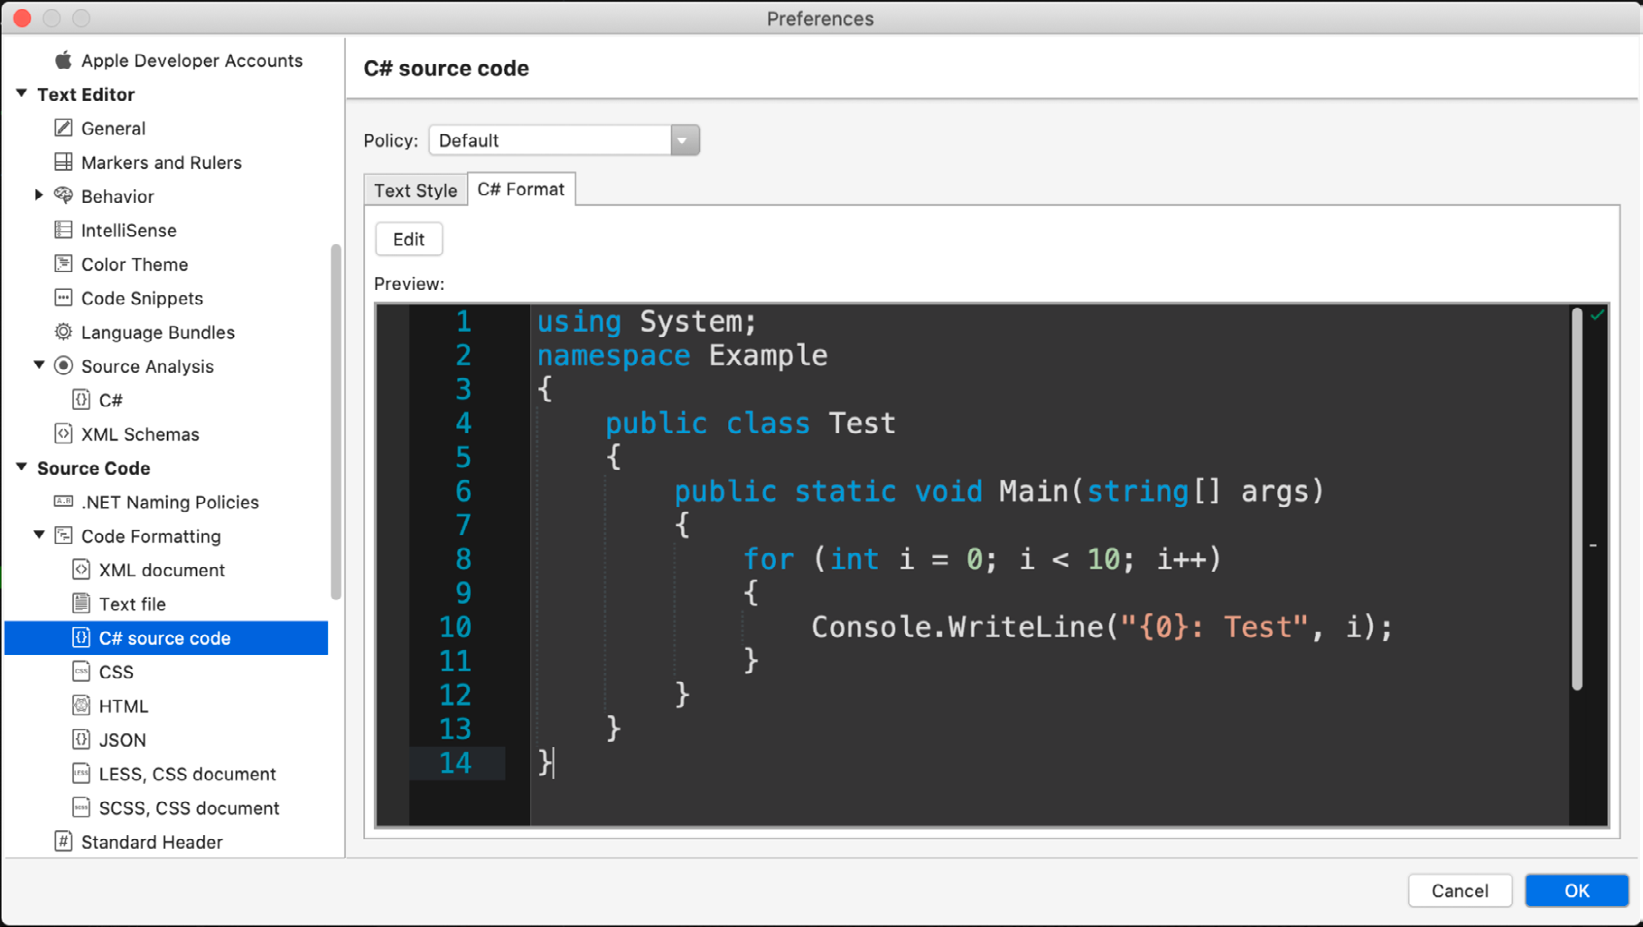
In Visual Studio for Mac, select Visual Studio > Preferences, then navigate to Source Code > Code Formatting > C# source code. Select the Policy at the top. Then set your spacing and indentation in the Text Style tab. In the C# Format tab, adjust the Indentation, New Lines, Spacing, and Wrapping settings.
The Preview window shows off your style guide choices.
If at any time you want to force your script file to conform to the style guide: —
In Visual Studio (Windows), go to Edit > Advanced > Format Document (Ctrl + K, Ctrl + D hotkey chord). If you want only to format white spaces and tab alignment, you can also use Run Code Cleanup (Ctrl + K , Ctrl + E) at the bottom of the editor.
In Visual Studio for Mac, go to Edit > Format Document (Ctrl + I hotkey)
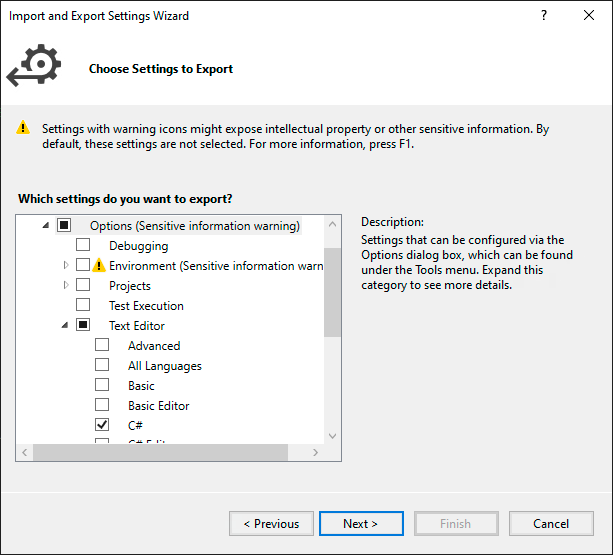
On Windows, you can also share your editor settings from Tools > Import and Export Settings. Export a file with the style guide’s C# code formatting and then have every team member import that file.
Exporting the C# code formatting to share.
Visual Studio makes it easy to follow the style guide. Formatting then becomes as simple as using a hotkey.
Note: You can configure an EditorConfig file (see above) instead of importing and exporting Visual Studio settings. Doing this allows you to share formatting more easily across different IDEs, and it has the added benefit of working with version control. See the .NET code style rule options for more information. Though this isn’t specific to clean code, be sure to check out this GDC session, Visual Studio tips & tricks to boost your productivity. Clean code is much easier to format and refactor if you apply these productivity tips. To set up an .editorconfig file in Visual Studio Code, follow these steps: 1.
In the root directory of your project, create a new file named .editorconfig.
Open the .editorconfig file and add your desired configuration settings. Here’s an example configuration for C#: # top-most EditorConfig file root = true # Unix-style newlines with a newline ending every file [*] end_of_line = lf insert_final_newline = true # 4 space indentation [*.cs] indent_style = space indent_size = 4 charset = utf-8 trim_trailing_whitespace = true # Tab indentation for Makefiles [Makefile] indent_style = tab # Specific settings for JSON files [*.json] indent_style = space indent_size = 2