Форматирование
Форматирование
Если хотите, чтобы код было легко писать, сделайте его удобным для чтения. — Роберт К. Мартин, автор книг «Чистый код» и «Гибкая разработка программного обеспечения»
Чем меньше вы думаете о форматировании, тем больше времени остается на другие задачи.
Наряду с именованием форматирование уменьшает количество догадок и делает код понятнее. При едином руководстве по стилю во время проверки кода обсуждают прежде всего то, как он работает, а не как выглядит. Исключайте, дополняйте или изменяйте предлагаемые правила с учетом потребностей команды.
Продумайте, как команда будет применять каждое правило форматирования, и добейтесь единообразия. При разногласиях сверяйтесь с принятым в команде стилем. Учитывайте следующие рекомендации по форматированию кода при подготовке руководства по стилю разработки на Unity.
Свойства Свойство — это гибкий механизм чтения, записи и вычисления значений класса. Свойства выглядят и используются как открытые поля, но фактически представляют собой специальные методы доступа. Свойство может иметь методы доступа get и set, работающие с закрытым полем — резервным полем (backing field).
Так свойство инкапсулирует данные и защищает их от нежелательных изменений пользователем или внешними объектами. У методов get и set могут быть разные модификаторы доступа, поэтому свойство может поддерживать чтение и запись, только чтение либо только запись. Методы доступа также позволяют проверять или преобразовывать данные: например, контролировать формат значения или переводить его в нужные единицы. Синтаксис свойств может различаться, поэтому руководство по стилю должно определять правила их оформления. Следующие рекомендации помогут сохранить единообразие:
— Для однострочных свойств только для чтения используйте тело выражения (=>): оно возвращает закрытое резервное поле.
// ПРИМЕР: свойства с телом выражения

public class PlayerHealth {
    // резервное поле

    private int m_maxHealth;
    // только чтение: возвращает резервное поле

    public int MaxHealth => m_maxHealth;
    // эквивалентно: //

    public int MaxHealth { get; private set; }
}
— Во всех остальных случаях используйте обычный синтаксис { get; set; }
. Если нужно открыть свойство без отдельного резервного поля, применяйте автоматически реализуемое свойство.
Применяйте синтаксис с телом выражения и к методам доступа get и set. Если внешняя запись запрещена, сделайте set закрытым. В многострочных блоках закрывающая фигурная скобка должна быть выровнена с открывающей.
// ПРИМЕР: свойства с телом выражения

public class PlayerHealth {
    // резервное поле

    private int m_maxHealth;
    // явная реализация методов get и set

    public int MaxHealth {
        get => m_maxHealth;
        set => m_maxHealth = value;
    }
    // только запись (без резервного поля)

    public int Health { private get; set; }
    // только запись, без явного set

    public SetMaxHealth(int newMaxValue) => _maxHealth = newMaxValue;
}
— Хотя закрытые данные можно открывать и через методы, как в примере ниже, для простых операций get/set обычно рекомендуются свойства. Для сложной логики или вычислений лучше использовать методы.
// ПРИМЕР: свойства с телом выражения

public class PlayerHealth {
    // резервное поле

    private int m_maxHealth;
    public int GetMaxHealth { return m_maxHealth; }
}
Сериализация Сериализация скриптов — это автоматическое преобразование структур данных или состояния объектов в формат, который Unity может сохранить и позднее восстановить. Из соображений производительности Unity выполняет сериализацию иначе, чем другие среды программирования. Сериализованные поля отображаются в Inspector, однако статические, константные и доступные только для чтения поля сериализовать нельзя. Поле должно быть открытым либо помеченным атрибутом [SerializeField]. Unity поддерживает сериализацию лишь определенных типов полей; полный набор правил приведен в документации.
При работе с сериализованными полями соблюдайте несколько основных рекомендаций:
— Используйте атрибут [SerializeField]. Он позволяет отображать закрытые и защищенные переменные в Inspector. Это лучше инкапсулирует данные, чем объявление переменной открытой, и не дает внешнему объекту перезаписывать ее значения.
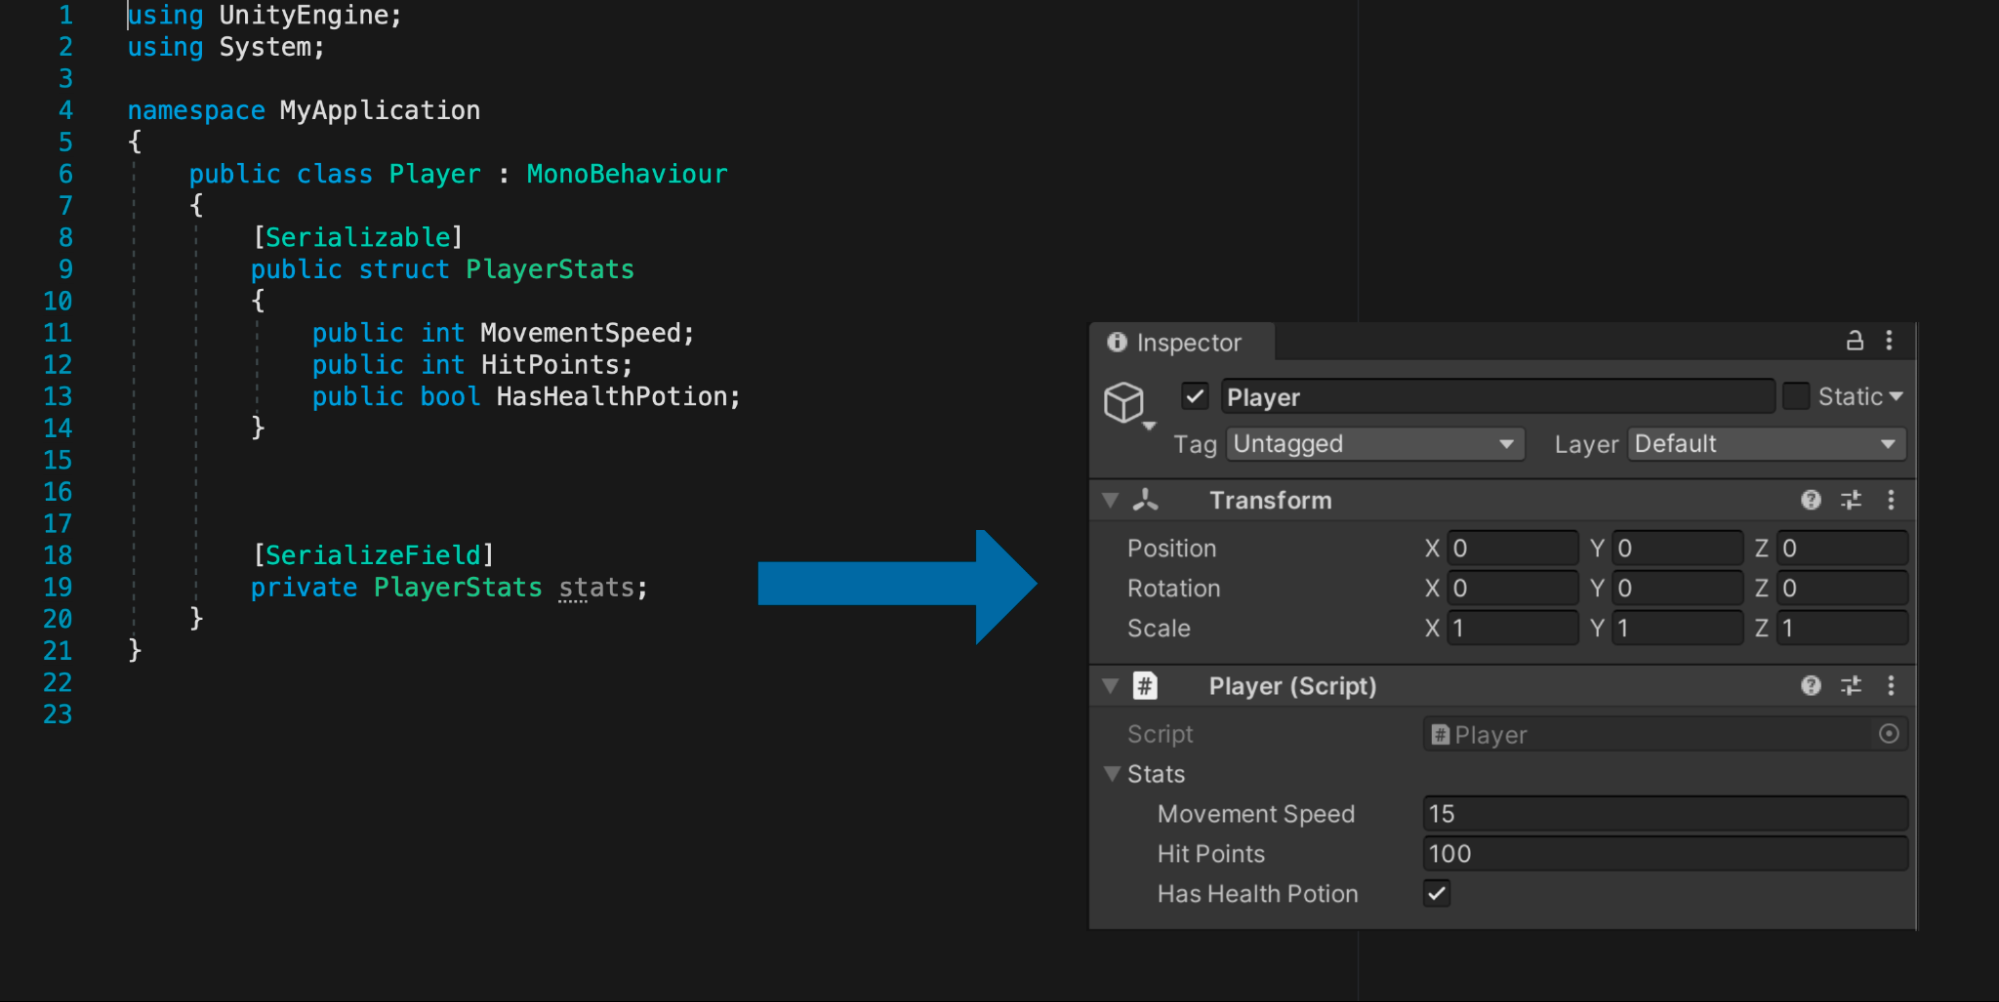
— Задавайте минимальное и максимальное значения атрибутом Range. Атрибут [Range(min, max)] ограничивает допустимое значение числового поля и удобно отображает его в Inspector в виде ползунка. — Группируйте данные в сериализуемые классы или структуры, чтобы упорядочить Inspector. Объявите открытый класс или структуру, пометьте атрибутом [Serializable] и создайте открытые переменные всех типов, которые должны отображаться в Inspector.
// ПРИМЕР: сериализуемый класс PlayerStats

using System;
using UnityEngine;
public class Player : MonoBehaviour {
    [Serializable] public struct PlayerStats {
        public int MovementSpeed;
        public int HitPoints;
        public bool HasHealthPotion;
    }
    // ПРИМЕР: закрытое поле отображается в Inspector

    [SerializeField] private PlayerStats m_stats;
}
Добавьте в другой класс поле типа этого сериализуемого класса. Его переменные появятся в Inspector в сворачиваемых группах.
Сериализуемый класс или структура помогают упорядочить Inspector.
Стиль скобок и отступов В C# распространены два стиля отступов: — В стиле Олмана открывающая фигурная скобка размещается с новой строки. Этот стиль также называют BSD-стилем, по имени BSD Unix. — В стиле K&R, также известном как «единственно верный стиль скобок», открывающая скобка остается в той же строке, что и предшествующая конструкция.
// ПРИМЕР: в стиле Олмана, или BSD, открывающая скобка находится на новой строке.void DisplayMouseCursor(bool showMouse) {
if (!showMouse) {
Cursor.lockState = CursorLockMode.Locked;
Cursor.visible = false;
}
else {Cursor.lockState = CursorLockMode.None; Cursor.visible = true; } }
// ПРИМЕР: в стиле K&R открывающая скобка остается в строке заголовка.
void DisplayMouseCursor(bool showMouse) {
    if (!showMouse) {
        Cursor.lockState = CursorLockMode.Locked;
        Cursor.visible = false;
    }
    else {
Cursor.lockState = CursorLockMode.None;
Cursor.visible = true;
}
}Существуют и другие варианты этих стилей. В примерах руководства применяется стиль Олмана из Microsoft Framework Design Guidelines. Какой бы вариант ни выбрала команда, все должны придерживаться одинаковых правил отступов и расстановки скобок. Следуйте этим рекомендациям: — Установите единый отступ. Обычно используют два или четыре пробела. Согласуйте настройку редактора со всей командой, не разжигая спор о табуляции и пробелах. Visual Studio умеет преобразовывать знаки табуляции в пробелы.
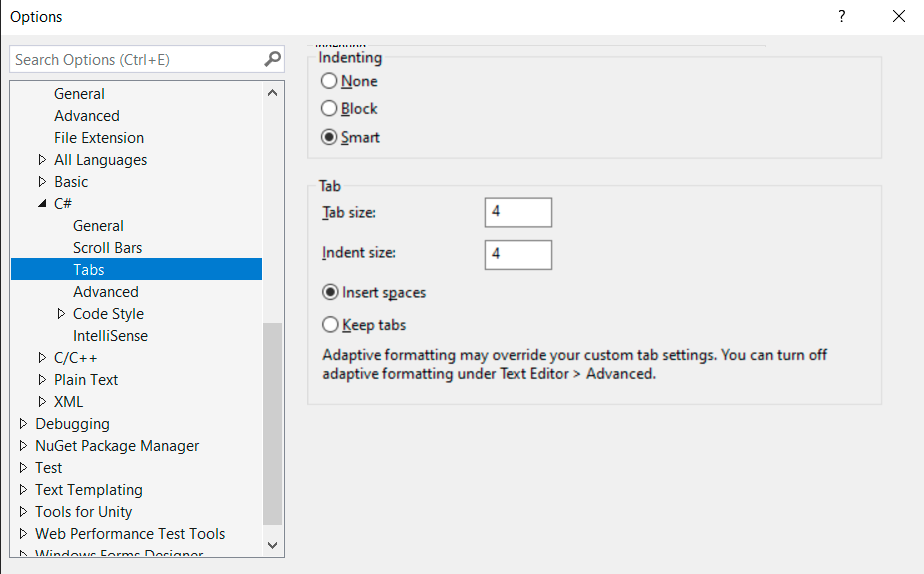
В Visual Studio (Windows) выберите Tools > Options > Text Editor > C# > Tabs..
Настройки табуляции в Visual Studio
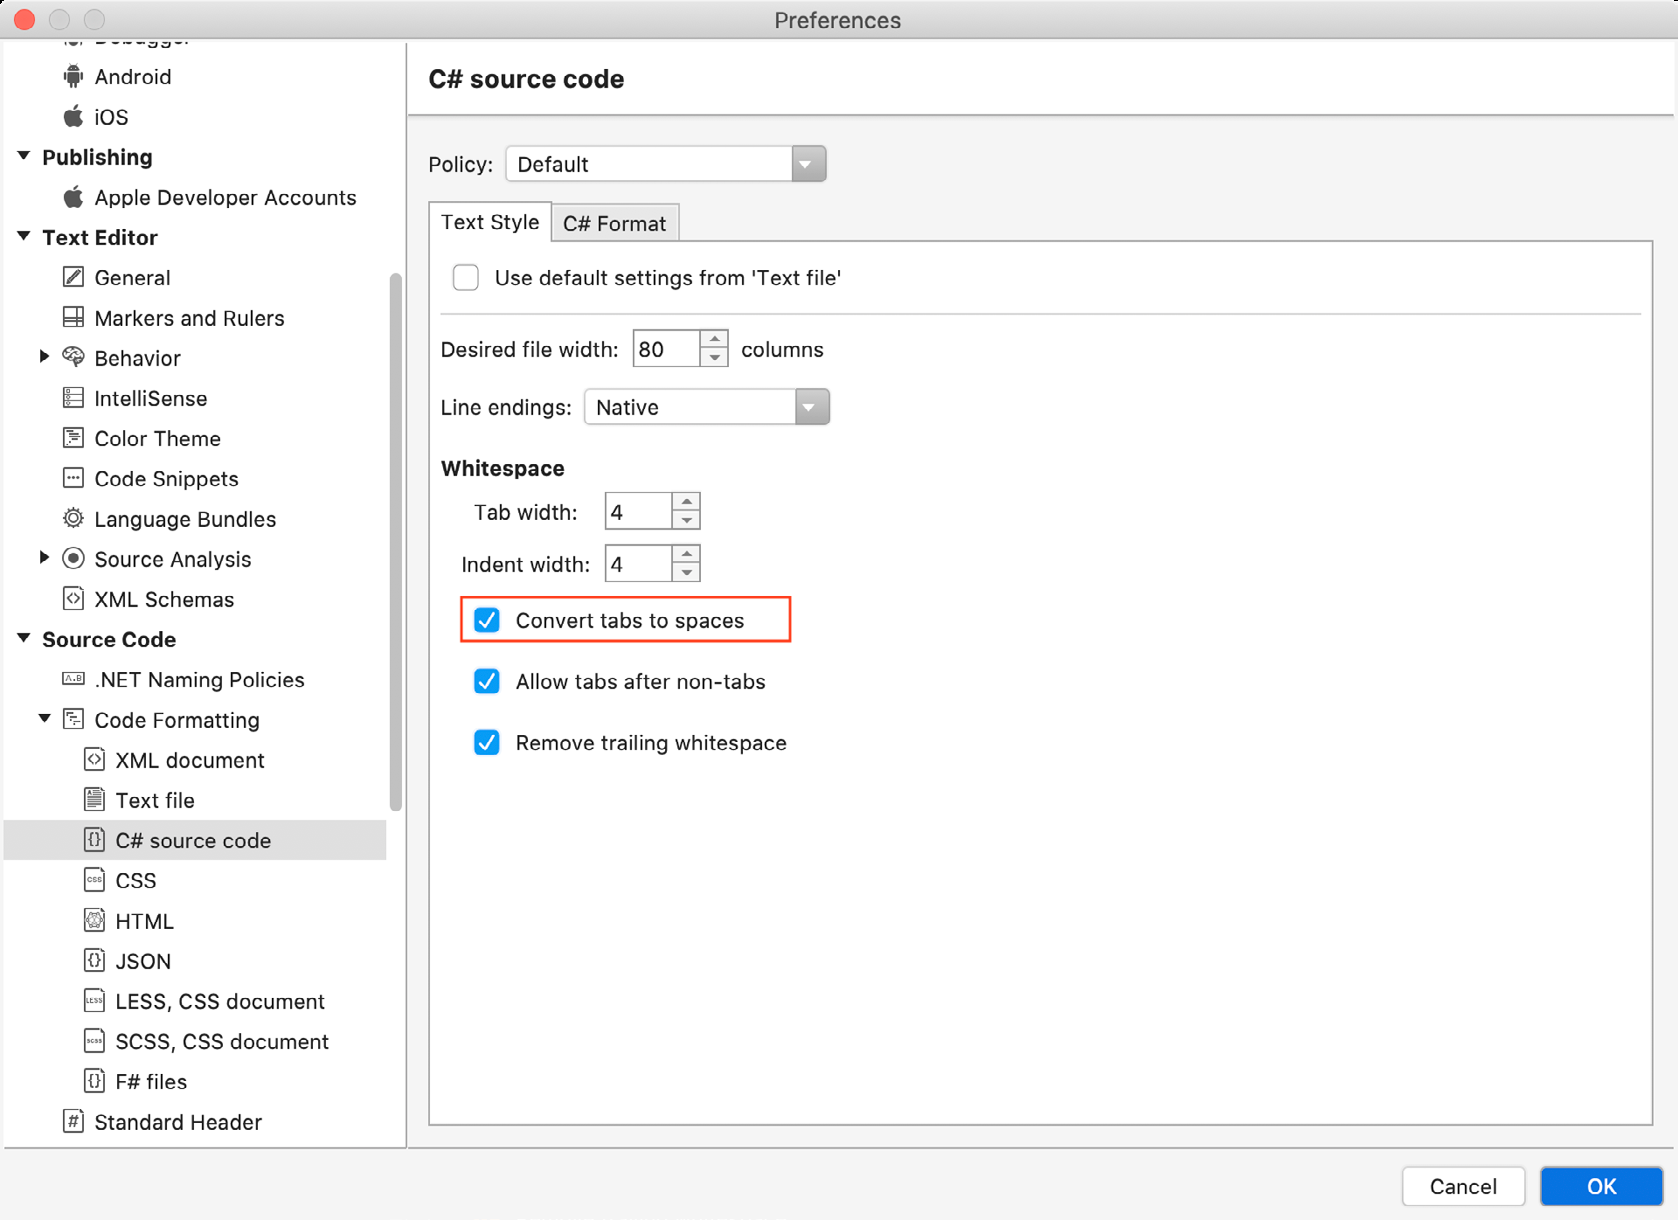
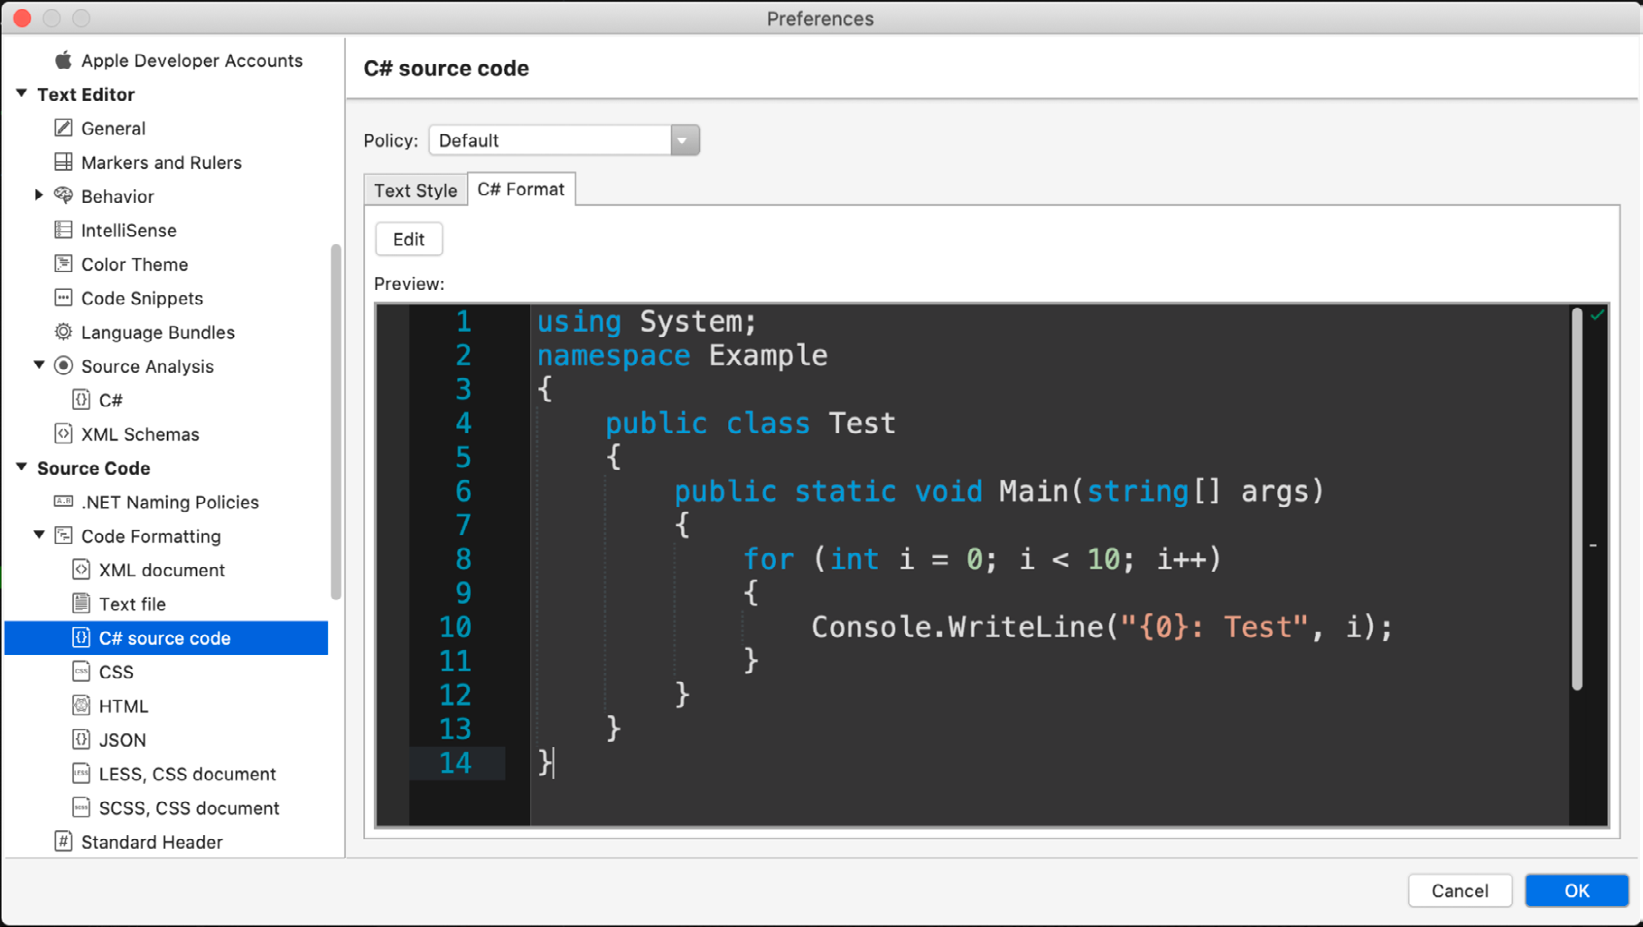
В Visual Studio for Mac выберите Visual Studio > Preferences > Source Code > C# Source Code, а затем настройте параметры на вкладке Text Style.
Преобразуйте знаки табуляции в пробелы, чтобы сделать отступы единообразными.
— По возможности не опускайте фигурные скобки даже в однострочных конструкциях. Это повышает единообразие и упрощает чтение и сопровождение кода. В примере скобки четко отделяют вызов DoSomething от цикла. Если позднее понадобится добавить строку отладочного вывода или вызвать DoSomethingElse, скобки уже будут на месте. Некоторые программисты также считают, что отдельная строка для выражения позволяет проще поставить точку останова.
// ПРИМЕР: сохраняйте скобки для ясности... for (int i = 0;

i < 100;
i++) { DoSomething(i); }
// …и/или вынесите выражение в отдельную строку. for (int i = 0;

i < 100;
i++) { DoSomething(i); }
// ИЗБЕГАЙТЕ: опускать скобки for (int i = 0;

i < 100;
i++) DoSomething(i);
— Не удаляйте скобки из вложенных многострочных конструкций. Ошибки компиляции не возникнет, но код станет запутаннее. Используйте скобки для ясности, даже когда они необязательны. Кроме того, с ними можно безопасно добавлять новую логику, не перестраивая окружающий код.// ПРИМЕР: сохраняйте скобки для ясности for (int i = 0;
i < 10;
i++) {
for (int j = 0;
j < 10;
j++) { ExampleAction(); }
}
// ИЗБЕГАЙТЕ: удалять скобки из вложенных многострочных конструкций for (int i = 0;
i < 10;
i++) for (int j = 0;
j < 10;
j++) ExampleAction();— Унифицируйте оформление операторов switch. Для удобства чтения длинные цепочки if-else обычно лучше заменять оператором switch. В этом примере метки case оформлены с отступом. Как правило, стоит добавлять и ветвь default. Даже если все варианты уже охвачены, ветвь default позволит обработать неожиданное значение.
// ПРИМЕР: метки case имеют отступ относительно switch switch (someExpression) {

    case 0: DoSomething();
    break;
    case 1: DoSomethingElse();
    break;
    case 2: int n = 1;
    DoAnotherThing(n);
    break;
    default: // Обработка неожиданного значения или ветви default break;

}
Что такое EditorConfig? Если над одним проектом работают несколько разработчиков, использующих разные редакторы и IDE, стоит задействовать файл EditorConfig. EditorConfig помогает определить единый стиль кода для всей команды. Многие IDE, включая Visual Studio и Rider, поддерживают его изначально и не требуют отдельного плагина. Файлы EditorConfig легко читать и удобно хранить в системе контроля версий. Пример такого файла приведен здесь. Настройки стиля из EditorConfig хранятся вместе с кодом и могут применяться даже вне Visual Studio. Параметры EditorConfig имеют приоритет над глобальными настройками текстового редактора Visual Studio. Личные настройки редактора продолжают действовать в проектах без файла .editorconfig и для параметров, которые этот файл не переопределяет.
Практические примеры можно найти в репозитории GitHub.
Горизонтальные пробелы Даже обычные пробелы могут улучшить внешний вид кода на экране. Предпочтения в форматировании различаются, но следующие рекомендации помогут повысить читаемость:
— Добавляйте пробелы, чтобы снизить плотность кода. Дополнительное пустое пространство визуально разделяет части строки и облегчает чтение.
// ПРИМЕР: пробелы делают строку удобнее для чтения for (int i = 0;

i < 100;
i++) { DoSomething(i); }
// НЕВЕРНО: без пробелов for(inti=0;

i<100;
i++){DoSomething(i);}
— Ставьте один пробел после запятой между аргументами метода. . // ПРИМЕР: один пробел после запятой между аргументами CollectItem(myObject, 0, 1);
// ИЗБЕГАЙТЕ: пропускать пробел CollectItem(myObject,0,1);

— Не ставьте пробелы внутри круглых скобок: ни после открывающей, ни. перед закрывающей.// ПРИМЕР: без пробелов внутри круглых скобок DropPowerUp(myPrefab, 0, 1);
// ИЗБЕГАЙТЕ: DropPowerUp( myPrefab, 0, 1 );
— Не ставьте пробел между именем метода и открывающей скобкой. . // ПРИМЕР: без пробела между именем метода и открывающей скобкой. DoSomething() // ИЗБЕГАЙТЕ DoSomething () — Не добавляйте пробелы внутри. квадратных скобок. // ПРИМЕР: без пробелов внутри квадратных скобок x = dataArray[index];
// ИЗБЕГАЙТЕ x = dataArray[ index ];— Ставьте один пробел перед условием управляющей конструкции: отделяйте условие в круглых скобках от ключевого слова. // ПРИМЕР: пробел перед условием; круглые скобки отделены пробелом. while (x == y) // ИЗБЕГАЙТЕ while(x==y) — Ставьте по одному пробелу до и после операторов сравнения. . // ПРИМЕР: пробелы до и после оператора сравнения. if (x == y) // ИЗБЕГАЙТЕ if (x==y) — Делайте строки короткими и учитывайте горизонтальные пробелы. Установите стандартную ширину строки в 80–120 символов. Длинную строку лучше разбить на несколько выражений, чем допустить ее переполнение.
— Соблюдайте отступы и иерархию. Отступы повышают читаемость кода. — Не выравнивайте код по столбцам без необходимости. Такое размещение выравнивает переменные, но мешает сопоставлять тип с именем. При этом выравнивание по столбцам может быть полезно для побитовых выражений или структур с большим объемом данных. Помните, что при добавлении элементов его придется поддерживать вручную, а некоторые автоформаттеры могут изменить выравниваемую часть столбца.
// ПРИМЕР: один пробел между типом и именем

public float Speed = 12f;
public float Gravity = -10f;
public float JumpHeight = 2f;
public Transform GroundCheck;
public float GroundDistance = 0.4f;
public LayerMask GroundMask;
// ИЗБЕГАЙТЕ: выравнивания по столбцам
public float
Speed = 12f;
public float
Gravity = -10f;
public float
JumpHeight = 2f;
public Transform
GroundCheck;
public float
GroundDistance = 0.4f;
public LayerMask
GroundMask;
Вертикальные отступы Вертикальные отступы тоже помогают организовать код. Располагайте связанные части скрипта рядом и осмысленно используйте пустые строки. Следующие рекомендации упорядочат код сверху вниз:
— Группируйте зависимые и похожие методы. Код должен быть логичным и связным. Размещайте рядом методы, выполняющие сходные задачи, чтобы читателю не приходилось перемещаться по всему файлу. — Отделяйте разные части класса пустыми строками. Например, можно оставить две пустые строки между: — объявлениями переменных и методами — классами и интерфейсами — блоками if-then-else, если это улучшает читаемость Не злоупотребляйте этим приемом и зафиксируйте в руководстве по стилю, где он уместен.
Области #region Директива #region позволяет сворачивать и скрывать участки кода в файлах C#, упрощая работу с большими файлами и их чтение. Однако при соблюдении рекомендаций этого руководства по размеру классов директива #region становится лишней. Вместо того чтобы скрывать блоки за областями, разбивайте код на небольшие классы. В коротком исходном файле потребность в #region возникает реже.
Примечание. Многие разработчики считают области признаком проблемного кода или антипаттерном. Команде следует договориться о едином подходе.
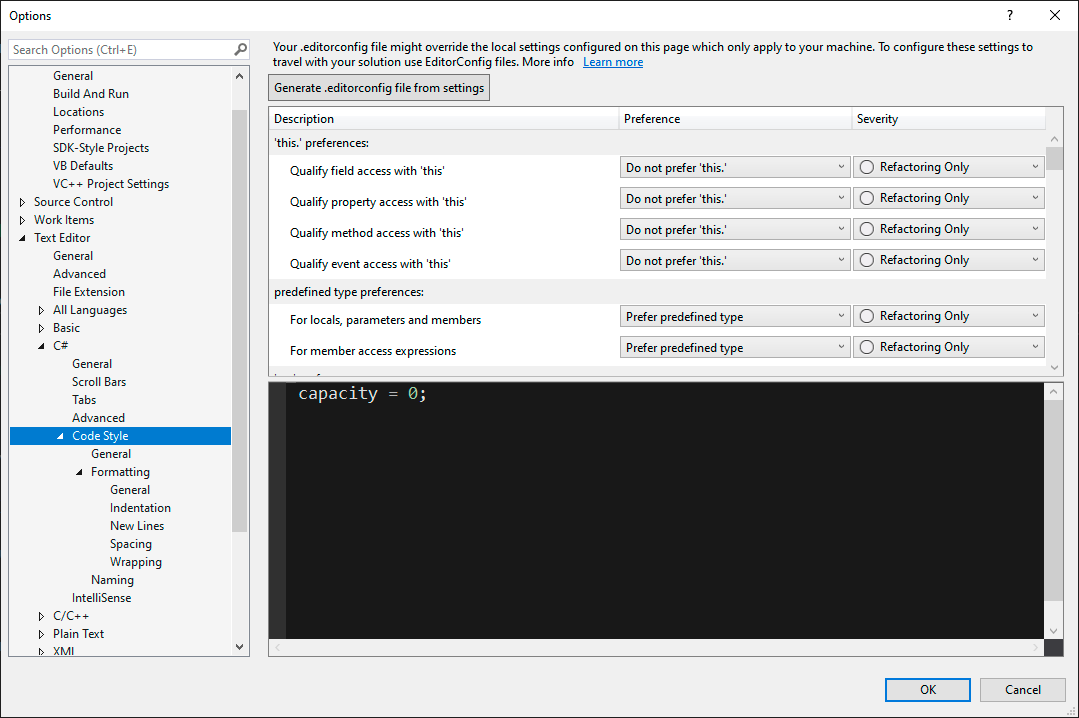
Форматирование кода в Visual Studio Не пугайтесь, если правил форматирования кажется слишком много. Современные IDE позволяют быстро настраивать и применять их. Можно создать шаблон правил форматирования и сразу применить его ко всем файлам проекта. Чтобы настроить правила форматирования в редакторе скриптов: — В Visual Studio (Windows) выберите Tools > Options, затем Text Editor > C# > Code Style > Formatting. Настройте параметры General, Indentation, New Lines, Spacing и Wrapping.
Параметры форматирования кода
— В Visual Studio for Mac выберите Visual Studio > Preferences, затем Source Code > Code Formatting > C# Source Code. В верхней части окна выберите Policy. Настройте пробелы и отступы на вкладке Text Style, а параметры Indentation, New Lines, Spacing и Wrapping — на вкладке C# Format.
В окне Preview отображается результат выбранных настроек стиля.
Чтобы в любой момент привести файл скрипта в соответствие с руководством по стилю:
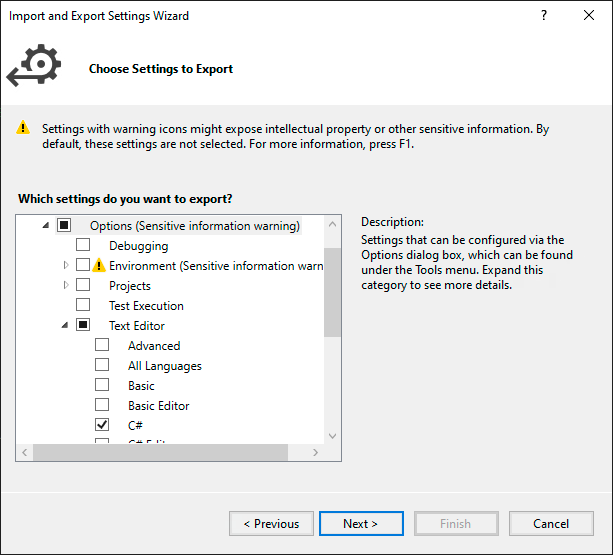
— В Visual Studio (Windows) выберите Edit > Advanced > Format Document (Ctrl+K, Ctrl+D). Если нужно отформатировать только пробелы и выровнять табуляцию, в нижней части редактора можно запустить Run Code Cleanup (Ctrl+K, Ctrl+E). — В Visual Studio for Mac выберите Edit > Format Document (Ctrl+I). В Windows настройки редактора можно передать через Tools > Import and Export Settings. Экспортируйте файл с правилами форматирования C# из руководства по стилю и попросите каждого участника команды импортировать его.
Экспорт настроек форматирования C# для совместного использования.
Visual Studio упрощает соблюдение руководства по стилю: для форматирования достаточно сочетания клавиш.
Примечание. Вместо импорта и экспорта настроек Visual Studio можно настроить файл EditorConfig, описанный выше. Так правила форматирования проще использовать в разных IDE и хранить в системе контроля версий. Дополнительные сведения см. в параметрах правил стиля кода .NET.
Хотя это не относится напрямую к чистому коду, рекомендуем посмотреть доклад GDC «Советы и приемы Visual Studio для повышения продуктивности». Эти советы упрощают форматирование и рефакторинг чистого кода.
Чтобы настроить файл .editorconfig в Visual Studio Code: 1. Создайте в корневом каталоге проекта файл с именем .editorconfig. 2. Откройте файл .editorconfig и добавьте нужные параметры. Ниже приведен пример конфигурации для C#:
# корневой файл EditorConfig root = true # переводы строк в стиле Unix; каждый файл заканчивается новой строкой
[*] end_of_line = lf insert_final_newline = true # отступ в 4 пробела [*.cs] indent_style = space indent_size = 4 charset = utf-8 trim_trailing_whitespace = true # отступы табуляцией для Makefile [Makefile] indent_style = tab # отдельные параметры для файлов JSON [*.json] indent_style = space indent_size = 2
Formatting
If you want your code to be easy to write, make it easy to read. – Robert C. Martin, author of Clean Code and Agile Software Development
The less you think about formatting, the more you can work on something else. Along with naming, formatting helps reduce guesswork and improves code clarity. By following a standardized style guide, code reviews become less about how the code looks and more about what it does. Omit, expand, or modify these example rules to fit your team’s needs. In all cases, consider how your team will implement each formatting rule and then have everyone apply it uniformly. Refer back to your team’s style to resolve any discrepancies. Consider each of the following code formatting suggestions when setting up your Unity dev style guide.
Properties A property provides a flexible mechanism to read, write, or compute class values. Properties behave as if they were public member variables, but in fact they’re special methods called accessors. Each property has a get and set method to access a private field, called a backing field. In this way, the property encapsulates the data, hiding it from unwanted changes by the user or external objects. The getter and setter each have their own access modifier, allowing your property to be read-write, read-only, or write-only. You can also use the accessors to validate or convert the data (e.g., verify that the data fits your preferred format or change a value to a particular unit). The syntax for properties can vary, so your style guide should define how to format them. Use these tips to keep properties consistent in your code: —
Use expression-bodied properties for single line read-only properties (=>): This returns the private backing field.
// EXAMPLE: expression bodied properties

public class PlayerHealth {
    // the

    private backing field private int m_maxHealth;
    // read-only, returns backing field

    public int MaxHealth => m_maxHealth;
    // equivalent to: //

    public int MaxHealth { get; private set; }
}
—Everything else uses the older { get; set; }
syntax: If you just want to expose a public property without specifying a backing field, use the Auto-Implemented property. Apply the expression-bodied syntax for the set and get accessors. Remember to make the setter private if you don’t want to give write access. Align the closing with the opening brace for multi-line code blocks.// EXAMPLE: expression bodied properties
public class PlayerHealth {
// backing field
private int m_maxHealth;
// explicitly implementing getter and setter
public int MaxHealth {
get => m_maxHealth;
set => m_maxHealth = value;
}
// write-only (not
using backing field) public int Health { private get; set; }
// write-only, without an explicit setter
public SetMaxHealth(int newMaxValue) => _maxHealth = newMaxValue;
}While you can also use functions to expose private data as in our example below, it’s generally recommended to use properties for simple get/set operations. For operations involving complex logic or computation, methods are generally recommended.
// EXAMPLE: expression bodied properties

public class PlayerHealth {
    // backing field

    private int m_maxHealth;
    public int GetMaxHealth { return m_maxHealth; }
}
Serialization Script serialization is the automatic process of transforming data structures or object states into a format that Unity can store and reconstruct later. For performance reasons, Unity handles serialization differently than in other programming environments. Serialized fields appear in the Inspector, but you cannot serialize static, constant, or readonly fields. They must be either public or tagged with the [SerializeField] attribute. Unity only serializes certain field types, so refer to the documentation page for the complete set of serialization rules. Observe a few basic guidelines when working with serialized fields: —
Use the [SerializeField] attribute: The SerializeField attribute can work with private or protected variables to make them appear in the Inspector. This encapsulates the data better than marking the variable public and prevents an external object from overwriting its values.
Use the Range attribute to set minimum and maximum values: The [Range(min, max)] attribute is handy if you want to limit what the user can assign to a numeric field. It also conveniently represents the field as a slider in the Inspector.
Group data in serializable classes or structs to clean up the Inspector: Define a public class or struct and mark it with the [Serializable] attribute. Define public variables for each type you want to expose in the Inspector.
// EXAMPLE: a serializable class for PlayerStats

using System;
using UnityEngine;
public class Player : MonoBehaviour {
    [Serializable] public struct PlayerStats {
        public int MovementSpeed;
        public int HitPoints;
        public bool HasHealthPotion;
    }
    // EXAMPLE: The

    private field is visible in the Inspector [SerializeField] private PlayerStats m_stats;
}
Reference this serializable class from another class. The resulting variables appear within collapsible units in the Inspector.
A serializable class or struct can help organize the Inspector.
Brace or indentation style There are two common indentation styles in C#: —
The Allman style places the opening curly braces on a new line, also known as the BSD style (from BSD Unix).
The K&R style, or “one true brace style,” keeps the opening brace on the same line as the previous header.
// EXAMPLE: Allman or BSD style puts opening brace on a new line.

void DisplayMouseCursor(bool showMouse) {
    if (!showMouse) {
        Cursor.lockState = CursorLockMode.Locked;
        Cursor.visible = false;
    }
    else {
Cursor.lockState = CursorLockMode.None; Cursor.visible = true; } }
// EXAMPLE: K&R style puts opening brace on the previous line.

void DisplayMouseCursor(bool showMouse) {
    if (!showMouse) {
        Cursor.lockState = CursorLockMode.Locked;
        Cursor.visible = false;
    }
    else {
        Cursor.lockState = CursorLockMode.None;
        Cursor.visible = true;
    }
}
There are variations on these indentation styles as well. The examples in this guide use the Allman style from the Microsoft Framework Design Guidelines. Regardless of which one you choose as a team, make sure everyone follows the same indentation and brace style. Try these tips: —
Decide on a uniform indentation: This is typically four or two spaces. Get everyone on your team to agree on a setting in your Editor preferences without igniting a tabs versus spaces flame war. Note that Visual Studio provides the option to convert tabs to spaces.
In Visual Studio (Windows), navigate to Tools > Options > Text Editor > C# > Tabs.
Tabs settings in Visual Studio
On Visual Studio for Mac, navigate to Preferences > Source Code > C# Source Code. Select the Text Style to adjust the settings.
Convert tabs to spaces to make indentation uniform.
Where possible, don’t omit braces, even for single-line statements: This increases consistency, keeping your code easier to read and maintain. In this example, the braces clearly separate the action, DoSomething, from the loop. If later you need to add a Debug line or to run DoSomethingElse, the braces will already be in place. Some programmers argue that keeping the clause on a separate line allows you to add a breakpoint easily.
// EXAMPLE: keep braces for clarity... for (int i = 0;

i < 100;
i++) { DoSomething(i); }
// … and/or keep the clause on a separate line. for (int i = 0;

i < 100;
i++) { DoSomething(i); }
// AVOID: omitting braces for (int i = 0;

i < 100;
i++) DoSomething(i);
—
Don’t remove braces from nested multi-line statements: Removing braces in this case won’t throw an error, but can be confusing. Apply braces for clarity, even if they are optional. Braces also ensure that modifications, such as adding new logic, can be done safely without needing to refactor the surrounding structure.
// EXAMPLE: keep braces for clarity for (int i = 0;

i < 10;
i++) {
    for (int j = 0;
    j < 10;
    j++) { ExampleAction(); }
}
// AVOID: removing braces from nested multi-line statements for (int i = 0;

i < 10;
i++) for (int j = 0;
j < 10;
j++) ExampleAction();
Standardize your switch statements: It’s generally advisable to replace longer if-else chains with a switch statement for better readability. Here is one example where you indent the case statements. It’s generally recommended to include a default case as well. Even if the default case is not needed (for example, in cases where all possibilities are covered), including one ensures that the code is prepared to handle unexpected values.
// EXAMPLE: indent cases from the switch statement switch (someExpression) {

    case 0: DoSomething();
    break;
    case 1: DoSomethingElse();
    break;
    case 2: int n = 1;
    DoAnotherThing(n);
    break;
    default: // Handle unexpected or default case break;

}
What is EditorConfig? Do you have multiple developers working on the same project with different editors and IDEs? Consider using an EditorConfig file. The EditorConfig file can help you define a coding style that works across your entire team. Many IDEs, like Visual Studio and Rider, come bundled with native support and do not require a separate plugin. EditorConfig files are easily readable and work with version control systems. You can see an example file here. The code styling from EditorConfig travels with your code and can enforce coding styles even outside of Visual Studio. EditorConfig settings take precedence over the global Visual Studio text editor settings. Your personal editor preferences still apply whenever you’re working in a codebase without a .editorconfig file, or when the .editorconfig file doesn’t override a particular setting. See the GitHub repo for some real-world samples.
Horizontal spacing Something as simple as spacing can enhance your code’s appearance on-screen. Your personal formatting preferences can vary, but try the following suggestions to improve readability: —
Add spaces to decrease code density: The extra whitespace can give a sense of visual separation between parts of a line improving readability.
// EXAMPLE: add spaces to make lines easier to read for (int i = 0;

i < 100;
i++) { DoSomething(i); }
// AVOID: no spaces for(inti=0;

i<100;
i++){DoSomething(i);}
—
Use a single space after a comma between function arguments.
// EXAMPLE: single space after comma between arguments CollectItem(myObject, 0, 1);
// AVOID: leaving out spacing CollectItem(myObject,0,1);

—
Don’t add a space after the parenthesis and function arguments.
// EXAMPLE: no space after the parenthesis and function arguments DropPowerUp(myPrefab, 0, 1);
//AVOID: DropPowerUp( myPrefab, 0, 1 );

—
Don’t use spaces between a function name and parenthesis.
// EXAMPLE: omit spaces between a function name and parenthesis. DoSomething() // AVOID DoSomething ()Avoid spaces inside brackets.
// EXAMPLE: omit spaces inside brackets x = dataArray[index];
// AVOID x = dataArray[ index ];
Use a single space before flow control conditions: Add a space between the flow comparison operator and the parentheses.
// EXAMPLE: space before condition;

separate parentheses with a space. while (x == y) // AVOID while(x==y) —
Use a single space before and after comparison operators.
// EXAMPLE: space before condition;

separate parentheses with a space. if (x == y) // AVOID if (x==y) —
Keep lines short. Consider horizontal whitespace: Decide on a standard line width (80120 characters). Break a long line into smaller statements rather than letting it overflow.
Maintain indentation/hierarchy: Indent your code to increase legibility.
Don’t use column alignment unless needed for readability: This type of spacing aligns the variables but can make it difficult to pair the type with the name. Column alignment, however, can be useful for bitwise expressions or structs with a lot of data. Just be aware that it may create more work for you to maintain the column alignment as you add more items. Some auto-formatters might also change which part of the column gets aligned.
// EXAMPLE: One space between type and name

public float Speed = 12f;
public float Gravity = -10f;
public float JumpHeight = 2f;
public Transform GroundCheck;
public float GroundDistance = 0.4f;
public LayerMask GroundMask;
// AVOID: column alignment
public float
Speed = 12f;
public float
Gravity = -10f;
public float
JumpHeight = 2f;
public Transform
GroundCheck;
public float
GroundDistance = 0.4f;
public LayerMask
GroundMask;
Vertical spacing You can use the vertical spacing to your advantage as well. Keep related parts of the script together and use blank lines to your advantage. Try these suggestions to organize your code from top to bottom: —
Group dependent and/or similar methods together: Code needs to be logical and coherent. Keep methods that do the same thing next to one another, so someone reading your logic doesn’t have to jump around the file.
Use the vertical whitespace to your advantage to separate distinct parts of your class: For example, you can add two blank lines between: —
Variable declarations and methods
Classes and Interfaces
if-then-else blocks (if it helps readability)
Keep this to a minimum and note on your style guide where applicable.
Regions The #region directive enables you to collapse and hide sections of code in C# files, making large files more manageable and easier to read. However, if you follow the general advice for Classes from this guide, your class size should be manageable and the #region directive superfluous. Break your code into smaller classes instead of hiding code blocks behind regions. You will be less inclined to add a region if the source file is short. Note: Many developers consider regions to be code smells or anti-patterns. Decide as a team on which side of the debate you fall.
Code formatting in Visual Studio Don’t despair if these formatting rules seem overwhelming. Modern IDEs make it efficient to set up and enforce them. You can create a template of formatting rules and then convert your project files at once. To set up formatting rules for the script editor: —
In Visual Studio (Windows), navigate to Tools > Options. Locate Text Editor > C# > Code Style Formatting. Use the settings to modify the General, Indentation, New Lines, Spacing, and Wrapping options.
Code style formatting options
In Visual Studio for Mac, select Visual Studio > Preferences, then navigate to Source Code > Code Formatting > C# source code. Select the Policy at the top. Then set your spacing and indentation in the Text Style tab. In the C# Format tab, adjust the Indentation, New Lines, Spacing, and Wrapping settings.
The Preview window shows off your style guide choices.
If at any time you want to force your script file to conform to the style guide: —
In Visual Studio (Windows), go to Edit > Advanced > Format Document (Ctrl + K, Ctrl + D hotkey chord). If you want only to format white spaces and tab alignment, you can also use Run Code Cleanup (Ctrl + K , Ctrl + E) at the bottom of the editor.
In Visual Studio for Mac, go to Edit > Format Document (Ctrl + I hotkey)
On Windows, you can also share your editor settings from Tools > Import and Export Settings. Export a file with the style guide’s C# code formatting and then have every team member import that file.
Exporting the C# code formatting to share.
Visual Studio makes it easy to follow the style guide. Formatting then becomes as simple as using a hotkey.
Note: You can configure an EditorConfig file (see above) instead of importing and exporting Visual Studio settings. Doing this allows you to share formatting more easily across different IDEs, and it has the added benefit of working with version control. See the .NET code style rule options for more information. Though this isn’t specific to clean code, be sure to check out this GDC session, Visual Studio tips & tricks to boost your productivity. Clean code is much easier to format and refactor if you apply these productivity tips. To set up an .editorconfig file in Visual Studio Code, follow these steps: 1.
In the root directory of your project, create a new file named .editorconfig.
Open the .editorconfig file and add your desired configuration settings. Here’s an example configuration for C#: # top-most EditorConfig file root = true # Unix-style newlines with a newline ending every file [*] end_of_line = lf insert_final_newline = true # 4 space indentation [*.cs] indent_style = space indent_size = 4 charset = utf-8 trim_trailing_whitespace = true # Tab indentation for Makefiles [Makefile] indent_style = tab # Specific settings for JSON files [*.json] indent_style = space indent_size = 2