Привязка данных
Привязка данных
Пользовательский интерфейс связывает игроков с данными, управляющими приложением. Именно через него они видят внутреннее состояние и логику игры и взаимодействуют с ними. Игроки не изучают необработанные значения характеристик - вместо этого они видят шкалу здоровья. Они не читают списки предметов напрямую, а пользуются инвентарём с перетаскиванием объектов. Такое взаимодействие интерфейса с данными влияет на структуру проекта.
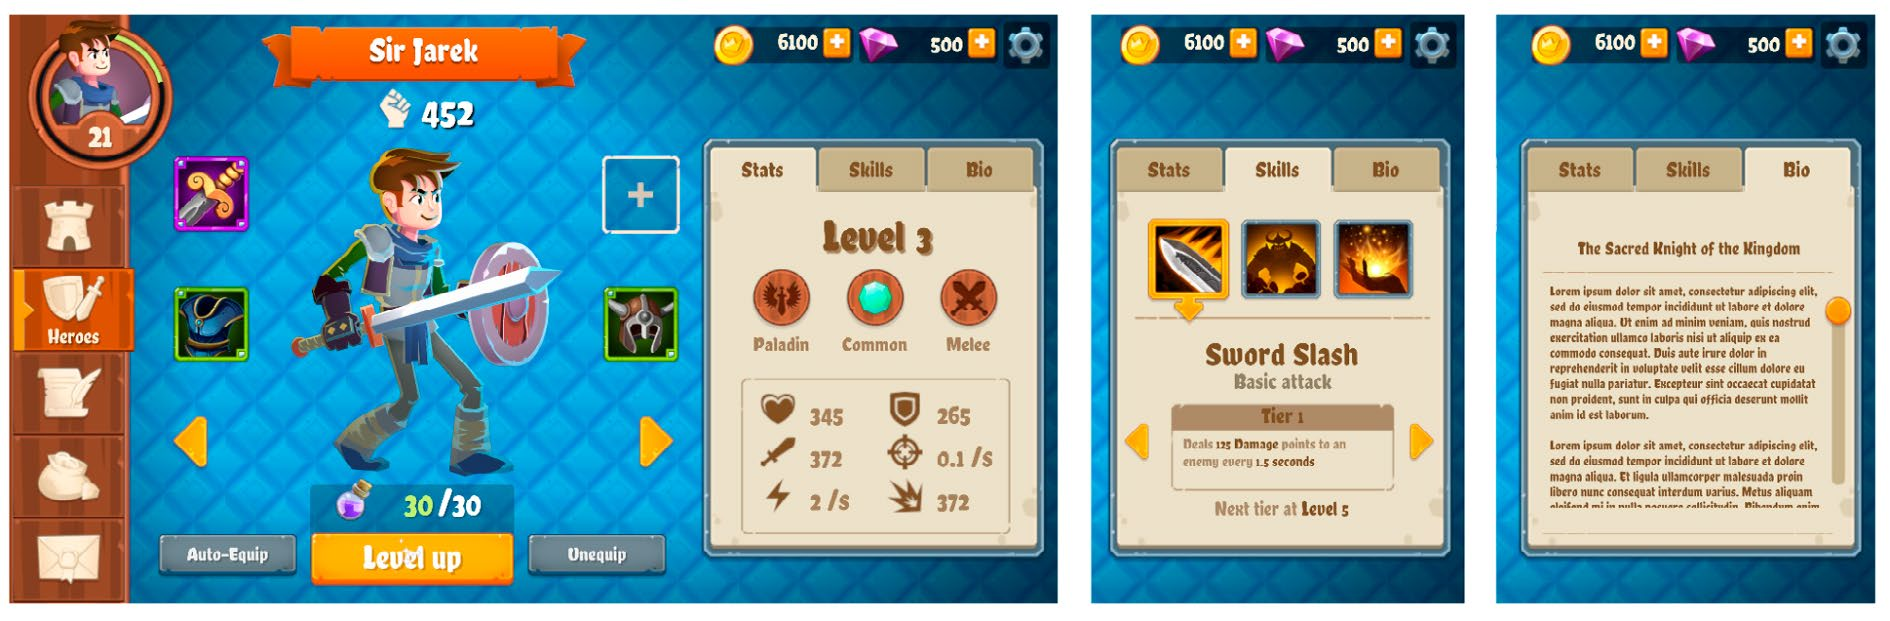
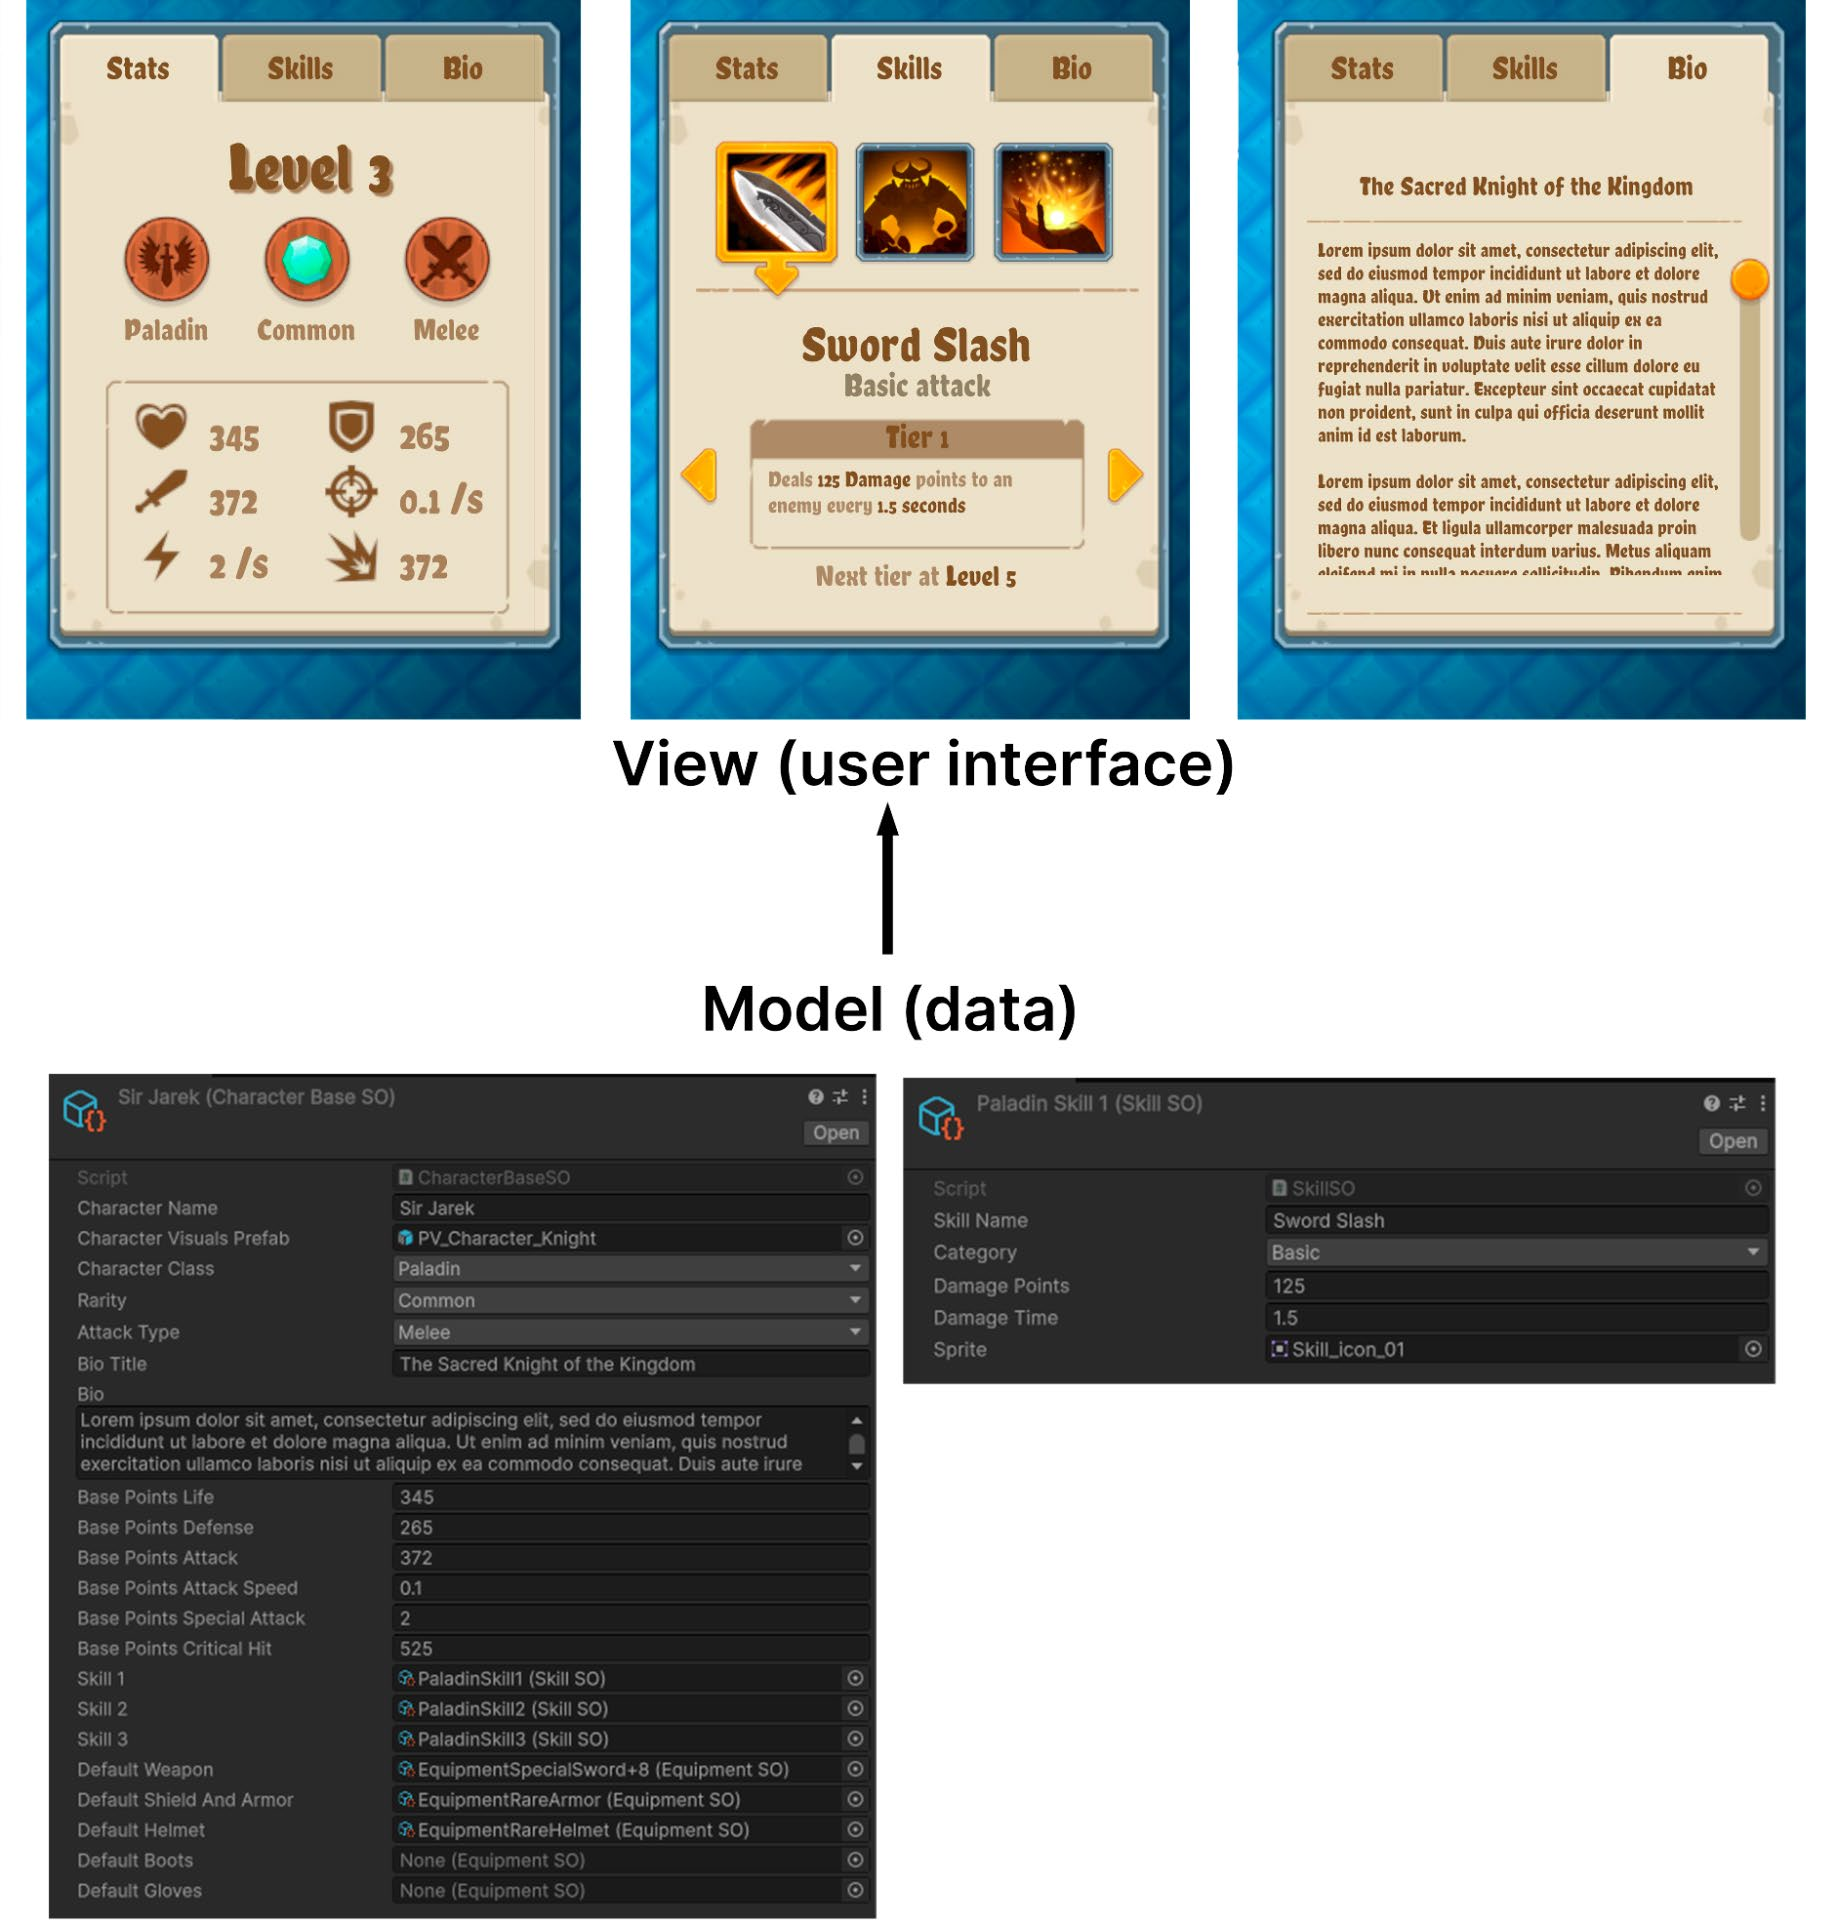
Интерфейс, отражающий игровые данные Ниже показано окно характеристик персонажа из UI Toolkit Sample - Dragon Crashers. Этот интерфейс отображает основные параметры игры в жанре RPG. Представление - это собственно интерфейс, с которым взаимодействует игрок. Контейнеры с вкладками упорядочивают способности персонажа и упрощают навигацию.
Окно характеристик персонажа отображает игровые данные.
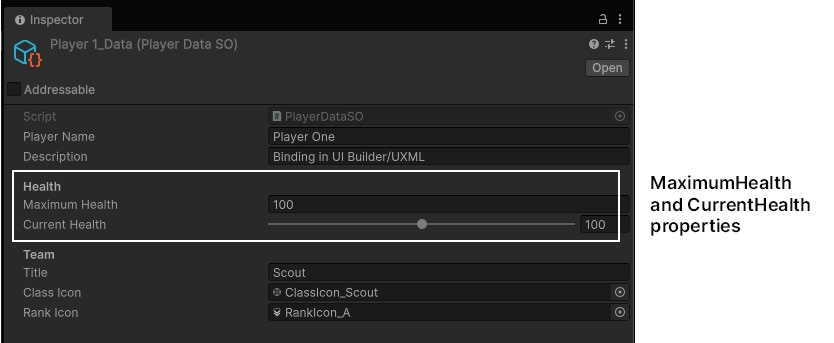
За интерфейсом стоит модель с данными - например, ScriptableObject, в котором хранятся характеристики каждого персонажа.
Ресурс ScriptableObject содержит данные персонажа.
Разделение представления и модели - один из основных принципов архитектуры пользовательских интерфейсов. Отделив визуальный интерфейс от данных, вы сделаете код гибче, пригоднее для повторного использования и удобнее в сопровождении. Но после разделения модели и представления их необходимо синхронизировать. Традиционно для этого данные обновляют напрямую или используют систему событий: при изменении данных наблюдатели обновляют интерфейс. Такой подход работает, но приводит к повторяющемуся шаблонному коду.
По мере роста проекта управлять системой становится всё сложнее: новые элементы и зависимости требуют дополнительной логики обновления или обработчиков событий. В результате сценарии разрастаются, их труднее читать и поддерживать.
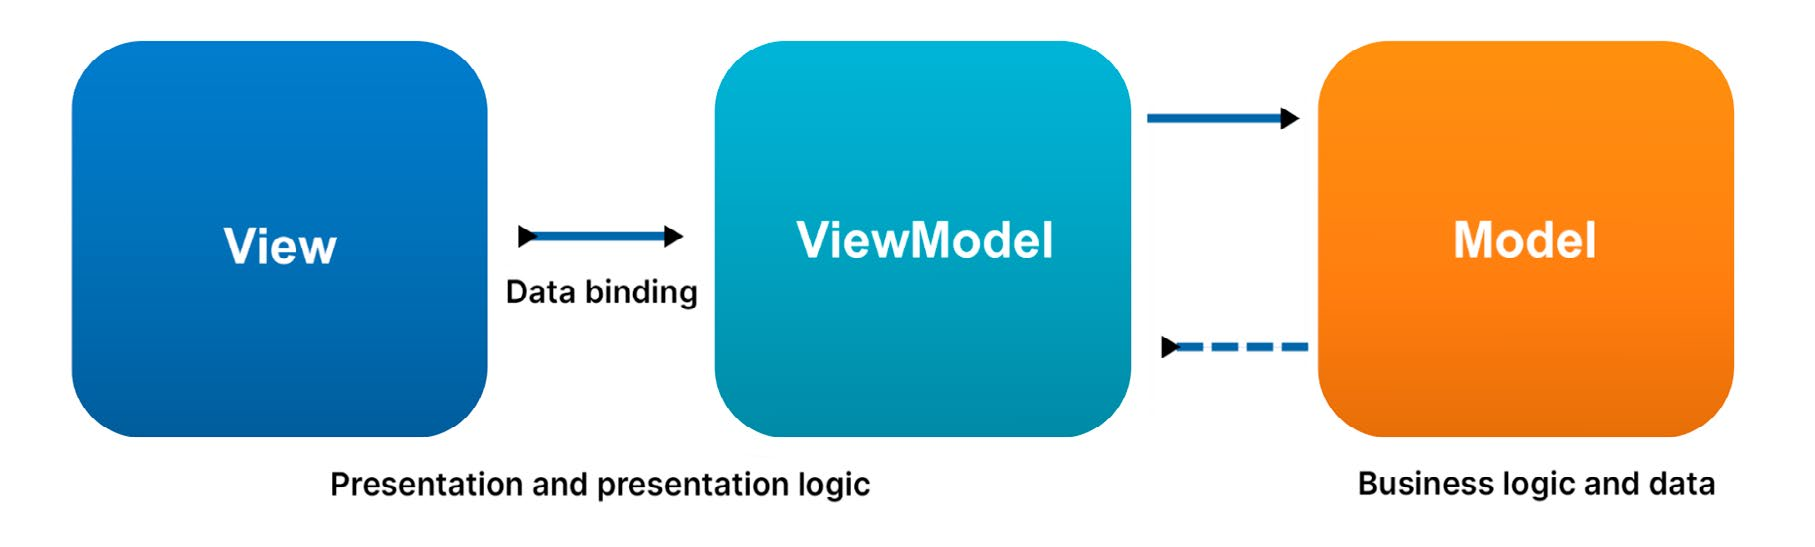
Привязка данных во время выполнения Привязка данных во время выполнения в Unity 6 предлагает более простой способ решить эту задачу. Данные приложения напрямую связываются с элементами интерфейса, поэтому изменения одной стороны автоматически отражаются на другой. Архитектура Model-View-ViewModel (MVVM - «модель - представление - модель представления») добавляет между представлением и моделью слой логики отображения. ViewModel выступает посредником и предоставляет данные модели в формате, подходящем представлению. Подробнее об MVVM и других шаблонах проектирования читайте в электронной книге Unity «Совершенствуйте код с помощью шаблонов проектирования и SOLID».
Архитектура MVVM (источник: Wikipedia)
Например, шкала здоровья может автоматически отображать запас здоровья игрока, а надпись со счётом - обновляться в реальном времени без дополнительной логики в сценариях и ручной обработки событий. Чем меньше кода синхронизации, тем проще масштабировать проект. Рассмотрим примеры привязки данных UI Toolkit во время выполнения и способы её применения.
Основные понятия привязки данных В Unity 6 появилась система привязки данных во время выполнения, которая обеспечивает структурированный способ связывать элементы интерфейса с данными приложения. Чтобы привязать свойство визуального элемента к источнику данных, создайте экземпляр DataBinding. Ниже перечислены основные понятия: - Data source: объект, содержащий данные для привязок интерфейса. - Data source path: свойство или поле источника данных, с которым связывается элемент интерфейса. - Binding mode: определяет направление передачи данных между источником и интерфейсом; привязка может быть односторонней или двусторонней. Вместе эти части образуют привязку данных. Рассмотрим их подробнее.
Подготовка источника данных Источник данных - это объект, содержащий данные для привязок интерфейса. Им может быть любой объект C#, включая ScriptableObject, MonoBehaviour или пользовательский объект C#. Структуры в роли источников данных способны повысить производительность благодаря небольшому объёму выделяемой памяти и меньшему числу сборок мусора. Привязку можно настроить как из кода, так и в Inspector.
В демонстрационном проекте источниками данных служат ScriptableObject, поскольку содержащиеся в них данные удобно сериализовать через Inspector Unity.
Использование атрибута CreateProperty Чтобы свойства можно было использовать в привязках, UI Toolkit опирается на контейнеры свойств, создаваемые модулем Unity Properties. Они определяют, какие свойства источника данных доступны системе привязки. Пометьте нужные свойства атрибутом CreateProperty, чтобы явно предоставить их системе. Ниже показан распространённый вариант настройки:
[SerializeField, DontCreateProperty] int m_Value;
[CreateProperty] public int Value {
    get => m_Value;
    set => m_Value = value;
}
В этом примере поле m_Value помечено атрибутом SerializeField для сериализации, но исключено из привязки атрибутом DontCreateProperty. Свойство Value, напротив, помечено CreateProperty и поэтому доступно системе привязки. Такое явное разделение упрощает управление потоком данных между моделью и интерфейсом.
Привязки данных во время выполнения используют контейнеры свойств для эффективного обхода и изменения данных типа. По умолчанию Unity создаёт такой контейнер с помощью рефлексии при первом обращении к типу, что вызывает небольшие накладные расходы во время выполнения. Чтобы избежать этого, помечайте объявляемые свойства атрибутом CreateProperty. Тогда код привязки создаётся во время компиляции, рефлексия во время выполнения не требуется, а накладные расходы снижаются.
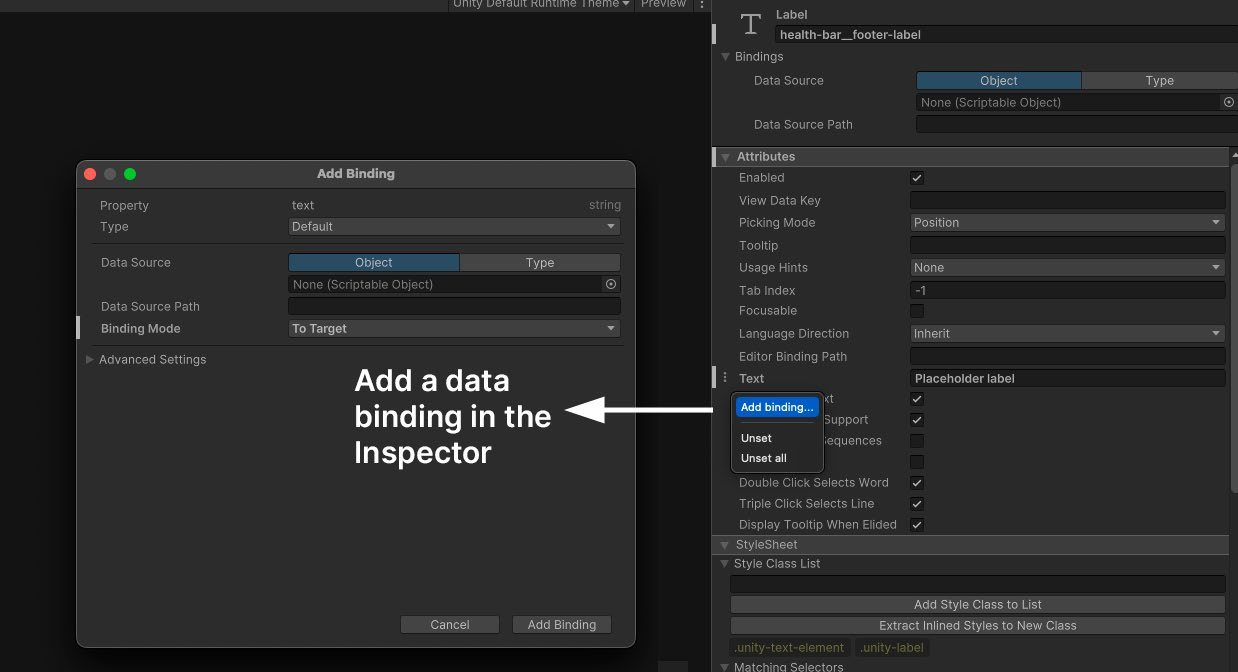
Источники данных и пути Когда источник данных готов, его можно связать с интерфейсом. Путь к источнику данных указывает свойство или поле, которое нужно связать с элементом интерфейса. Например, если источник содержит свойство health, путь будет указывать непосредственно на него - в UXML или в настройке привязки C#. Рассмотрим практический пример. В UI Builder выберите элемент в Hierarchy, откройте Inspector и в меню параметров ( ) выберите Add Binding.
Добавление привязки в Inspector.
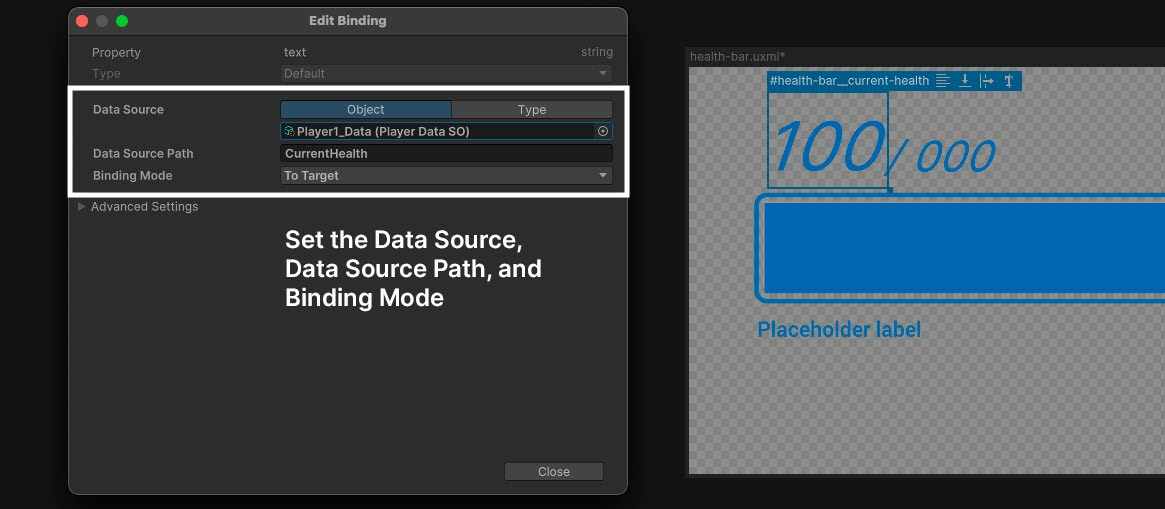
Затем назначьте Data Source - например, ScriptableObject PlayerDataSO - и укажите Data Source Path, например CurrentHealth.
Настройка Data Source и Data Source Path в UI Builder.
В UXML: когда привязка данных настраивается в UI Builder, соответствующий код UXML создаётся автоматически. Путь к источнику данных также можно добавить или изменить вручную в текстовом редакторе. Ниже показан блок кода, создающий привязку:
<Bindings> <ui:DataBinding property="text" data-source-path="Health"/> </Bindings> В C#: создайте экземпляр объекта источника данных или получите ссылку на него в сценарии - например, на ScriptableObject. Присвойте объект свойству dataSource корневого элемента. Точное привязываемое свойство задайте через dataSourcePath. В следующем фрагменте показано, как установить свойства dataSource и dataSourcePath из сценария. Подробнее этот способ рассматривается ниже, в разделе о настройке привязки данных на C#.
var label = new Label();
var parentData = ScriptableObject.CreateInstance<PlayerDataSO>();
playerData.Health = 100;
label.SetBinding("text", new DataBinding() {
    dataSource = playerData, dataSourcePath = new PropertyPath(nameof(PlayerDataSO.Health)),
}
);
Примечание: если определить несколько привязок для одного элемента интерфейса, может возникнуть конфликт. Чтобы избежать путаницы: - Используйте привязки UI Builder/UXML для статических или стандартных конфигураций данных, которые не требуется изменять во время выполнения. - Используйте привязки C# для динамических обновлений и случаев, когда источник данных должен меняться во время игры. Можно также частично настроить привязку в UI Builder/UXML, а завершить её во время выполнения. Дополнительные сведения приведены ниже, в разделе «Работа с неразрешёнными привязками данных».
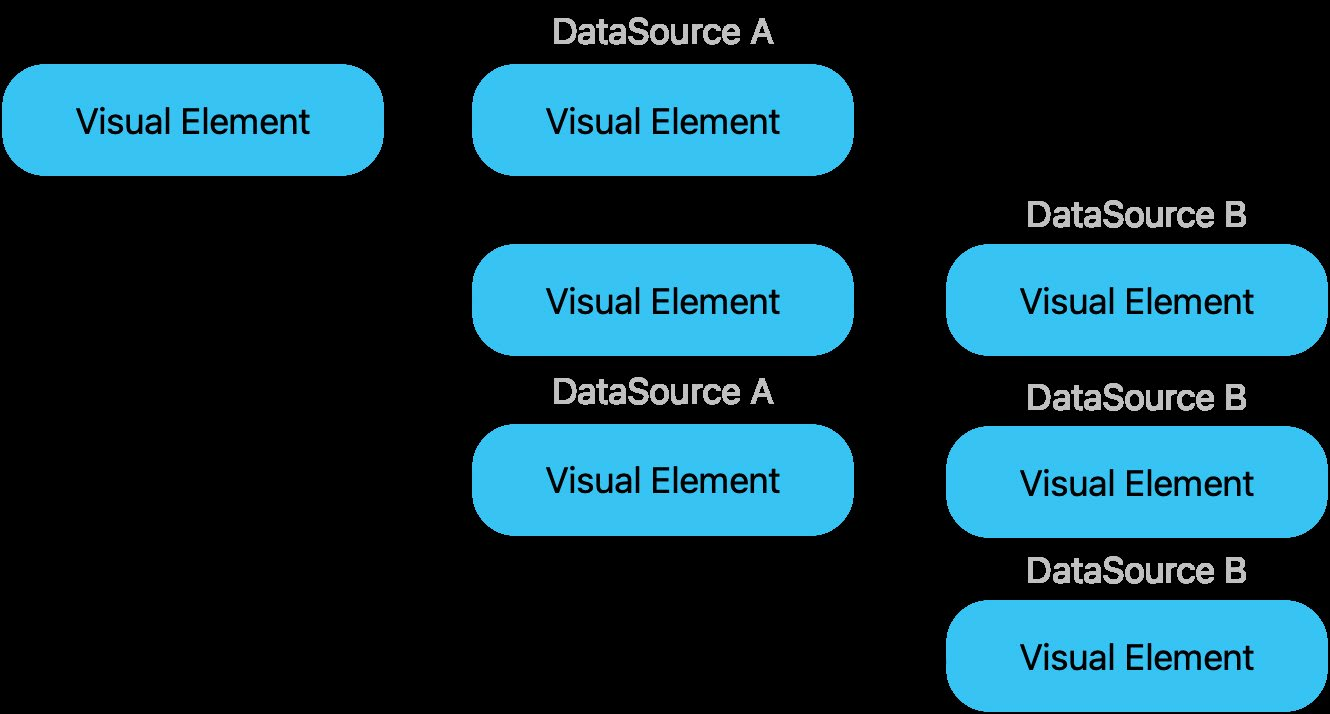
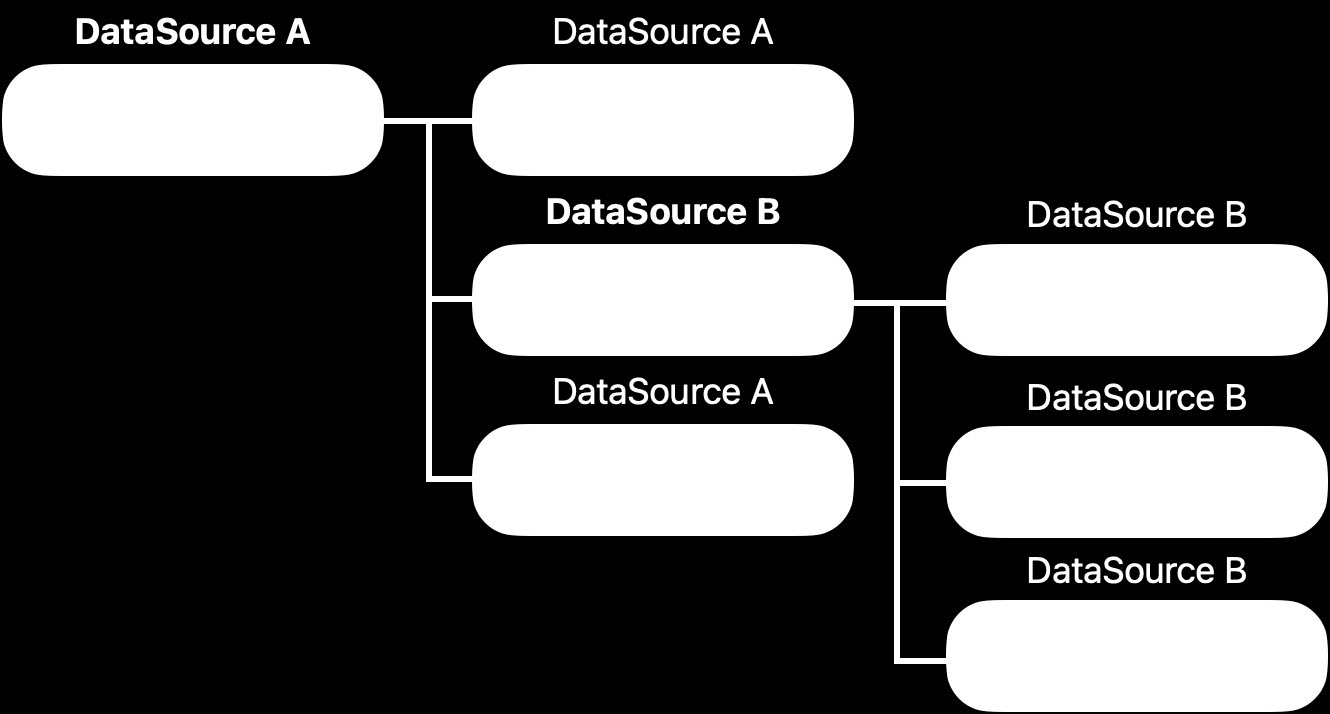
Наследование источников данных Визуальные элементы автоматически наследуют источник данных родительского элемента, если им явно не назначен другой. Например, когда источник данных задан корневому элементу, все его дочерние элементы по умолчанию используют тот же источник. Это поведение показано на схеме:
Дочерний элемент может переопределить источник данных родительского элемента.
Если у родительского элемента есть источник данных, дочерние элементы автоматически его наследуют. В UI Builder поле Data Source дочернего элемента заранее заполняется источником родителя, но при необходимости значение можно переопределить.
При работе с C# действует тот же принцип наследования, как показано в следующем примере: var root = new VisualElement(); var parentData = ScriptableObject.CreateInstance<PlayerDataSO>(); parentData.Health = 100;
// Assign a data source to the root element root.dataSource = parentData;

var child = new VisualElement();
var childData = ScriptableObject.CreateInstance<PlayerDataSO>(); childData.Health = 50;
// Override the inherited data source for the child child.dataSource = childData;

root.Add(child);
Здесь дочерний элемент переопределяет значение родителя и получает независимый источник данных.
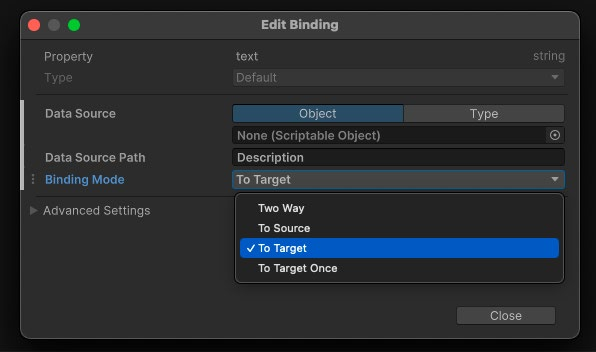
Режимы привязки Режим привязки определяет направление передачи данных между источником и интерфейсом.
Режимы привязки в UI Builder позволяют управлять потоком данных между источником данных и интерфейсом.
В UI Builder и API C# доступны следующие режимы:
- TwoWay (по умолчанию): изменения передаются в обе стороны - из источника данных в интерфейс и из интерфейса в источник. Используйте этот режим для интерактивных элементов, через которые пользователь может менять данные, например ползунков и текстовых полей.
- ToTarget: данные передаются только из источника в интерфейс. Подходит для элементов интерфейса, доступных только для чтения. - ToSource: данные передаются только из интерфейса в источник. Полезно для полей ввода, в которых не требуется изначально отображать текущее значение. - ToTargetOnce: данные передаются из источника в интерфейс один раз; последующие изменения источника не отслеживаются.
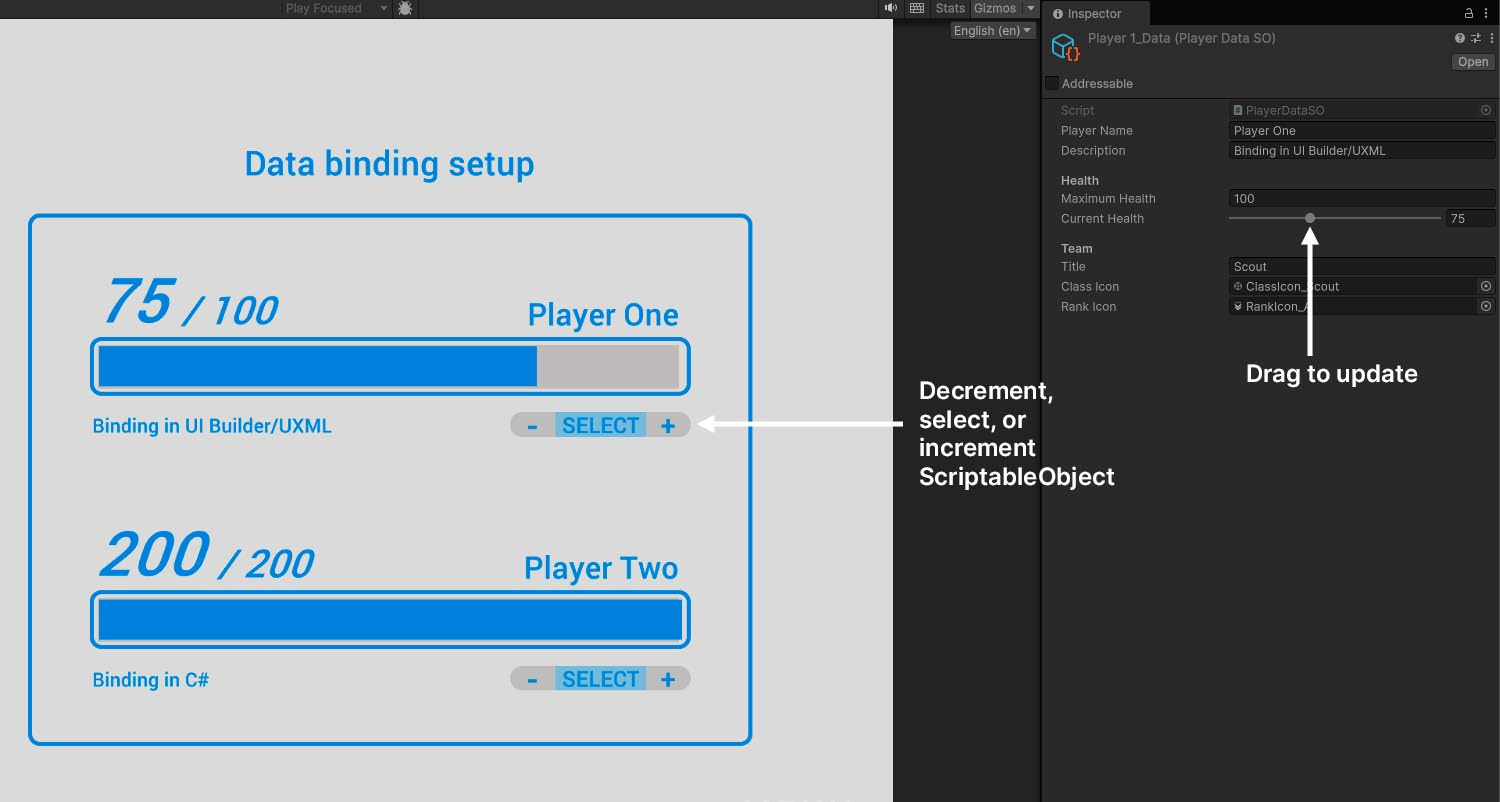
Пример: привязка данных шкалы здоровья Рассмотрим практический пример базовой привязки данных в UI Toolkit. В демонстрационной сцене используется простая шкала здоровья, которая динамически обновляется в соответствии с запасом здоровья игрока.
Демонстрационная сцена. Следующие примеры входят в демонстрацию Data Binding проекта QuizU.
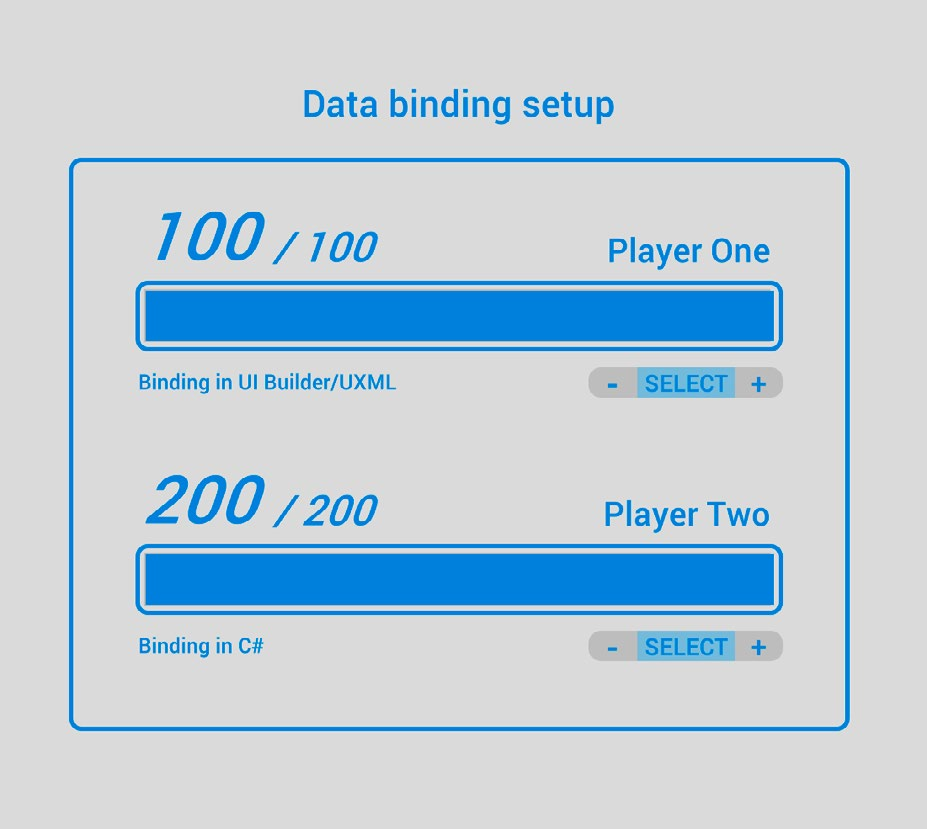
Чтобы открыть её во время выполнения, в главном меню выберите Demos > Data Binding. Также можно отключить загрузчик командой Quiz > Don’t Load Bootstrap Scene on Play и загрузить сцену DataBindingDemo напрямую. В демонстрации есть две шкалы здоровья: привязки одной созданы в UXML с помощью UI Builder, а привязки другой - в C#.
Шкала здоровья отображает данные игрока.
Подготовка источника данных Сведения и характеристики игрока в примере хранятся в ScriptableObject PlayerDataSO. Нужные свойства PlayerDataSO помечены атрибутом CreateProperty, поэтому их можно использовать в привязках. Каждая шкала здоровья представляет лишь часть данных PlayerDataSO: имя игрока и значения здоровья. Во фрагменте класса показаны некоторые свойства и связанные с ними поля:
using System;
using Unity.Properties;
using UnityEngine;
using UnityEngine.UIElements;
[CreateAssetMenu(fileName = "PlayerDataSO", menuName = "Demos/Player_Data")] public class PlayerDataSO : ScriptableObjectpublic string PlayerName => m_PlayerName;
[CreateProperty] public int CurrentHealth => Mathf.Clamp(m_CurrentHealth, 0, m_MaximumHealth);
[CreateProperty] public int MaximumHealth => m_MaximumHealth;
[SerializeField] string m_PlayerName;
[SerializeField] int m_MaximumHealth = 100;
[SerializeField] [Range(0, k_MaxHealthRange)] int m_CurrentHealth = 100;
const int k_MaxHealthRange = 200;
Для отображения этих сведений на экране интерфейс использует конкретные пути к данным, например PlayerName, CurrentHealth и MaximumHealth.Источник данных содержит сведения о здоровье из ScriptableObject PlayerDataSO.
Привязка данных в UI Builder/UXML UI Builder предлагает наглядный интерактивный способ связывать элементы интерфейса с данными. Он удобен художникам интерфейсов, предпочитающим работать с дизайном визуально, и разработчикам, которым важна мгновенная обратная связь во время настройки. Кроме того, это полезный учебный инструмент для тех, кто только знакомится с привязкой данных.
В демонстрационной сцене все привязки шкалы здоровья Player One настроены в UI Builder. Для этого необходимо: - Выбрать корневой элемент: в иерархии выберите корневой элемент, содержащий шкалу здоровья. В данном примере самый верхний контейнер - элемент demo_container-uxml.
- Назначить источник данных: в разделе Data Binding окна Inspector укажите ресурс ScriptableObject как источник. Он будет назначен выбранному элементу и унаследован всеми дочерними элементами. - Задать пути к источнику данных: укажите пути, связывающие отдельные элементы интерфейса с соответствующими свойствами ScriptableObject, например PlayerDataSO.PlayerName.
Базовая шкала здоровья
После назначения источника данных корневому элементу он должен появиться как источник по умолчанию у дочерних элементов. Остаётся лишь указать правильный путь к данным. В таблице показано, как привязки соединяют свойства элементов интерфейса со свойствами ScriptableObject: Элемент UI
Свойство элемента UI
Привязанное свойство
Примечание
health-bar__player-name
text
PlayerName
Имя игрока
health-bar__current-health
text
CurrentHealth
Текущее здоровье
health-bar__max-health
text
MaximumHealth
Максимальное здоровье
health-bar__progress
style.width
Progress
Динамическая ширина шкалы
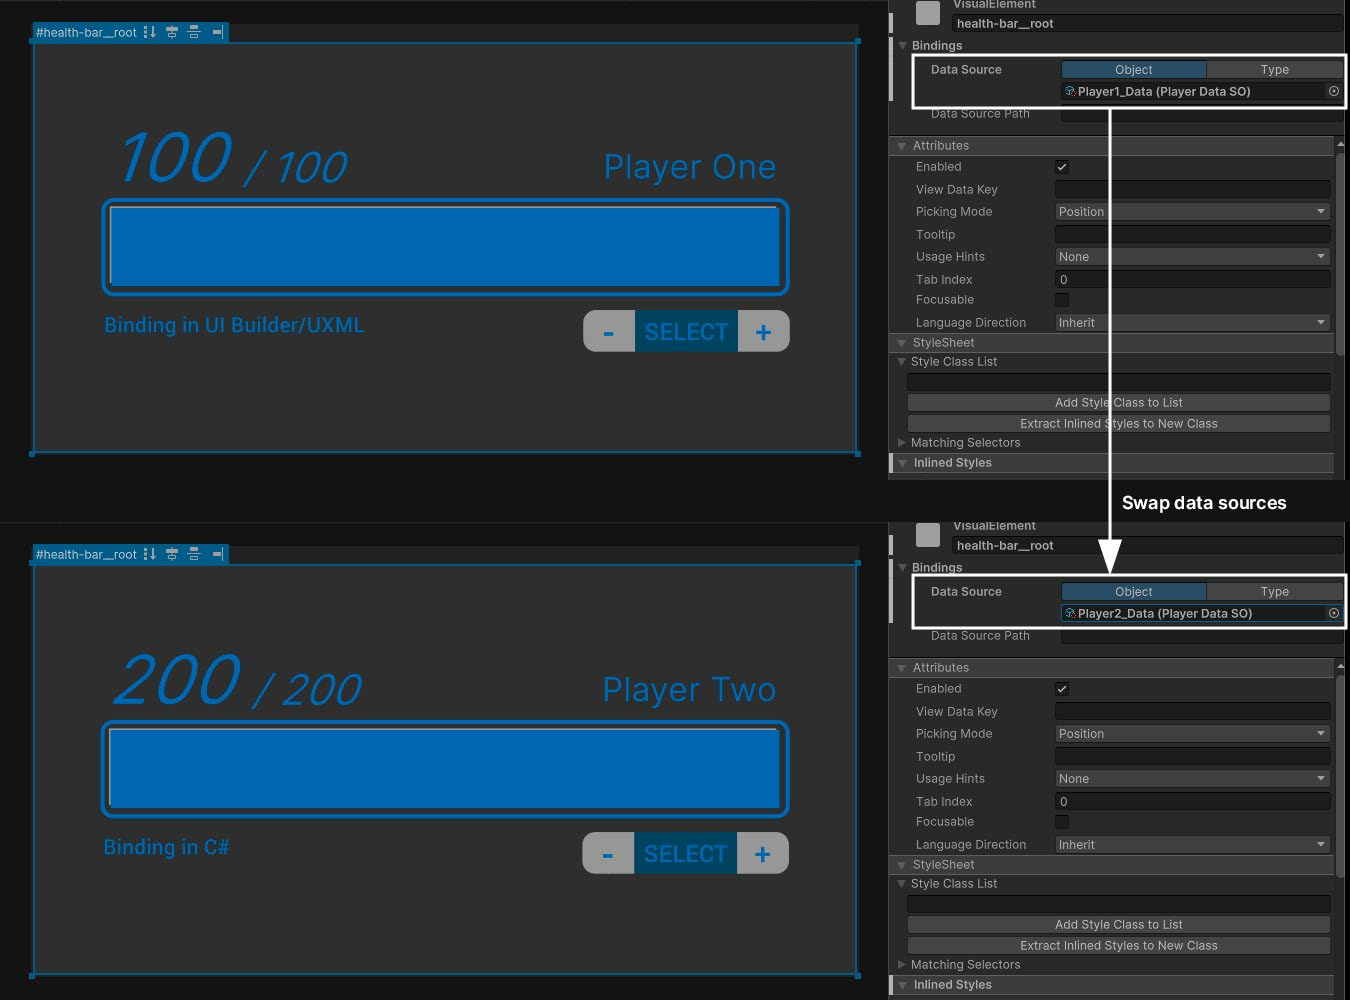
После завершения настройки шкала здоровья обновляется в реальном времени, отображая значения и полосу текущего здоровья игрока. Источник данных легко заменить: назначьте другой ресурс ScriptableObject, и интерфейс автоматически покажет новые значения, сохранив прежние привязки.
При смене источника данных привязки обновляются.
Привязки, настроенные в UI Builder, добавляются непосредственно в файл UXML: для каждого привязанного элемента создаётся блок <Bindings>. Ниже приведён фрагмент созданного UXML, в котором свойство text элемента health-bar__player-name связано со свойством PlayerName. Для удобства чтения некоторые атрибуты опущены:
<ui:Label text="Placeholder" name="health-bar__player-name" class="health-bar__player-name"> <Bindings> />
<ui:DataBinding property="text" data-source-path="PlayerName" binding-mode="ToTarget" </Bindings>
</ui:Label> Опытные пользователи могут создавать такие привязки непосредственно в UXML. При большом числе привязок ручное редактирование кода может обеспечить более точный контроль и ускорить работу. Написанный вручную UXML также формирует более понятные различия в системе контроля версий, поэтому конфликты слияния проще разрешать, а изменения - отслеживать.
Настройка привязки данных в C# UI Builder отлично подходит для прототипирования со статическими данными, например заранее созданными ресурсами ScriptableObject. Однако динамические данные во время выполнения часто удобнее обрабатывать в C#. В следующем примере кода показано, как в демонстрационной сцене работает шкала здоровья Player Two:
using UnityEngine;
using UnityEngine.UIElements;
using Unity.Properties;
public class HealthBar : MonoBehaviour {
    [SerializeField] PlayerDataSO m_HealthData;
    public void Initialize(VisualElement root) {
        var m_PlayerName = root.Q<Label>("health-bar__player-name");
        root.dataSource = m_HealthData;
        m_PlayerName.SetBinding("text", new DataBinding() {
            dataSourcePath = new PropertyPath(nameof(PlayerDataSO.PlayerName)), bindingMode = BindingMode.ToTarget
        }
        );
    }
}
Сценарий HealthBar выполняет настройку в методе Initialize, который основной управляющий сценарий вызывает из OnEnable. - Сначала выполняется запрос элемента health-bar__player-name. Затем данные ScriptableObject назначаются ему как источник. - После этого метод SetBinding связывает свойство text с новым экземпляром DataBinding и задаёт параметры dataSourcePath и bindingMode. Все четыре привязки из приведённой выше таблицы настраиваются аналогично. Изменяйте CurrentHealth ползунком ScriptableObject или пользовательским Property Drawer редактора. Демонстрация содержит элементы управления для тестирования в режиме Play: +, - и Select позволяют увеличивать или уменьшать значение либо выбирать ScriptableObject. Шкала здоровья динамически обновляется при каждом изменении.
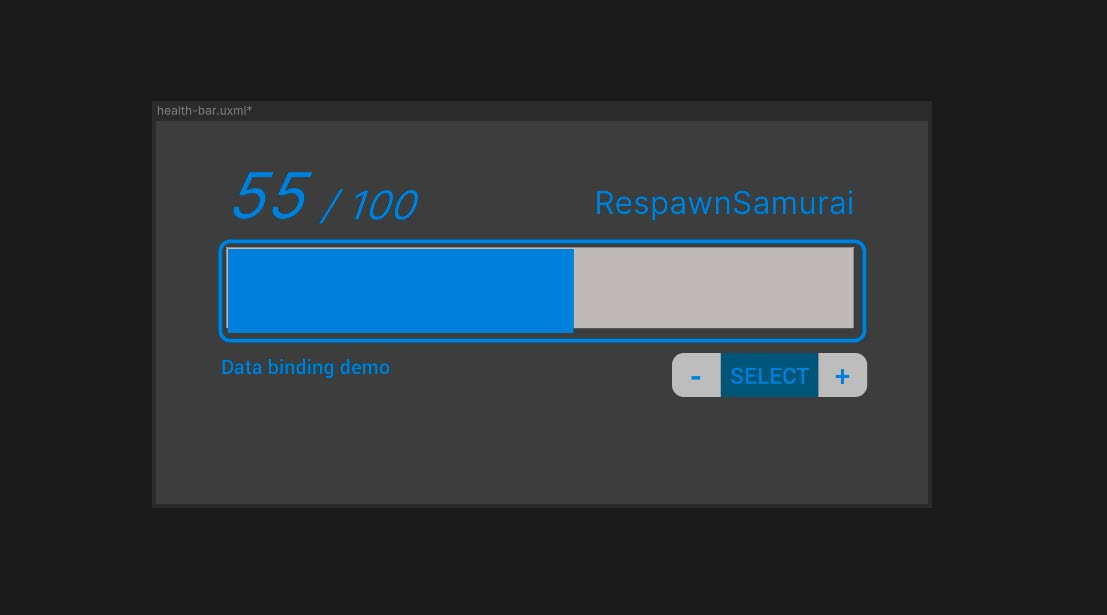
HealthBar синхронизируется со значением CurrentHealth.
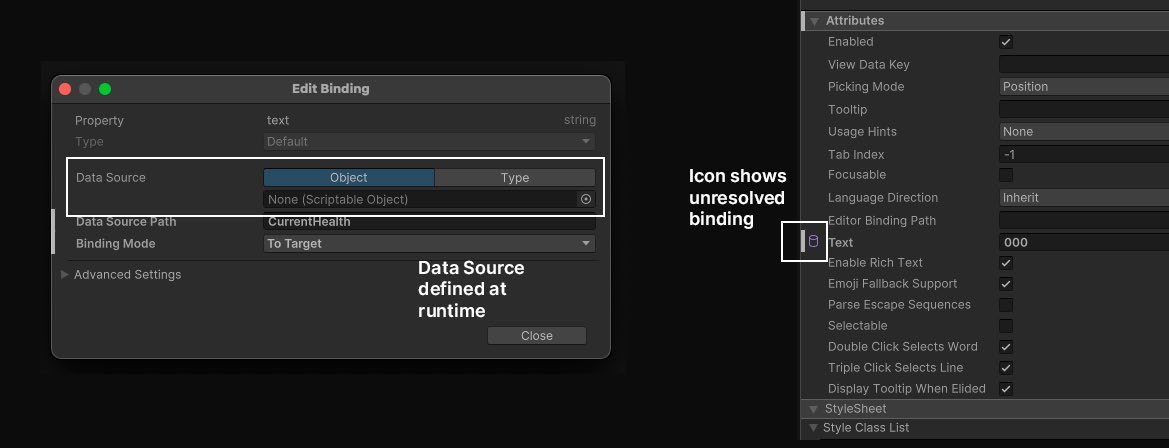
Работа с неразрешёнными привязками данных Unity 6 также поддерживает гибридный рабочий процесс, сочетающий визуальную настройку в UI Builder с гибкостью сценариев. Вместо жёсткого задания источника данных в UXML можно указать Data Source Type, оставив сам источник неразрешённым. UI Builder отмечает такие незавершённые привязки полым значком. Это означает, что пути и типы уже заданы, но источник данных ещё не назначен.
Неразрешённая привязка данных отмечается полым значком.
Во время выполнения источник данных можно назначить одной строкой кода. Например:
myElement.dataSource = myNewDataSource;
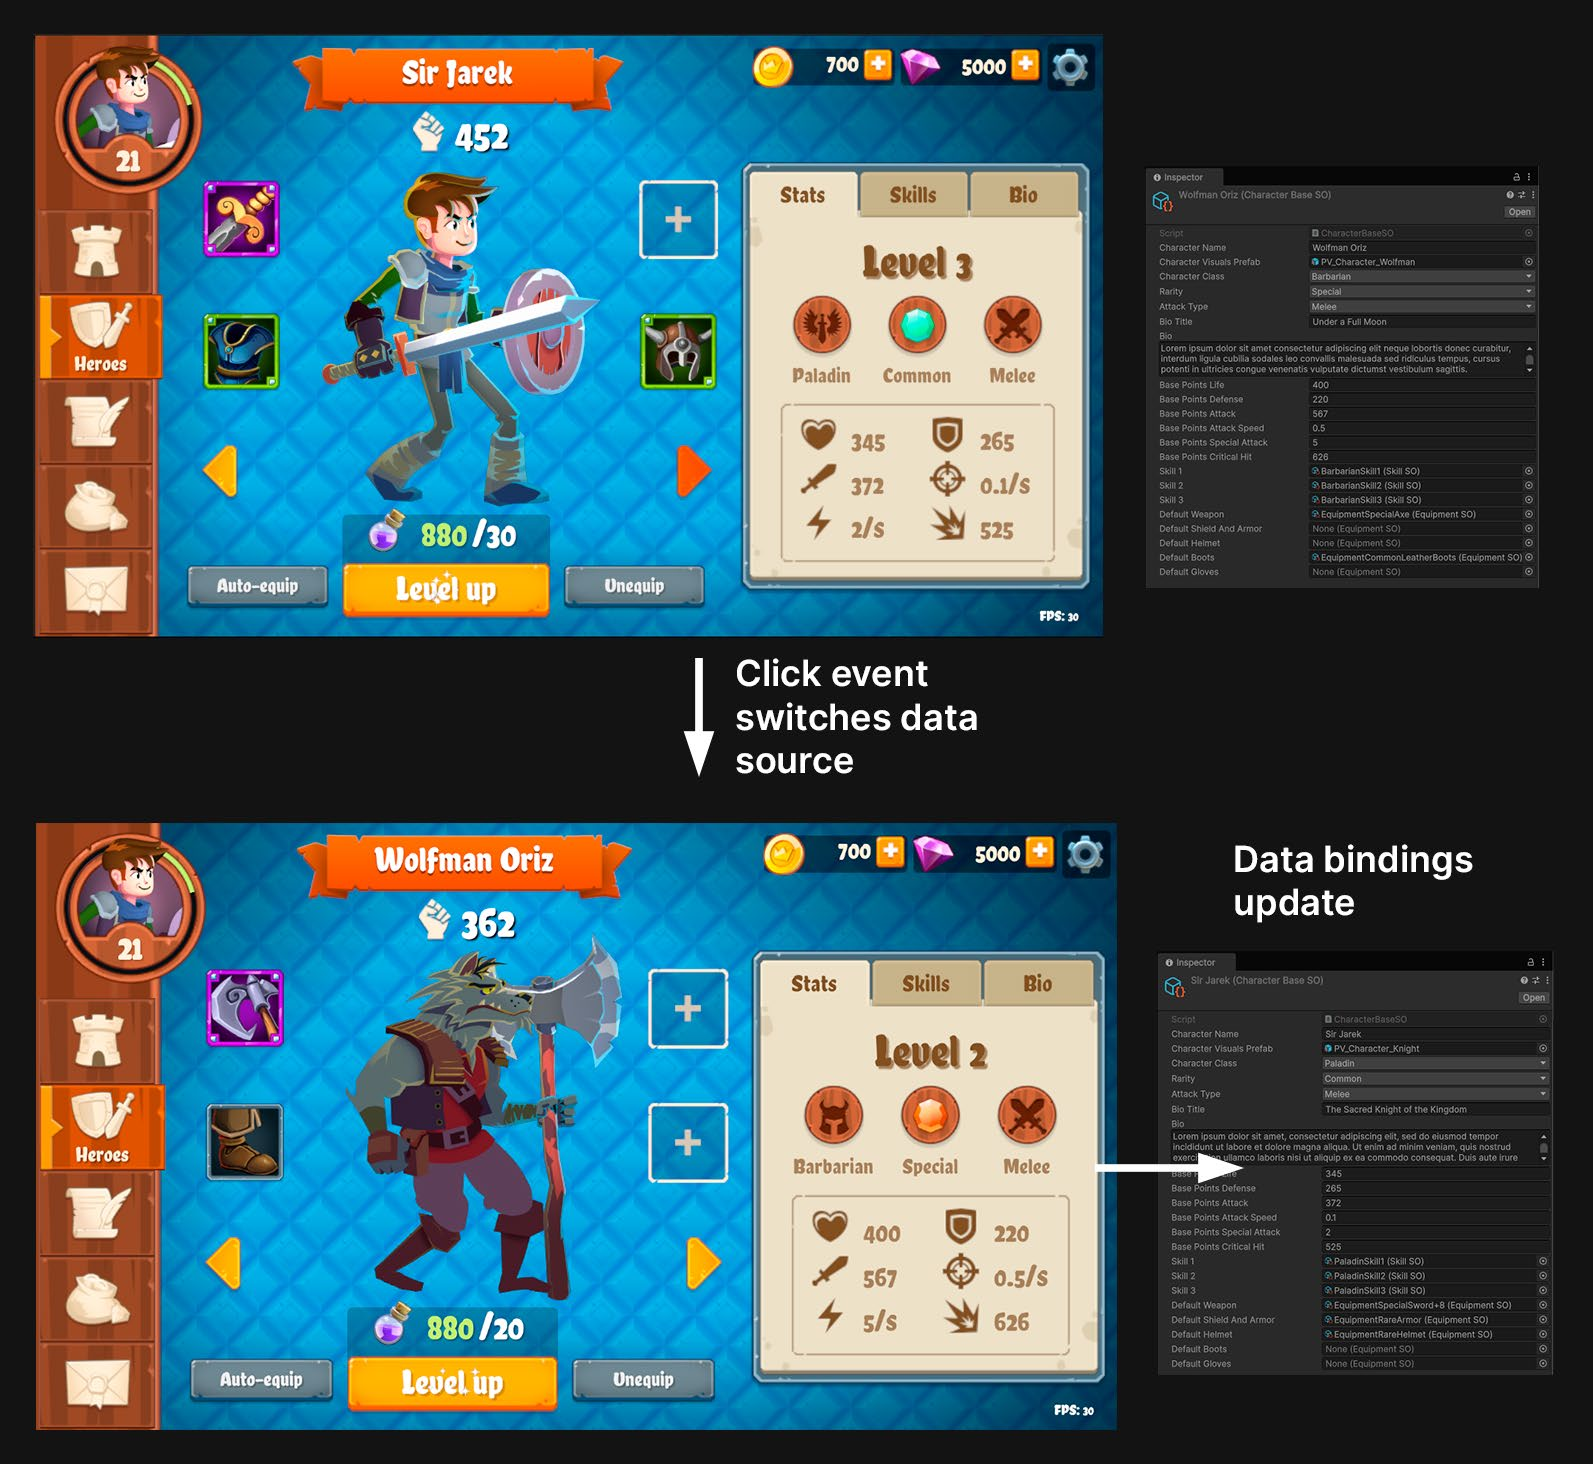
Здесь назначение myNewDataSource элементу myElement разрешает привязки-заполнители, определённые в UXML, после чего интерфейс обновляется автоматически. Это устраняет повторяющиеся вызовы SetBinding и сохраняет гибкость UXML. Например, в проекте Dragon Crashers пути к данным заранее определены в UXML, а фактические источники назначаются во время выполнения. При нажатии кнопок перехода к следующему и последнему персонажу выбранный персонаж становится текущим источником данных. Для смены источника изменять UXML не требуется. После назначения нового источника неразрешённые привязки отображают правильные характеристики персонажа.
Обновление источника данных в примере Dragon Crashers
Примечание: если в UXML указан конкретный источник данных, например data-source="PlayerDataSO.asset", привязка становится фиксированной, и изменить её во время выполнения нельзя. Чтобы разрешить изменение, оставьте атрибут data-source пустым или используйте data-source-type. Пример такого гибридного процесса приведён в разделе о привязке списка к ListView.
Конвертеры типов Конвертеры типов в Unity 6 преобразуют исходные данные в более удобный для пользователя формат отображения. Они работают как посредники между источником данных и интерфейсом, представляя значения в интуитивно понятном виде. Например, конвертер может переводить радианы в градусы или преобразовывать числовой запас здоровья в цвет шкалы. Так интерфейс показывает информацию ясно и наглядно, а писать большой объём логики преобразования вручную не приходится. Unity 6 поддерживает две категории конвертеров типов: - Глобальные конвертеры: применяются к любым привязкам, которым требуется определённое преобразование типа. Например, глобальный конвертер может преобразовывать любое значение здоровья типа float в цвет или объекты Color в значения StyleColor, обеспечивая единообразное поведение во всём интерфейсе. - Конвертеры отдельных привязок: применяются к конкретным привязкам данных и обеспечивают более точное управление.
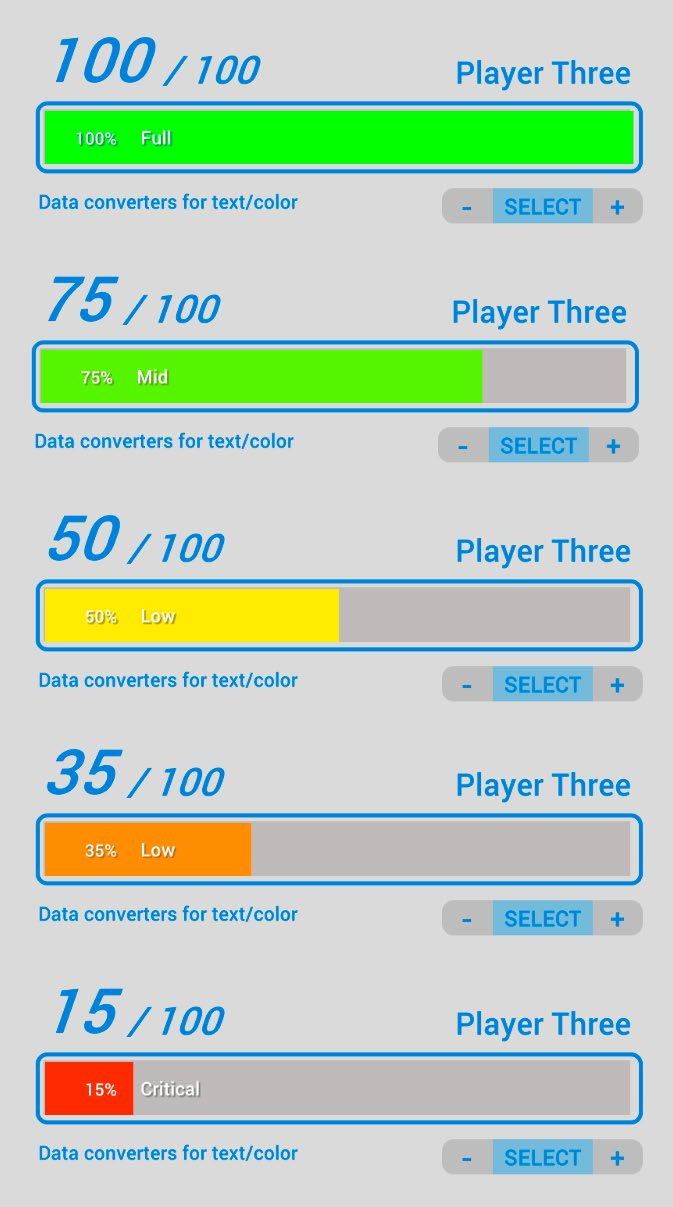
Пример: преобразование значения в цвет Шкала, меняющая цвет в зависимости от здоровья игрока, наглядно демонстрирует привязку данных с конвертером типа. Текущее здоровье сопоставляется с цветовым градиентом: например, зелёный означает высокий запас здоровья, жёлтый - низкий, красный - критический. Благодаря этому игрок быстро оценивает своё состояние во время игры. Пример можно увидеть в сцене DataBindingDemo проекта QuizU.
Настройка HealthDataConverter В сцене DataBindingDemo класс HealthBarWithConverter использует функции статического класса HealthDataConverter, чтобы зарегистрировать несколько DataConverter:
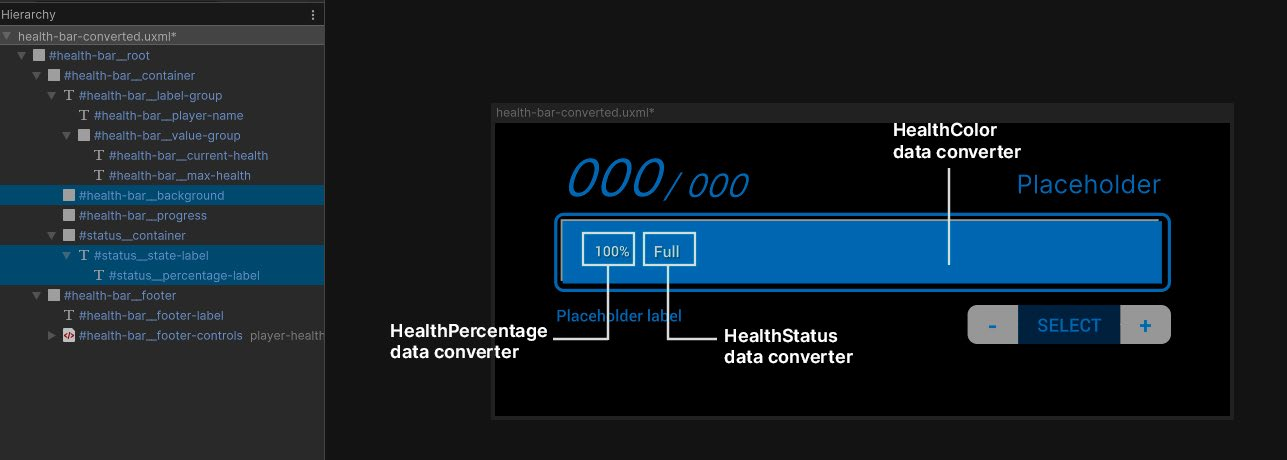
- Процент здоровья управляет цветовым градиентом шкалы: от зелёного при полном здоровье до красного при критическом. - Одна надпись представляет числовое значение строкой с процентом, например «75%».
- Другая сопоставляет тот же процент здоровья текстовому состоянию, например Full, Mid или Critical.
Ниже приведён фрагмент класса HealthDataConverter:
static class HealthDataConverter {
    static readonly Color s_FullColor = new Color(0.2f, 1f, 0.2f);
    static readonly Color s_MidColor = Color.yellow;
    static readonly Color s_LowColor = new Color(1f, 0.3f, 0f);
static readonly Color s_CriticalColor = Color.red;static void Register() { RegisterHealthColorConverter(); // … }
static void RegisterHealthColorConverter() {
var colorConverter = new ConverterGroup("HealthColor");
colorConverter.AddConverter((ref float healthPercentage) => {
if (healthPercentage > 0.5f) {
return new StyleColor(Color.Lerp(s_MidColor, s_FullColor, (healthPercentage - 0.5f) * 2f));
}
else if (healthPercentage > 0.25f) {
return new StyleColor(Color.Lerp(s_LowColor, s_MidColor, (healthPercentage - 0.25f) * 4f));
}
else {
return new StyleColor(Color.Lerp(s_CriticalColor, s_LowColor, healthPercentage * 4f));
}
}
);
ConverterGroups.RegisterConverterGroup(colorConverter);
}
// …
}Приведённая выше логика создаёт ConverterGroup HealthColor, который преобразует долю здоровья типа float в диапазоне от 0 до 1 в соответствующее значение StyleColor между красным при низком здоровье и зелёным при полном. Класс HealthDataConverter также содержит конвертеры для двух надписей. Они представляют свойство HealthPercentage объекта PlayerDataSO в виде форматированных строк. Несколько конвертеров можно объединить в одну ConverterGroup, однако для удобства чтения в демонстрации они разделены по разным группам.
Использование конвертеров типов в UI Builder.
Использование HealthBarWithConverter Обратите внимание: вся фактическая логика находится в классе HealthDataConverter. Класс HealthBarWithConverter лишь выполняет следующее:
public class HealthBarWithConverter : HealthBar {
    #if UNITY_EDITOR [UnityEditor.InitializeOnLoadMethod] #else [RuntimeInitializeOnLoadMethod(RuntimeInitializeLoadType.SubsystemRegistration)] #endif public static void RegisterConverters() { HealthDataConverter.Register(); }
}
Обратите внимание на следующее:
- UnityEditor.InitializeOnLoadMethod регистрирует ConverterGroup и делает её доступной в UI Builder, чтобы группу можно было увидеть и применить в редакторе. - RuntimeInitializeOnLoadMethod обеспечивает доступность ConverterGroup во время выполнения игры. Директива препроцессора #if UNITY_EDITOR гарантирует вызов нужного метода в зависимости от того, выполняется код в редакторе или во время игры.
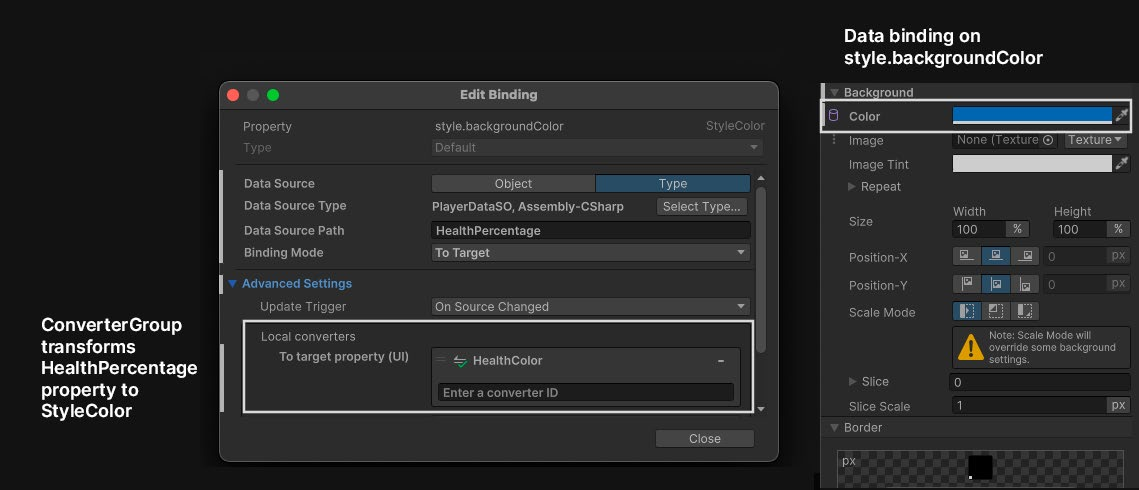
Применение DataConverter в UI Builder После регистрации DataConverter можно применить к любой привязке, которой требуется это преобразование. Чтобы использовать его непосредственно в UI Builder: 1. Откройте файл UXML и выберите элемент шкалы. В проекте QuizU пример настройки можно посмотреть в файле RuntimeDataBinding.uxml. 2. Назначьте ScriptableObject PlayerDataSO в качестве Data Source. 3. Свяжите стилевое свойство backgroundColor шкалы с путём данных HealthPercentage. 4. Используйте ConverterGroup HealthColor, чтобы преобразовать процент здоровья в цвет фона шкалы.
Настройка привязки данных для шкалы здоровья.
5. Теперь при перетаскивании ползунка CurrentHealth в ScriptableObject PlayerDataSO цвет шкалы здоровья обновляется. Градиент плавно интерполируется от зелёного при полном здоровье через жёлтый при среднем и оранжевый при низком к красному при критическом.
Теперь этот глобальный DataConverter доступен во всём приложении, где требуется преобразовать значение float в такой цветовой градиент.
Конвертер HealthColor изменяет цвет шкалы.
Рекомендации При работе с конвертерами типов придерживайтесь следующих рекомендаций:
- Сведите выделения памяти к минимуму: делегаты преобразования должны оставаться легковесными, особенно при частых вызовах, чтобы избежать лишних накладных расходов.
- Не усложняйте: создавайте простые специализированные конвертеры для быстрых преобразований. Не помещайте в них сложную или ресурсоёмкую логику. - Выполняйте преобразование в источнике данных: базовые преобразования обрабатывайте непосредственно в источнике - например, заранее форматируйте процент здоровья в свойстве ScriptableObject. Оставляйте DataConverter для преобразований, относящихся именно к привязкам интерфейса.
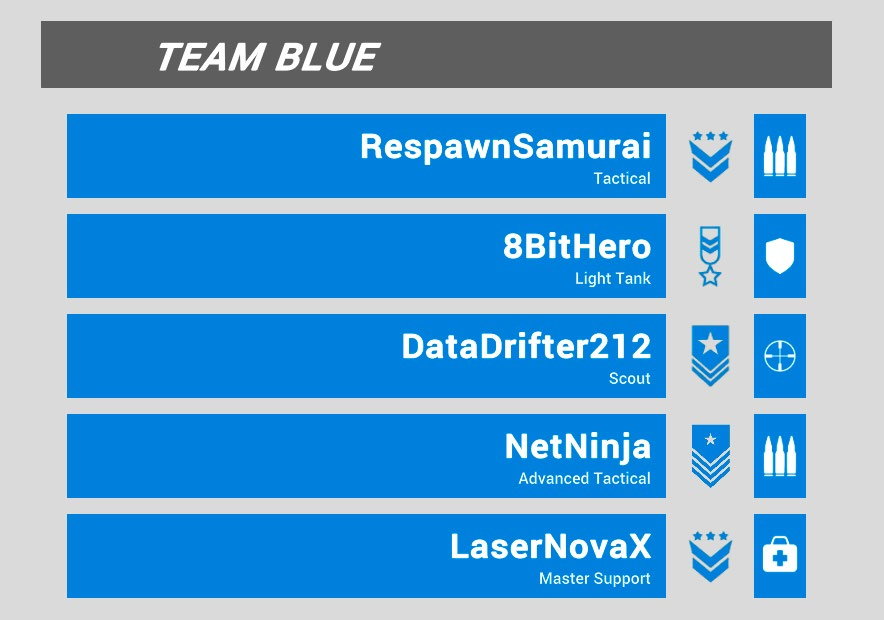
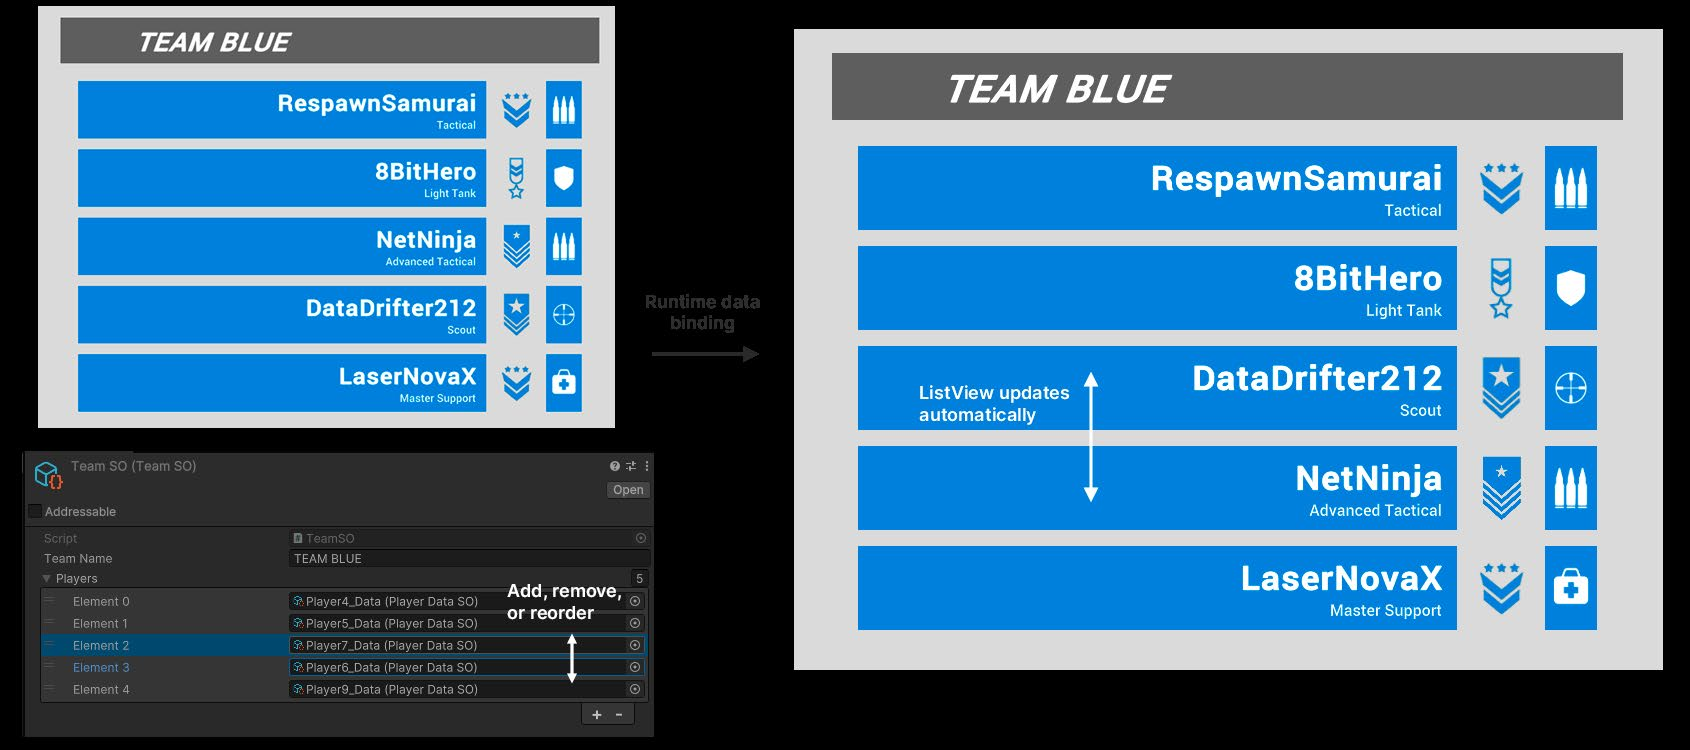
Пример: привязка списка к ListView В зависимости от интерфейса игры приложению может потребоваться отображать разные коллекции данных: инвентарь собранных предметов, журнал заданий с целями, рейтинг игроков и так далее. ListView предоставляет аккуратный прокручиваемый интерфейс, в котором удобно представлять такие сведения и управлять ими. В Unity 6 привязка данных во время выполнения упрощает процесс: при изменении данных не нужно вручную обновлять интерфейс или писать для этого специальные сценарии. В предыдущих версиях Unity для заполнения ListView и обработки изменений приходилось создавать собственный код. В Unity 6 ListView можно связать с источником данных напрямую, и изменения будут автоматически отслеживаться и отображаться в интерфейсе. В демонстрационной сцене простой ListView связан со списком ScriptableObject PlayerDataSO. Так можно создать интерфейс, похожий на лобби многопользовательской игры или таблицу рекордов.
TeamList связывает список с ListView.
С помощью привязки во время выполнения ListView можно напрямую связать с источником данных, например ScriptableObject. ListView автоматически отслеживает изменения, упрощая настройку и сопровождение. Чтобы привязать ListView к списку, сначала создайте несколько неразрешённых привязок, а затем завершите их настройку во время выполнения.
Настройка списка и шаблонов Чтобы подготовить ListView к привязке данных, выполните следующие действия:
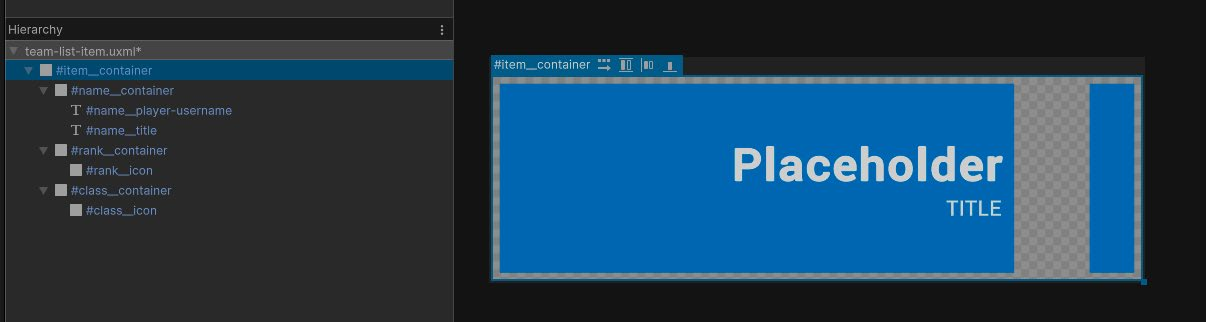
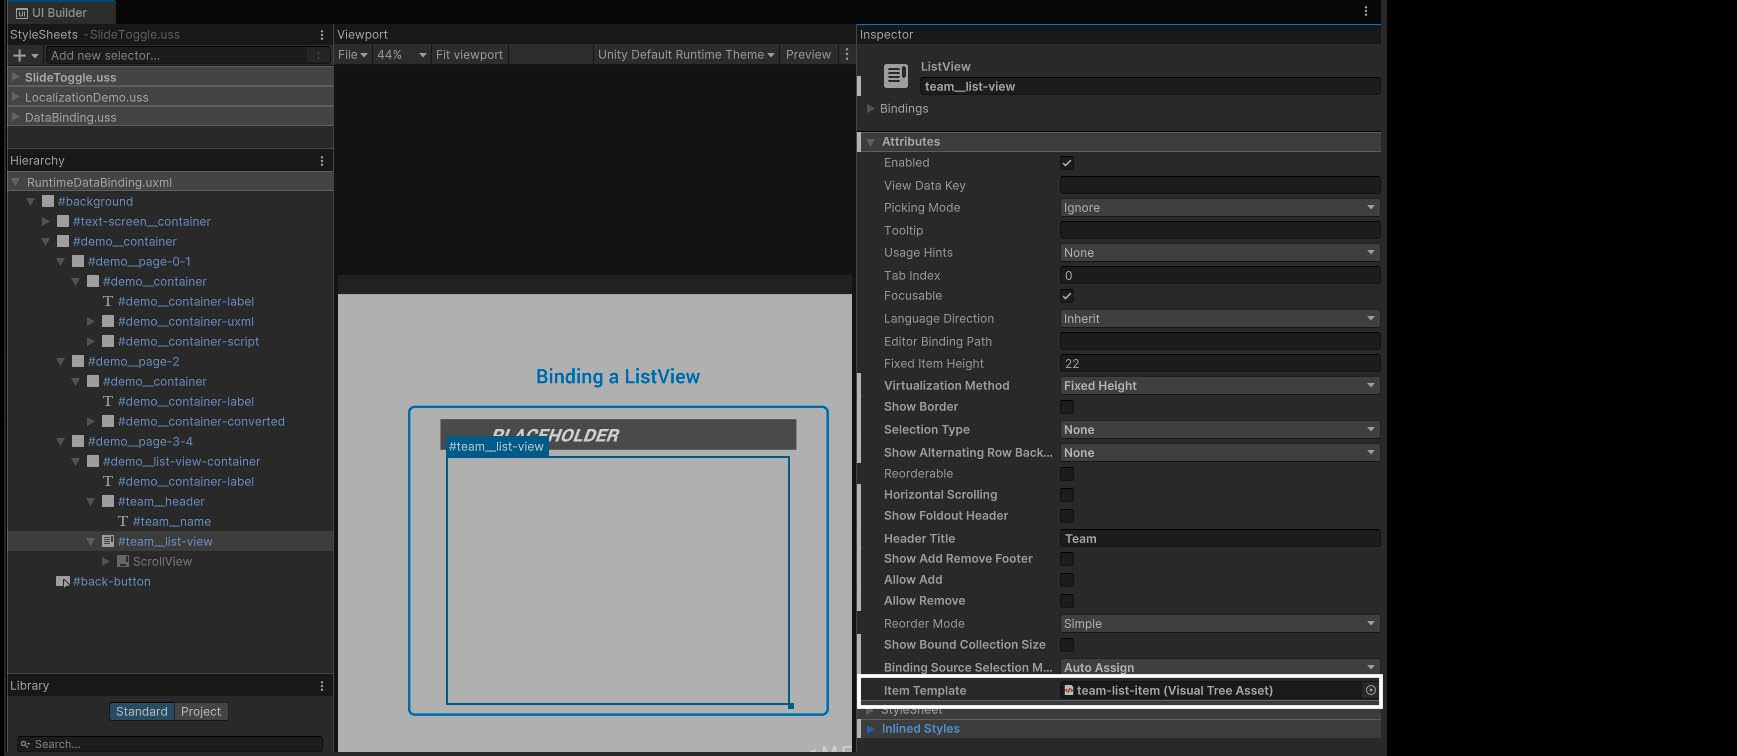
1. Определите источник данных. ListView необходим список данных. В этой демонстрации ScriptableObject TeamSO содержит список объектов PlayerDataSO. Каждый элемент списка соответствует одной строке ListView. 2. Создайте шаблон элемента UXML. В UI Builder разработайте шаблон UXML, то есть VisualTreeAsset, который определяет вид одного элемента списка. Например, шаблон team-list-item из демонстрации содержит имя игрока и несколько свойств Texture2D. Не указывайте источник данных напрямую: задайте в UI Builder параметры Data Source Type и Data Source Path. Привязка останется неразрешённой, и её можно будет завершить позднее во время выполнения.
Разработка ресурса визуального дерева в UI Builder.
3. Добавьте ListView в основной интерфейс. В другом файле UXML добавьте элемент ListView, который будет отображать весь список игроков. Назначьте созданный шаблон свойству Item Template списка. Теперь ListView знает, как должна выглядеть каждая строка, но конкретный источник данных ещё не определён.
Добавление шаблона в ListView.
В ListView демонстрационной сцены используются лишь несколько базовых параметров, показанных выше. Расширенные возможности описаны в официальной документации ListView.
Завершение привязки во время выполнения Во время выполнения простой сценарий TeamList завершает привязку, предоставляя фактический источник данных. Следующие строки разрешают ранее незавершённые привязки:
// Set the data source m_ListView.dataSource = m_TeamData;
// Bind the "itemsSource" to the Players list m_ListView.SetBinding("itemsSource", new DataBinding {

    dataSourcePath = new PropertyPath("Players")
}
);
Здесь m_TeamData, экземпляр TeamSO, назначается списку ListView. Однократный вызов SetBinding связывает свойство Players с itemsSource, после чего ListView заполняет строки интерфейса. Поскольку до начала выполнения эти привязки в UXML остаются неразрешёнными, подключать каждый элемент списка отдельно не требуется. UI Toolkit самостоятельно разрешает привязки и заполняет данными все элементы. Любые изменения списка в источнике - добавление, удаление или перестановка игроков - сразу появляются в интерфейсе без дополнительного кода.
Интерфейс отражает изменения списка Player.
Помните: гибридный подход к привязке данных позволяет значительно сократить объём повторяющегося шаблонного кода. Задав в UXML пути-заполнители, можно отложить назначение фактического источника до времени выполнения. Если модель данных изменится, переписывать всю логику привязки не придётся: достаточно одного обновления при запуске, чтобы переключить интерфейс на новый источник. Полное руководство по привязке ListView к списку приведено на этой странице документации. .
Оптимизация привязки данных Эффективные привязки помогают поддерживать высокую производительность интерфейса. Избыточные и дублирующиеся привязки перегружают систему, вызывают лишние обновления и снижают производительность. Это особенно важно для сложных или ресурсоёмких интерфейсов. По умолчанию система привязки во время выполнения обновляет элементы интерфейса каждый кадр. Для небольшого приложения это обеспечивает хорошую отзывчивость, но при большом числе привязок может стать узким местом. В этом разделе рассматриваются способы повысить эффективность привязки данных в крупных проектах.
Работа с типами-значениями Если источник данных использует типы-значения, например int, float или struct, учитывайте затраты на упаковку. Свойство dataSource имеет тип object, поэтому частое преобразование типов-значений создаёт дополнительные расходы. Чтобы снизить их, избегайте лишних привязок и повторных обновлений свойств типов-значений.
Сокращение накладных расходов Сначала найдите привязки, которые несколько раз обновляют одни и те же элементы или отслеживают редко меняющиеся данные. Объедините либо удалите их, чтобы сократить лишнюю работу. По возможности используйте плоские простые структуры данных вместо сложных иерархий - это помогает избежать задержек из-за частого поиска значений. Ресурсоёмкие вычисления стоит выполнять заранее или кэшировать их результаты. Привязка к заранее рассчитанным значениям уменьшает вычислительную нагрузку и исключает повторные расчёты. Часто обновляемые привязки оставляйте только у элементов, которым это действительно необходимо. Если постоянная синхронизация не нужна, удалите привязку и назначайте значение напрямую либо обновляйте его по событию.
Использование условий обновления Привязки обновляются в соответствии с условиями, которые определяют частоту синхронизации интерфейса с источником данных. Это позволяет найти баланс между производительностью и отзывчивостью. Доступны следующие варианты:
- Каждый кадр: непрерывное обновление. Используйте для элементов, которым требуется постоянная синхронизация, например для шкал здоровья из примера. - При обнаружении изменений: обновление выполняется, когда меняется источник данных, либо каждый кадр, если обнаружить изменение невозможно. Подходит, например, для панелей характеристик и списков инвентаря, основанных на наблюдаемых данных.
- При пометке как изменённой: если обновления происходят редко, явный вызов MarkDirty позволяет избежать лишних циклов обновления. Такой вариант подходит, например, для меню настроек, которые меняются лишь в определённых ситуациях. Подбирая условие обновления под потребности каждого элемента интерфейса, можно сохранить и отзывчивость, и эффективность.
Версионирование и отслеживание изменений Чтобы сократить число лишних обновлений, добавьте в источники данных версионирование и отслеживание изменений. Повысить эффективность привязки помогают два интерфейса: - IDataSourceViewHashProvider: отслеживает общие изменения с помощью хеша версии и запускает обновление только при изменении источника. Полезен для статических и полустатических данных, которые обновляются редко. - INotifyBindablePropertyChanged: отслеживает изменения отдельных свойств и обновляет только затронутые привязки, обеспечивая более точное управление. Добавьте эти интерфейсы в источник данных. Их можно использовать по отдельности или вместе для более точного управления обновлениями. Примеры и рекомендации приведены на этой странице документации.
Совет: дополнительные рекомендации по оптимизации UI Toolkit В докладе Unite 2024 об оптимизации UI Toolkit рассматриваются цепочки вызовов отрисовки и влияние размеров буферов, рекомендации по динамическим атласам, а также работа с ограничениями, включая пользовательские шейдеры и трёхмерные интерфейсы.
Data binding
At its core, the user interface is your players’ connection to the data driving your application. It’s their primary way of seeing, touching, and engaging with your game’s internal state and logic. Players won’t see raw stats; instead, they’ll see a health bar. Rather than reading item lists directly, they use a drag-and-drop inventory. This interplay between the UI and its data will impact how you structure your project.
UI that reflects your game data Here’s the character stats window in UI Toolkit Sample – Dragon Crashers. This user interface shows off key attributes from an RPG-like game. The view represents the UI itself – the part players interact with. Tabbed containers neatly organize the character’s abilities for easy navigation.
The character stats window represents game data.
Behind the scenes, the data lives in a model, such as a ScriptableObject storing each character’s stats.
The ScriptableObject asset contains the character’s data.
This separation of concerns between the view and the model is a core principle in UI architecture. Decoupling the visual interface from the underlying data makes your code more flexible, reusable, and easier to manage. However, once separated, connecting the model to the view requires some synchronization. Traditionally, this involves direct updates or event-driven systems, where observers update the UI when the data changes. While effective, these sync operations can introduce repetitive, boilerplate code. As your project grows, these systems can become difficult to manage. Adding new elements or dependencies often requires additional update logic or event handlers. This can clutter your scripts, making them harder to read and maintain.
Enter runtime data binding Runtime data binding in Unity 6 offers a streamlined solution to this problem. It links your application’s data directly to UI elements, ensuring that changes in one are automatically reflected in the other. This Model-view-viewmodel (MVVM) architecture adds a layer of presentation logic between the view and model. The viewmodel acts as a mediator, exposing data from the model formatted for the view. Learn more about MVVM along with more design patterns in the Unity e-book Level up your code with design patterns and SOLID.
The MVVM architecture (Source: Wikipedia)
For instance, a health bar can automatically display a player’s health, or a score label can update in real-time without requiring extra script logic or manual event handling. With less sync logic to manage, your project can scale more effectively. Let’s explore examples of UI Toolkit’s runtime data binding to see how you can use it in your project.
Data binding concepts Unity 6 introduces a runtime data binding system that provides a structured way to connect UI elements with application data. To bind a property of a visual element to a data source, you will create an instance of DataBinding. Here are a few important concepts: —
Data source: This is the object that holds the data for UI bindings.
Data source path: This property or field in the data source is what the UI element connects to.
Binding mode: This controls how data flows between the source and the UI and can be either one-way or two-way.
These parts work together to create the data bindings. Let’s explore them in more detail.
Preparing a data source A data source is the object that holds the data for UI bindings. Any C# object can serve as a data source, including ScriptableObjects, MonoBehaviours, or custom C# objects. Using structs as data sources can improve performance through lightweight memory allocations and reduced garbage collection. Data binding can be set up both through code and through the Inspector. This demo project uses ScriptableObjects as data sources for their convenient ability to serialize data within the Unity Inspector.
Using the CreateProperty attribute To expose properties for binding, UI Toolkit relies on property bags generated by the Unity Properties module. These define which properties in your data source are accessible to UI bindings. To make properties bindable, use the CreateProperty attribute. This explicitly marks properties for the binding system. Here’s a common setup pattern:
[SerializeField, DontCreateProperty] int m_Value;
[CreateProperty] public int Value {
    get => m_Value;
    set => m_Value = value;
}
In this example, m_Value is marked with the SerializeField attribute for serialization but excluded from binding by the DontCreateProperty attribute. The Value property, on the other hand, is marked with CreateProperty, making it accessible to the binding system. This clear separation helps manage data flow between the model and the UI. Runtime data bindings use property bags to traverse and manipulate a type’s data efficiently. By default, Unity generates property bags using reflection the first time a type is accessed, which adds a small runtime overhead. To avoid this, use the CreateProperty attribute when defining properties. This generates binding code at compile time, eliminating the need for runtime reflection and reducing performance overhead.
Data sources and paths Once your data source is ready, it can be bound to the UI. A data source path specifies the property or field within that data source that you want to connect to a UI element. For example, if your data source has a "health" property, the path would point directly to the property using it in UXML or via a binding setup in C#. Let’s look at how this looks in practice. In the UI Builder: Select a Hierarchy element, go to the Inspector, and use the Add Binding option from the options (⁝) menu.
Add a binding from the Inspector.
Then, assign your Data Source, like a PlayerDataSO ScriptableObject, and specify the
Data Source Path, such as CurrentHealth.
Set the Data Source and Data Source Path in the UI Builder.
In UXML: When you set up data binding in UI Builder, it generates the corresponding UXML. You can also add or edit the data source path manually in a text editor. This is the code block that creates the binding: <Bindings> <ui:DataBinding property="text" data-source-path="Health"/> </Bindings> Using C#: Instantiate or reference a data source object in your script, such as a ScriptableObject. Assign it to the dataSource property of the root element. Use the dataSourcePath to specify the exact property to bind. Here’s a snippet that shows how to set the dataSource and dataSourcePath properties in script. We discuss this in more detail in the section below on setting up data binding in C#.
var label = new Label();
var parentData = ScriptableObject.CreateInstance<PlayerDataSO>();
playerData.Health = 100;
label.SetBinding("text", new DataBinding() {
    dataSource = playerData, dataSourcePath = new PropertyPath(nameof(PlayerDataSO.Health)),
}
);
Note: It’s possible to create a conflict if you’re defining data bindings for the same UI element. To avoid confusion: —
Use UI Builder/UXML bindings for static or default data configurations that don’t need runtime adjustments.
Use C# bindings for dynamic updates or cases where the data source needs to change during gameplay.
You can also set up part of the binding in UI Builder/UXML and complete the binding at runtime. See the section on "Unresolved data bindings workflow" below for additional context.
Inheriting data sources Visual elements automatically inherit the data source of their parent unless explicitly assigned a new one. For example, if the root element has a data source, all child elements use it by default. This diagram illustrates this behavior:
A child element can override a parent data source.
When a parent element has a data source, its child elements automatically inherit it. In UI Builder, the Data Source field for a child is pre-filled with the parent’s data source but can be overridden as needed.
The same inheritance logic applies when working with C#, as demonstrated in the following example: var root = new VisualElement(); var parentData = ScriptableObject.CreateInstance<PlayerDataSO>(); parentData.Health = 100;
// Assign a data source to the root element root.dataSource = parentData;

var child = new VisualElement();
var childData = ScriptableObject.CreateInstance<PlayerDataSO>(); childData.Health = 50;
// Override the inherited data source for the child child.dataSource = childData;

root.Add(child);
Here, the child overrides the parent, giving it an independent data source.
Binding modes Binding modes control the flow of data between the data source and the UI.
Binding modes in the UI Builder allows you to control the flow of data between data source and the UI.
These options appear in the UI Builder and C# API: —
TwoWay (Default): Changes propagate both from the data source to the UI and from the UI to the data source. Use this for interactive elements like sliders or text fields where the user can change the data.
ToTarget: Data flows only from the data source to the UI. Use this for read-only UI elements.
ToSource: Data flows only from the UI to the data source. This is useful for inputs where you don’t need to display the current value initially.
ToTargetOnce: Data flows from the data source to the UI only once and doesn’t track further changes in the data source.
Example: Data binding a health bar Let’s look at a practical example to see how to create some basic data bindings in UI Toolkit. Here’s an example from the demo scene – a simple health bar that dynamically updates based on a player’s health. Demo scene You can find the following examples in the Data Binding how-to demo included in the QuizU sample project. To access it at runtime, navigate to Main Menu and select Demos > Data Binding, or load the DataBindingDemo scene directly after disabling the bootloader (Quiz > Don’t Load Bootstrap Scene on Play). The demo scene includes two health bars, one with bindings created in UXML with UI Builder and another with bindings created in C#.
The health bar represents player data.
Preparing the data source The sample project includes Player information and stats that are stored in a PlayerDataSO ScriptableObject. Relevant properties in PlayerDataSO are marked with the CreateProperty attribute, making them available for binding. Each health bar represents only a subset of the data in PlayerDataSO, including the player name and health values. A snippet of the class shows some of its properties and related fields:
using System;
using Unity.Properties;
using UnityEngine;
using UnityEngine.UIElements;
[CreateAssetMenu(fileName = "PlayerDataSO", menuName = "Demos/Player_Data")] public class PlayerDataSO : ScriptableObjectpublic string PlayerName => m_PlayerName;
[CreateProperty] public int CurrentHealth => Mathf.Clamp(m_CurrentHealth, 0, m_MaximumHealth);
[CreateProperty] public int MaximumHealth => m_MaximumHealth;
[SerializeField] string m_PlayerName;
[SerializeField] int m_MaximumHealth = 100;
[SerializeField] [Range(0, k_MaxHealthRange)] int m_CurrentHealth = 100;
const int k_MaxHealthRange = 200;
The UI uses specific data paths, such as PlayerName, CurrentHealth, and MaximumHealth, to display this information visually on the screen.The data source contains health data from the PlayerDataSO ScriptableObject.
Data binding in UI Builder/UXML UI Builder offers a visual, interactive way to bind UI elements to data. It’s ideal for UI artists who prefer a design-centric workflow and developers who benefit from real-time feedback during setup. It also serves as a helpful learning tool for anyone new to data bindings. In the demo scene, the Player One health bar’s data bindings are set up entirely in UI Builder. This involves: —
Selecting the root element: Choose the root element in the hierarchy which contains the health bar. In this example, the topmost container is the demo_container-uxml element.
Assigning the data source: In the Data Binding section of the Inspector, set the data source to the ScriptableObject asset. This assigns the data source and propagates it to all child elements.
Defining data source paths: Specify the data source paths to link individual UI elements to their respective properties in the ScriptableObject (e.g., PlayerDataSO. PlayerName).
The basic health bar
Once the data source is set on the root, it should appear as the default data source for the child elements. Simply fill in the correct data source path. This table illustrates the data bindings join the UI element properties with the ScriptableObject: UI Element
UI Element Property
Bound Property
Notes
health-bar__player-name
text
PlayerName
Displays the player’s name
health-bar__current-health
text
CurrentHealth
Shows the current health value
health-bar__max-health
text
MaximumHealth
Displays the maximum health
health-bar__progress
style.width
Progress
Adjusts the bar width dynamically
When the data binding is complete, the health bar updates in real-time, showing labels and a progress bar for the player’s health. Swapping data sources is simple – just assign a new ScriptableObject asset, and the UI automatically reflects the new values while keeping the same bindings.
Swapping data sources updates the data bindings.
When you set up data bindings in UI Builder, they are added directly to the UXML file, creating a <Bindings> block for each bound element. Here is a snippet of the resulting UXML when binding the health-bar__player-name element’s text property to the PlayerName property (some attributes are omitted for readability): <ui:Label text="Placeholder" name="health-bar__player-name" class="health-bar__player-name"> <Bindings> />
<ui:DataBinding property="text" data-source-path="PlayerName" binding-mode="ToTarget" </Bindings>
</ui:Label> Experienced users can also create these bindings directly in UXML. Doing it in code can give precise control and be faster to edit when working with a lot of bindings. Hand-written UXML also offers clearer diffs for version control, making it easier to resolve merge conflicts or track changes.
Set up data binding in C# UI Builder is great for prototyping with static data (like pre-defined ScriptableObject assets), but runtime data often requires dynamic handling in C#. This code example shows how Player Two’s health bar works in the demo scene:
using UnityEngine;
using UnityEngine.UIElements;
using Unity.Properties;
public class HealthBar : MonoBehaviour {
    [SerializeField] PlayerDataSO m_HealthData;
    public void Initialize(VisualElement root) {
        var m_PlayerName = root.Q<Label>("health-bar__player-name");
        root.dataSource = m_HealthData;
        m_PlayerName.SetBinding("text", new DataBinding() {
            dataSourcePath = new PropertyPath(nameof(PlayerDataSO.PlayerName)), bindingMode = BindingMode.ToTarget
        }
        );
    }
}
The HealthBar script handles this in its Initialize method, which is called from the main controller script in OnEnable. —
First, we query for the health-bar__player-name element. Then, we assign the ScriptableObject data as a source.
The SetBinding method then binds the text property to a new DataBinding instance and sets the dataSourcePath and bindingMode parameters.
All four bindings in the above table are set up similarly. Use the ScriptableObject slider or custom Editor property drawer to adjust the CurrentHealth. The demo includes play test controls (+, -, Select) to increment, decrement, or select the ScriptableObject. The health bar updates dynamically as the changes occur.
The HealthBar syncs to the CurrentHealth value.
Unresolved data bindings workflow Unity 6 also supports a hybrid data binding workflow that blends UI Builder’s visual setup with the flexibility of scripting. Instead of hard-coding data sources in UXML, you can specify a Data Source Type and leave the actual data source unresolved. UI Builder marks these incomplete bindings with a hollow icon. This means that the paths and types are set but the data source is not yet assigned.
Unresolved data binding shows a hollow icon.
At runtime, you can assign the data source with just one line of code. For example: myElement.dataSource = myNewDataSource;
Here, assigning the myNewDataSource to myElement resolves the placeholder bindings defined in UXML, allowing the UI to update automatically. This eliminates repetitive SetBinding calls and keeps the UXML flexible. The Dragon Crashers sample, for example, predefines data paths in UXML while setting the actual data sources at runtime. Clicking the next and last buttons in the UI sets the currently selected character as the data source. Changing the data source requires no modification to the UXML. The unresolved bindings show the correct character stats once the new data source is set.
Updating the data source in the Dragon Crashers sample
Note: If the UXML file sets a specific data source (e.g., data-source="PlayerDataSO. asset"), the binding becomes fixed and cannot be altered at runtime. To enable runtime changes, leave the data-source attribute empty or use a data-source-type instead. See Binding a list to a ListView for an example of this hybrid data binding workflow.
Type converters Type converters in Unity 6 allow you to transform raw data into more user-friendly formats for display in your UI. They act as intermediaries between your data source and the UI, transforming the data into a more intuitive format for the user. For example, type converters can convert radians into degrees or raw health values into colors for a health bar. This allows the UI to present information in a format that’s clear and easy to understand. Type converters do this without requiring a lot of manual transformation logic. Unity 6 supports two categories of type of converters: —
Global converters: Apply these to any bindings that need a specific type conversion. For example, global converters can turn any float health percentage into a color value or convert Color objects into StyleColor types, ensuring consistent behavior
across your UI.
Per-binding converters: Apply these to specific data bindings for more granular control.
Example: Converting a value to a color A health bar that changes color based on the player’s health illustrates the use of a data binding with a type converter. By mapping the player’s current health to a color gradient (e.g. green for high health, yellow for low health, and red for critical health), players can quickly gauge their status during gameplay. You can see this in action in the DataBindingDemo scene within the QuizU project.
HealthDataConverter setup In the DataBindingDemo scene, the HealthBarWithConverter class uses some
functionality from a static HealthDataConverter to register a few DataConverters:
The health percentage drives a color gradient for a health bar, transitioning from green (full health) to red (critical health).
A label can represent the numerical value as a percentage string (e.g., "75%").
Another label can map the same health percentage to a status label like "Full," "Mid," or "Critical."
Here’s a snippet of the HealthDataConverter class: public
static class HealthDataConverter {
    static readonly Color s_FullColor = new Color(0.2f, 1f, 0.2f);
    static readonly Color s_MidColor = Color.yellow;
    static readonly Color s_LowColor = new Color(1f, 0.3f, 0f);
static readonly Color s_CriticalColor = Color.red;static void Register() { RegisterHealthColorConverter(); // … }
static void RegisterHealthColorConverter() {
var colorConverter = new ConverterGroup("HealthColor");
colorConverter.AddConverter((ref float healthPercentage) => {
if (healthPercentage > 0.5f) {
return new StyleColor(Color.Lerp(s_MidColor, s_FullColor, (healthPercentage - 0.5f) * 2f));
}
else if (healthPercentage > 0.25f) {
return new StyleColor(Color.Lerp(s_LowColor, s_MidColor, (healthPercentage - 0.25f) * 4f));
}
else {
return new StyleColor(Color.Lerp(s_CriticalColor, s_LowColor, healthPercentage * 4f));
}
}
);
ConverterGroups.RegisterConverterGroup(colorConverter);
}
// …
}The above logic creates a HealthColor ConverterGroup, which transforms a float health percentage (from 0 to 1) into a matching StyleColor value between red (low health) and green (full health). The HealthDataConverter class also includes converters for the two labels. These can represent the HealthPercentage property of the PlayerDataSO as formatted string values. Although you can bundle multiple converters into a single ConverterGroup, this demo separates them into distinct ConverterGroups for readability.
Use type converters in the UI Builder.
Using the HeathBarWithConverter Note that the HealthDataConverter class contains the actual functionality. The HealthBarWithConverter is simply:
public class HealthBarWithConverter : HealthBar {
    #if UNITY_EDITOR [UnityEditor.InitializeOnLoadMethod] #else [RuntimeInitializeOnLoadMethod(RuntimeInitializeLoadType.SubsystemRegistration)] #endif public static void RegisterConverters() { HealthDataConverter.Register(); }
}
Note the following: —
UnityEditor.InitializeOnLoadMethod ensures the ConverterGroup is registered and available for the UI Builder, allowing you to see and apply it in the Editor.
RuntimeInitializeOnLoadMethod ensures the ConverterGroup is available during runtime when the game is running.
The #if UNITY_EDITOR preprocessor directive ensures the appropriate method runs, depending on whether the code executes in the Editor or during gameplay.
Applying DataConverters in UI Builder Once registered, this DataConverter can be applied to any binding that needs this conversion. To use it directly in the UI Builder: 1.
Open your UXML file and select the progress bar element. In the QuizU project, you can open the RuntimeDataBinding.uxml file to see how it’s set up.
Set the Data Source to your PlayerDataSO ScriptableObject.
Bind the progress bar’s backgroundColor style property to the HealthPercentage data path.
Use the HealthColor ConverterGroup to transform the health percentage value into a color background for the progress bar.
Set up the data binding for the health bar.
Dragging the CurrentHealth value of the PlayerDataSO ScriptableObject now updates the health bar color. The gradient smoothly lerps from green (full health) to yellow (medium), orange (low), and red (critical).
This global DataConverter is now available anywhere in your application where you need to convert a float value to this color gradient.
The HealthColor converter changes the progress bar color.
Best practices When working with type converters, keep these tips in mind: —
Minimize allocations: Keep conversion delegates lightweight, especially for frequent operations, to avoid unnecessary performance overhead.
Keep it simple: Write simple, focused converters for quick transformations. Avoid embedding complex or resource-intensive logic.
Integrate conversion into the data source: Handle basic conversions in the data source itself (e.g., pre-format health percentages in a ScriptableObject property). Reserve DataConverters for conversions specific to UI bindings.
Example: Binding a list to a ListView Depending on your game UI, your application may need to display different collections of data on-screen – an inventory of collected items, a quest log tracking objectives, a leaderboard ranking players, etc. A ListView offers a clean, scrollable interface that makes it easy to manage and present this information. Unity 6 streamlines this process with runtime data binding, eliminating the need for manual updates or custom scripts to refresh the UI when data changes. In earlier versions of Unity, setting up a ListView required writing custom code to populate the list and handle updates as data changed. With Unity 6, a ListView can bind directly to a data source, automatically tracking and reflecting changes in the UI. The demo scene includes a simple ListView that binds to a list of PlayerDataSO ScriptableObjects. This lets us create an interface similar to one found in a multiplayer game lobby or high-score leaderboard.
The TeamList binds a list with a ListView.
With runtime data binding, you can link a ListView directly to a data source, such as a ScriptableObject. The ListView automatically tracks changes to the data, streamlining setup and maintenance. Data binding a ListView to a list involves setting up some unresolved bindings and then completing the data binding at runtime.
Setting up the list and templates Follow these steps to prepare your ListView for data binding: 1.
Define a data source: Your ListView needs a list of data. In this demo, a TeamSO ScriptableObject holds a list of PlayerDataSO objects. Each item in that list corresponds to a row in the ListView.
Create a UXML item template: In the UI Builder, design a UXML template (a VisualTreeAsset) that defines what a single list item looks like. For example, the team-list-item template in the demo includes a player’s name and some Texture2D properties. Instead of directly referencing a data source, set a Data Source Type and Data Source Path in UI Builder. This leaves the binding unresolved, ready to be completed later at runtime.
Design a visual tree asset in UI Builder.
Add the ListView to the main user interface: In another UXML file, add a ListView element that will display the entire list of players. Assign your item template as the ListView’s Item Template. At this point, the ListView knows how each row should look, but it doesn’t know which specific data source to use yet.
Add the template to the ListView.
The demo scene’s ListView uses only a few basic settings (shown above). For more advanced features, consult the official ListView documentation.
Completing the binding at runtime At runtime, a simple TeamList script finalizes the binding by providing the actual data source. These lines complete the previously unresolved bindings:
// Set the data source m_ListView.dataSource = m_TeamData;
// Bind the "itemsSource" to the Players list m_ListView.SetBinding("itemsSource", new DataBinding {

    dataSourcePath = new PropertyPath("Players")
}
);
Here, m_TeamData (an instance of TeamSO) is assigned to the ListView. Calling SetBinding once associates the Players property with the itemsSource. This allows the ListView to populate the rows of the UI. Because these bindings remain unresolved in the UXML until runtime, you don’t need to individually connect each list element. UI Toolkit resolves these bindings on its own and fills in the data for every list item. Any changes to the list in the data source (e.g., adding, removing, or rearranging players) immediately appear in the UI without requiring further scripting.
The UI reflects changes to the Player list.
Remember that this hybrid approach to data binding can reduce a lot of repetitive boilerplate code. By setting up placeholder data paths in UXML, you can postpone assigning the actual data source until runtime. If you change the data model, there’s no need to rewrite your entire binding logic. A single update at startup can rewire the UI to the new source. For a comprehensive look at binding a ListView to a list, see this documentation page.
Optimizing data binding Efficient binding can help you maintain a performant UI. Redundant or excessive bindings can overload the system, leading to unnecessary updates and reduced performance. This is especially important if your interface is complex or resource-intensive. By default, the runtime binding system updates UI elements every frame. This is responsive for a small application but can become a performance bottleneck with more bindings. This section covers methods to improve data binding efficiency for larger projects.
Managing value types If your data source uses value types (e.g., int, float, struct), watch out for boxing costs. Because the dataSource property operates as an object, frequent conversions from value types can add overhead. To reduce this, minimize unnecessary bindings or redundant updates when working with value-type properties.
Minimizing overhead Start by identifying bindings that update the same elements multiple times or track data that rarely changes. Consolidate or remove these bindings to reduce unnecessary work. Use flat, simple data structures instead of complex hierarchies when possible. This can avoid performance bottlenecks caused by frequent data lookups. Consider precomputing or caching values that require heavy calculations. Binding to these precomputed values reduces the computational load on the binding system and avoids repeated recalculations. Make sure that your bindings are on elements that need frequent updates. For elements that don’t need constant synchronization, remove unnecessary bindings and instead assign values directly or update them only when triggered by events.
Using update triggers Bindings refresh based on update triggers, which determine how often the UI synchronizes with the data source. This allows you to balance performance with responsiveness. These options determines how often the bindings update: —
Every frame: This updates continuously. Use this for elements that require constant updates, like the example health bars.
On change detection: This updates when the data source changes, or every frame if detection isn’t possible. For instance, use this for stats panels or inventory lists that depend on observable data.
When marked as dirty: In scenarios where updates are infrequent, explicitly marking bindings as dirty with MarkDirty avoids unnecessary refresh cycles. This update triggers works for elements like settings menus that change only in specific contexts.
By matching update triggers to the needs of each UI element, you can balance responsiveness with efficiency.
Versioning and change tracking To reduce unnecessary updates, you can integrate versioning and change tracking into your data sources. Two interfaces can help make your data binding more efficient: —
IDataSourceViewHashProvider: This tracks overall changes using a version hash, triggering updates only when the data source changes. This is useful for static or semistatic data, where updates are infrequent.
INotifyBindablePropertyChanged: This tracks changes at the property level, ensuring that affected bindings are refreshed. This offers granular control.
Add these interfaces to the data source. They can be used independently or together for greater control over updates. See this documentation page for usage and best practices. Tip: More UI Toolkit optimization tips In this Unite 2024 talk on UI Toolkit optimizations, you’ll learn about topics like the chained draw-calls implementation and the implications of buffer sizes, dynamic atlasing best practices, and dealing with limitations like custom shaders and 3D UI.