Подготовка графических ресурсов и шрифтов
Подготовка графических ресурсов и шрифтов
Значительная часть работы над дизайном UI выполняется за пределами Unity, в приложениях для создания цифрового контента (DCC). В зависимости от стиля и предпочтений UI-художник может проектировать интерфейс в редакторе растровой графики, например Adobe Photoshop, или в векторном редакторе. Обычно каждый графический элемент UI экспортируется в виде растрового изображения с прозрачностью и сжатием без потерь, например PNG, а затем объединяется с другими элементами в атлас текстур ради эффективности во время выполнения. Если вы работаете в векторном DCC-приложении, для использования графики в UI Toolkit её потребуется экспортировать в растровый формат. Подробнее см. раздел «Векторные изображения».
Растровые изображения Unity поддерживает большинство распространённых форматов изображений: PNG, BMP, TIF, TGA, JPG и PSD. После добавления таких файлов в папку Assets Unity импортирует их как ресурсы Texture 2D для трёхмерных проектов или как спрайты для двухмерных. После импорта тип можно изменить в поле Texture Type инспектора. UI Toolkit поддерживает оба формата растровой графики интерфейса.
Текстура почти не содержит сведений помимо размеров и формата изображения, тогда как спрайт обладает дополнительными свойствами, которые использует UI Toolkit.
Спрайты Спрайты - это текстуры, подготовленные для двухмерных игр и предназначенные для компонента Sprite Renderer. В Unity двухмерные спрайты можно замостить, снабдить скелетом и скиннингом для анимации, задать им пользовательскую геометрию или дополнительные карты для двухмерного освещения. В этом разделе рассматриваются только параметры, относящиеся к UI Toolkit. Подробнее о двухмерной графике можно будет прочитать в издании электронной книги «2D-графика, анимация и освещение» для Unity 6 на странице https://unity.com/resources.
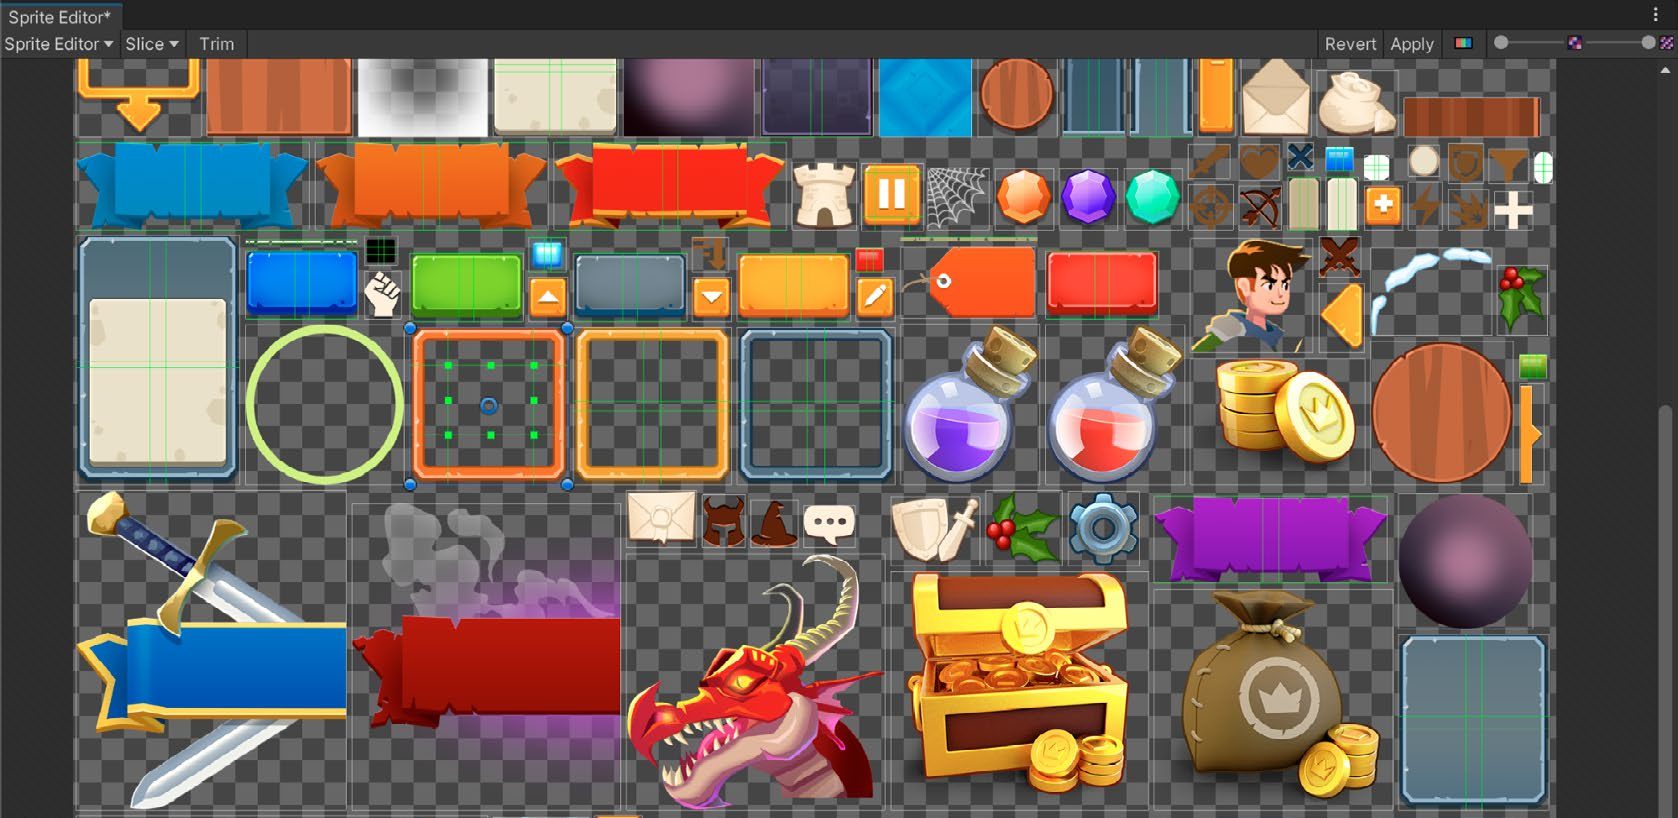
Большинство графических ресурсов UI выводится в экранном пространстве, а не в масштабе мира Unity, где одна единица соответствует кубическому метру трёхмерного пространства. UI Toolkit управляет масштабом такой графики, однако значение PPU (Pixels Per Unit, пикселей на единицу) влияет на размер спрайта в интерфейсе. Например, если на одну единицу сетки должно приходиться 128 пикселей изображения, задайте PPU равным 128. Sprite Editor предоставляет инструменты редактирования графики: например, обрезку синими маркерами и нарезку зелёными. С их помощью изображение можно подготовить к мозаичному заполнению или применить технику девятисегментного масштабирования (9-slice), широко используемую для создания масштабируемых элементов. Спрайты представляют собой двухмерные текстуры, наложенные на плоские прямоугольные трёхмерные сетки. При импорте по умолчанию используется параметр Mesh Type: Tight. Он подгоняет сетку под контур непрозрачных пикселей спрайта. Это повышает производительность за счёт уменьшения избыточной отрисовки, когда GPU в одном кадре несколько раз рисует один и тот же пиксель из-за перекрывающихся прозрачных областей. Сетку можно вручную уточнить и оптимизировать в разделе Outline окна Sprite Editor. Полезный параметр Sprite Mode выбирается в инспекторе ресурса спрайта и поддерживает следующие режимы: - Single. Режим по умолчанию: текстура содержит одно изображение. - Multiple. Выберите этот режим, если исходная текстура содержит несколько элементов. В Sprite Editor укажите их расположение, чтобы Unity смогла разделить изображение на отдельные дочерние ресурсы. После нарезки каждый графический элемент становится самостоятельным спрайтом, который можно отдельно использовать в UI Toolkit. - Polygon. Лучше всего подходит для круглых изображений и правильных многоугольников. Режим позволяет задать контур, точно повторяющий форму изображения, и получить более аккуратный результат.
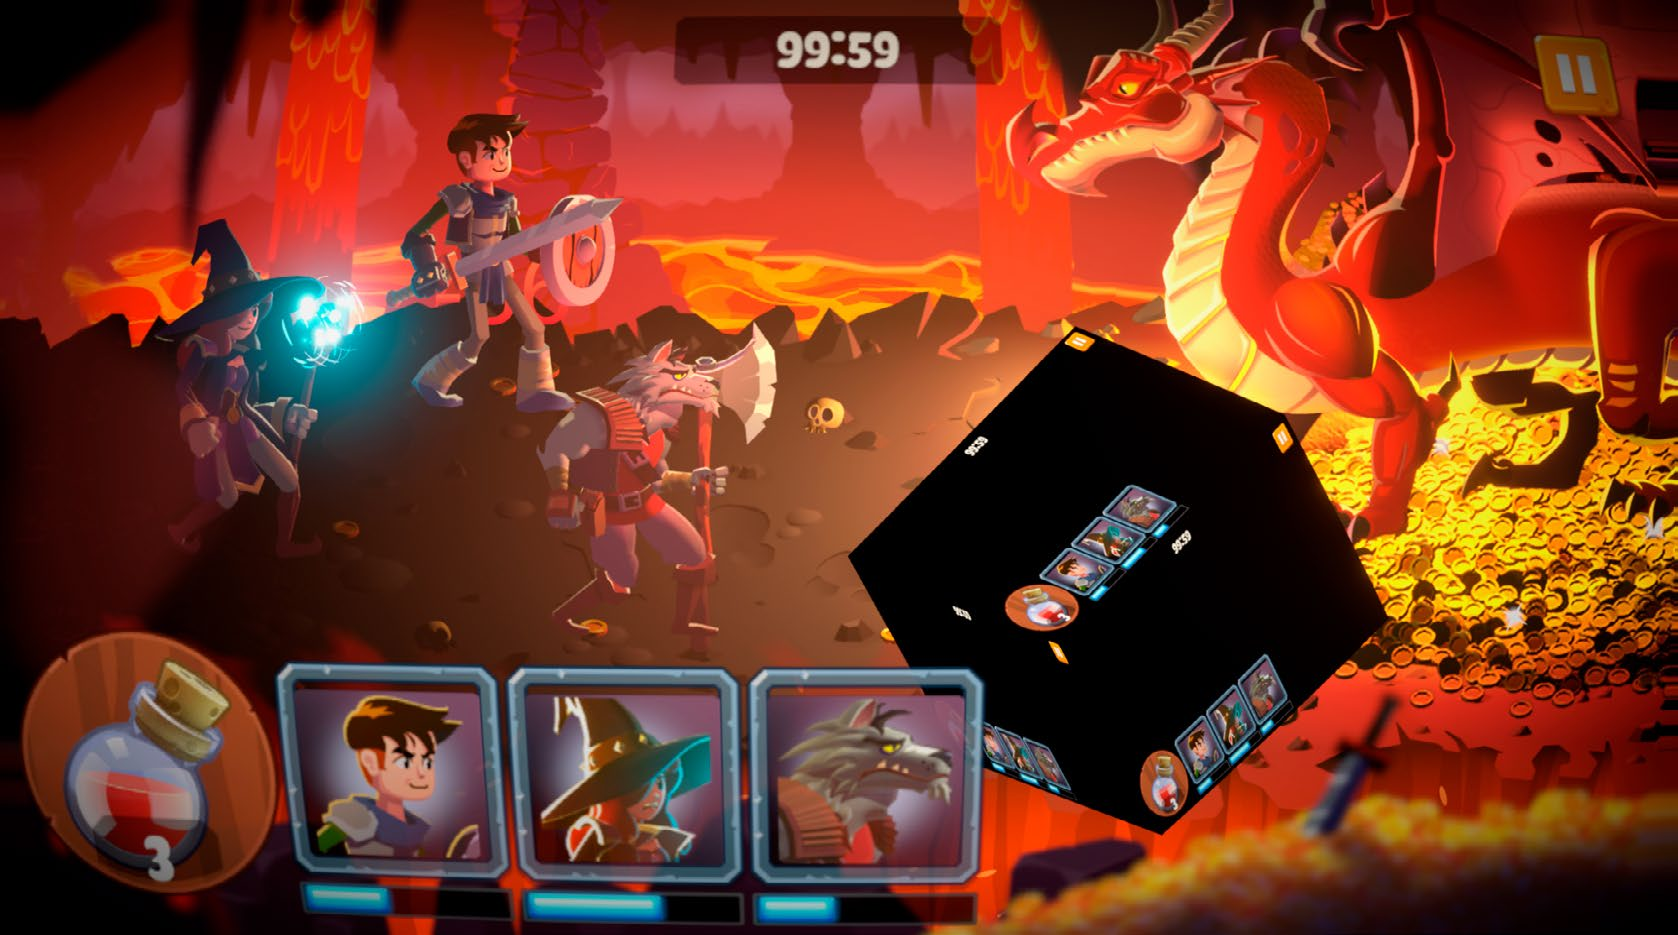
Ресурс Render Texture Render Texture - это текстура со снимком изображения камеры, которая обновляется в каждом кадре. Такой ресурс можно создать через меню Assets > Create > Rendering, а затем указать в меню Output компонента Camera. В UI Toolkit эти текстуры позволяют отображать мини-карты, экраны выбора персонажа и другую внутриигровую графику, которую требуется встроить в интерфейс.
В UI Toolkit Sample: Dragon Crashers Render Texture используется, например, для предпросмотра персонажа на индикаторе уровня и эффектов частиц поверх кнопок UI. Возможен и обратный сценарий, когда интерфейс нужно показать внутри игрового объекта. Представьте трёхмерную модель компьютера с работающим интерфейсом, созданным в UI Toolkit. Интерфейс UI Toolkit можно отрисовать в Render Texture, назначить её в Panel Settings и Camera, а затем применить к материалу трёхмерной модели.
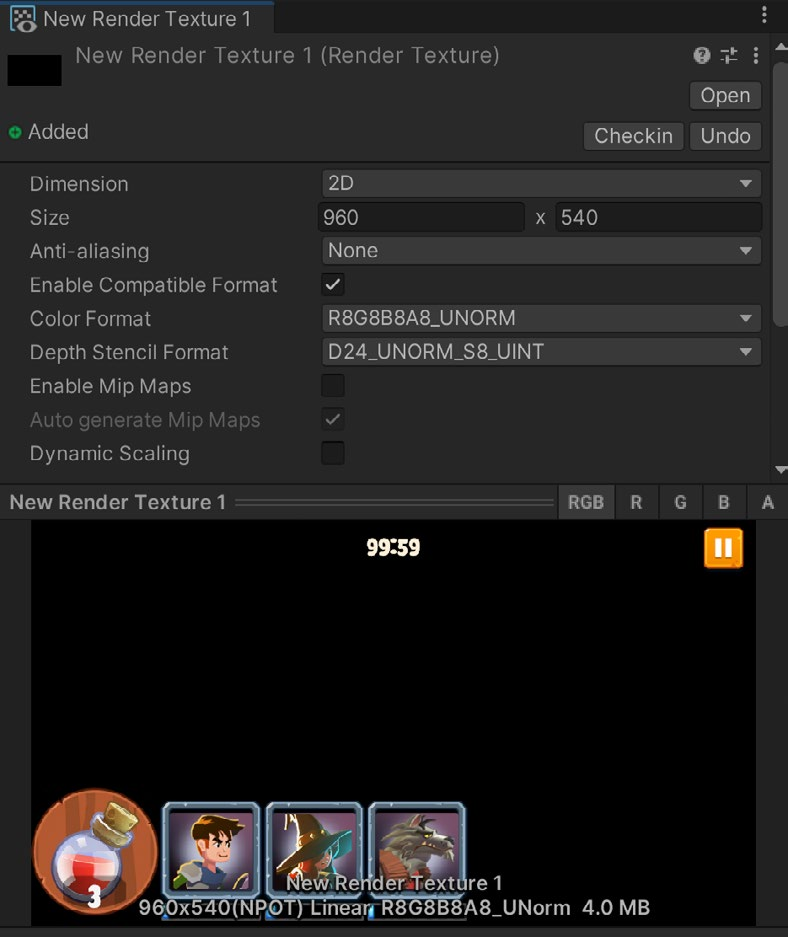
Параметры Render Texture и простые тесты
Помните, что Render Texture требует значительных ресурсов. Используйте такие текстуры умеренно и обязательно профилируйте проект, чтобы оптимизировать производительность. В полноэкранных интерфейсах, где одновременно не выполняются другие активные элементы игрового процесса, дополнительные эффекты такого рода, скорее всего, не вызовут серьёзных проблем с производительностью.
2D PSD Importer По умолчанию Unity импортирует PSD-файлы Adobe Photoshop как сведённые текстуры. Чтобы сохранить структуру слоёв, в проекте должен быть установлен пакет 2D PSD Importer. Формат PSD обычно используют для хранения нескольких изображений на разных слоях в одном файле; экспорт в него поддерживает большинство DCC-инструментов.
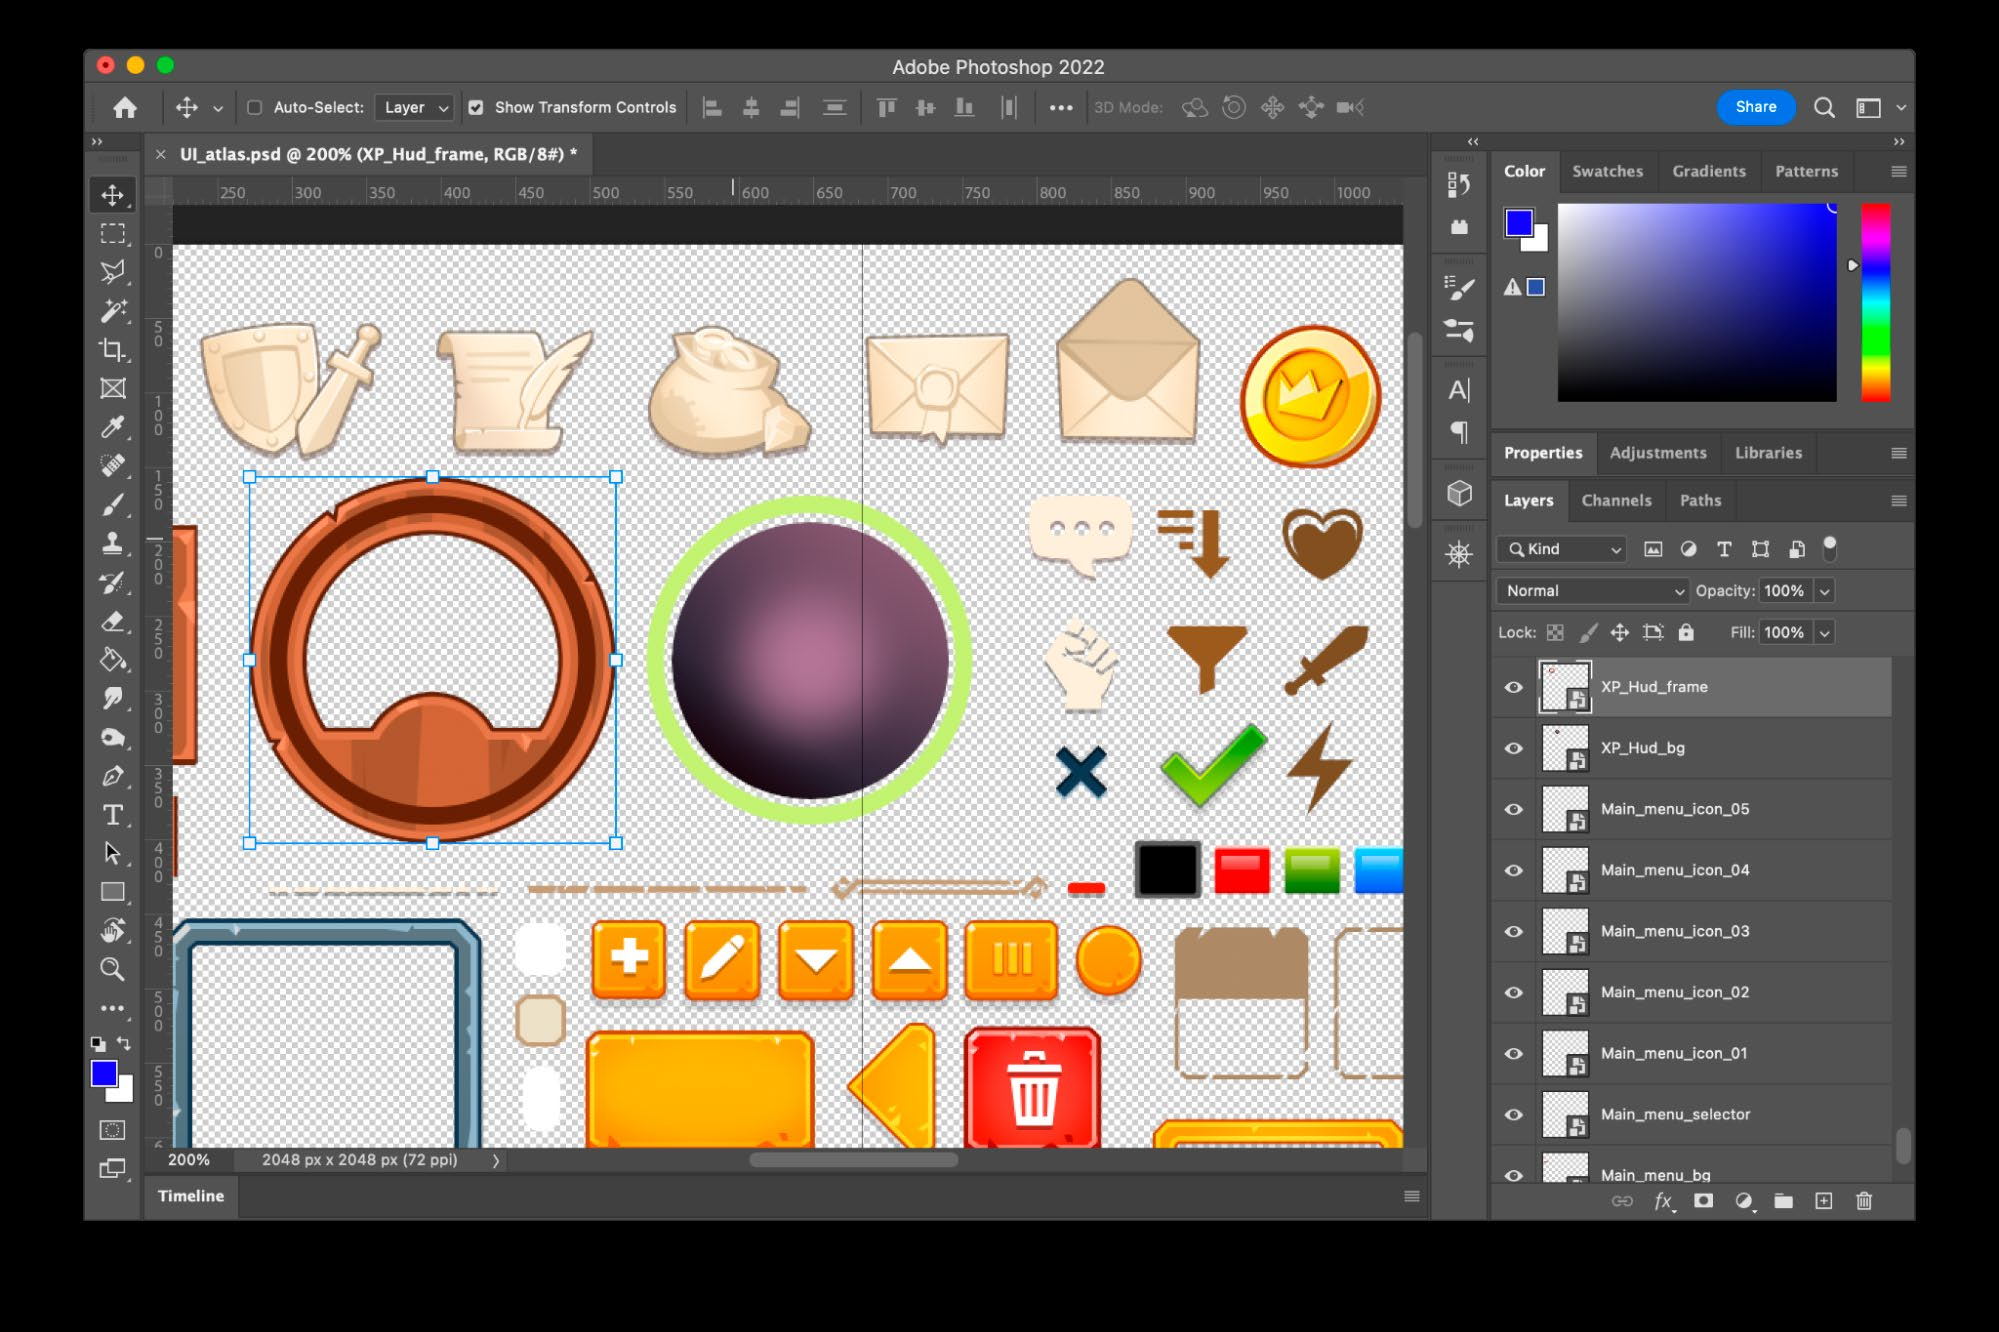
Создание ресурсов UI в Photoshop. Обычно каждый элемент размещают на отдельном слое, в отдельной группе или оформляют как смарт-объект. Смарт-объекты позволяют редактировать элементы независимо и сохраняют их исходное разрешение, даже если позднее изменить размер в основном документе.
PSD-файлы упрощают рабочий процесс: их можно импортировать непосредственно в Unity, не экспортируя каждый слой в отдельный файл и не повторяя эту операцию после каждого изменения. Установите пакет 2D PSD Importer через Package Manager, затем проверьте параметры импорта PSD-файла в инспекторе.
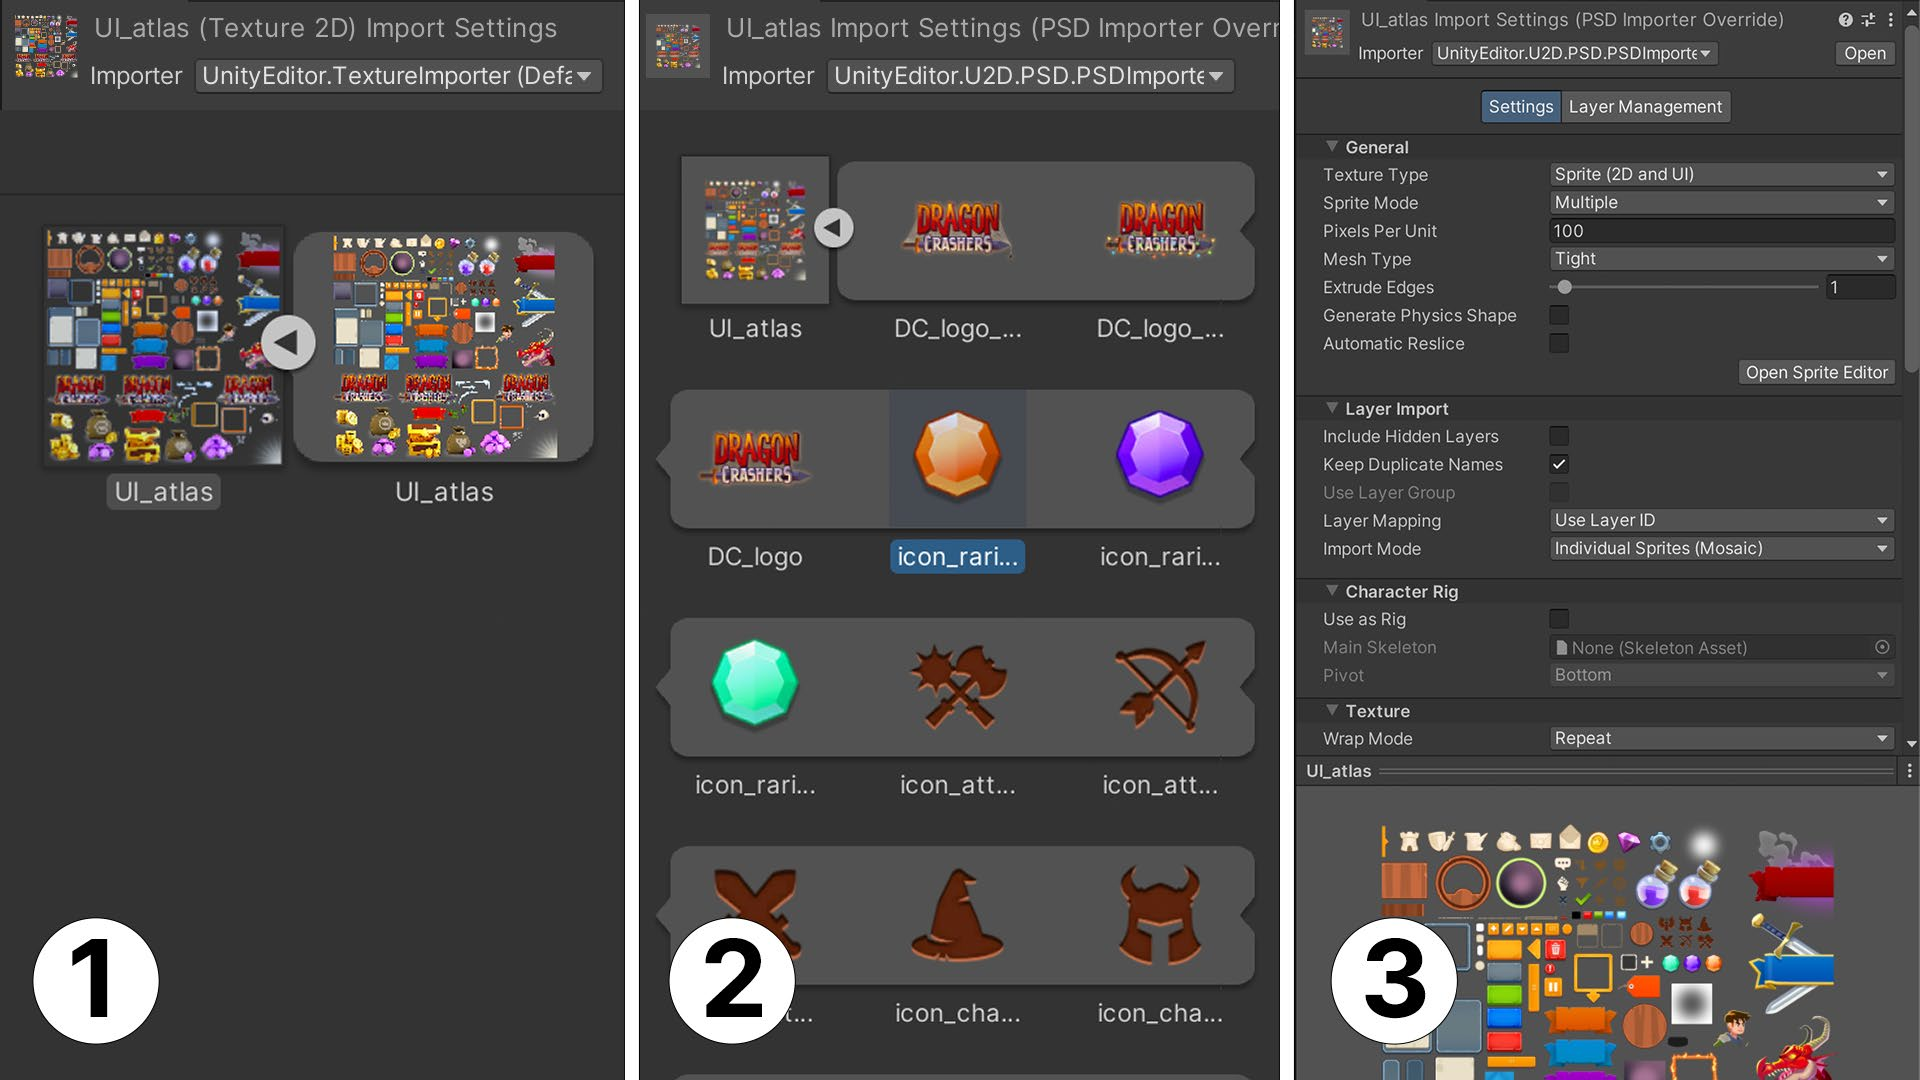
Выберите PSD Importer в инспекторе, чтобы просмотреть параметры обработки файла.
При работе с ресурсами UI отключите в инспекторе параметр Use as Rig в разделе Character Rig. Он нужен только для скелетной анимации двухмерных персонажей и не требуется элементам UI. Здесь же доступны параметры импорта слоёв: например, исключение скрытых слоёв и группировка объектов по слоям.
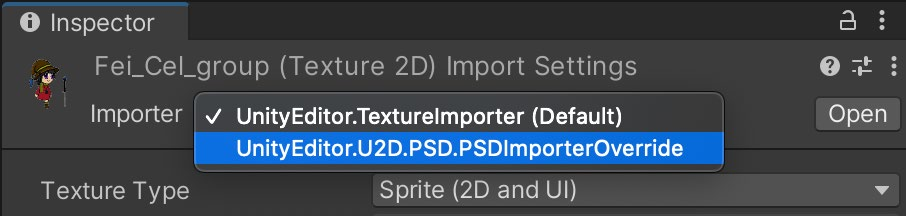
Переключитесь на PSD Importer, чтобы получить дополнительные параметры импорта.
Созданные из PSD спрайты в окне Project можно использовать как обычные. В Sprite Editor их можно нарезать, изменить контур или настроить Pixels Per Unit (PPU) так же, как у стандартных ресурсов Sprite.
Совет: итеративное проектирование Unity автоматически обновляет спрайты из PSD-файла при каждом его сохранении. Благодаря этому можно быстро создать временный вариант, дорабатывать его и сразу наблюдать изменения в окне Game. Просмотр результата в контексте без замены файлов и без помощи другого разработчика заметно экономит время и помогает повысить качество работы.
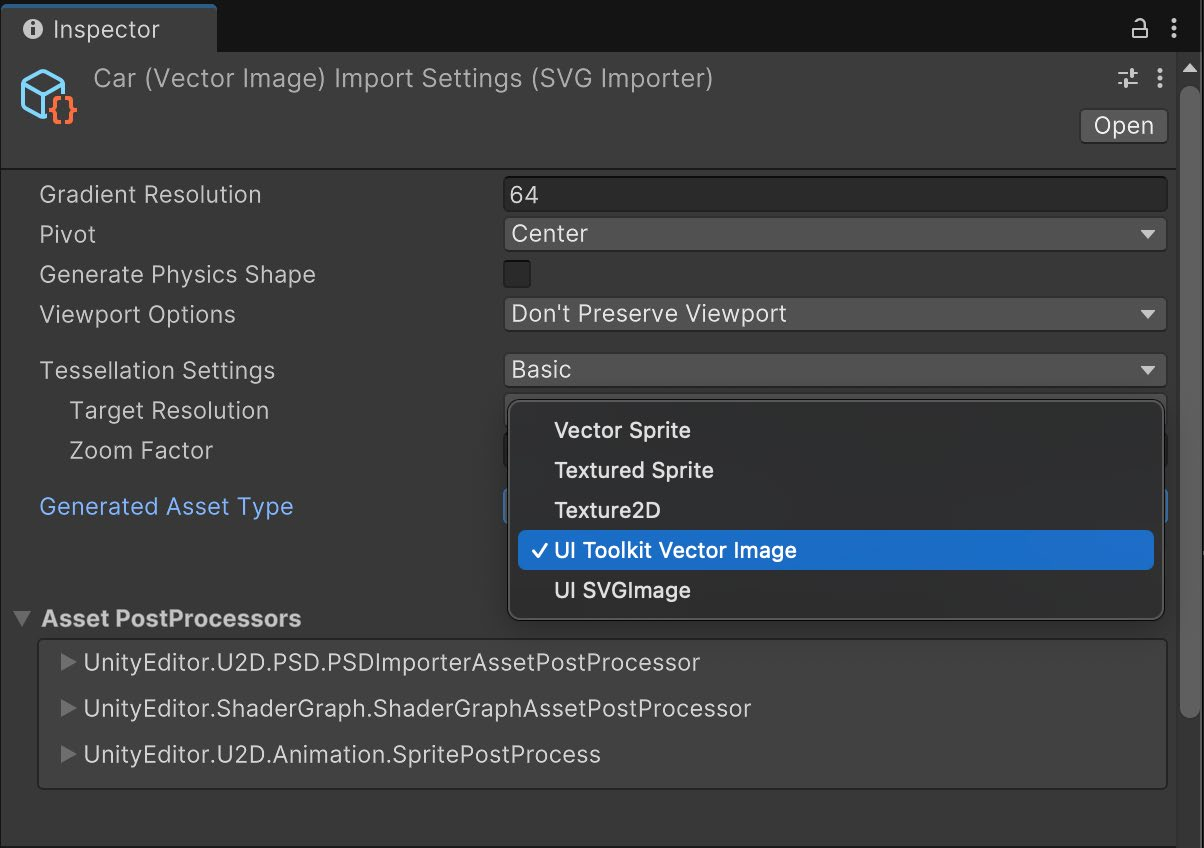
Векторные изображения На момент написания книги поддержка векторного формата всё ещё разрабатывалась, однако в UI Builder его уже можно было использовать для фоновых изображений. Тем не менее для UI Toolkit пока рекомендуются растровые изображения - спрайты и текстуры. Чтобы опробовать векторную графику, установите экспериментальный пакет Vector Graphics, который по умолчанию скрыт в Package Manager. Порядок установки приведён в документации. В пакете можно настроить уровень тесселяции при преобразовании векторной графики в полигоны. Чтобы использовать полученный ресурс в UI Toolkit, для Generated Asset Type выберите UI Toolkit Vector Image.
Пакет Vector Graphics позволяет в ограниченном объёме испытать SVG-изображения в игре или интерфейсе.
Сейчас при рендеринге SVG-файлы разбиваются на полигоны, что ограничивает преимущества векторной графики. При сильном увеличении вместо характерных для вектора гладких кривых могут проявиться многоугольные грани. На момент написания книги сглаживание в UI Toolkit ещё не поддерживалось.
Ожидается, что завершённая реализация будет непосредственно работать с настоящими векторными формами и отдельный пакет Vector Graphics больше не потребуется.
Шрифты UI Toolkit поддерживает типы Font и FontAsset:
- Font. Стандартные форматы шрифтов TTF и OTF поддерживаются ради обратной совместимости, но в фоновом режиме автоматически преобразуются в FontAsset. - FontAsset. Рекомендуемый формат, позволяющий точно настраивать кернинг, базовую линию и другие характеристики без изменения исходного файла шрифта. Это особенно полезно для выразительных стилизованных шрифтов, часто используемых в играх.
- FontAsset также позволяет точно управлять созданием атласов: выбирать набор символов, разрешение и способ заполнения. Эти параметры помогают сократить потребление памяти, особенно при работе с Unicode-шрифтами для языков с большим числом символов.
Упаковщики текстур Объединение двухмерной графики в одной текстуре - распространённый способ оптимизации, который уменьшает число вызовов отрисовки и улучшает использование памяти. UI Toolkit поддерживает две системы атласов.
Атлас спрайтов
Типичный атлас игрового интерфейса из UI Toolkit Sample - Dragon Crashers
Sprite Atlas - инструмент Unity для упаковки спрайтов и другой графики двухмерных игр в атлас; его также можно использовать для графики UI. Он автоматически упаковывает ресурсы из одной папки проекта, создавая атласы спрайтов, карт нормалей и масок. Поддерживаются варианты для разных платформ и API для расширенного управления. Sprite Atlas обычно применяют для упаковки ресурсов в редакторе, а не во время выполнения.
Динамический атлас
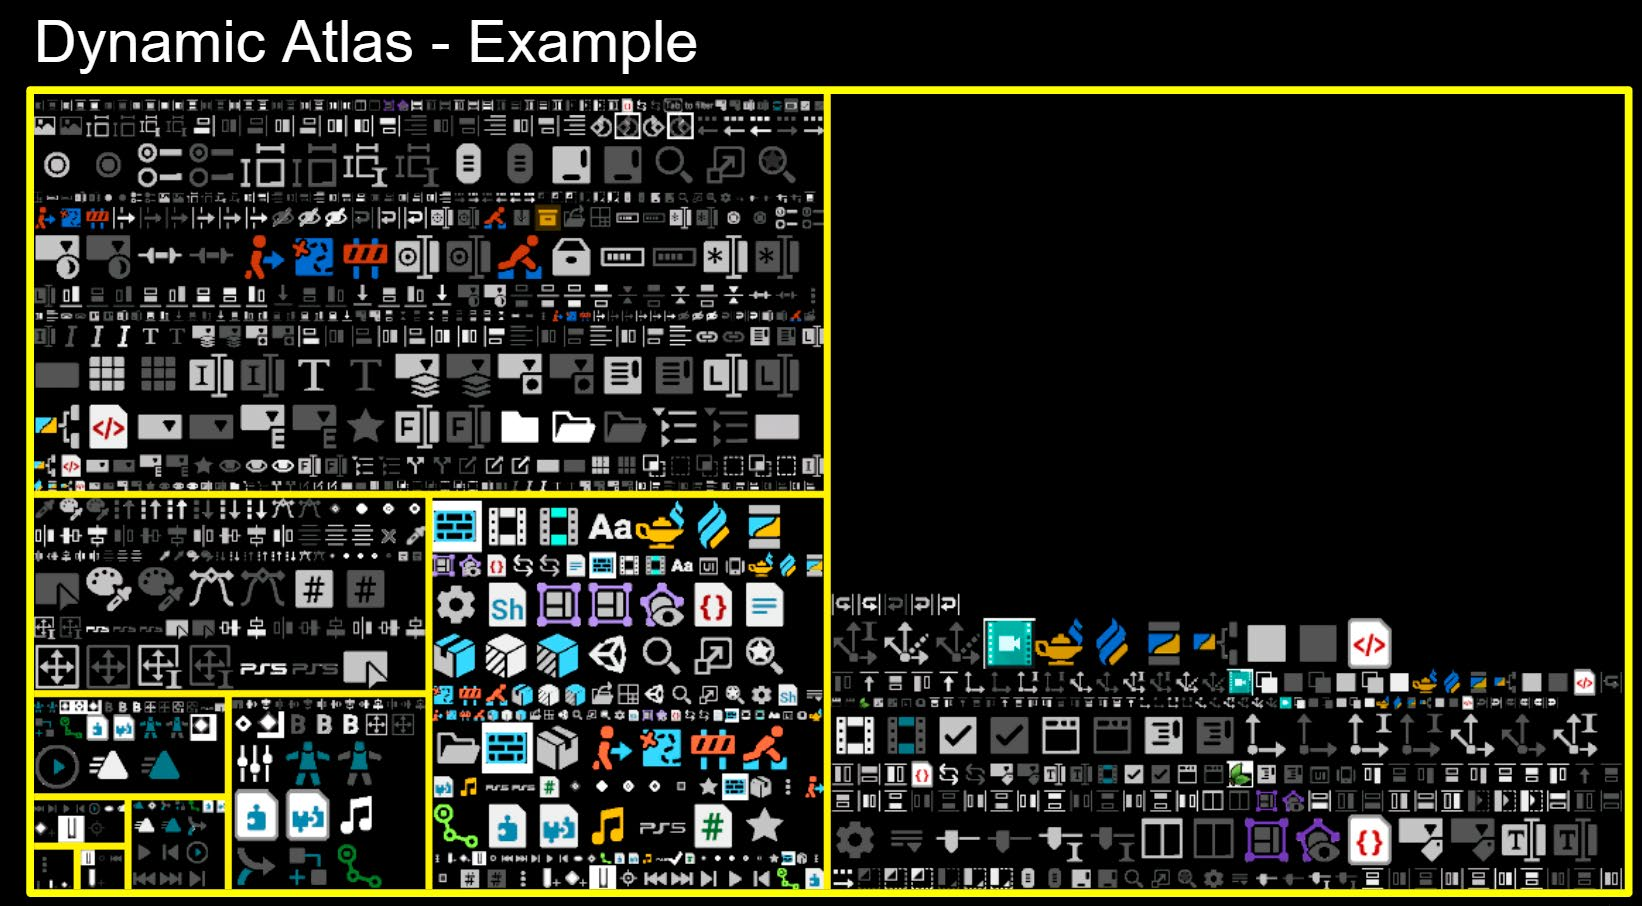
Динамический атлас, созданный редактором Unity и открытый в Texture Atlas Viewer. Атлас увеличивается по горизонтали и вертикали степенями двойки, не превышая максимально допустимый размер текстуры.
Если графика UI не упакована средствами Sprite Atlas, UI Toolkit автоматически добавляет её в динамический атлас на предварительном проходе. Изображения, на которые ссылается визуальный элемент, включаются в атлас по критериям, заданным в Panel Settings документа UI. Например, можно указать минимальные и максимальные размеры упаковываемых текстур или фильтровать изображения по другим свойствам. Созданные атласы доступны для просмотра в Texture Atlas Viewer отладчика UI Toolkit. Динамический атлас работает и во время выполнения, и в редакторе, поэтому удобен для элементов UI, создаваемых динамически, например содержимого инвентаря игрока. При подготовке графики придерживайтесь следующих рекомендаций: - Уже на этапе создания макетов задайте в графическом редакторе максимальное целевое разрешение, чтобы впоследствии не переделывать работу. Например, если вы планируете поддерживать графику вплоть до 4K, используйте это разрешение как минимальное рабочее. - Не увеличивайте растровые изображения после их создания: это приводит к пикселизации и размытию, снижая визуальное качество. Начинайте работу с максимального поддерживаемого разрешения и уменьшайте изображение при экспорте из графического приложения.
- При работе с векторной графикой последующее изменение размера ресурсов не так критично. Тем не менее используйте эталонное разрешение (Reference Resolution), чтобы сохранять правильный относительный масштаб каждого ресурса, например одинаковую толщину контура элементов.
- Если разрешение графических ресурсов ниже требуемого, попробуйте 2D Enhancers и функцию масштабирования на основе ИИ в Sprite Editor. - Используйте возможности 2D PSD Importer, импортируя PSD-файлы прямо в Unity. После сохранения PSD все изменения слоёв автоматически отразятся в Unity. Кроме того, находящийся в проекте PSD-файл можно хранить в системе контроля версий. - Автоматизируйте импорт. Не изменяйте параметры вручную при каждом добавлении графического ресурса. С помощью Preset можно сохранить настройки одного ресурса и автоматически применять их ко всем ресурсам того же типа в заданной папке. - Для более глубокой автоматизации, например проверки ресурсов или массового изменения их параметров, используйте API AssetPostprocessor.
Graphic and font assets preparation
A lot of UI design happens outside of Unity in a Digital Content Creation (DCC) application. Depending on the style and preferences of the UI artist, designing the UI can take place in a raster drawing application like Adobe Photoshop or in a vector-based tool. Typically, every piece of UI graphic is exported as a lossless bitmap image with transparency, such as a PNG, and combined into a texture atlas with other UI elements for runtime efficiency. If you work in a vector-based DCC application, you’ll need to export vector graphics into a raster format in order to work with UI Toolkit. For more details, refer to the Vector images section.
Bitmap images Unity supports most common image file types, like PNG, BMP, TIF, TGA, JPG, and PSD. When you add files of these formats to your Assets folder, Unity will import them as Texture 2D assets for 3D projects or as Sprites for 2D projects. You can change the type in the Texture Type field within the Inspector once imported. UI Toolkit supports both formats for UI bitmap graphics. Textures don’t contain much more information besides the size and format of the image, but sprites have some additional properties that are used by UI Toolkit.
Sprites Sprites are textures prepared for 2D game development to be used by the Sprite Renderer component. 2D sprites in Unity can be tiled, rigged and skinned for animation, have custom geometry or include additional maps for 2D lighting. This section solely focuses on settings that are relevant to the UI Toolkit. For a deeper understanding of 2D graphics you can find more in the Unity 6 edition of the 2D art, animation, and lighting e-book that will soon be available at https://unity.com/resources. Most UI graphic assets will be rendered on screen space rather than following Unity’s world scale (where one unit represents a cubic meter in 3D space). UI Toolkit manages the scale of these graphics, but the PPU (Pixels Per Unit) of sprites affects the size of the sprites in the UI. For example, if your sprite is meant to have 128 pixels of resolution per grid unit, set the PPU to 128. The Sprite Editor provides tools for modifying your graphics, such as cropping with the blue handles or slicing with the green handles. These tools allow you to make the graphic tileable or use the 9-slice technique, a common way to create scalable elements. Sprites are 2D textures mapped onto flat, rectangular 3D meshes. By default, when imported, they use the setting Mesh Type: Tight. This setting adjusts the mesh to closely follow the outline of the opaque (non-transparent) pixels of the sprite. This improves performance by reducing overdraw, which happens when the GPU draws the same pixel more than once within a single frame, due to transparent overlapping areas. You can manually adjust and optimize this mesh in the Sprite Editor under the Outline section. Sprite Modes is a useful feature that you can select from the Inspector of a sprite asset. It provides the following modes: —
Single: This is the default mode, where the image only contains a single image element.
Multiple Choose this value if the texture source file has several elements in the same image. Then define the location of the elements in the Sprite Editor so that Unity knows how to split the image into different sub-assets. Once sliced, each graphic becomes an individual sprite that can be used separately in the UI Toolkit.
Polygon: Best for images that are circular or a regular polygon, this mode helps you to set up an outline that closely matches the image shape, resulting in a cleaner outline.
Render Texture asset Render textures are snapshots of a camera view in a texture, updated every frame. They can be created via Assets < Create < Rendering and referenced from a Camera component in the Output menu. You can then use these textures in the UI Toolkit to display elements such as mini-maps, character selection screens, or any other in-game visuals that need to be integrated into the UI. Examples of render textures in UI Toolkit Sample: Dragon Crashers include the character preview in the level meter and the particle effects rendered over the UI buttons. The opposite use case is also possible, where you want the UI to be displayed within a game element. For example, imagine a 3D computer model in your application displaying a functional interface made in UI Toolkit. You can render the UI Toolkit interface to a render texture, assign it in the Panel Settings and Camera, and then apply it to a material of the 3D model.
The Render Texture settings and simple tests
Just be aware that render textures are expensive. Use them sparingly and be sure to profile your project to optimize performance. For full screen interfaces without other active gameplay elements, adding extra effects this way is unlikely to pose major performance issues.
2D PSD Importer Unity imports PSD (or Adobe Photoshop files) as flattened textures unless your project has the 2D PSD Importer package installed. PSD files are generally used for storing multiple images in layers in one single file. Most DCC tools support exporting to this format.
Creating the UI assets in Photoshop: Normally each element has its own layer, group, or is a smart object. Smart objects allow you to work on each element in isolation and preserve the original resolution of the element, even if resized later in the main document.
PSD files simplify workflows by allowing direct import into Unity, avoiding the need for you to export each layer as individual files and repeat the process whenever changes are needed. After installing the 2D PSD Importer package from the Package manager, ensure the PSD files are imported from the Inspector.
Select the PSD Importer in the Inspector to see options for handling the file.
When working with UI assets, deselect the Use as Rig option in the Inspector under Character Rig. That setting is only relevant for 2D character skeletal animation and is unnecessary for UI elements. You should also find options for importing layers (e.g., discarding hidden layers, grouping objects by layer, etc.)
Switch to the PSD Importer to give yourself more import options.
The sprites in the Project view generated from the PSD are usable as normal sprites. You can slice them, change the outline, or modify the Pixels Per Unit (PPU) from the Sprite Editor just as you would with regular Sprite assets. Tip: Iterative design Unity will automatically refresh the sprites included in the PSD file every time you save it. This allows you to make a quick placeholder and iterate on it while viewing changes in the Game view. This can be a great time saver and improve the quality of the work by letting you see it in context without swapping files or needing support from a fellow developer in the team.
Vector images Although the vector format support is still in development at the time of writing, it’s available as an option for background images in the UI Builder. However, raster images (sprites and textures) are currently the recommended image format for UI Toolkit. If you want to test this functionality, you will need the Vector Graphics package which is still in preview and hidden from the Package Manager by default. Follow the steps in the documentation to install it. This package includes a setting for defining the tessellation level when converting vector graphics into polygons. For the Generated Asset Type setting, choose UI Toolkit Vector Image to be able to use it in UI Toolkit.
With the Vector Graphics package you can test using SVG images for your game or UI in a limited capacity.
Currently, SVG files are tessellated into polygons when rendering, which limits the benefits of vector images. You may notice polygonal edges when scaling up, rather than the smooth curved edges typical of vector images. At the time of writing, anti-aliasing is not yet enabled for UI Toolkit. The finalized version of vector support is expected to be able to support real vector shapes natively, eliminating the need for a separate Vector Graphics package.
Fonts UI Toolkit supports both Font and FontAsset: —
Font: Standard font formats, such as TTF or OTF, are supported for backwards compatibility. However, they are automatically converted into FontAssets in the background.
FontAsset: This is the recommended format, and allows you to fine-tune aspects like kerning or baseline without modifying the original font asset. This is useful for the highly stylized fonts commonly found in games. —
Font Asset also provides precise control on how atlases are created, including the character set, resolution, and atlas population options. These settings can help reduce the memory footprint, especially when working with Unicode fonts that support languages with large amounts of characters.
Texture packers Combining 2D graphics into the same texture is a common optimization technique to reduce draw calls and improve memory usage. UI Toolkit supports two current atlasing systems.
Sprite atlas
A typical game UI atlas from the UI Toolkit Sample – Dragon Crashers
Sprite Atlas is Unity’s atlasing tool for 2D game development and sprites, but you can also use it for UI graphics. It automatically packs assets in the same project folder, creating an atlas for the sprites, and normal and mask maps. It also supports platform-specific variants and has an API for advanced control. Sprite Atlas is commonly used in the Editor to pack assets but not at runtime.
Dynamic atlas
Dynamic atlas generated from the Unity Editor and shown in the Texture Atlas Viewer; the atlas grows horizontally and vertically in multiples of 2 fitting in the max allowed texture size
When UI graphics are not packed with Sprite Atlas, they are automatically packed with the dynamic atlas feature in UI Toolkit during a pre-pass. The referenced images within a visual element will be atlased according to the criteria defined in the Panel Settings of the UI Document. For example, you can define the minimum or maximum texture sizes to be packed or filter images based on other properties. You can preview generated atlases in the Texture Atlas Viewer within the UI Toolkit Debugger. The dynamic atlas tool works both at runtime and in the Editor, making it useful for UI elements that are dynamically generated, like a player’s inventory. Common good practices for your graphics include: —
Once you start creating mockup screens, make sure to set the highest target resolution in your drawing software to avoid having to redo work later. If you plan to support up to 4K graphics, for instance, make that your minimum working resolution.
Avoid scaling raster images up after they’re created. This can result in pixelation and blurriness, thereby lowering visual quality. Instead, begin from the highest resolution supported, then scale down when exporting from a graphics application.
If you design with vector graphics, resizing assets later is less of an issue. But try to work with a Reference Resolution, so that each asset has the correct relative scale - for example, keeping the outline thickness of the element consistent.
If you are in the situation where the graphic assets have a lower resolution than needed, try 2D Enhancers, and the AI-powered upscale feature within the Sprite Editor.
Make the most out of the 2D PSD Importer by importing PSDs directly into Unity. Any changes to a layer will be reflected in Unity once you save the PSD file. If you have the PSD file in Unity, it can also benefit from Version Control.
Automate your import process. Avoid manually changing the asset settings every time you add a graphic asset. The Preset feature allows you to save settings applied to one asset and automatically apply them to all assets of the same kind in a given folder.
If you need to automate the process even further, such as running checks on assets, or mass-changing settings for multiple assets, you can use the Asset PostProcessor API.