Текст
Текст
UI Toolkit использует TextCore - технологию рендеринга шрифтов, первоначально созданную на основе TextMesh Pro, который применяется в прежней системе интерфейса Unity UI. TextCore предоставляет расширенные возможности оформления и чётко отображает текст при разных кеглях и разрешениях. Технология использует шрифты на основе знакового поля расстояний Signed Distance Field (SDF), поэтому ресурсы шрифтов сохраняют резкость при преобразовании и увеличении. Подробнее о режимах рендеринга TextCore см. в документации.
Теперь рассмотрим типы ресурсов шрифтов и их назначение.
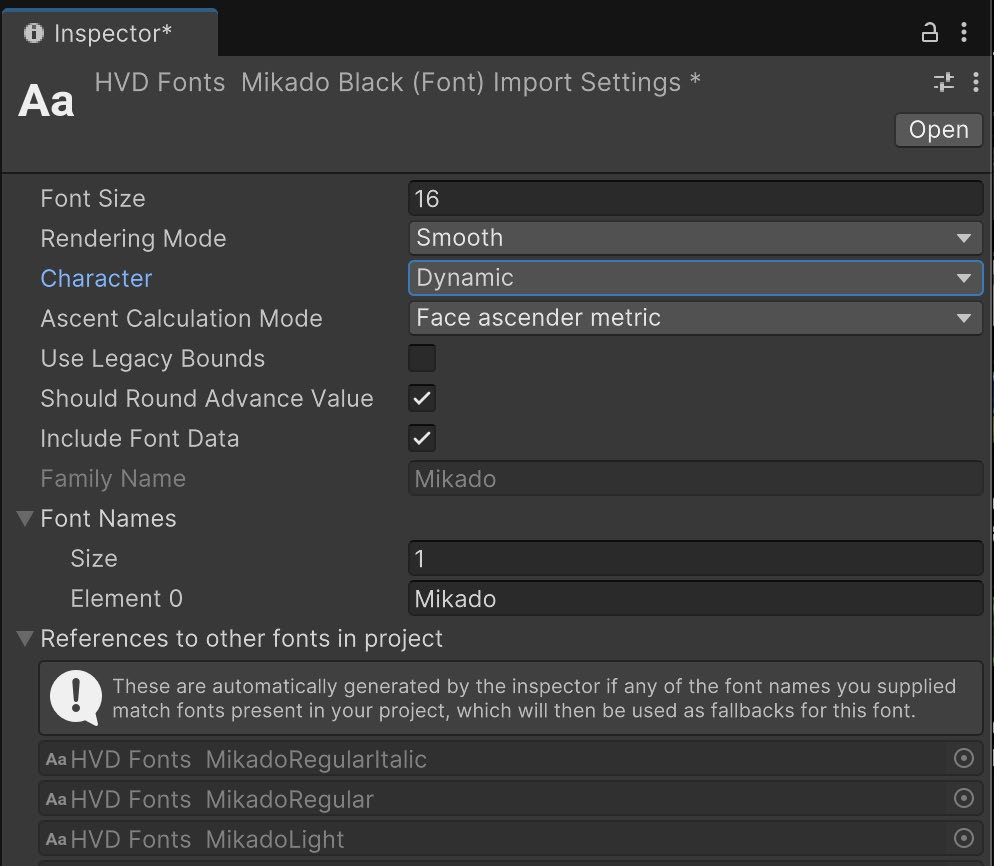
Исходный файл шрифта Наиболее распространённые форматы шрифтов, TTF и OTF, необходимо преобразовать в ресурсы шрифтов, прежде чем использовать их в проекте Unity. Ресурс шрифта - это специальный ресурс Unity, содержащий данные для отображения шрифта: глифы символов, метрики и параметры рендеринга, включая размер, насыщенность и начертание. Для импортированного исходного файла отображаются сведения о каждом семействе шрифтов и доступных вариантах рендеринга.
Многие из этих параметров импорта остались от прежней текстовой системы Unity UI и будут удалены в будущих выпусках. Параметры Rendering Mode, Character и Include Font Data используются при создании ресурса шрифта.
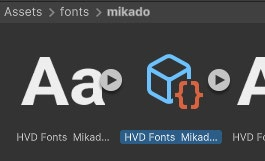
Чтобы создать соответствующий ресурс шрифта, выберите исходный файл шрифта, щёлкните правой кнопкой мыши в окне Assets и выберите Create > Text Core > Font Asset > SDF, если SDF - предпочтительный режим рендеринга.
В разных системах интерфейса используются разные ресурсы шрифтов.
Параметры ресурса шрифта После преобразования исходного файла выберите ресурс шрифта. В Inspector отобразятся все параметры, позволяющие полностью управлять созданием шрифта. Рассмотрим основные из них; дополнительные сведения о ресурсах шрифтов приведены в документации:
- Face Info: параметры интервалов и масштаба шрифта. С их помощью можно скорректировать исходный шрифт, если стандартные значения не подходят приложению.
- Generation Settings: основные параметры, включая исходный шрифт, начертание для ресурса шрифта, если исходный файл содержит несколько начертаний, режим заполнения атласа и режимы рендеринга. - Atlas and Material: созданные материал и текстура; тип атласа - статический или динамический; режим рендеринга - растровый или SDF. Здесь также можно управлять размером создаваемого атласа, что особенно важно для языков с большими наборами символов.
- Font Weights: имитация разных вариантов насыщенности, если их нет в исходном ресурсе шрифта. - Fallback Font Asset: резервный шрифт для символов или глифов, отсутствующих в текущем ресурсе шрифта. - Character and Glyph Tables: подробный список всех символов и глифов, включённых в ресурс шрифта. - Ligature table: добавление глифа, который используется для сочетания двух символов и улучшает читаемость и зрительную плавность текста. - Glyph Adjustments: переопределения для отдельных символов или глифов.
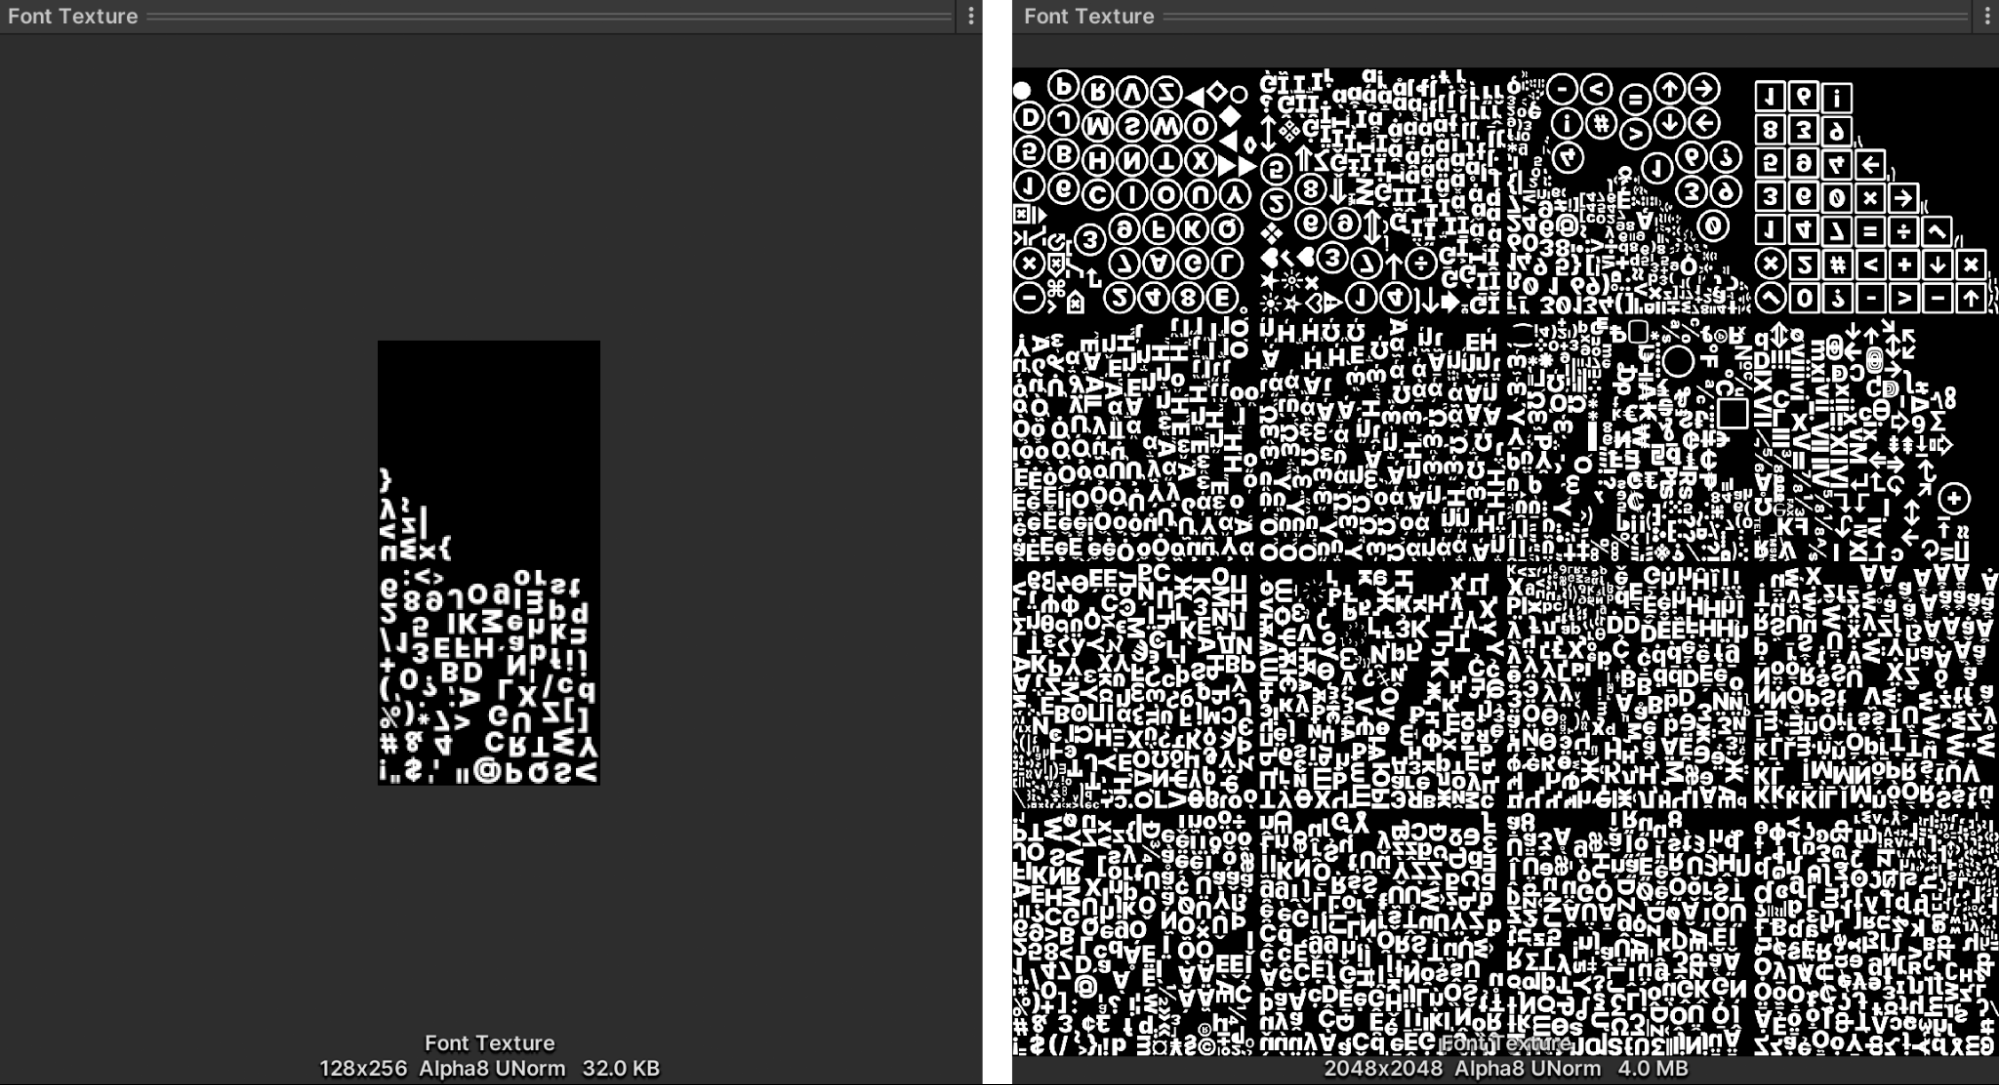
Исходные шрифты и атласы могут увеличивать размер сборки: слева показан атлас с символами ASCII, справа - атлас с полным набором символов Unicode.
Если выбрать ресурс шрифта, в верхней части Inspector под кнопкой Update Atlas Texture будет доступен Font Asset Creator. Он позволяет полностью управлять заполнением атласа и его свойствами.
Совет: поля и разрешение атласа Между символами в текстуре шрифта необходимо оставить поля заданного размера в пикселях, чтобы каждый символ можно было отрисовывать отдельно. Поля также создают пространство для градиента SDF. Чем они шире, тем плавнее переход, что позволяет получать качественное изображение и применять эффекты вроде толстой обводки.
Если используются только символы ASCII, для большинства шрифтов достаточно атласа 512 x 512 с полем 5 пикселей. Для шрифтов с большим числом символов может потребоваться более высокое разрешение или несколько атласов. Как правило, размер поля должен составлять примерно одну десятую размера выборки.
Вариант ресурса шрифта Чтобы изменить метрики шрифта без создания нового атласа, выберите Create > Text Core > Font Asset Variant. Такой вариант может содержать альтернативные метрики строк. Он хранит собственные параметры Face Info - например, высоту строки и положение нижнего индекса, - но по-прежнему ссылается на исходный атлас. Благодаря этому вариант может иметь оформление, отличное от исходного ресурса шрифта, не занимая дополнительное место под текстуры.
Форматированный текст Теги форматированного текста изменяют вид и компоновку текста с помощью дополнительных тегов в текстовом поле. Их можно использовать для визуальных элементов как в коде, так и в UI Builder. Теги позволяют форматировать текст во время выполнения - например, менять оформление имени пользователя.
С их помощью можно изменять цвет или выравнивание текста, не меняя свойства и стили элемента. Применяйте их для оформления диалогов или визуального акцента на важных сообщениях. Чтобы включить форматированный текст в UI Builder, откройте Extra Settings. После этого текст вместе с тегами будет отображаться правильно. Например, текст между тегами <b> и </b> станет полужирным.
Включите поддержку тегов форматированного текста в UI Builder, чтобы они изменяли визуальное оформление текста.
Полный список доступных тегов форматированного текста и их параметров приведён по ссылке.
Градиенты Градиенты помогают оформить интерфейс. В UI Toolkit их можно применять с помощью тега <gradient>. Чтобы создать простой градиент, выполните следующие действия:
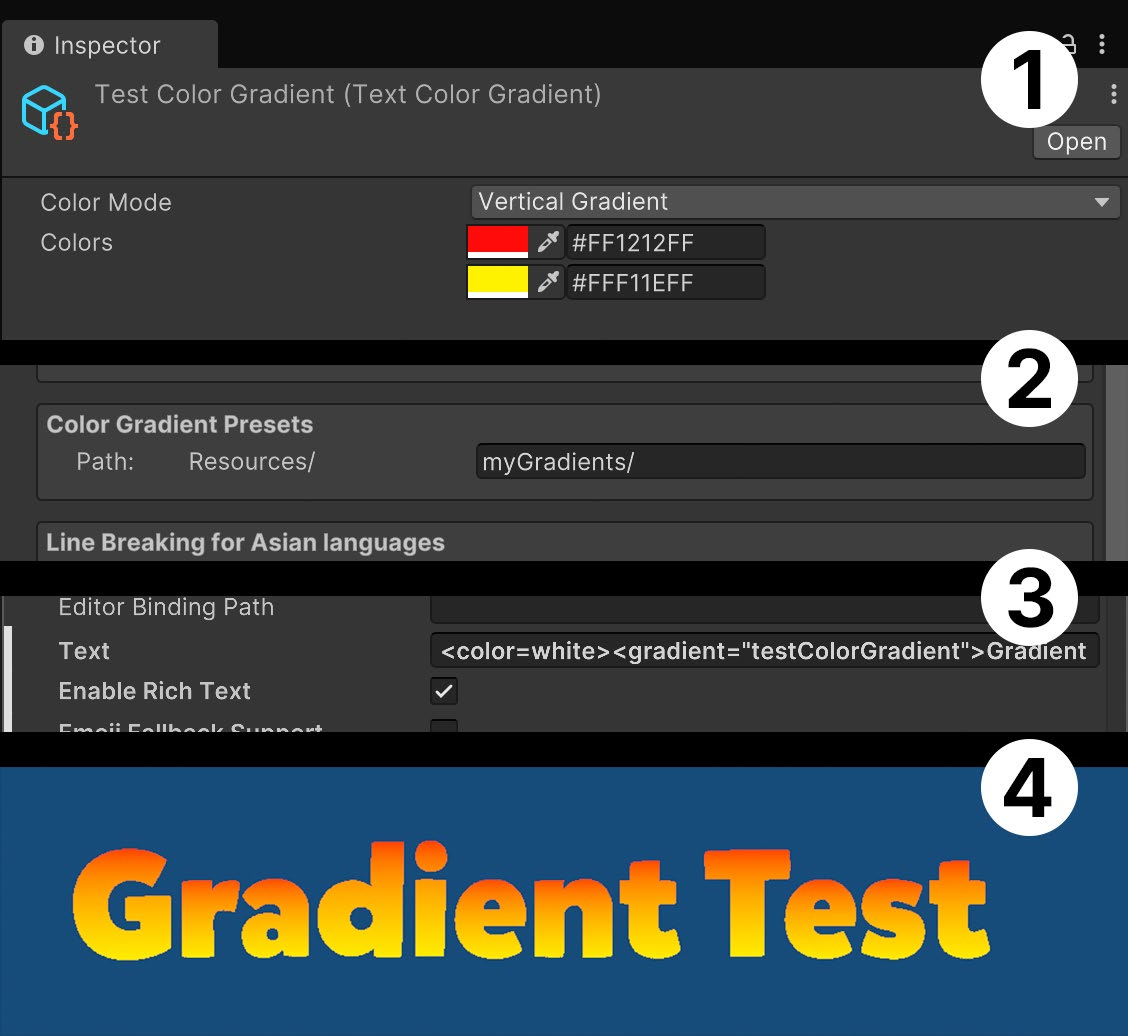
1. Создайте ресурс цветового градиента командой Create > Text Core > Gradient Color. Поместите файл в папку Assets/Resources или в любую её вложенную папку.
2. Создайте ресурс Text Settings, на который будет ссылаться Panel Settings. В ресурсе найдите параметр Color Gradient Presets и укажите папку или вложенную папку внутри Resources, где находится градиент. 3. Добавьте в UI Builder следующие теги форматированного текста: <color=white><gradient="testColorGradient">Gradient Test<∕gradient><∕color>. 4. Тег color возвращает белый цвет шрифта, чтобы градиент выглядел правильно. Имя в теге gradient должно совпадать с именем ресурса, созданного на шаге 1. Убедитесь, что параметр Rich Text включён. 5. Результат можно увидеть непосредственно в UI Builder или в окне Game.
Ресурсы спрайтов и эмодзи С помощью тегов форматированного текста в текст можно добавлять спрайты, например эмодзи. Для этого понадобится ресурс Sprite Asset, аналогичный ресурсу градиента. Если импортируется несколько спрайтов, объедините их в один атлас, чтобы сократить число вызовов отрисовки. Убедитесь, что разрешение атласа спрайтов подходит для целевой платформы. Подробнее о разрешении спрайтов см. в разделе подготовки графики.
Распространённый сценарий применения Sprite Asset - добавление эмодзи и значков непосредственно в текстовые строки.
Чтобы импортировать спрайты для этой цели, выполните следующие действия:
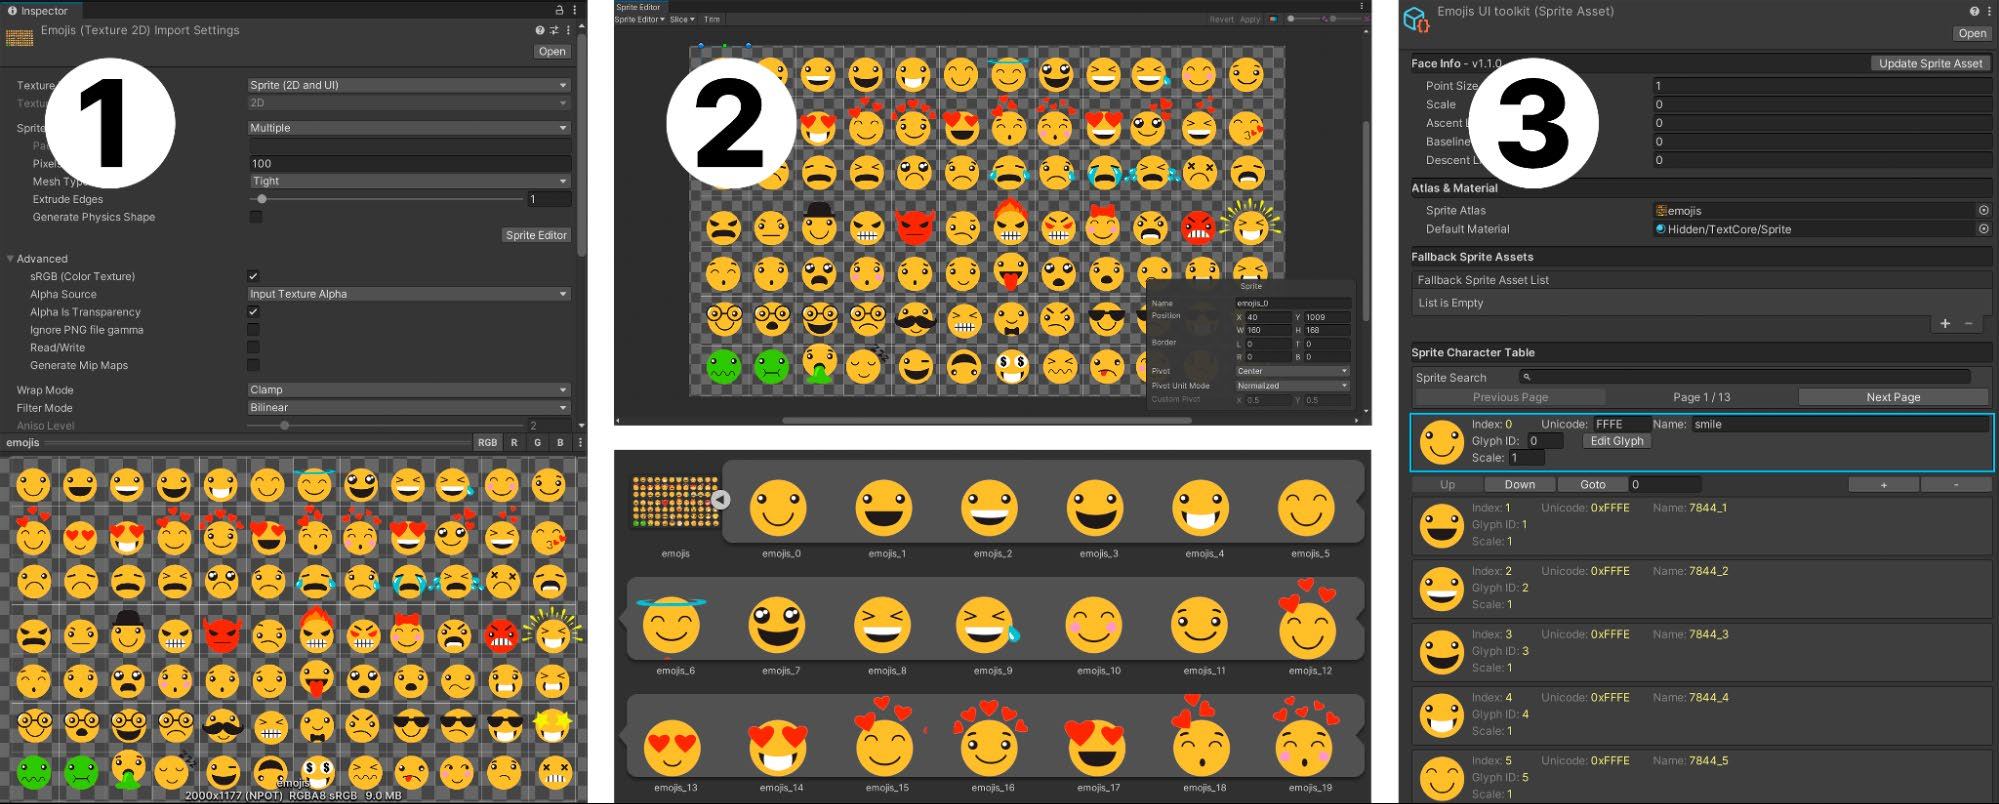
1. Импортируйте файл спрайта или PSD с эмодзи либо значками. 2. Разделите изображение на отдельные спрайты. Если используется PSD-файл, описанный в разделе подготовки графических ресурсов и шрифтов, выполнять разрезание не нужно. Создайте Sprite Asset из файла: выберите его, затем воспользуйтесь командой Create > Text Core > Sprite Asset. Поместите ресурс в Assets/Resources или вложенную папку. 3. В новом Sprite Asset можно изменить Face Info, а также внешний вид и имена каждого «глифа». Эти параметры заменяют стандартные Face Settings из ресурса шрифта.
Примечание: в данном случае команда Update Sprite Asset синхронизирует Sprite Asset с последними изменениями в Sprite Editor.
Чтобы использовать этот ресурс в UI Toolkit, выполните те же действия, что и для градиентов:
1. Выберите Panel Settings в UI Document.
2. Откройте ресурс Text Settings или создайте его, если он отсутствует. 3. В файле Text Settings с помощью окна выбора файла укажите Sprite Asset. Сохраните изменения и войдите в режим Play, чтобы новые параметры вступили в силу.
4. Добавьте спрайт с помощью тега форматированного текста: <sprite index=0> или <sprite name="name">. Встроенный спрайт также учитывает остальные текстовые теги.
Добавление Sprite Asset в текстовое поле UI Toolkit с помощью тегов форматированного текста. Убедитесь, что флажок Enable Rich Text установлен (вверху).
Совет: использование эмодзи операционной системы Если приложение предназначено для конкретной платформы, например iOS или Android, вместо включения исходного шрифта в проект можно использовать встроенный системный шрифт эмодзи. Это экономит память и избавляет от необходимости поставлять с приложением большую коллекцию эмодзи. Такие шрифты также часто хорошо подходят для списка Global Fallbacks в Text Settings.
Чтобы использовать эмодзи операционной системы в проекте, выполните следующие действия:
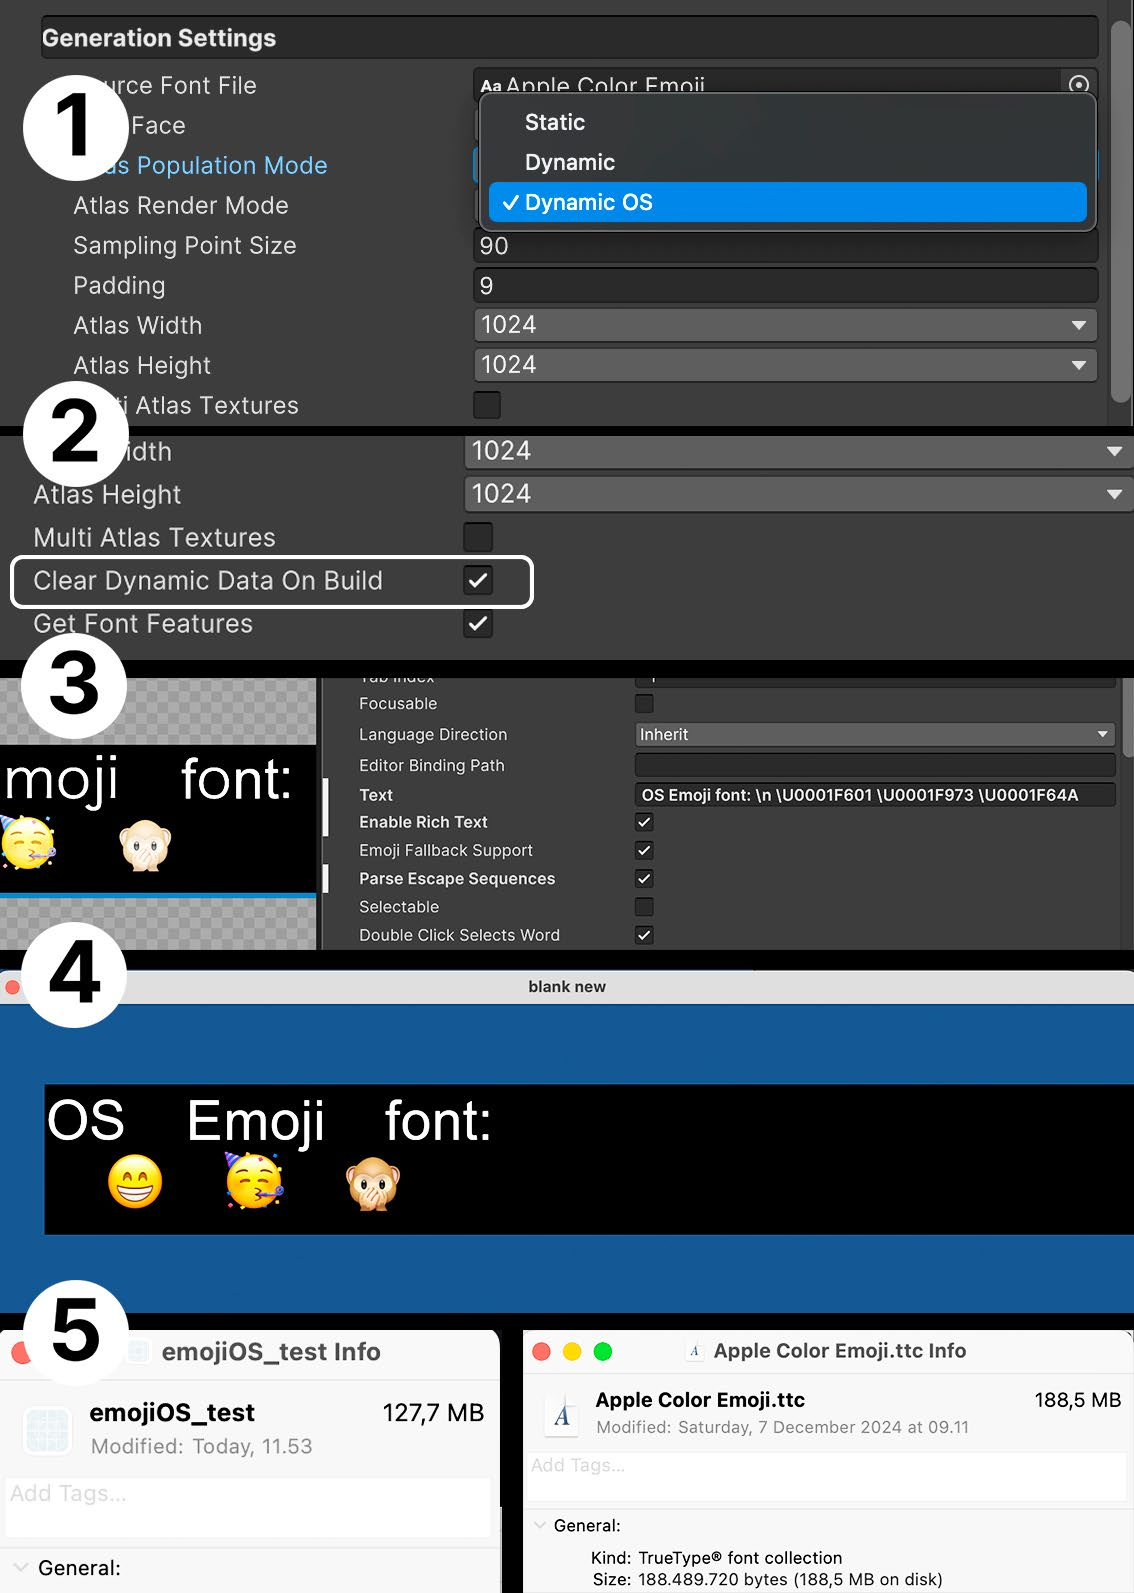
1. Создайте ресурс шрифта на основе шрифта целевой системы. В iOS он называется Apple Emoji и используется в этом примере, а в Android - Noto Color Emoji; в настоящее время поддерживается только COLRv0. Выберите для Font Asset тип Color, затем установите режим заполнения атласа Dynamic OS. Он не требует включать исходный шрифт в ресурс и тем самым экономит место.
2. В Font Asset установите флажок Clean Dynamic Data On Build. 3. В UI Builder включите Parse Escape Sequences и введите нужные эмодзи с помощью панели эмодзи macOS или Windows либо в формате UTF. Например, улыбающееся лицо можно задать как \U0001F601. Код UTF каждого эмодзи можно посмотреть в Character Table ресурса шрифта. 4. Сборка, запущенная в macOS, отображает эмодзи с помощью системного шрифта.
5. В нашем тесте размер сборки оказался меньше размера отдельного шрифта эмодзи. Это подтверждает, что шрифт не был включён в проект, хотя применялся для отображения соответствующих эмодзи.
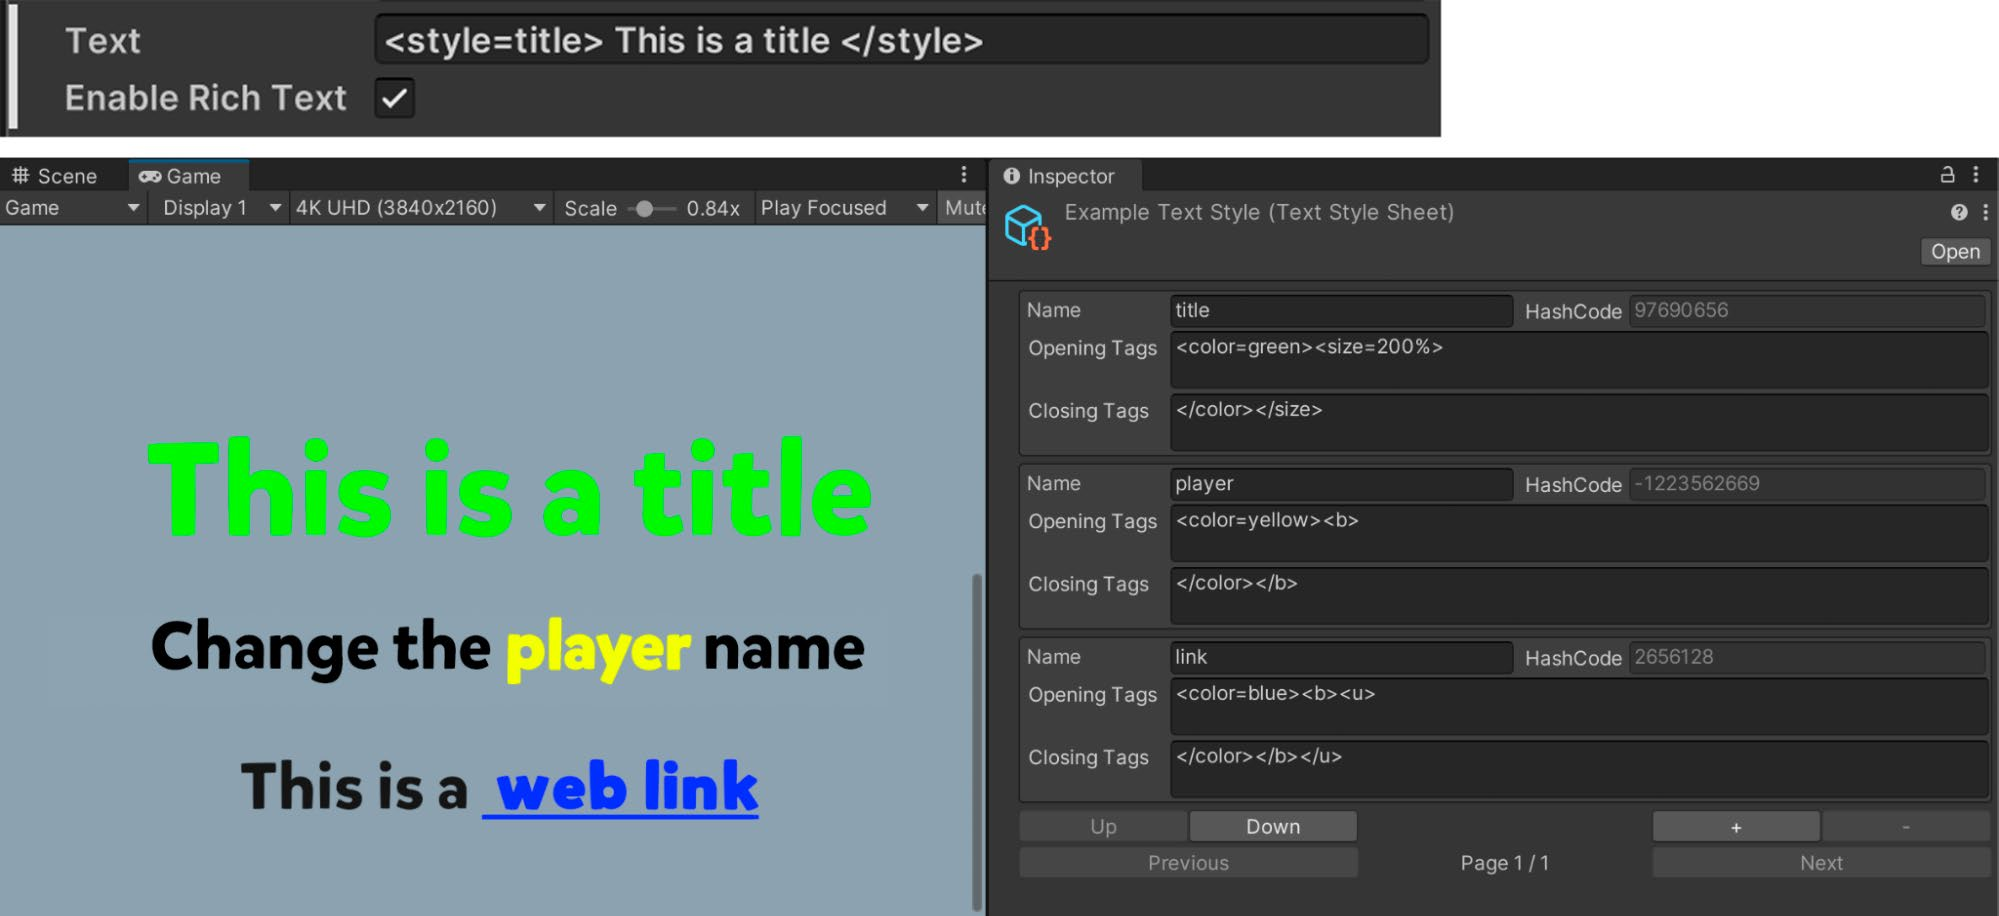
Таблицы стилей текста Если в приложении много текста, для управления его оформлением стоит создать таблицу стилей текста. Она позволяет определять пользовательские стили, применяемые тегом форматированного текста <style>. Создать таблицу можно командой Assets > Text Core > Text Stylesheet в меню Create.
Повторно используемая таблица стилей текста
Таблицы стилей текста обладают следующими преимуществами:
- Пользовательский стиль может содержать открывающие и закрывающие теги форматированного текста, а также текст до и после них. - Таблицу стилей текста удобно обновлять - намного удобнее, чем изменять форматирование непосредственно в тексте. - Пользовательские стили сокращают число тегов форматирования. Достаточно одного тега <style=name>, который применяет всё необходимое оформление. - Один тег форматированного текста проще изменить в таблице стилей, и вероятность ошибки ниже, чем при ручном редактировании множества тегов <style>.
Text
UI Toolkit uses TextCore, a font rendering technology originally based on TextMesh Pro (which is used by the legacy UI system, Unity UI). TextCore offers advanced styling capabilities and can render text cleanly at various point sizes and resolutions. It takes advantage of Signed Distance Field (SDF) font rendering, which can generate font assets that look crisp even when transformed and magnified. You can get the details of the different rendering modes for TextCore in the documentation. Let’s look at the different font asset types and what they are used for.
Source font file The most common font formats, TTF and OTF files, need to be converted into font assets before they can be used in your Unity project. A font asset is a Unity-specific resource that contains the data required to render a font including character glyphs, font metrics, and rendering configurations like size, weight, and style. The imported source file shows information on each font family and their rendering options.
Many of these import options are remnants of the legacy text system in Unity UI. There are plans to remove them in future releases. Rendering Mode, Character, and Include Font Data are used for generating the Font Asset
To generate corresponding font assets, select the source font file and then right-click on the Assets menu and generate via Create > Text Core > Font Asset > SDF (if SDF is your preferred rendering mode).
Different UI systems use different font assets.
Font asset settings Once you have the source font file converted, select the font asset and you’ll find all of the options to give you full control over the font generation. Let’s look at some key options here (read more about font assets in the documentation): —
Face Info: Spacing and scaling options for your font to adjust parameters that can better suit your application if the default source font required tweaks
Generation Settings: Essential configuration including the source font, the font face to use for the font asset in case the source font includes several styles, the atlas population mode, as well as the render modes
Atlas and Material: The material and texture generated; whether the atlas is static, dynamic, or has the rendering mode as bitmap or SDF; provides control of the size of atlas generated in the case of supporting languages with large character sets
Font Weights: Simulates different font weights when the source asset doesn’t have such variations
Fallback Font Asset: Provides for a fallback font in cases where the current Font asset lacks a character or glyph
Character and Glyph Tables: A detailed list of all the characters and glyphs included in the font asset
Ligature table: For adding a glyph to be used when two characters are together (improves readability and visual flow)
Glyph Adjustments: Defines overrides per character or glyph
Source fonts and atlases can increase the build size: On the left is an atlas with ASCII characters and on the right is an atlas of a complete Unicode character set.
At the top of the Inspector, when selecting a font asset, you’ll find the Font Asset Creator under the Update Atlas Texture button. It gives you all the control to populate and define atlas properties.
Tip: Padding and atlas resolution Characters in the Font Texture need some padding between them (specified in pixels) so they can be rendered separately. Padding also creates room for the SDF gradient. The larger it is, the smoother the transition, which allows for high-quality rendering and effects like thick outlines. If you are only using ASCII characters, an atlas resolution of 512 x 512 with a padding of 5 is sufficient for most fonts. Fonts with more characters might need larger resolutions or multiple atlases. As a general rule, aim for the padding size to be at a 1:10 ratio with the sampling size.
Font asset variant To make changes without employing a new font atlas, create a font asset variant via Create > Text Core > Font Asset Variant. This variant can hold an alternate version of the font’s line metrics. The variant stores its own Face Info settings – think line height and subscript position – but still refers to the original atlas. As such, it can have its own styling, distinct from the original Font asset, without consuming extra space for textures.
Rich text Rich text tags alter the appearance and layout of text through the use of supplemental tags in the text field. You can use rich text tags with both visual elements in code UI Builder. The tags enable text to be formatted at runtime, for example, to customize the appearance of a username. Rich text tags can change the color or alignment of text without modifying its properties or styling. Use them to format the text in a dialogue system or visually reinforce what you want to communicate. Go to Extra Settings to enable the rich text feature in UI Builder. Doing so will format your text (including tags) appropriately. For instance, text between the <b> and closing </b> tags will show up as bold.
Enable rich text tags in UI Builder to make the tags modify your visual text properties.
Check out this complete list of available rich text tags and parameters.
Gradients Gradients add stylization throughout the interface; in UI Toolkit you can apply them via the <gradient> tag. Follow these steps to create a simple gradient:
Create a gradient color asset via Create > Text Core > Gradient Color. Make sure to place this file inside Assets/Resources or any subfolder under Resources.
Create a Text Settings asset to refer to from the Panel Settings. In the asset look for Color Gradient Presets, and indicate the folder or subfolder inside Resources where the asset is.
Add the following rich text tags inside UI Builder: <color=white><gradient="testColorGradient">Gradient Test</gradient></ color>.
The color tag restores the font color to white so the gradient looks as intended, while the referred gradient has to match the asset name created in step 1. Make sure Rich Text is enabled.
You can see the changes take effect inside UI Builder or in the Game view.
Sprite asset and emojis You can include sprites like emojis in your text via rich text tags. To use them, you’ll need to use a Sprite asset similar to the Gradient asset. When importing multiple sprites, pack them into a single atlas to reduce draw calls. Make sure that the sprite atlas has a suitable resolution for your target platform. Return to the asset preparation section for more on sprite resolutions.
A common use case for sprite assets are emojis or icons integrated into text strings.
Follow these steps to import sprites for this purpose: 1.
Import the sprite or PSD file that contains the emojis or icons
Slice the image into multiple sprites; if you use a PSD file as described in the Graphic and font assets preparation section you won’t need to do this slicing. Generate the Sprite Asset from the file (select and then use the Create > Text Core > Sprite Asset menu). Make sure the asset is placed under Assets/Resources or a subfolder.
You can adjust the Face Info and customize the appearance/names of each "glyph" in this new Sprite asset. Any changes here will replace the default Face Settings from the Font asset.
Note: In this context, Update Sprite Asset syncs the Sprite asset to the latest Sprite Editor changes.
To use this asset with UI Toolkit, you must follow the same step as you did with gradients: 1.
Select the Panel Settings from the UI Document.
Open the Text Settings asset (or create one, if there’s none).
Link to the Sprite asset using the file browser in the Text Settings file. Save and enter Play mode for the updated settings to take effect.
Use the rich text tag (<sprite index=0> or <sprite name="name">) to add the sprite. The embedded sprite will respect other text tags as well.
Add a Sprite Asset to a text field in UI Toolkit using rich text tags: Make sure that the Enable Rich Text option is checked (top).
Tip: Using emojis from the OS If you are targeting a specific runtime platform, such as iOS or Android, you can make use of the system’s built-in emoji font instead of including the source font in your project. This can save memory and eliminate the need to package a large collection of emojis with your application. They are also often a great fit for Global Fallbacks in Text Settings.
These are the steps to use OS emojis in your project: 1.
Create a Font asset from the font that your target system uses. On iOS the font is called Apple Emoji (used in this example), and on Android it’s called Noto Color Emoji (currently only COLRv0 is supported). Make sure the Font Asset is of the type Color, and then set the atlas population mode to Dynamic OS which doesn’t require you to include the source font in your asset saving space.
Ensure Clean Dynamic Data On Build is checked on the Font Asset
Enable Parse Escape Sequences on UI Builder and enter the desired emojis using the emoji keyboard from MacOS or Windows or in UTF format, for example, you would introduce a smiley as \U0001F601. You can check the UTF of each emoji in the Character Table of the Font Asset.
The build running on MacOS displays the emojis according to the OS font.
We can observe that in our test, the build size is smaller than the standalone emoji font proving that it was not included in the project but still being used to render the appropriate emojis.
Text Style Sheets If your application deals with a significant amount of text, you might want to consider creating a text style sheet to manage its formatting. This lets you create custom text styles with the <style> rich text tag. You can do this from the Create menu via Assets > Text Core > Text Stylesheet.
A reusable Text Style Sheet
Consider these benefits of text style sheets: —
A custom style can include opening and closing rich text tags, plus leading and trailing text.
You can conveniently update a text style sheet, especially when compared to directly changing rich text formatting.
Custom styles can reduce the amount of rich text tags. You can just use one tag, <style= name>, that applies all the necessary styling.
This makes it easier to change one rich text tag in a text style sheet, and is less error prone than manually changing multiple <style> tags.