Рабочие процессы DevOps
DevOps workflows
Unity Version Control tips Unity Version Control (UVCS) is a scalable, engine-agnostic version control and source code management tool for game development studios of all sizes. If you’re already using Unity Version Control with Unity 6, here are some of the latest updates and tips that your team could use in your day-to-day work.
Work on multiple branches in parallel, without losing your work, with Shelve and Switch Starting with UVCS package version 2.7.1, you can use shelvesets to temporarily save your current changes when switching between branches, to make sure your unfinished work is safely stored and easily accessible.
In your Unity Version Control window, right-click the branch you’d like to switch to and select Switch workspace to this branch.
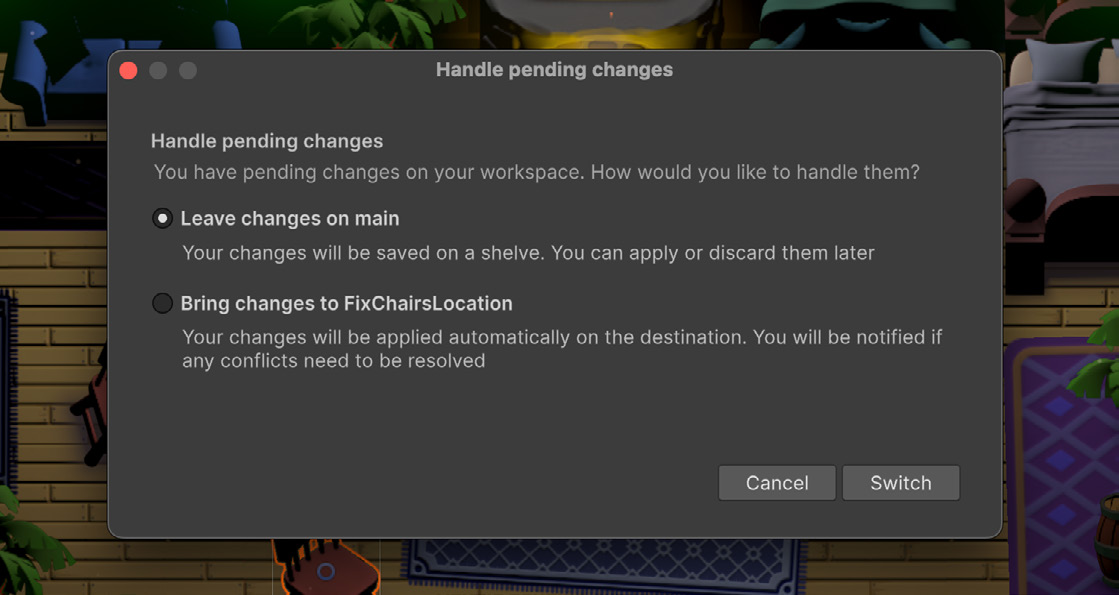
The Handle pending changes window
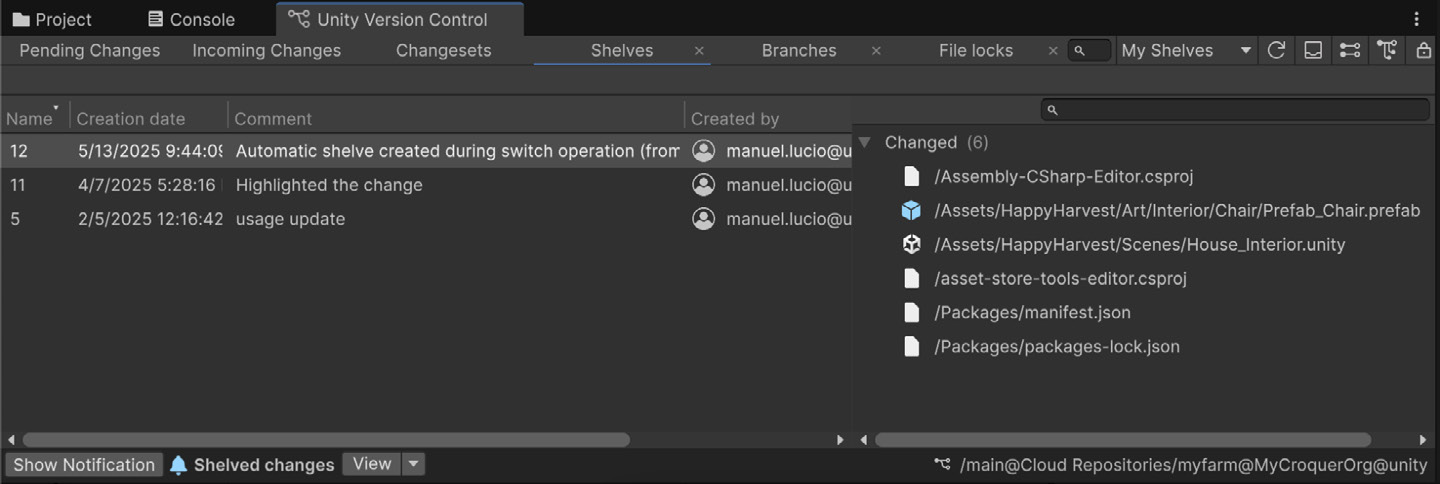
Then choose whether you want to carry your changes or leave them behind temporarily. The Shelves option provides great flexibility by allowing you to revisit your changes, re-apply them, and share them with your team.
The Shelves tab in the Unity Version Control window
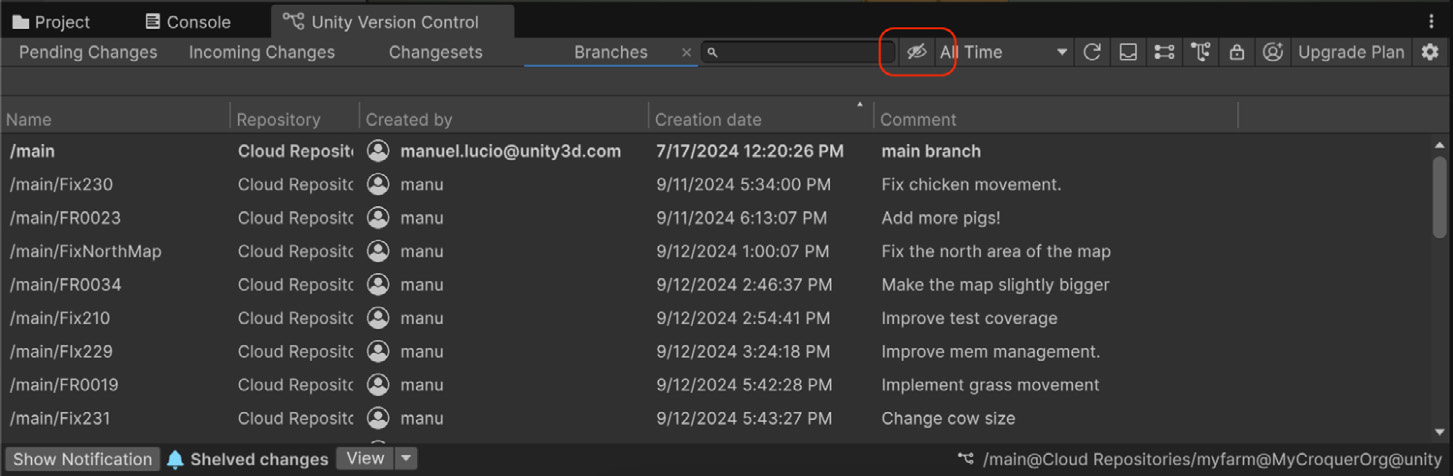
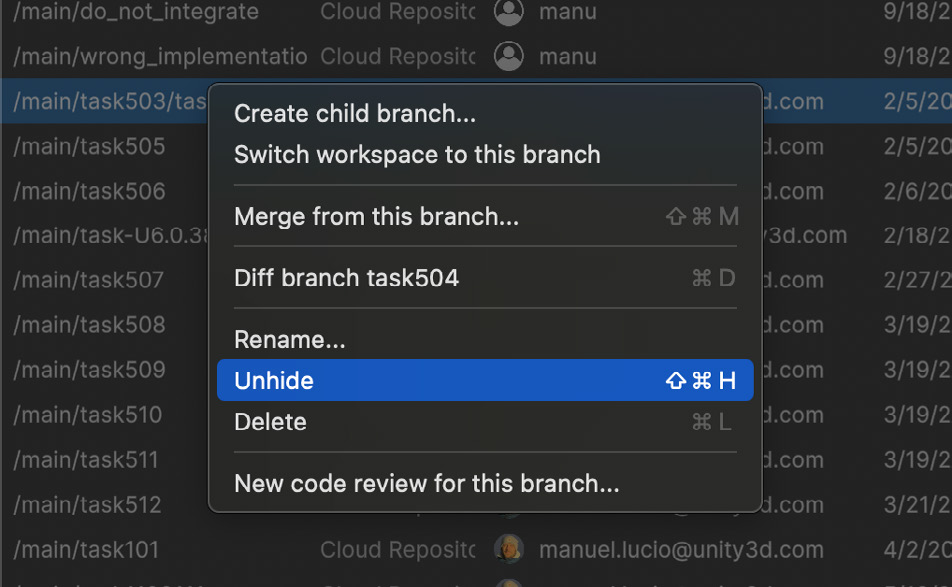
Declutter your branches view with the Hide/Unhide feature When your project’s branches view becomes cluttered, you can use the global Hide/Unhide feature to hide branches directly from the context menu, making them invisible for your entire team across all UVCS platforms (Unity plugin, Unity Dashboard, or the Desktop application). You can make Hidden branches visible again by using the “strikethrough eye” icon or from the context menu of the Hidden branches list (see images below).
The strikethrough eye icon in Unity Version Control
The “Unhide” option in the branch context menu
Avoid losing asset data with the exclusive lock option The UVCS plugin for the Unity Editor allows you to lock an asset to prevent others from modifying it. This helps the team to avoid losing any work-in-progress data and removes the merge operation for files that can’t be merged.
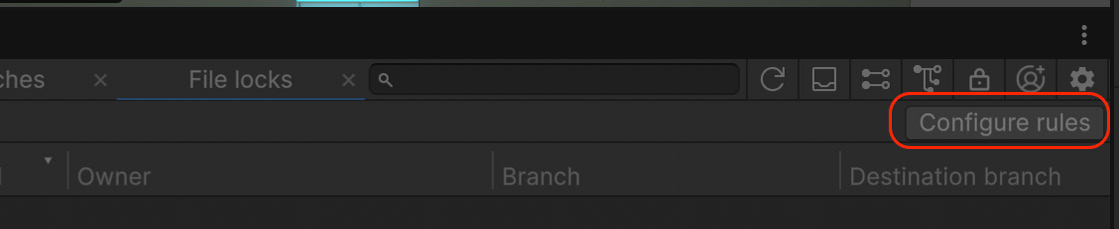
To enable the lock support go to Configure rules in the File locks tab.
The Configure rules option in the File locks tab
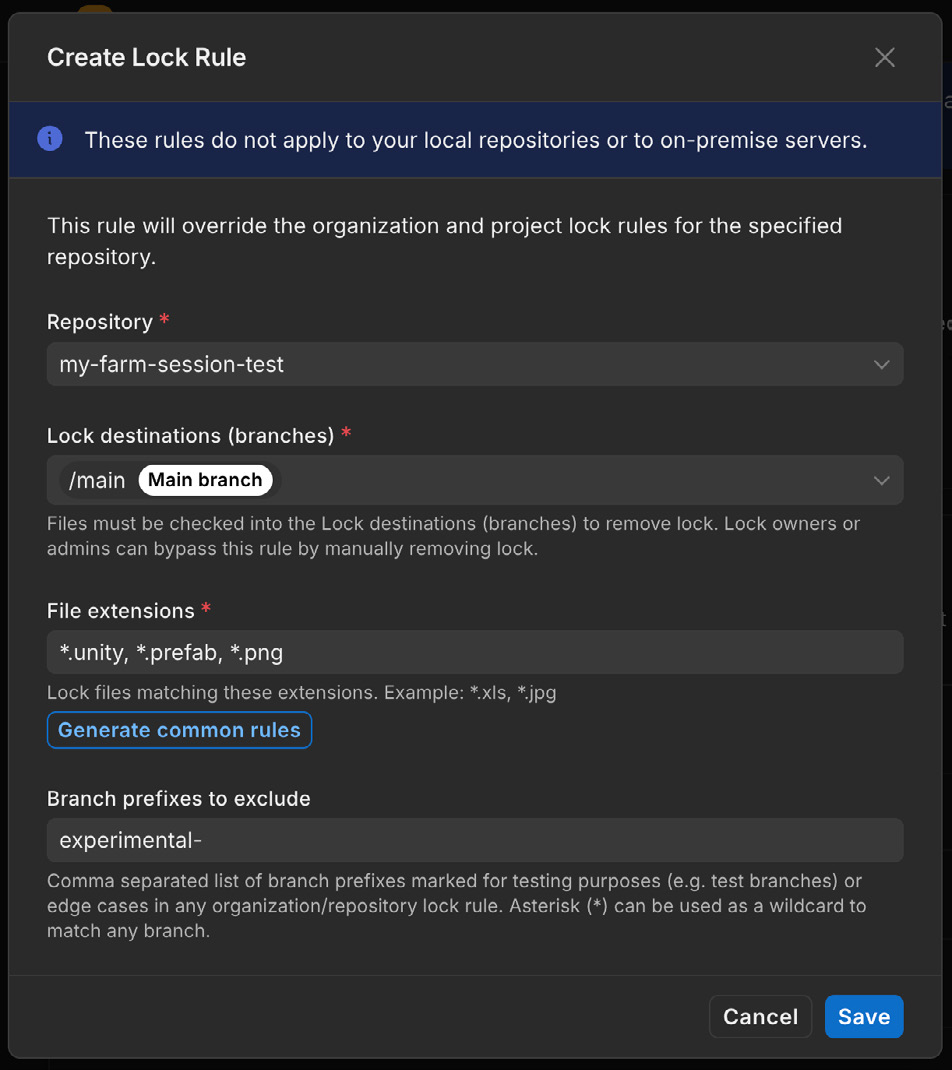
Then configure the repository, the destination branch (usually the main branch), and the file extensions you want in order to enable the lock support.
The Create Lock Rule in Unity Version Control
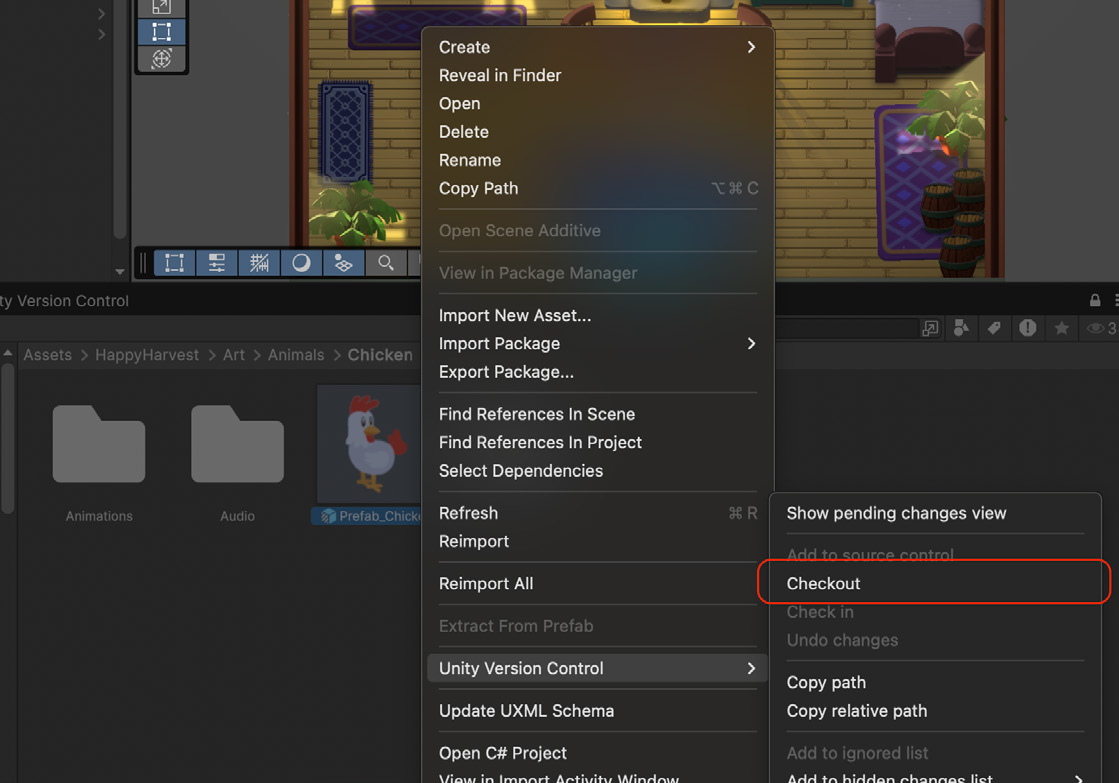
To avoid conflicts, make sure to check out the assets before making changes.
The Checkout option from the Unity Version Control context menu
If you want to learn more about the smart locks system check out the Smart Locks page.
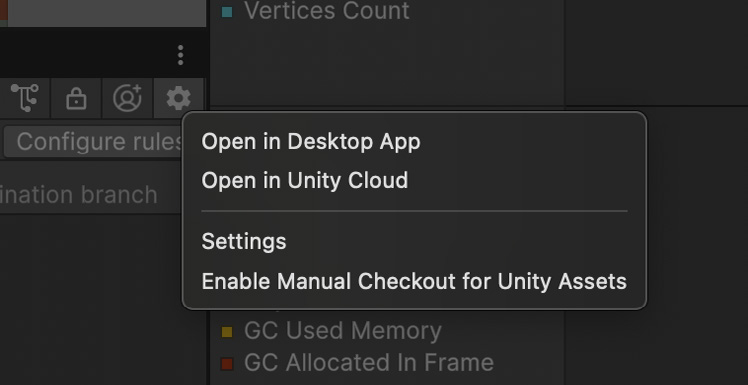
Protect your changes with “Enable manual checkout for Unity Assets” When working with unmergeable assets, the UVCS Unity plugin will automatically check out a file after you modify and save it. This workflow leaves room for someone else to lock the same file without your changes. To avoid this from happening, go to the UVCS plugin settings via clicking on the gear icon, and select the option Enable manual checkout for Unity Assets.
The Enable Manual Checkout for Unity Assets option
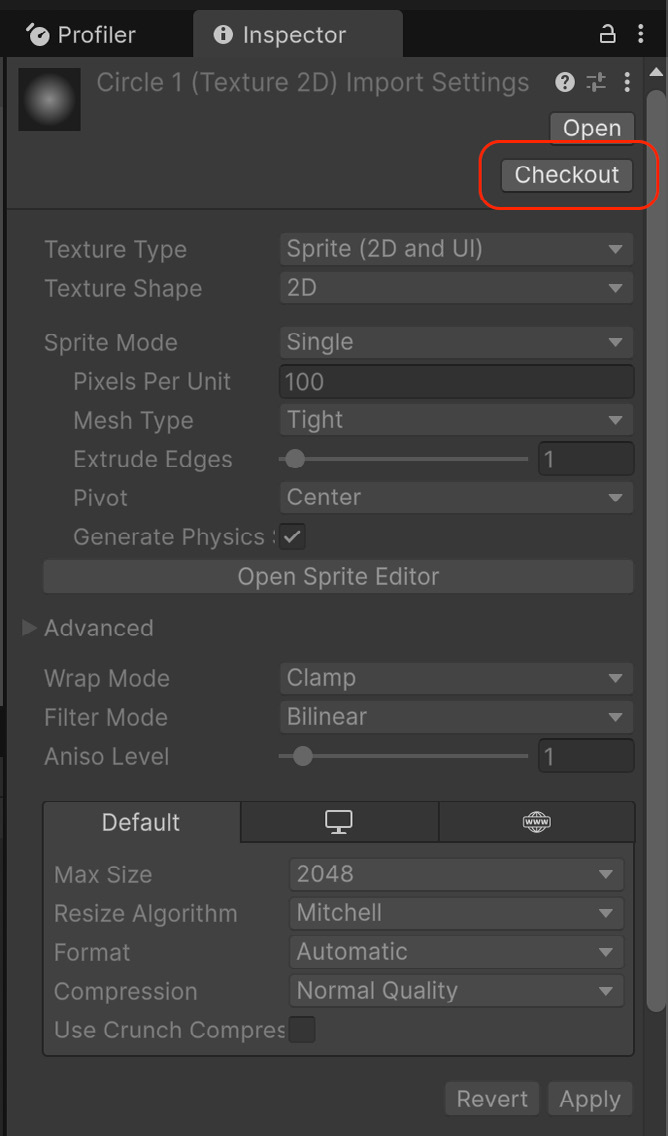
This preference makes the asset read-only until it’s explicitly checked out. When you click the Checkout option in the Inspector, your file becomes editable and you’ll get the exclusive lock to change it.
The Checkout option in the Inspector
Asset Manager If you’re looking for a digital asset management system to manage your assets, such as models, textures, audio files, etc., then check out Unity’s Asset Manager. It supports over 70 file formats to help teams centralize, organize, discover, and use assets seamlessly across projects. Use the Asset Manager via the web interface or through the Editor integration, depending on your needs.
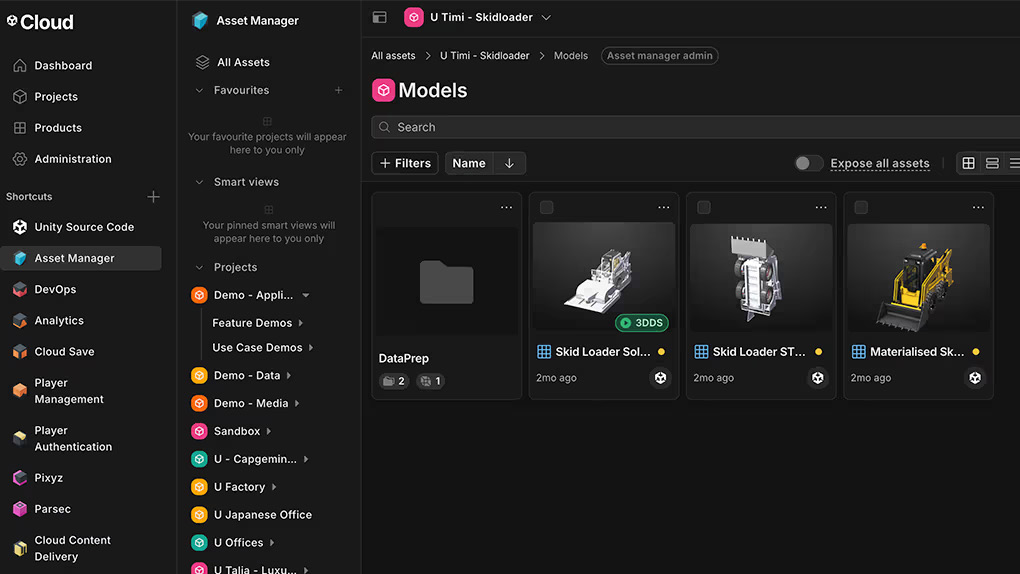
Manage, view, and organize your assets in your preferred browser The web interface enables asynchronous, speedy collaboration among all team members and stakeholders involved in your projects. Through the web interface, you can create and manage collections, move assets between collections or projects, and track changes with version history. You can easily upload single or multiple files while adding relevant collections and tags, making it straightforward to structure your assets and collaborate with your team to review and improve them. You can enrich assets with custom metadata, where admins, owners, and managers can define new metadata fields – like text, Boolean, and numeric field types – while all users can add tags, including AI-suggested tags, for overall better organization.
Working with assets in the web interface of the Asset Manager
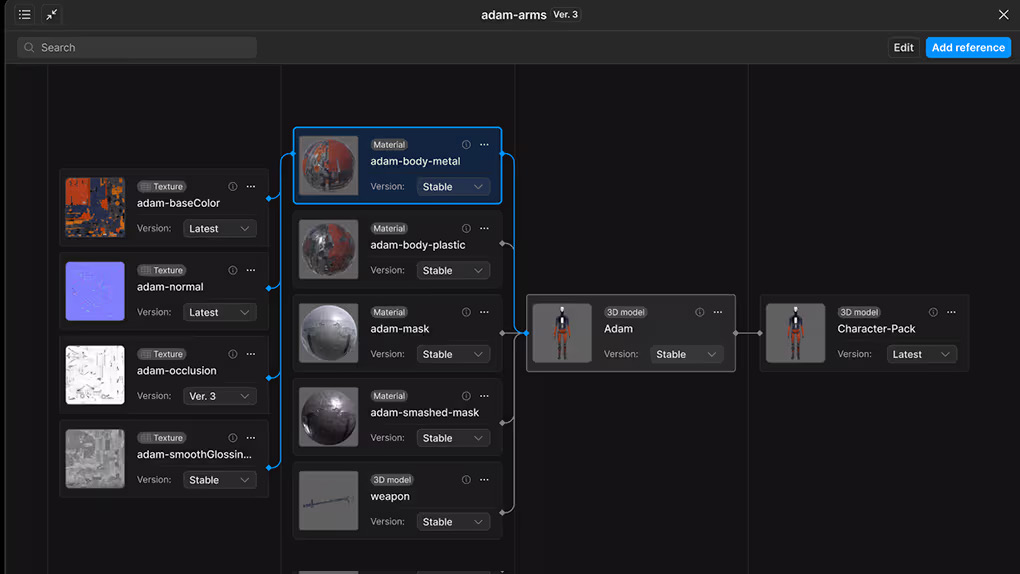
The Dependency Viewer reveals asset relationships at a glance, showing what each asset needs and what depends on it. Both upstream and downstream dependencies are available in the Dependency Viewer.
An example of asset dependencies in the Dependency Viewer
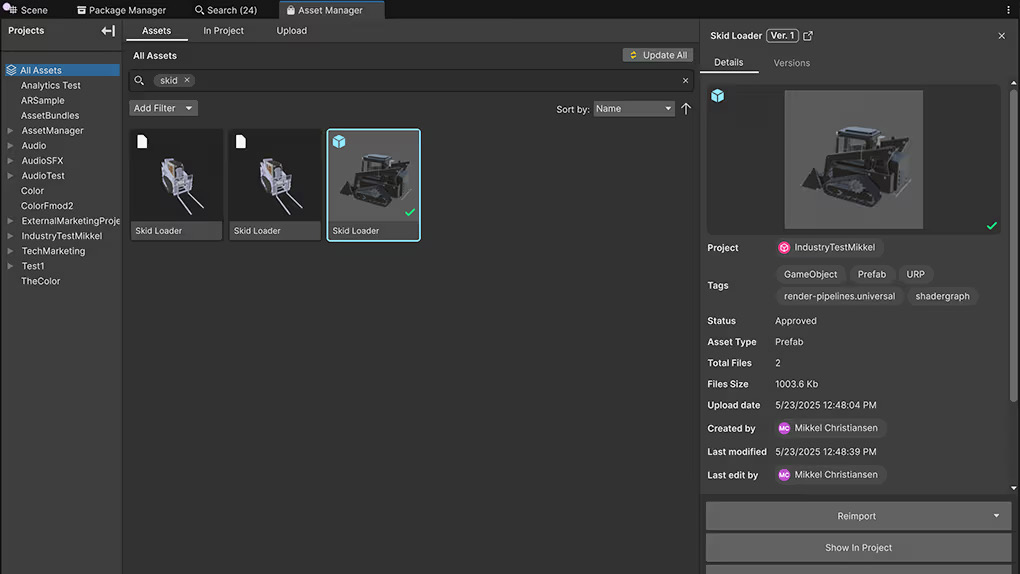
Manage assets without any disruptions in the Editor The Unity Asset Manager package integrates with the Unity Editor, allowing you to manage assets without disrupting your workflow. After installing it, you can upload assets to, and import them from, the Unity Cloud, as well as access assets from all your projects through the Editor’s search interface. The in-Editor solution also makes it easier to reuse prefabs, scripts, and other cross-project components, speeding up iteration time and enabling teams to focus on better workflows and optimization.
Accessing the Asset Manager from the Unity Editor
To help you locate specific assets efficiently, make sure to filter by creator, status, type, update time or import status. The plugin automatically detects dependencies across assets. For example, if multiple prefabs use the same material, only one instance of the material is uploaded. This ensures optimized storage and prevents unnecessary duplication. Learn more about the Unity Asset Manager from the following resources: —
Video tutorial: A quick guide to the Asset Manager in Unity
Unity Learn: Unity Asset Manager: Quick start guide
Article: Introduction to Asset Manager transfer methods in Unity
Unity Build Automation Unity DevOps Build Automation, formerly known as Cloud Build, is a turnkey continuous integration and deployment (CI/CD) solution that can execute and deploy builds in the cloud. It empowers you to build and release more often for higher-quality, more innovative releases. Build Automation can be connected to any source control repository in a matter of minutes and set up to execute builds manually or automatically once any change is committed to version control. Build Automation also supports multiple platforms including iOS, Android, Windows, and Unity Web, eliminating the need to maintain unique build infrastructure for every platform. As of Unity 6.1, Build Automation is now fully integrated with the Editor and you can run quick validation builds from local branches with your build automation settings.
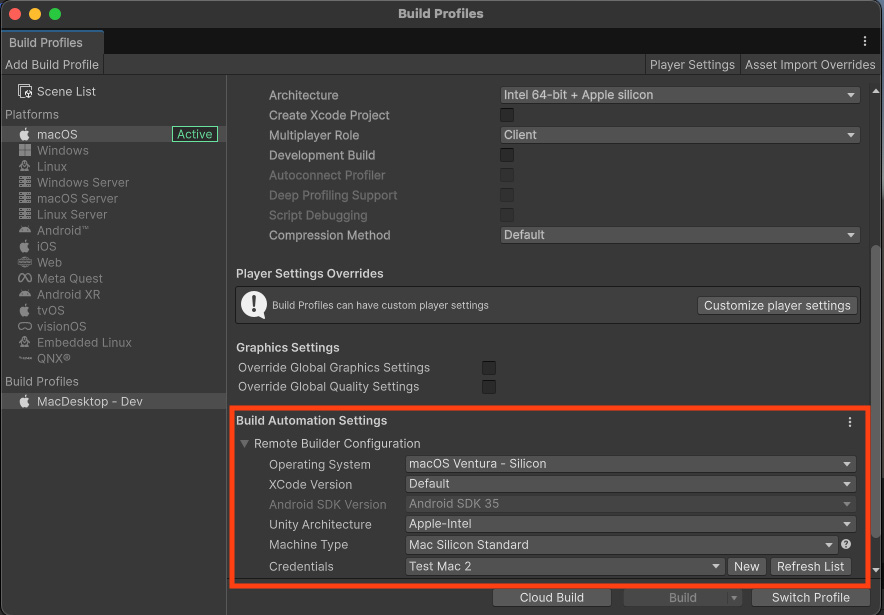
Share and reuse build settings across your teams You can install the Build Automation package from the Build Profiles window or from the Package Manager. Once you install the package, a new section labeled Build Automation Settings will appear under your selected profile. These settings allow you to define how Unity automates your builds.
The Build Automation Settings section in your Build Profiles window
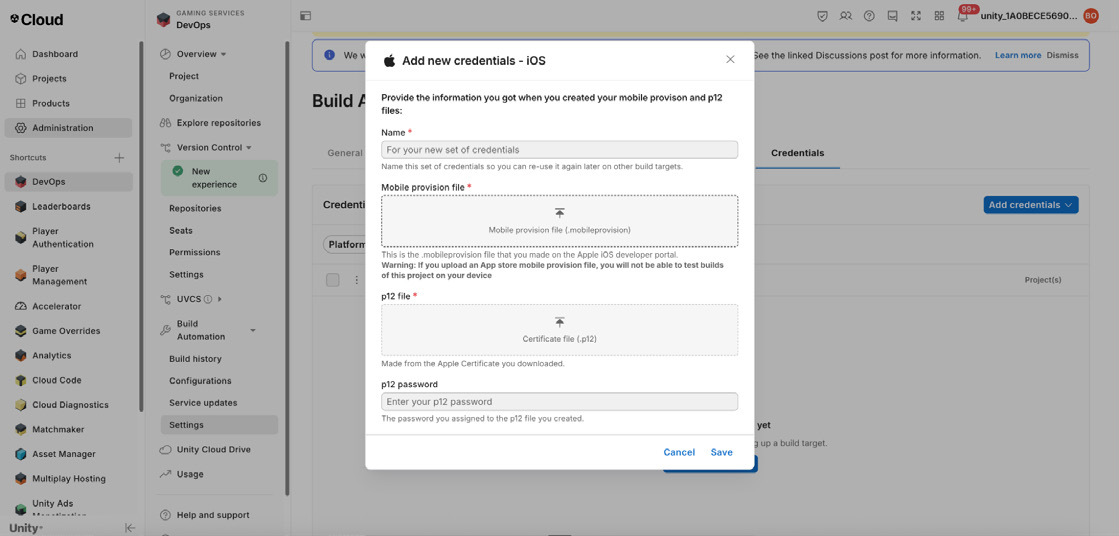
For Android, iOS, and other platforms that require credentials, you’ll have to configure the credentials in the Unity Dashboard. To create new credentials, click on the New button next to the Credentials drop-down. This opens a new window in the Build Automation dashboard where you can create a new set of credentials. To learn more about credentials and app signing make sure to check out the Unity Build Automation documentation.
Credentials configurations window in the Unity Dashboard
Once you save your credentials, go back to the Build Profiles window and click on Refresh list. You should see the credentials in the drop-down list. The build settings are automatically saved to your build profile, which means you can reuse and share across your team.
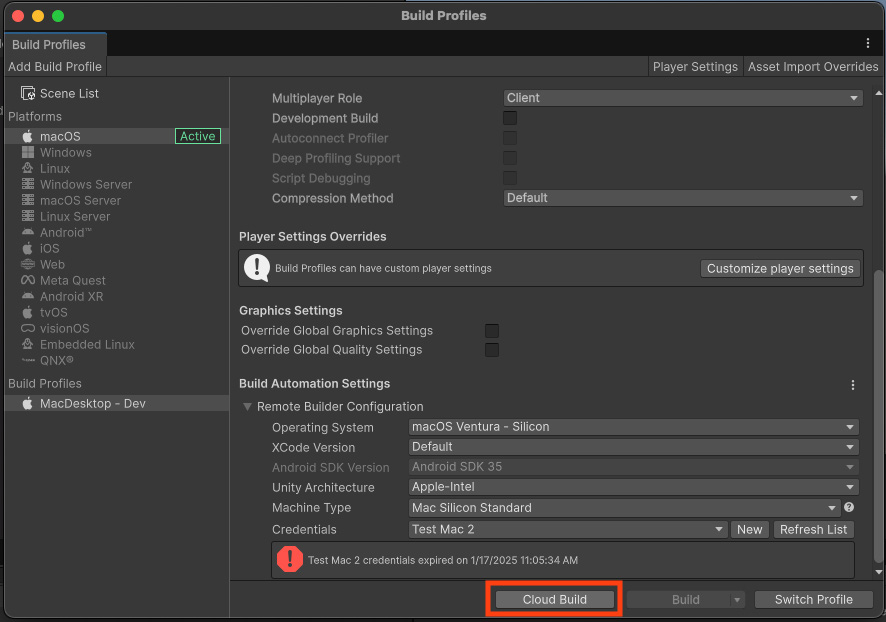
Test work in progress with Shelve and Build Once you’ve configured your settings, and you’re ready to run a build, click the Cloud Build button in your build profile. Unity will then begin processing your build in the cloud.
Cloud Build settings in your build profile
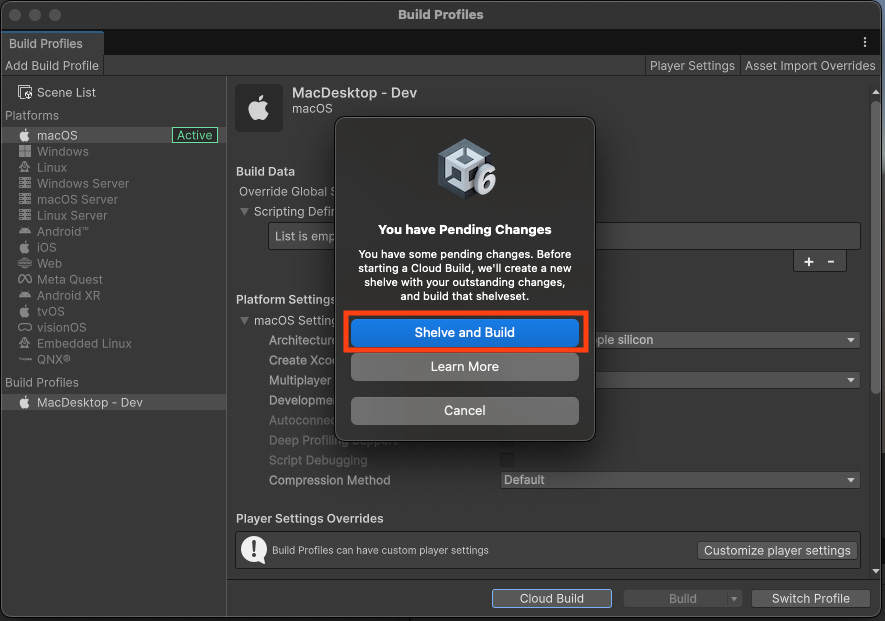
If you have pending changes in your project, you’ll be prompted with the option to Shelve and Build. This allows you to build your local changes without pushing them to the main repository which is ideal for testing work in progress.
Shelve and Build pending changes
If you have no pending changes, Unity will create a build using the latest commit from the branch you currently have checked out.
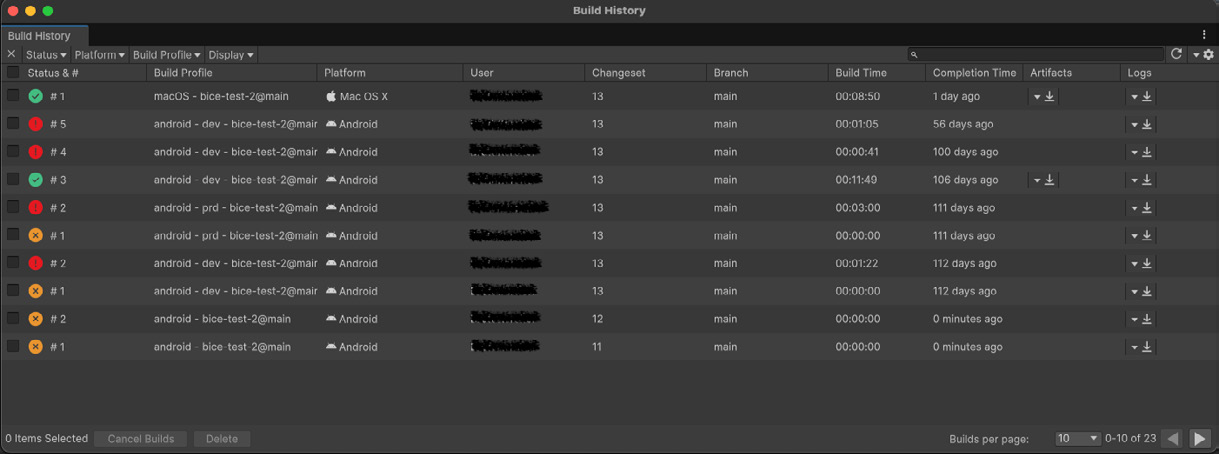
Track build progress, troubleshoot, and download results with Build History As soon as the build begins, the Editor will open the Build History window where you can monitor its progress and the build status. This view provides logs and access to the build artifacts, allowing you to troubleshoot or download results easily.
Build History window
Each status is color-coded for quick visibility and allows you to take actions, e.g., rerun failed builds or download the log. Check out this documentation page to get a full overview of what each status symbol means.
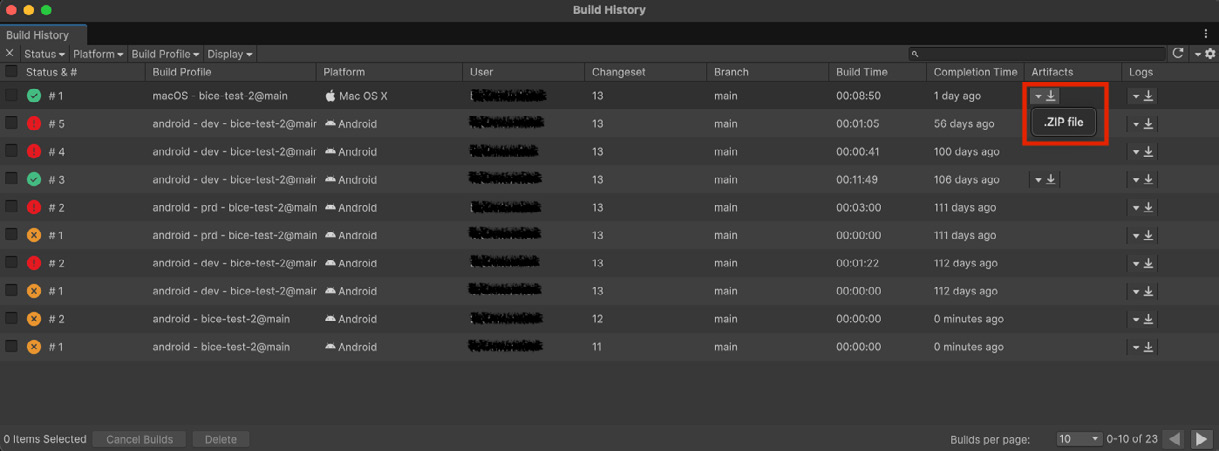
Share build artifacts links with your team members Once builds are successfully completed, you can download the build artifacts or share links with team members.
Download build artifacts for successful builds
For failed builds, you can download the logs for further inspection. Learn more about Build Automation from the Getting started with Build Automation in Unity video tutorial and the Unity Build Automation: Quick start guide tutorial on Unity Learn.
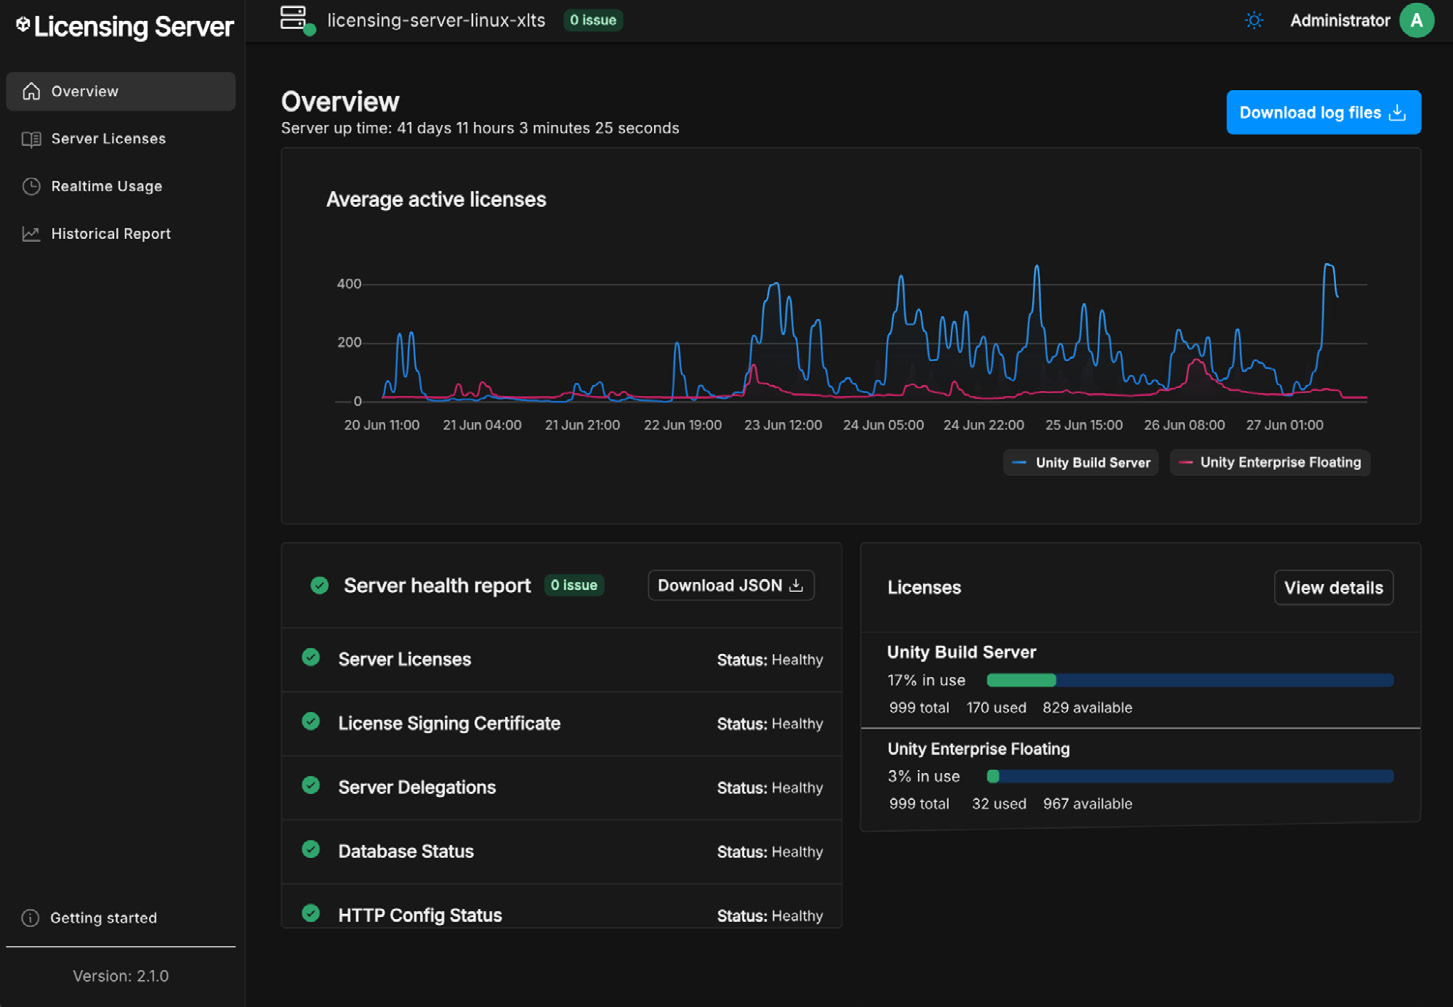
Unity Build Server If you want to streamline and automate the process of building, compiling, and packaging Unity projects, especially across larger teams and organizations, try Unity Build Server. This is a license management tool that enables floating build licenses for Unity, allowing multiple machines to build without requiring a full Unity Editor license for each machine. It is a great addition to your automated build pipeline and continuous integration (CI) environments. To start using Unity Build Server, you can deploy the Unity Licensing Server software on a central server in your network and add your Unity Build Server licenses to this server. Then, you can configure each build machine to request a build license from the Build Server when it needs to build a project. The Unity Licensing Server that is used in the Build Server solution can support more than one type of subscription on the same server. Customers can use the same server to distribute floating licenses to the developers using a Unity Enterprise Floating or a Unity Industry Floating subscription. See an example in the image below.
You can learn more about the requirements for Unity Build Server, how to set it up, and how to get started from the Unity Licensing Server documentation.
Two active subscriptions: Unity Build Server (for build machines) and Unity Enterprise Floating (for developers).
Sample projects From sample projects that provide game interfaces that showcase UI Toolkit and UI Builder workflows, or samples demonstrating various design patterns and project architecture, as well as those that showcase capabilities of 2D lighting and visual effects in the Universal Render Pipeline (URP) in Unity 6, we’ve got you covered with these projects. —
Happy Harvest - 2D Sample Project
Gem Hunter Match - 2D Sample Project
Dragon Crashers - UI Toolkit Sample Project
QuizU - A UI Toolkit sample
Paddle Game ScriptableObjects
Level up your code with design patterns and SOLID
C# Code style guide
Fantasy Kingdom
Shader Graph samples
VFX Learning Templates Sample Content
URP 3D sample
HDRP sample scene
HDRP Time Ghost
VR Multiplayer Template
MR multiplayer template
UGS samples
Resources for all Unity users
You can download many more e-books for advanced Unity developers and creators from the Unity best practices hub. Choose from over 30 guides, created by industry experts, and Unity engineers and technical artists, that provide best practices for efficient game development with Unity’s toolsets and systems. You’ll also find tips, best practices, and news on the Unity Blog and Unity community forums, as well as through Unity Learn and the #unitytips hashtag.