Рабочие процессы разработчика
Developer workflows
Awaitable class Unity 6 introduces the Awaitable class, a lightweight, allocation-free type designed specifically to support C# async/await workflows within Unity. It provides a performancefriendly alternative to coroutines. It makes it easier for you to write asynchronous code that integrates cleanly with Unity’s frame-based update cycle.
using UnityEngine;
using System.Threading.Tasks;
public class LogWithDelay : MonoBehaviour {
    private async void Start() {
        Debug.Log(“Message 1”);
        await Task.Delay(1000);
        // Wait 1 second Debug.Log(“Message 2”);

        await Task.Delay(1000);
        // Wait another second

    }
}
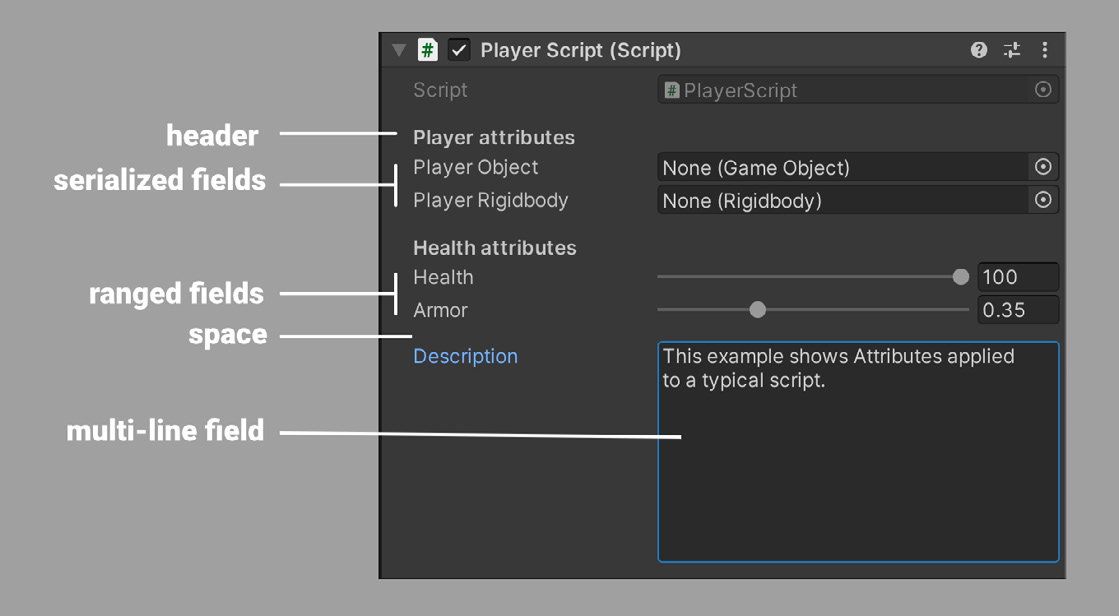
Enhance your Inspector window with attributes Unity has a variety of attributes that can be placed above a class, property, or function to indicate special behavior such as creating headers, spacing, or ranged fields in the Inspector.
Attributes affecting the Inspector fields
C# contains attribute names within square brackets. These are some common attributes you can add to your scripts.
Attribute
Description
Example
SerializeField
This forces Unity to serialize a private field and makes it visible in the Inspector.
[SerializeField]
This attribute takes a float or int variable restricted to a specific range. The field appears as a slider in the Inspector.
[Range(1,6)]
This hides a variable in the Inspector while serializing it.
[HideInInspector]
Range
HideInInspector
private GameObject m_myObject;public int IntegerRange;
[Range(0.2f, 0.8f)] public float m_floatRange;public Int p = 5;RequireComponent
This automatically adds required components as dependencies to avoid setup errors. Note: This attribute only checks the moment that the component is added to a GameObject.
// PlayerScript requires the GameObject to have a Rigidbody

[RequireComponent(typeof(Rigidbo dy))] public class PlayerScript: Monobehaviour {
    private Rigidbody m_rBody;
    void Start() { m_rBody = GetComponent<Rigidbody>(); }
}
Tooltip
This shows a tooltip when the user hovers a mouse over a field in the Inspector.
public class PlayerScript: Monobehaviour {
    [Tooltip(“Health value between 0 and 100.”)] int m_health = 0;
}
Space
Header
This adds a small space between your fields (without any additional text) to create visual separation between your fields.
[Space(10)] // 10 pixel of spacing added
This adds some bold text and spacing to help organize your variables in the Inspector. Only add this to the first field that you want to belong to the group.
public class PlayerScript: Monobehaviour
int p = 5;
private int m_health = 0;
private int m_maxHealth = 100;
[Header(“Shield Settings”)] private int m_shield = 0;
private int m_maxShield = 0;
}
Multiline
This makes the string editable with the multiline text field. Pass in an optional int to designate the number of lines.
public string textToEdit;
[Multiline(20)] public string m_moreTextToEdit;
Tip: Use this for annotating scripts with notes to yourself or another user.
SelectionBase
ColorUsage
This is useful for selecting an otherwise empty GameObject whose children may contain meshes. Add the attribute to any component on the base object. When picking objects in the Editor, the GameObject containing the [SelectionBase] attribute gets selected rather than the children.
// add this to the base GameObjectThe [ColorUsage] attribute lets you control what colors can be selected in a color field. You can enable HDR and/or disable the alpha channel, depending on the parameters.
public ColorUsageAttribute(bool showAlpha, bool hdr, float minBrightness, float maxBrightness, float minExposureValue, float maxExposureValue);
public class PlayerScript: Monobehaviour { }RunOnce
Need to automatically run a function only once when your project starts? Using the static standard with the [RuntimeInitialization] attribute is an easy way to do it. Use it Performing one-time project setup logic like a boatloader as demonstrated in the QuizU sample.
public RuntimeInitializeOnLoadMeth odAttribute(RuntimeInitializeLoadT ype loadType);This is just a small sample of the numerous attributes available. Do you want to rename your variables without losing their values? Or invoke some logic without needing an empty GameObject? You can even create your own PropertyAttribute to define custom attributes for your script variables. See the Scripting API for a complete list of attributes.
Create your own custom windows and Inspectors One of Unity’s most powerful features is its extensible Editor. We recommend that you use the UI Toolkit package to create Editor UIs such as custom windows and custom Inspectors.
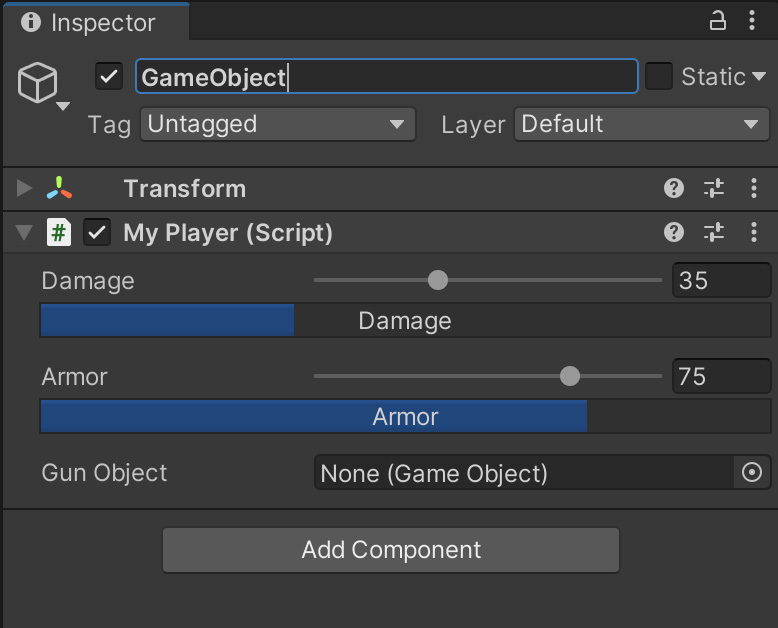
A custom Editor modifies how the MyPlayer script displays in the Inspector.
See Creating user interfaces (UI) for more detail on how to implement custom Editor scripts using either UI Toolkit or IMGUI. For a quick introduction to UI Toolkit, watch the Getting Started with Editor Scripting tutorial.
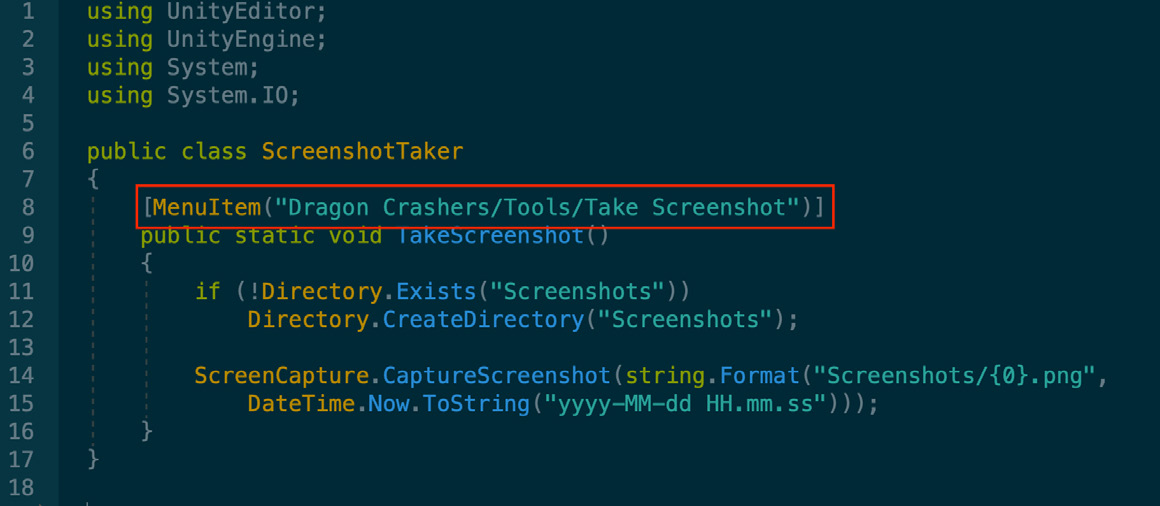
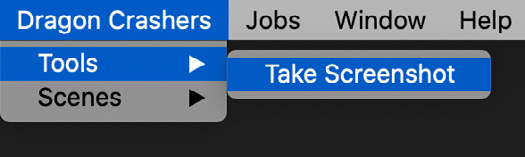
Create custom menus Unity includes a simple way to customize Editor menus and menu items, the MenuItem attribute. You can apply this to any static method in your scripts. If you have functions for your project that you will use frequently, organize them into menu items. This allows you to build a basic user interface with just a single PropertyAttribute modifier.
The MenuItem attribute creates a simple interface to attach the static method (Take Screenshot).
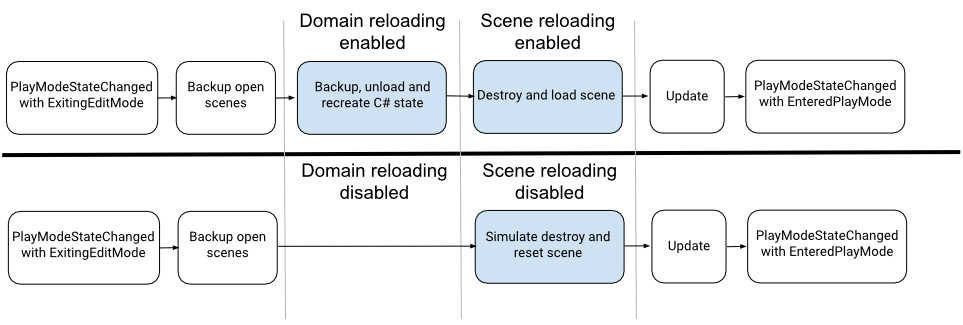
Speed up the Enter Play time When you enter Play mode, your project starts and runs as it would in a build. Any changes you make in the Editor during Play mode reset when you exit Play mode. Unity performs two significant actions every time you enter Play mode: —
Domain Reload: Unity backs up, unloads, and recreates scripting states.
Scene Reload: Unity destroys the Scene and loads it again.
These two actions take more and more time as your scripts and scenes become more complex. If you don’t plan on making any more script changes, the Enter Play Mode Settings (Edit > Project Settings > Editor) can save you a bit of compile time. Unity gives you the option to disable either Domain Reload, Scene Reload, or both. This can speed up entering and exiting Play mode.
Just remember that if you do plan on making further script changes, you need to reenable Domain Reload. Likewise, if you modify the Scene Hierarchy, you should reenable Scene Reload. Otherwise, unexpected behavior could result.
The effects of disabling the Reload Domain and Reload Scene settings.
Customize the default Script templates Do you find that you make the same changes every time you create a new script? Do you instinctively add a namespace or delete the update event function? Save yourself a few keystrokes and create consistency across the team by setting up the script template for your preferred starting point. Every time you create a new script or shader, Unity uses a template stored in %EDITOR_ PATH%\Data\Resources\ScriptTemplates: —
Windows: C:\Program Files\Unity\Editor\Data\Resources\ScriptTemplates
Mac: /Applications/Hub/Editor/[version]/Unity/Unity.app/Contents/Resources/ ScriptTemplates
There are also templates for shaders, other behavior scripts, and assembly definitions. For project-specific script templates, create an Assets/ScriptTemplates folder. Copy the script templates into this folder to override the defaults. You can also modify the default script templates directly for all projects, but make sure that you back up the originals before making any changes.
Distribute content to your players on demand with Addressables Addressables and Asset Bundles are powerful tools to structure your game in logical blocks that can then be exported separately and added to the main executable whenever needed.
They are used to load and unload assets, to configure, build, and load asset bundles that you can then distribute to your players on demand. The Addressables system is built on top of Asset Bundles, taking care of dependencies resolution and bundle loading for you.
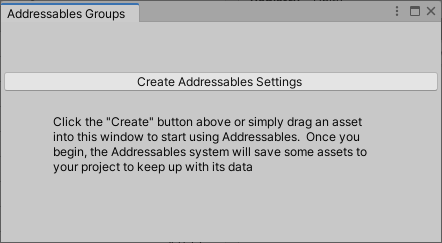
Before initializing the Addressables system in a Unity project
If you’re new to Addressables, make sure you check out the Get started page in Unity Documentation. Tips for effective asset management: —
Leverage Addressables from the start and ensure that every new asset is registered as an Addressable.
Aim to group assets by how often they are loaded and used together, instead of organizing them by type. This will improve runtime memory usage, reduce boot time, and as a result improve game retention as well.
Aim for small bundles because it leads to shorter dependency chains and lower runtime memory usage.
Read more in the Effective asset management in Unity with Addressables article.
Create conditionally compiled code with Preprocessor directives The platform-dependent compilation feature allows you to conditionally compile and execute code based on the target platform, Unity version, or scripting backend. This can be useful when you write cross-platform code, optimize for device-specific behavior, or manage version-specific APIs.
You can supply your own custom #define directives when testing in the Editor. Open the Other Settings panel of the Player settings, and navigate to Scripting Define Symbols.
Scripting Define Symbols in Script Compilation
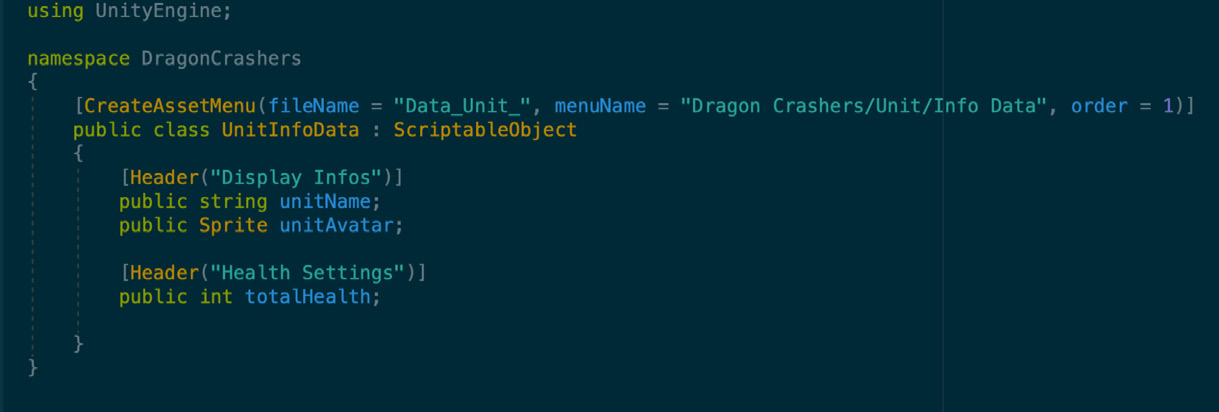
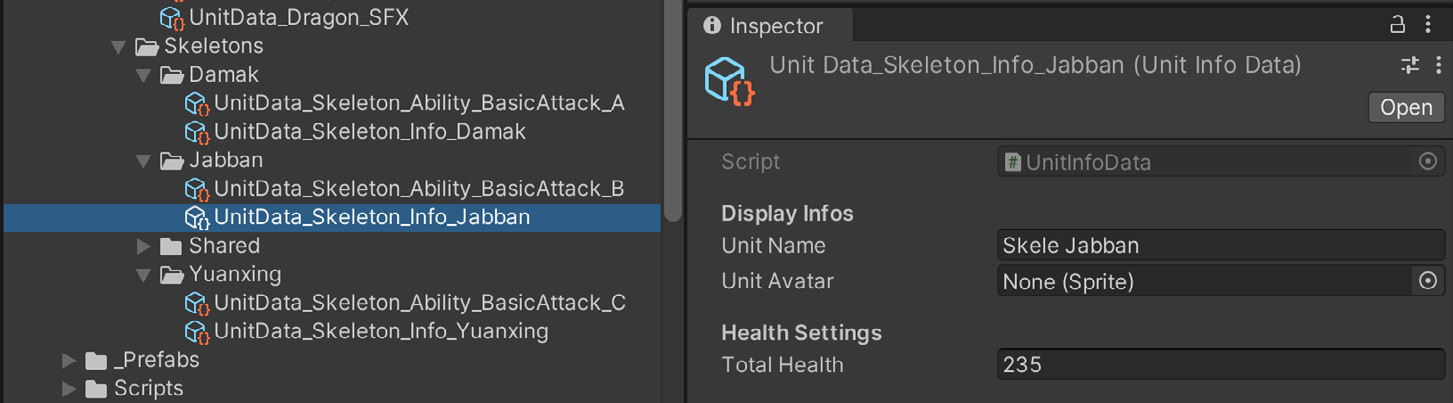
Use ScriptableObjects to separate data from logic ScriptableObjects can help you promote clean coding practices by separating data from logic. This means it’s easier to make changes without causing unintended side effects, which improves testability and modularity. They’re also useful when you’re collaborating with nonprogrammers like artists and designers; they can edit game data without touching code. Dragon Crashers demonstrates a typical use case. A UnitInfoData class inherits from ScriptableObject. Each of its instances contains the unit’s name, sprite, and health settings. This data remains constant over the course of gameplay, making it especially suitable for storage inside a ScriptableObject.
A ScriptableObject defines a data container object.
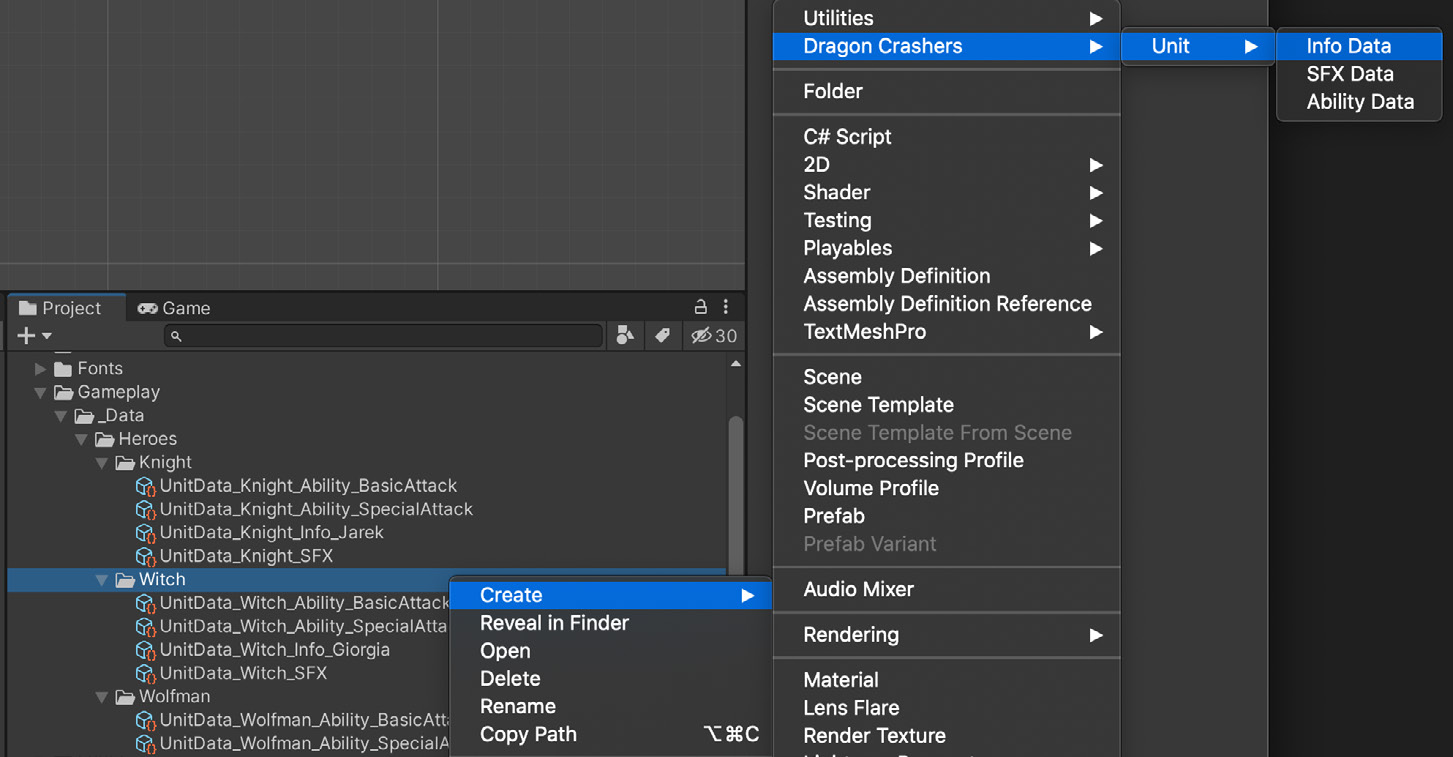
The CreateAssetMenu attribute generates a context menu item to help you generate a ScriptableObject asset. Each unit has additional ScriptableObjects for sound effects and special abilities.
With the assets created in the project window, you can fill in the correct values using the Inspector: Unit Name, Unity Avatar (Sprite), and Total Health.
Use the Inspector to fill out values for the ScriptableObject asset. These values won’t change during gameplay.
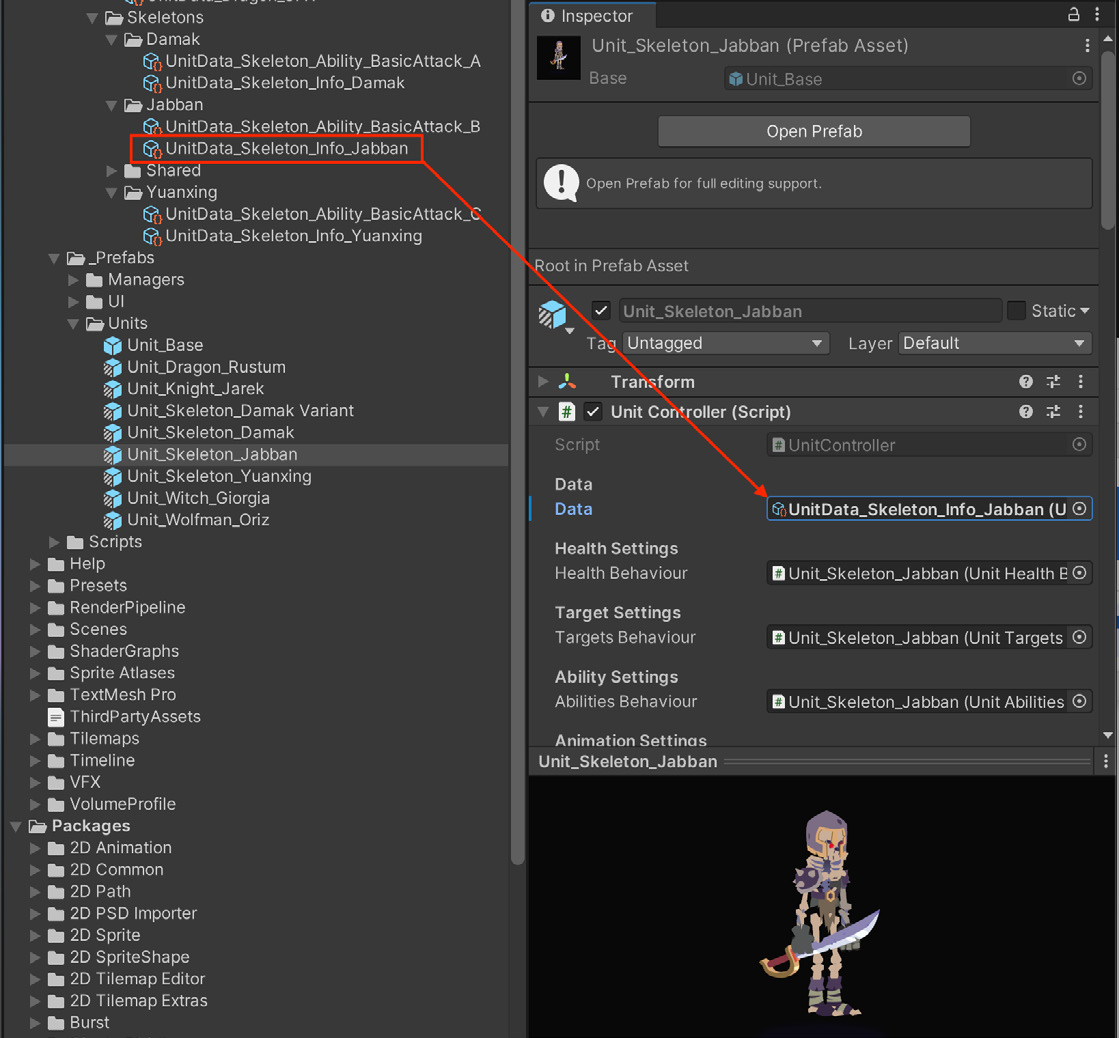
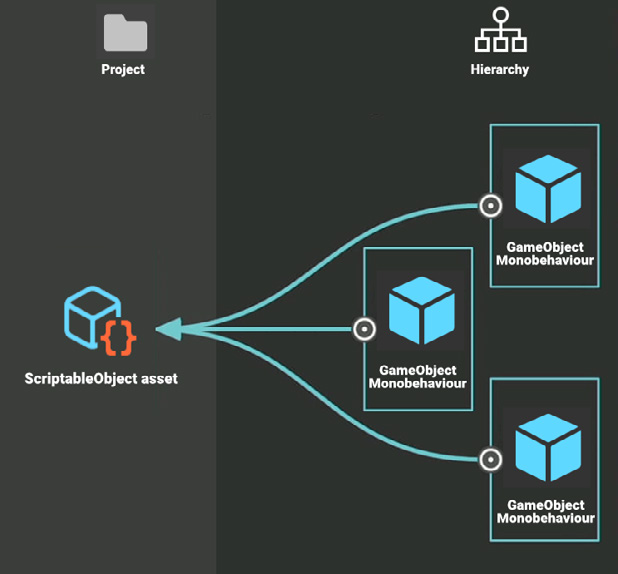
A GameObject (like the UnitController in this case) can then reference the ScriptableObject asset. If the scene suddenly fills with units, the data on the ScriptableObject asset does not duplicate, saving memory.
The Monobehaviour object (UnitController, shown above) refers to the ScriptableObject data asset in the project.
Save memory and stay organized with ScriptableObjects. Set static data and settings in the asset in the project just once, even if you have lots of GameObjects.
Even if you add a thousand instances of a prefab to your scene, they still refer to the same data stored in your asset. Setting up the set of values just once guarantees consistency. As your game scales up with more unit types, simply create more ScriptableObject assets and swap them out appropriately. Maintain your gameplay data just by tweaking the centrally stored assets. ScriptableObjects don’t replace keeping persistent data for the rest of your application’s save files, where the data may change during gameplay. It’s a workflow suited more for storing your static gameplay settings and default values. Unlike parsing data from JSON or XML, reading a ScriptableObject asset won’t generate garbage (and, as a bonus, it’s faster). More resources on ScriptableObjects: —
Create modular game architecture with ScriptableObjects in Unity
ScriptableObjects Paddle Ball demo project
ScriptableObject documentation
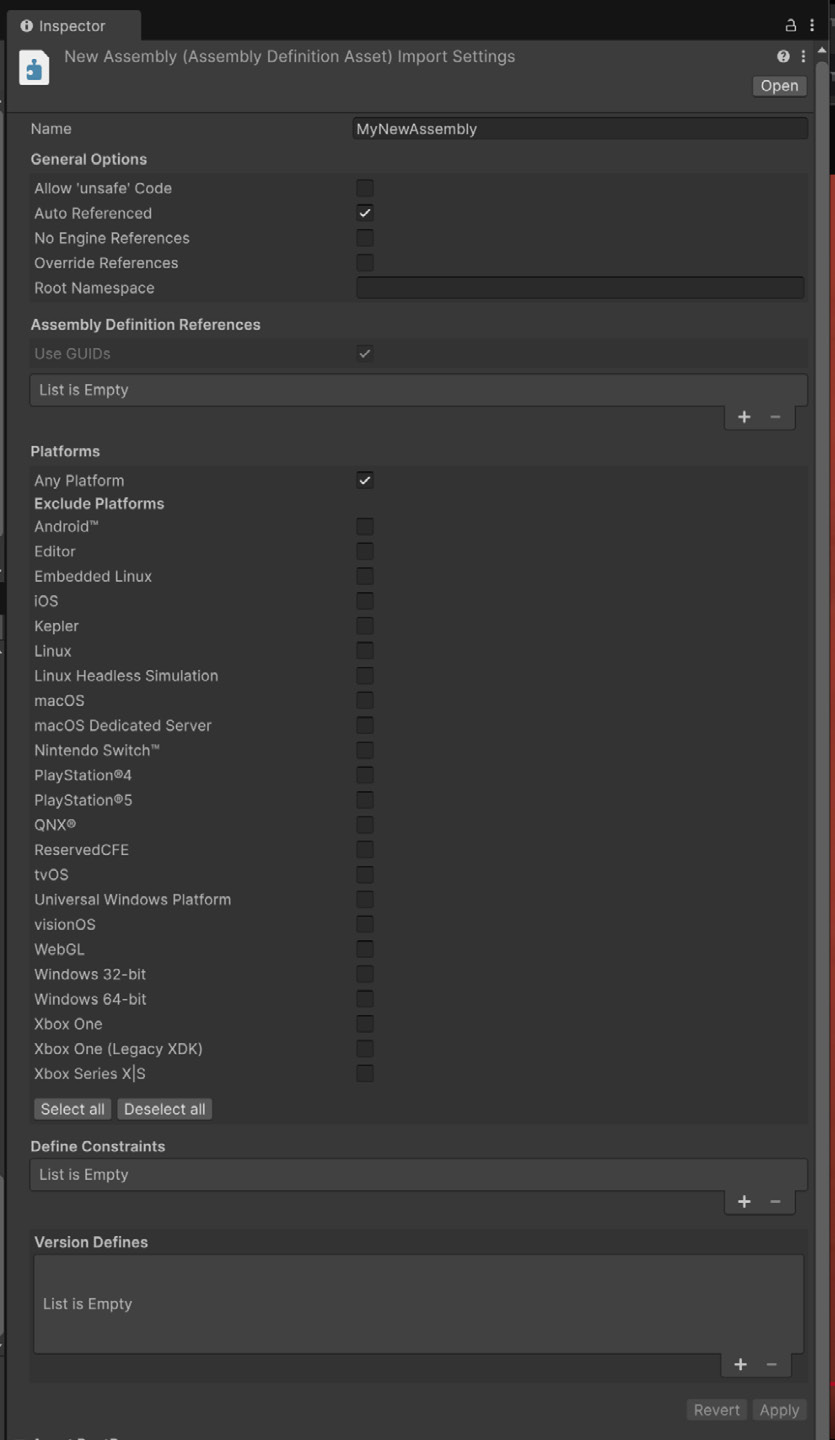
Promote script modularity with Assembly Definitions An assembly is a compiled C# code library that groups related types and resources into a single, logical unit. In Unity, you can manage your assemblies using Assembly Definition Files (.asmdef). Organizing your scripts into custom assemblies promotes modularity and reusability while also decreasing compilation time. It prevents them from getting added to the default assemblies automatically and limits which other scripts they can access. If you’re cleaning up your projects with Assembly Definitions and your Editor scripts are put into your builds, then create an Assembly Definition in your Editor folder and set it to include only the Editor Platform.
Assembly Definitions settings in the Inspector
Upgrade to the Input System If you haven’t upgraded already, make sure to check out the Input System package which is a newer, more flexible system than the Input Manager, which allows you to use any kind of Input Device to control your Unity content. It’s referred to as “The Input System Package”, or just “The Input System”. It also supports rebindable controls, input action assets, and cleaner separation between input and gameplay logic giving you significant advantages over the legacy system. To get started check out the following resources: —
Prototype mobile games faster with the Input System in Unity 6 | Unite 2024
Get up and running with the Input System
Unity Input System 7-video tutorial series
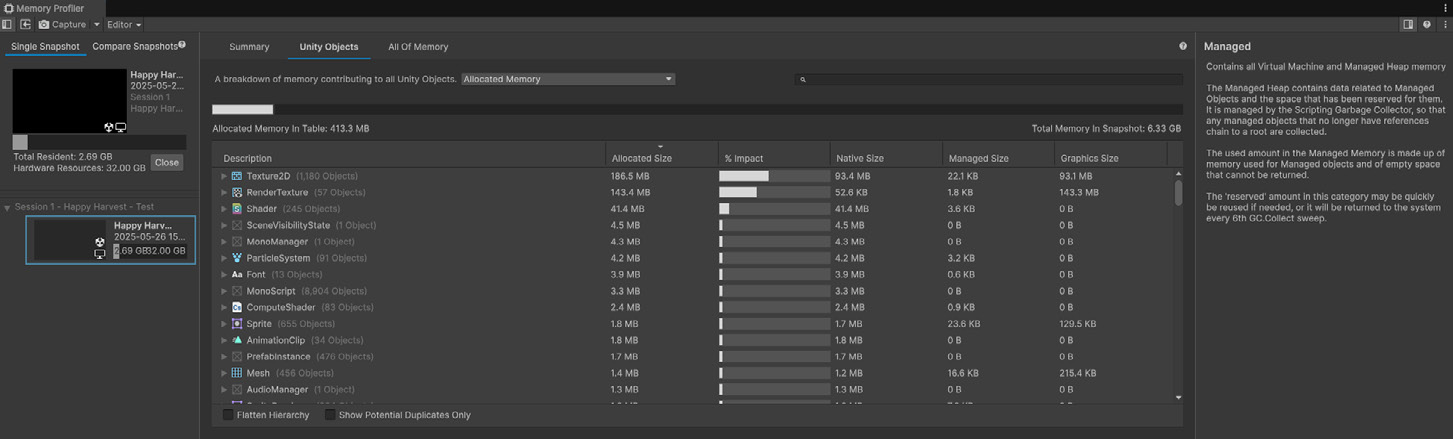
Profiling tools Optimize your memory performance with Memory Profiler The Memory Profiler lets you capture and analyze memory usage in your project to identify leaks, reduce memory spikes, and optimize runtime performance. Use it to take memory snapshots during key moments (e.g. scene loads, after long play sessions) and compare them to track down objects that aren’t being released properly. When you create resources in code make it a habit to name them in your Memory Profiler. Also, remember to release anything you allocated to avoid leaks.
A snapshot of the Memory Profiler
Use the ProfilerMarker to pinpoint performance critical code Instead of only seeing performance data aggregated under general markers like BehaviourUpdate, you can isolate and measure the exact execution time of your specific functions. Use the ProfilerMarker to mark up script code blocks as a way to increase the detail level of profiling runs. The information is then displayed in the CPU Profiler and can also be captured with the Unity Recorder. This provides you with a detailed breakdown of where time is spent in your specific code sections, making it easier to identify performance bottlenecks and optimize the code.
using UnityEngine;
using Unity.Profiling;
public class UnityTips : MonoBehaviour {
    private static readonly ProfileMarker SetupProfileMarker = new ProfileMarker(“Setup”);
    private static readonly ProfileMarker ExpensiveProfileMarker = new ProfileMarker(“Expensive”);
    public void UpdateLogic() {
        SetupProfileMarker.Begin();
on...// Setup your performance heavy things, Initializers, and so SetupProfileMarker.End();using (ExpensiveProfileMarker.Auto()) { //This starts and ends automatically // More expensive things here.
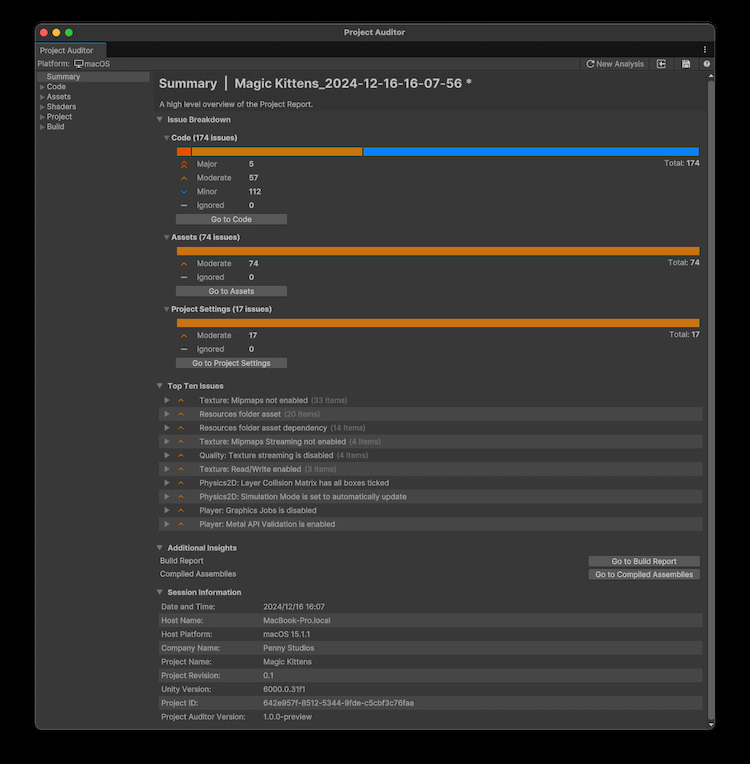
Get a performance audit on your project Use the Project Auditor (introduced as a package in Unity 6.1) to analyze your projects performance, maintain best practices, and identify potential issues and bottlenecks. With a few clicks you can scan your entire project and get a detailed report about inefficiencies, such as heavy scripting calls, unused assets, excessive entity counts, and more.
Project Auditor Summary view
The reports generated are categorized by severity, such as errors, warnings, and informational insights making it easy to focus on addressing errors and warnings first, such as overallocation of memory or excessive garbage collection. It’s generally recommended to run the Project Auditor at key stages of development (e.g., before milestones, beta releases, final builds), so that you can catch performance bottlenecks, unused assets, or outdated code early, preventing problems from growing larger as your project scales. You can customize the Project Auditor using custom rules and filters. For example, exclude certain scripts or assets from analysis that are meant to be unused and experimental, or make specific rules for your build targets, resolution, text compression, or other project settings to ensure they are optimized for your “budgets” .
Animation curves Control interpolation with the custom lerp function By default, Mathf.Lerp(a, b, t) clamps the interpolation factor t between 0 and 1, meaning it won’t return values outside the range between a and b. If you need values to overshoot (t > 1) or undershoot (t < 0), use Mathf.LerpUnclamped(a, b, t) instead. This gives you full control over the interpolation and allows for effects like extrapolation or momentum-based motion.
using UnityEngine;
public class LerpComparison : MonoBehaviour {
    [SerializeField] private float start = 0f;
    [SerializeField] private float end = 10f;
    [SerializeField] private float t = 1.5f;
    private void Start() {
        // Clamps t to

        [0, 1] float clamped = Mathf.Lerp(start, end, t);
        // Uses full t value float unclamped = Mathf.LerpUnclamped(start, end, t);

        // Outputs 10 Debug.Log($”Mathf.Lerp: {clamped}

        (t = {t})”);
        // Outputs 15 Debug.Log($”Mathf.LerpUnclamped: {unclamped}

        (t = {t})”);
    }
}
An example of
using custom lerp in Unity
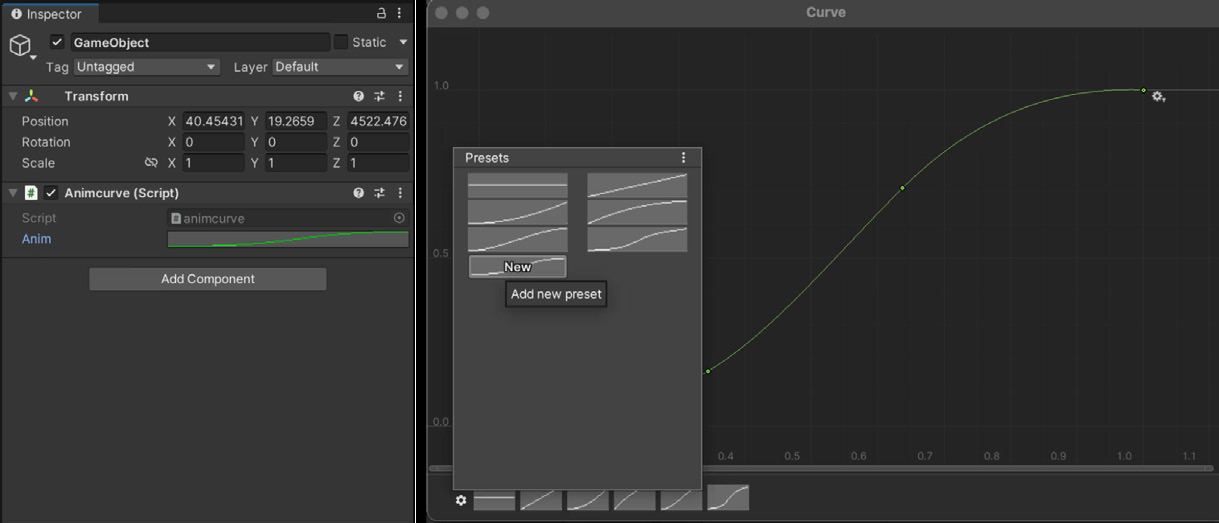
Use AnimationCurve for more than just animation AnimationCurves are typically used to animate the value of component properties in AnimationClip, but you can use them to dynamically drive any float value. Animation Curves can be edited within the Inspector either as public variables, or when serialized. You can save, export, or load them in Edit mode or at runtime. Editable tangents make it possible to control the shape of the curve between the keys.
An Animation Curve property in the Inspector: Clicking on it opens the Curve Editor, where you can adjust the curve and save it into your own library by selecting the cog icon.
Check out the blog post Animation Curves, the ultimate design lever for more practical tips and examples of using AnimationCurves in your project.
Reduce processing power with object pooling Object pooling is a design pattern that can enhance performance optimization by reducing the processing power required of the CPU to run repetitive create and destroy calls. Instead, with object pooling, existing GameObjects can be reused over and over. How you use object pools will vary by application. A good general rule is to profile your code every time you instantiate a large number of objects, since you run the risk of causing a GC spike. If you detect significant spikes that put your gameplay at risk of stuttering, consider using an object pool. Just remember that object pooling can add more complexity to your codebase due to the need to manage the multiple life cycles of the pools. Additionally, you may also end up reserving memory your gameplay doesn’t necessarily need by creating too many premature pools. Learn more about object pooling from the e-book Level up your code with design patterns and SOLID and its companion sample project that’s available for free from the Unity Asset Store.
More resources —
Use a C# style guide for clean and scalable game code (Unity 6 edition)
The Unity game designer playbook
Create modular game architecture in Unity with ScriptableObjects
Effective asset management in Unity with Addressables
What you need to know about Build Profiles in Unity 6